Make a Shark Faux Leather Keychain with a Cricut
In this tutorial, I’ll show you how to make a Shark Faux Leather Keychain using faux leather, heat transfer vinyl, and a Cricut! This keychain is an easy and fun summer Cricut craft.
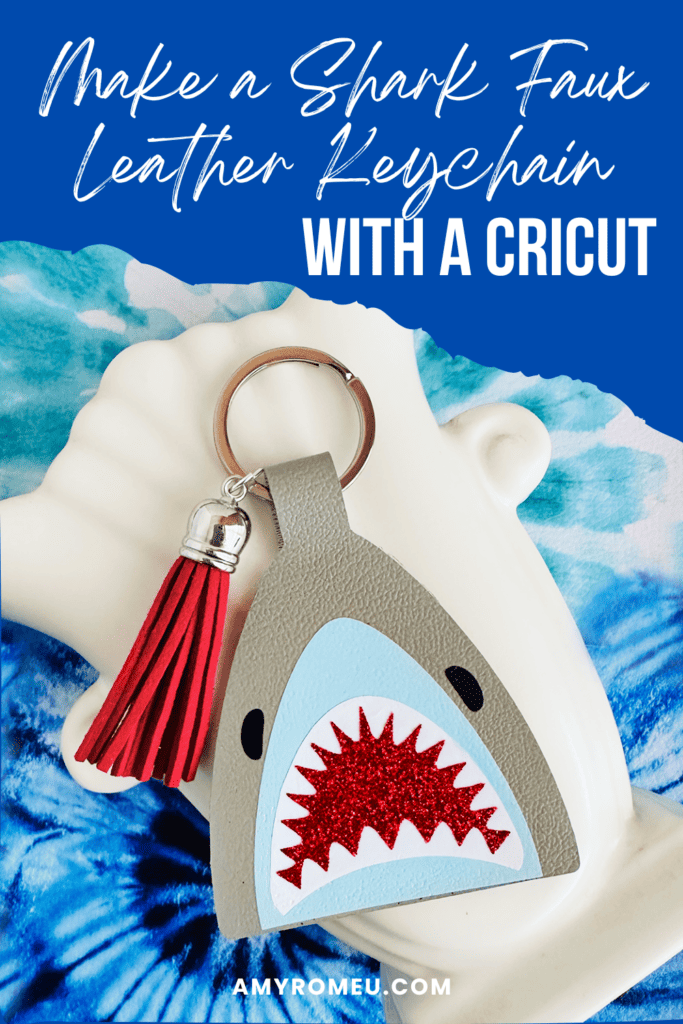
Learn how to make a Shark Faux Leather Keychain with a Cricut
I love using faux leather and heat transfer vinyl to make simple and fun summer faux leather keychains with my Cricut. This Shark Keychain is so easy to make with a Cricut Maker, Maker 3, Explore Air 2 or Explore 3, or even the Cricut Joy.
I have the keychain SVG template for sale in my SVG shop here.
Get the SVG for this project from my SVG Shop
This SVG is also included in my Summer Keychains Event SVG Bundle – you can learn more and get it here.
So if you’re ready to try making this Shark Faux Leather Keychain with a Cricut, let’s get started!
Want to watch a video tutorial on YouTube instead? Check it out below!
Printable Instructions for this Project
For printable instructions for this project, click here.
How to make a Shark Faux Leather Keychain with a Cricut Step by Step
This page contains some affiliate links (which means if you make a purchase after clicking a link, I will earn a small commission at no additional cost to you). Read my full disclosure policy here.
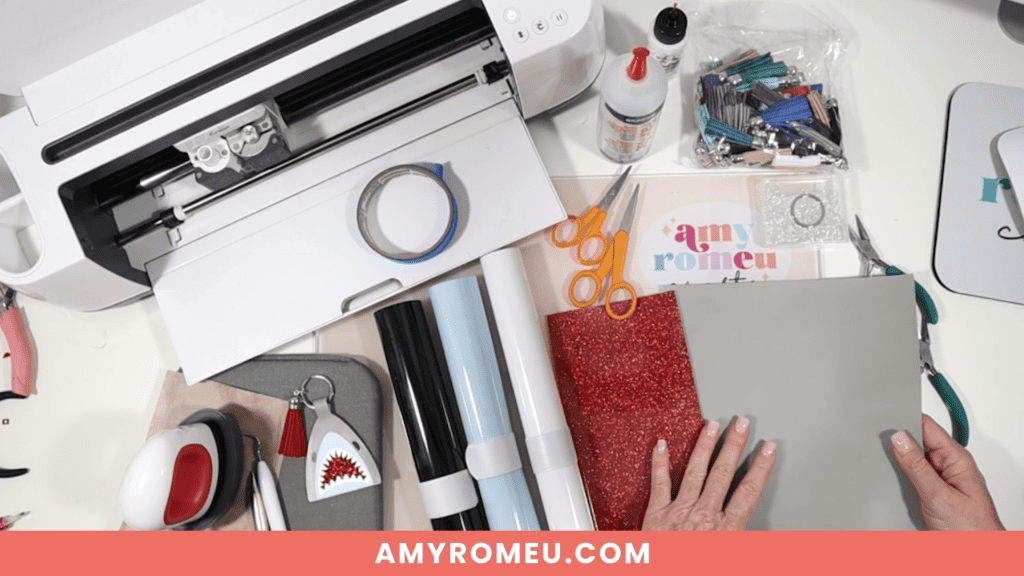
Materials you’ll need to make a Shark Faux Leather Keychain with a Cricut
Get all 12 Days of Cricut Summer Keychain SVGs!
Love this Cricut Summer Keychain project? It’s one of my 12 days of surprise faux leather keychain designs created just for my Cricut Summer Keychains Event. Get all 17 event keychain SVGs at once by purchasing the Instant Access SVG Bundle below.
Step by Step Instructions
Step 1: Get the keychain SVG template for this keychain project
You can get the Shark Keychain SVG template included in the Cricut Summer Keychains Event Bundle here or individually from my shop here. You’ll receive an order confirmation email with a link to download the SVG after purchasing.
Save the zipped folder that downloads to your computer. You’ll need to unzip or extract the folder FIRST so you can upload the keychain SVG file to Cricut Design Space.
Step 2: Upload the SVG template to Cricut Design Space.
Click on Upload Image, then browse to where your unzipped file SVG is located on your device.
Click on it to upload it to Design Space. You’ll see a preview of the Shark keychain SVG on the screen. Click the UPLOAD button.

Then select the SVGs from your Recent Uploads row and click Add to Canvas. Your Canvas should look like this:

If you are using the Cricut Joy, you may need to resize the keychain layers down a bit to fit on the Joy sized mat. For any other Cricut machine, it isn’t necessary to resize the shark keychain. Click the green “Make It” button.
Step 3: Prepare to Cut the Keychain Shapes in Cricut Design Space
First, select “On Mat” for how you’ll upload your materials to Design Space.

Then click on each mat in the Mat Preview screen and toggle the MIRROR button to ON (green). This is because faux leather and heat transfer vinyl cut in reverse (face down) on the cutting mat.
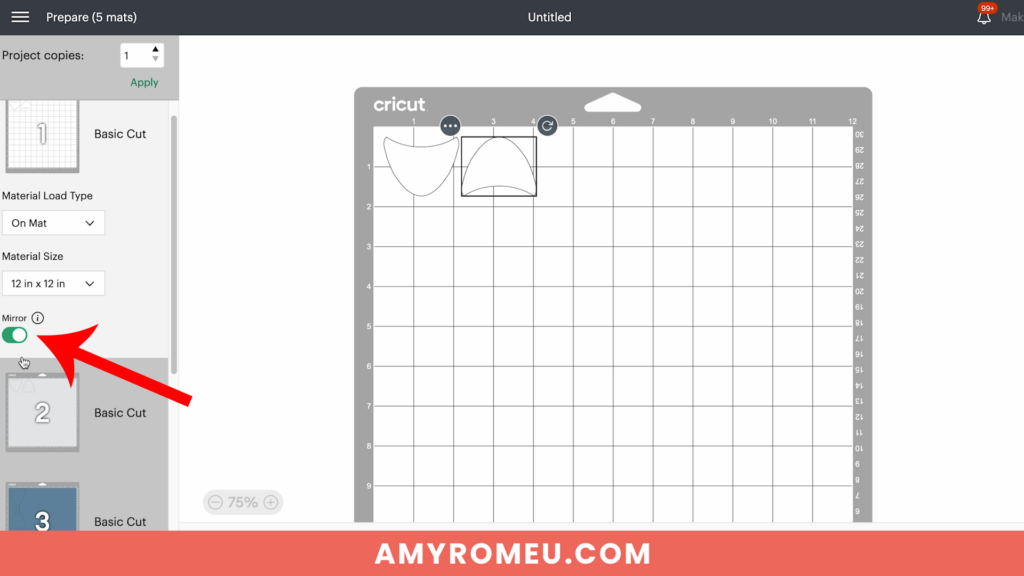
Begin by dragging the shapes on each mat away from the edges of the mat and away from each other slightly.
Arrange the shapes on your mat preview screen to get the shapes set up to cut from the least amount of faux leather possible.
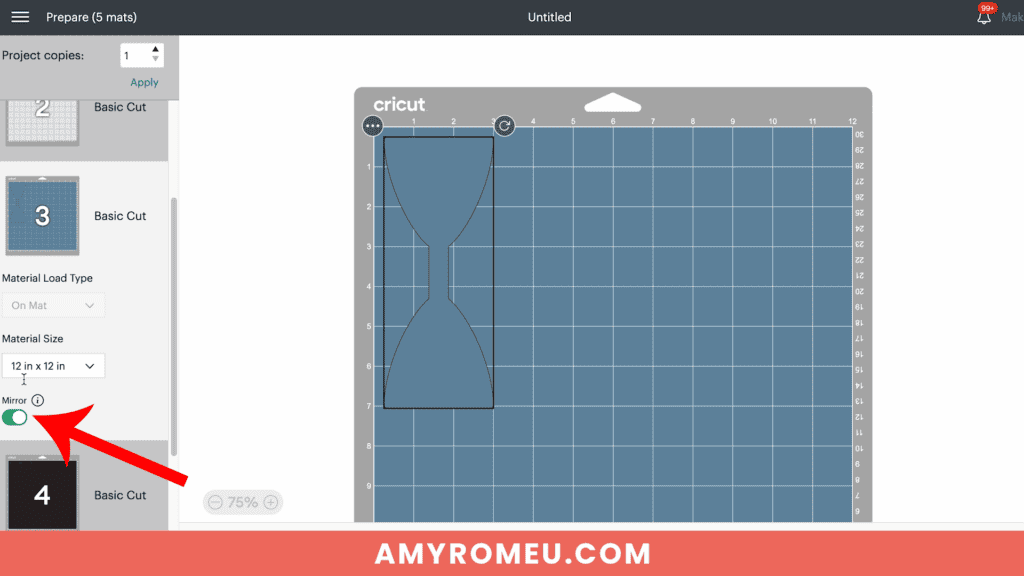
Make a note of what size faux leather you need to place on your mat to cut the keychain base shape out completely with a little room to spare. For this project and cutting with a Cricut Maker, I need a piece of faux leather about 4 inches wide and 8 inches tall.
See the Layering Guide graphic below to know which layer will cut from what material and in what order to press the vinyl layers.

Repeat these steps with the vinyl mats.
Then click back on the faux leather mat to select it again. Click the green CONTINUE button to make the first material selection.
Step 4: Make Material Selections
Choose the material selections you’ll use to cut each mat. I always cut the faux leather mat first.
I use the Faux Leather (Paper Thin) setting with “More” pressure for the faux leather mat.
If you don’t have this faux leather material setting as a favorite, click “Browse All Materials” to search for it and select it.

Note for Explore Air 2 users: Cricut Explore Air 2 users will need to turn the dial to “Custom” before choosing Faux Leather (Paper Thin).

Use the material setting recommended by your vinyl manufacturer for your vinyl.
I use the Vinyl or Washi Sheet setting with “Default” pressure for my regular vinyl mats, and the Glitter Vinyl setting with “Default” pressure for my glitter HTV mats.
If you are using Siser Glitter HTV like I do, I find it’s best to repeat the cut one time before unloading the mat.
Step 5: Cut the Faux Leather and Vinyl Mats
Cut a piece of faux leather just slightly larger than the size shown in the mat preview screen.

Place the faux leather pretty side down on a purple Cricut Strong Grip mat in the location shown on the mat preview screen.
Press the faux leather down to the mat well with your hands or roll over it with a brayer. Then put blue painter’s tape around on all sides.
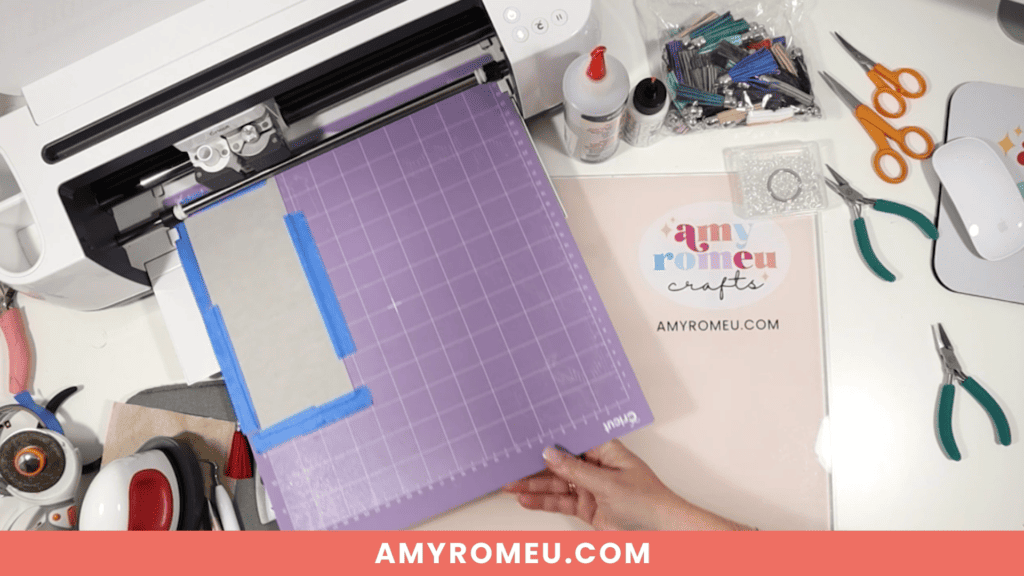
Make sure the white “star wheels” on the roller bar are pushed off to the side so the wheels don’t make indentations in your material.
Load the mat into the Cricut and begin the cut.
Once the cut is complete, BEFORE unloading the mat, use a sharp weeding tool to check and see if the cut is complete.
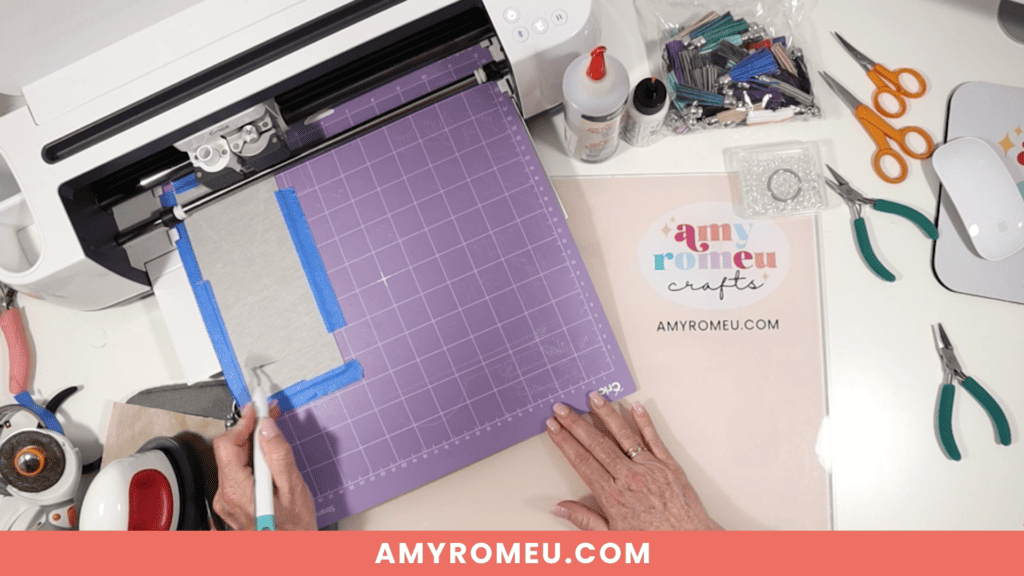
If not, press the C button again to repeat the cut. You can repeat the cut as many times as necessary as long as you haven’t unloaded the mat.
When the cut is complete, unload the mat and remove the keychain shape. You can trim any stray fuzz with small curved scissors.

Repeat the cutting process on the Heat Transfer Vinyl mats using a Standard Grip green cutting mat and the recommended cut settings for your particular vinyl.

Remove the cut vinyl from the mat and weed away the excess vinyl.

Trim apart any shapes for the front and back of each side of the keychain, being careful not to trim apart the shapes that have been attached in the SVG to make placement easy, like the shark’s eyes.
When all of your vinyl layers are trimmed apart, it’s time to heat press the vinyl layers of the Shark Faux Leather Keychain.

Step 6: Assemble the Shark Faux Leather Keychain
Remember to refer to the Layering Guide for this project to see which layers to press in what order.

I press vinyl to faux leather using a Cricut EasyPress Mini on the “low” setting (one green bar). You can also use a traditional EasyPress set to 255-265 degrees.
Place the first vinyl layer onto the faux leather layer on a heat pressing pad.

Then cover with a piece of Teflon sheet, parchment paper, or butcher paper.
Press for about 10 seconds. After 10 seconds, remove the cover sheet and carefully try to peel up the clear vinyl cover sheet. If it peels up easily, remove it.

If the vinyl is pulling up, place the clear vinyl cover layer back down and repeat pressing for 5-7 seconds. Repeat this process until the vinyl adheres to the faux leather well.
Once the first vinyl layer is well pressed onto the faux leather keychain shape, repeat with the other vinyl layers in order.


Then repeat the pressing on the other side of the keychain.
PRO TIP: When both sides of the keychain have all the vinyl layers applied, place the warm faux leather keychain under your pressing pad or something flat for a minute or two to help it cool flat.
Thread a 1.25″ keyring onto the center of the connected faux leather keychain shape. You can do this step either before you heat press your vinyl, or after.

Now it’s time to glue the faux leather keychain together.
I’m using Fabri-Tac glue, but you can use any good fabric glue or craft glue that spreads easily and in a thin, even layer, like Bearly Art Glue.
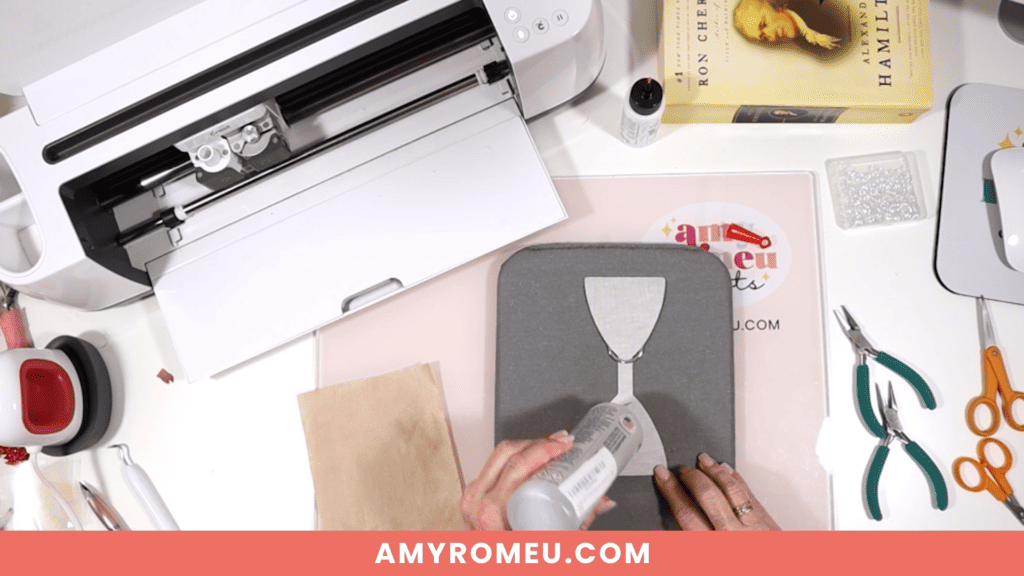
Place the connected faux leather keychain shape pretty side down on your work surface. Spread glue evenly onto the back of one shape only, avoiding the center connector shape.
Fold over the top half of the keychain onto the bottom half. Carefully line up the front and back edges and press together. The edges will not stick together right now, and that’s ok!
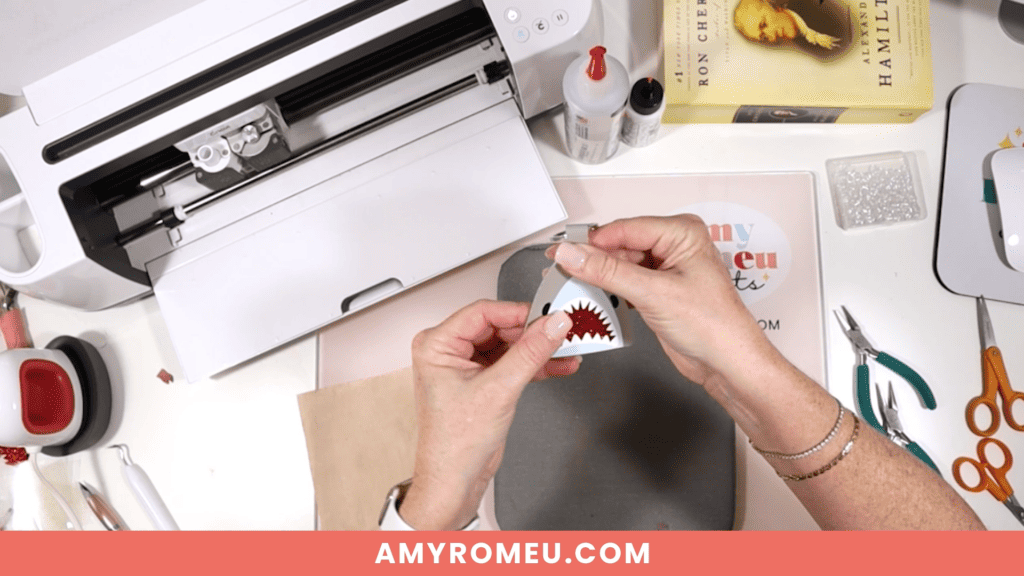
The next important step will make sure we get a flat keychain with an almost seamless edge.
PRO TIP: Place the glued keychain under something heavy like a book for several hours to let the glue dry well.

After several hours, remove you keychain from the book and see how nicely the edges are glued together. If necessary, use a precision tipped glue like Bearly Art Glue to apply glue into any small areas that aren’t firmly pressed together.

Next, to attach an optional faux suede tassel, use flat nose jewelry making pliers to open a 10mm jump ring. Connect the jump ring to the tassel loop and then attach it to the keyring. Close the jump ring securely.


That’s it! Your Shark Faux Leather Keychain is ready to attach to your keys or hang on a backpack!
I hope you’ll enjoy creating different colors of this Shark Faux Leather Keychain with your Cricut. Let me know in the comments what your Turtle keychain will look like!

Will you make this project?
I would love to see what you have created! Please join my free jewelry making & crafting Facebook group and share your creations with me and all of my crafting friends!
For Printable Instructions, click the image below!

Cricut Shark Faux Leather Keychain
Materials
- See blog post for materials & links.
Tools
- See blog post for tools & links.
Instructions
- Download and unzip the keychain SVG folder. Upload the SVG file to Cricut Design Space.
- It isn't necessary to resize the keychain SVG unless you are using the Cricut Joy. (For the Joy, use the sizing arrows to make the keychain shapes smaller until it fits on the Joy sized mat.)
- Click the MAKE IT button.
- When Design Space asks how you will load the materials for this project, select ON MAT.
- In the mat preview screens, click on every mat and toggle the mirror button to ON. (This is for when you are cutting faux leather and heat transfer vinyl for the project. If you are using faux leather and permanent vinyl instead, only mirror the faux leather mat.)
- Now return to each mat and drag the shapes apart from the edges and each other slightly. Make a note of what size material you'll need to cut to place on the mat and cut the shape completely.
- When you've done this for each mat, click back on the faux leather mat. Click CONTINUE.
- I like to cut the faux leather mat first. Choose Faux Leather (Paper Thin) as the material setting. If you don't have this setting selected, click "Browse All Materials" and search for it. (On the Explore Air 2, turn your dial to Custom so you can see the Faux Leather material choice.) Then choose "more" from the Pressure drop down menu.
- Trim a piece of faux leather to the size you noted in the mat preview screen. Place it "pretty" side down on a sticky purple strong grip mat. Tape the faux leather down on all sides with blue painter's tape.
- Load the mat into the Cricut and press the C button to begin the cut. When the cut is complete, BEFORE unloading the mat, use a sharp object like a weeding tool to lift up the corner of a cut to see if it went all the way through. If it did, unload the mat. If not, repeat the cut by pressing the C button again. On a Joy, you'll repeat the cut by clicking on "Rerun" on the screen in Design Space.
- Remove the cut shapes from the mat. Trim away any fuzz with small sharp scissors. Color the edges of the faux leather if desired with a color coordinated Sharpie marker.
- Return to Design Space and cut any vinyl mats using a green standard grip cutting mat. Place heat transfer vinyl shiny side down. I use the Vinyl setting or the Washi Sheet setting with "default" pressure for regular heat transfer vinyl. I use the Glitter Vinyl setting with "default" pressure for glitter heat transfer vinyl and I repeat the cut once if the glitter is thick (Siser brand). For permanent vinyl, I use the Vinyl setting with "default" pressure (make sure mats are NOT mirrored).
- Weed away the excess vinyl and cut the vinyl shapes apart.
- Using a Cricut EasyPress Mini set on the "low" setting or an EasyPress set to 265 degrees, press the heat transfer vinyl layers onto the faux leather base shape one at a time. Refer to the Layers Guide in the tutorial for the pressing order. Place the first vinyl layer onto the faux leather and cover with a cover sheet - Teflon sheet, butcher paper or parchment paper. Then press for 5-10 seconds. Remove the cover sheet and try to peel away the clear vinyl carrier sheet. If the vinyl lifts up, replace the clear carrier sheet and cover sheet and press again for 5-7 seconds.
- Repeat with the rest of the vinyl layers.
- Place the pressed faux leather keychain under something like book or your heat pressing pad for a minute or so after pressing to allow the keychain to cool flat.
- Thread a 1.25" key ring onto the middle section of the larger connected faux leather keychain shape.
- Using fabric glue, carefully apply glue all over the back of just one of the connected keychain shapes, being careful to avoid getting glue on the center connecter shape.
- Fold the connected keychain shape over so the keychain shapes are touching and the edges line up neatly.
- Place the glued keychain under something heavy like a book to dry for several hours.
- To attach an optional tassel, use a 10mm jump ring and flat nose pliers to connect the tassel to the key ring.
Recommended Products
As an Amazon Associate and member of other affiliate programs, I earn from qualifying purchases.
Until next time… and happy creating!

Answers to your questions about making a Shark Faux Leather Keychain with a Cricut
Q: How do I get the SVG template for this project?
A: The SVG template for this project is in my SVG shop here. It’s available with a Personal Use and Small Business Commercial Use option.
Q: Can I get all the Summer Keychain Event SVG templates at once?
A: You can purchase all the Cricut Summer Keychain Event SVGs (17 in total) as a Instant Access Bundle in my shop here.
Q: What Cricut is best for cutting faux leather?
A: The good news is there is no “best” Cricut for cutting faux leather. You can cut faux leather with any of the five current Cricut machines – the Cricut Maker, the Cricut Maker 3, the Cricut Explore Air 2, the Cricut Explore 3, and even the Cricut Joy. That’s because you can cut faux leather with a Cricut using the standard Fine Point Blade that comes with each of these machines.
Q: What setting on Cricut do I need to cut faux leather?
A: I use the Faux Leather (Paper Thin) setting with “More” pressure to cut faux leather with any of the five current Cricut machines. I use the standard Fine Point Blade and repeat the cut as needed before unloading the mat. For more of my best Tips, Tricks, and secrets to cutting faux leather with a Cricut, check out my blog post here.
If you loved this Cricut faux leather keychain project, you’ll love these projects too:
Want to remember this project? Save this tutorial to your favorite Pinterest board!

Want instant access to my Free Resource Library full of SVG files?
Just Enter your name and email Below!
By signing up, you’ll get instant access to my FREE SVG Library with hundreds of crafting SVG templates! You’ll also get my weekly newsletter full of crafting ideas, tutorials, and inspiration! Unsubscribe anytime.


Once again. Another awesome keychain design! Thank you!!
Wicked cute!
This shark keychain is perfect for Florida and thank you!
Reminds me of watching Jaws in the movie theatre when it came out!!!
This will be super cute for my nephew!
The shark is a great design! Like it in particular because it isn’t feminine.
Each day is like Christmas with your keychain event!!! I love all your cute keychains!!!
“I’m gonna have to get a bigger Cricut.” This reminds me of that terrifying movie from the 70’s! What a fun keychain! Thanks for sharing!
I can’t wait to make this one for my friend! She loves sharks. Thank you!
Can’t wait to make for my grandsons who love sharks
This is so cute!!
I just loved this shark key chain My nephew will love this I also made the van and the bicycle one So adorable Thank you Amy
Such a fun project, my grandkids will love it.
My boys are so excited for this one!
Very cute!
Another cute one for the win! Thanks, Amy!
I know my grandchildren would love this shark keychain. They can use it on there backpack for school. Love it 😍
Thank you Amy for another great project. I really like how you make these easy to line up(the eyes of the Shark) I’d have crooked eyes on my Shark.
I’m going to make this for my grandson first day of school bookbag.
Great beach favors for a birthday party.
I think when I make this, I will give the shark some nostrils. But, otherwise this is SO CUTE! Any kid would love to have this.
The shark is a super fun design! I love the idea of turning it into a backpack tag with a name on the back.
Thanks again for a great step by step tutorial!
The Shark Keychain will make great backpack tags! Thank you for another great design
Oh my goodness, love love this keychain!
This is so adorable!! Love all your keychains!!!
This is a cute one for boys. Thanks for sharing and making your tutorials clear.
So cute. My grandsons will love it.
The video convinced me and I think it is very fun and cute.
Oh my goodness–I love this design! My husband is a scuba diver, and I think he’ll love it, too. Thank you for the easy-to-understand tutorial with pictures. You make it so easy for us newbies 😀
My great nephew just loves Baby Shark. He’ll be getting one of these. 🙂
Love this keychain . My daughter and I saw this and loved it immediately .
Great design
This is great. Thanks for the pattern and instructions.
not sure my Texas customers would like, but my FL friends just might
I love the simplicity of this design! I needed one for the little guys in my life & this shark is perfect. So many of them have shark backpacks – thanx!!
So fun!!
Too cute! Love this series. Maybe it can be held again next year!
Really cute I think my students will love it.
Very original and beautiful! Thank you.
good for Shark week
Hooray fo Shark week stuff 🙂 Or just the pool key! <3
This is a really cute idea, especially for those who live in Florida, like me. I look forward to trying this keychain. I bet there can be more applications for this
SVG. Do I need your permission to use it in another way?
Hi, Shelley! My designs are for personal use only, so you can use the design for decals or shirts or whatever as long as it’s for personal use. I also have commercial use licenses available in my shop.
Another cute one…Thanks
I’ll be making this for my friend in California that is a San Jose Shark fan.
Thank you for all the awesome keychains!!! Helps pass the time! Have an awesome day!!
You are so talented, the Shark is so cute. My 11yr old son might like this one ❤️
I love how easy these keychains are! You are doing an amazing job and cant wait to see whats next!!
Your imagination and creativity just amaze me this is such a cute idea TFS
These are cute. I’m old enough to remember the movie, “Jaws.”
I really like the idea of using this as a name tag, thanks
Need to make these in multiple sizes for the whole family.
I know just who to make this one for. Thanks so much.
So cute!!
My nephew Ioved JAWS. I the I will make this key chain for him.
Thank you for taking the time to do these video’s. This really helps making them.
This key chain would be great for kids. Also like that the colors are more readily available in my stash vs. having to buy more specialty like colors. Always great instructions to follow along to make the project. Thanks!
This is a great keychain for my grandson to hang on his school bag. 🦈
The Shark is so cute.
so cute
I just find this so cute shark! You explain everything so nicely ! Thank you, Amy!
Cute and fun keychain! Thank you!
Love it! Making this one for sure!!!
My youngest son saw this and is super excited he wants to make it this weekend.
The shark is great. Great for shark week, or for a marine biologist.
Cute keychain for a kid.
So cute!
This will be a perfect addition to a birthday gift! Thank you!
I absolutely love this shark keychain it’s so adorable
So cute!!!!
This shark is adorable (well, as adorable as sharks can be) lol. I love the use of the glitter red!! I definitely have to get some more Faux Leather colors 🙂 Thanks so much for these videos.
Another amazing design! I’m looking forward to making it as both a keychain and a tag and possibly a luggage tag. Thank you!💕
The shark is such a cute idea!!!
Love it!
This one is my grandson’s favorite 😎
How many layers of HTV can you place on one area?
Hi, Pye! Good question. You can place as many as you want, but the piece will start to get thick and the layers may be more likely to peel up.
Ready for Shark Week on Discovery Channel!
this a great cool keychain
This is so cute! I love the idea of using it on a backpack!
Your tag idea would work on any of these. These are fun to craft.
Thank you for this lesson. Not sure I would make this one. LOL
This shark keychain is so fun! Thank you
I’ll have to make some for shark week for my grandson. Thanks for sharing.
Another great svg and video thanks for all you do and teach people
Amy, You keep outdoing yourself each day. The shark is so cute.
I like it. Thanks for so many different ideas.
These keychains are so cute! You have an amazing imagination
Another cute one!
The red glitter for the inside of the mouth is perfect!
I love this one!!
We’re gonna need a bigger… Craft room!!!
Thank you for making a design that appeals to boys!
These are great- guys would like these!!
making it for a co worker whom loves sharks
This is a cute project. Grandkids will love it! Thank you Amy.
I love the idea of using this as a backpack tag, I’m going to make it and put it on the zipper as a luggage tag for out traveling dive bag!
Definitely my favorite keychain so far. I can’t wait to see the future items you will be sharing.