
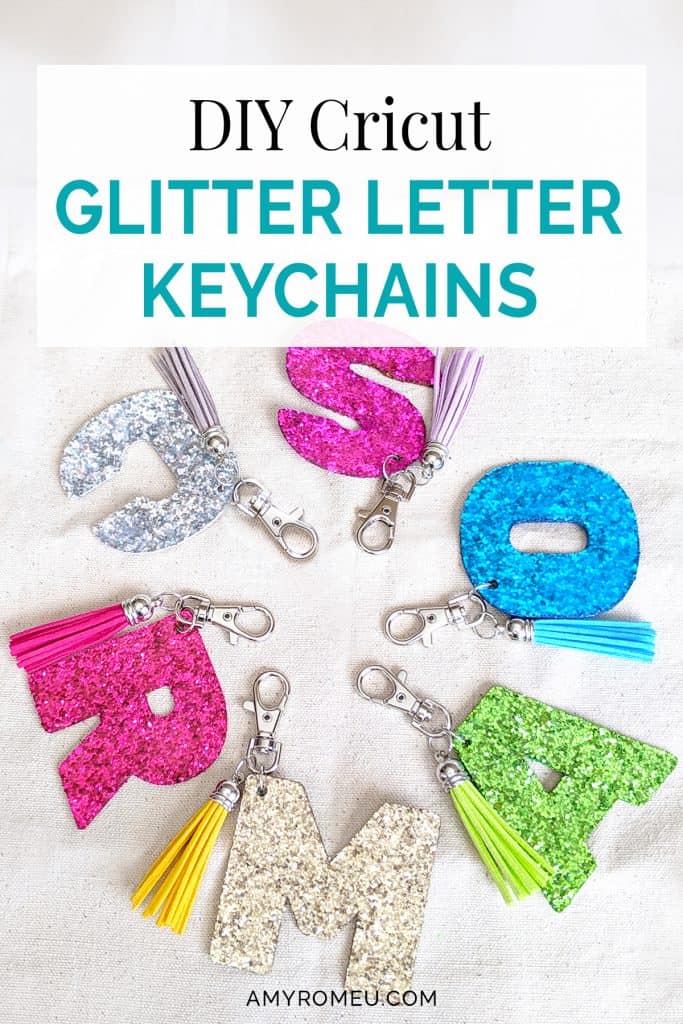
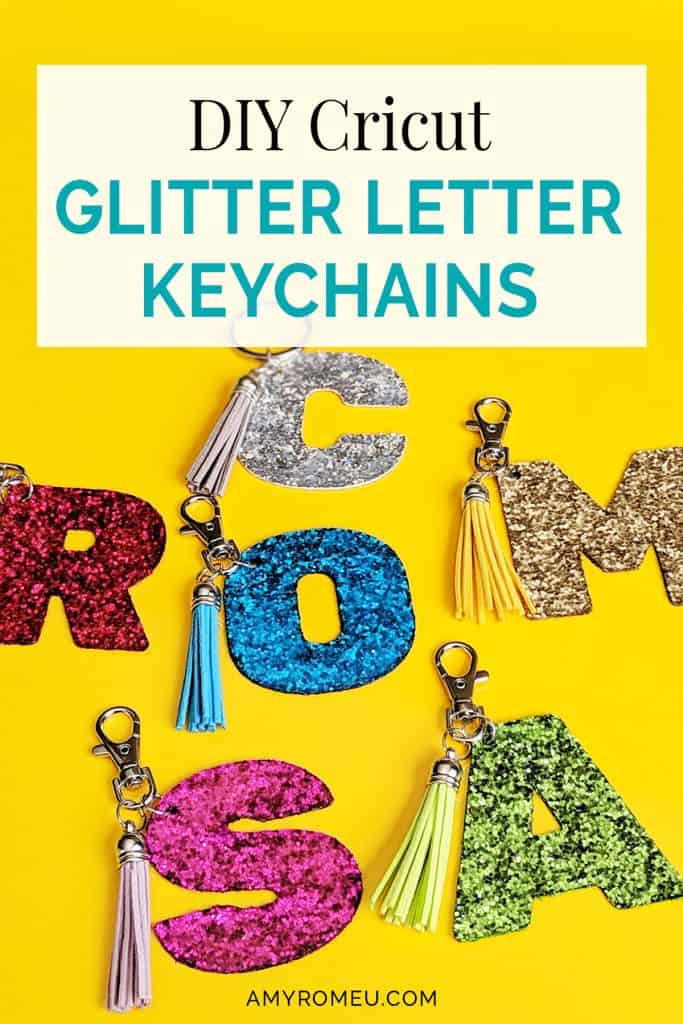
DIY Cricut Glitter Letter Keychains
How To Make a DIY Glitter Letter Keychain with a Cricut
My daughter’s birthday is coming up, and she wants to make glitter letter keychains for her friends as party favors. We got the idea when she saw some acrylic glitter letter keychains on Pinterest. Since I make earrings and keychains with my Cricut all the time, I wanted to try making a glitter letter keychain with my Cricut and chunky glitter sheets instead of acrylic. We were so excited when our little experiment worked! So if you want to learn exactly how I made these fun and colorful glitter letter keychains with my Cricut, read on!
If you haven’t worked with chunky glitter sheets before, this is a great first project to try. They have a canvas backing, come in a wide variety of colors, and cut like faux leather on the Cricut. The best part is, chunky glitter sheets can be cut with the regular Cricut Fine Point Blade – which means if you don’t have the Cricut Maker, you can still create these glitter letter keychains with your Cricut Explore Air or Explore Air 2!
If you don’t have a Cricut or cutting machine, don’t worry! You can cut these letters out by hand and then punch the holes. I’ve included PDF’s of all the letters to make this process very easy for you.
In this tutorial, I’ll give you my step by step instructions and tell you exactly what materials I used to make this project. I’ll also share my tips and tricks for cutting chunky glitter, including how I keep my mat from getting ruined from all the glitter!
Finally, I’ll give you my SVG cut file for these glitter letter keychains for FREE so you can get started making your own glitter letter keychains right away!
You can download my SVG file for this project at the bottom of this post.
Ready? Let’s get started!
Want to see all of my Cricut earring & jewelry tutorials? CLICK HERE
This page contains some affiliate links (which means if you make a purchase after clicking a link, I will earn a small commission at no additional cost to you). Read my full disclosure policy here.
CRICUT GLITTER LETTER KEYCHAINS – Materials List
- Chunky Glitter sheets in the color of your choice. For this project, I used a colors from from an assortment pack of chunky glitter sheets I bought from Amazon here. Another great assortment pack of chunky glitter sheets from Amazon here is what I want to try next!
- A vinyl cutting machine. I have the Cricut Maker, available at Amazon here. You can also use the Cricut Explore Air 2 or any cutting machine you have that will cut a thicker material like canvas backed chunky glitter.
- Cricut Strong Grip (Purple) Cutting Mat. You can buy these on Amazon here, or at Michael’s here. They are also available at Hobby Lobby, Joann’s, and Walmart.
- Cricut Strong Grip Transfer Tape. This is to protect your mat from the chunky glitter residue AND hold your chunky glitter sheet firmly to your cutting mat. I like the Cricut brand for this application because it’s super sticky. I bought mine from Amazon here.
- Blue painters tape (as needed). This will help keep your glitter vinyl in place on your mat. (If your mat is new and very sticky, you may not need to use it.) You can get it at any hardware store and most big box or grocery stores. Amazon also has it here.
- A weeding tool and a small spatula tool (if you have one). I had all the tools I needed in my Cricut tool set here. You can get also get the basic Cricut tool set at Michael’s here, or from Hobby Lobby, Joann’s, or Walmart.
- A good fabric glue. You can use any kind of glue for this project because the shapes are large and easy to work with. I prefer Art Glitter Glue but you can also use E6000 or Aleene’s Quick Dry Tacky Glue. Use your favorite fabric glue (or whatever fabric glue you have on hand) for this project.
- Triple Thick Gloss Glaze by DecoArt. This is for coating your glitter letter keychain to both make it thicker and keep the glitter from shedding. You can get it from most major craft stores, or on Amazon here.
- A small, flat and wide paintbrush.
- A small hole punch (if you plan to punch holes in your glitter letter keychain after you cut the letter instead of having the Cricut cut them). For this project I recommend this 1/8″ paper punch from Amazon here. Even though it’s called a paper punch, it works great with chunky glitter sheets.
- Keyrings. I used these swivel hook keyrings from Amazon here. You can also use regular circle keyrings if you’d like. I regularly use these 1.25 inch size key rings from Amazon here.
- Large jump rings – I used this assortment of 10mm size jump rings in different metal finishes from Amazon here. Your local craft store or bead store will have plenty of jump rings if you want to shop in person. Or you may buy a keyring that already has a smaller jump ring attached.
- Faux leather tassels (optional) – I got these faux leather tassels from Amazon here. Again, totally optional, but so cute and fun! This assortment pack was great, too, because it has so many colors of tassels – perfect for making party favors in a variety of colors.
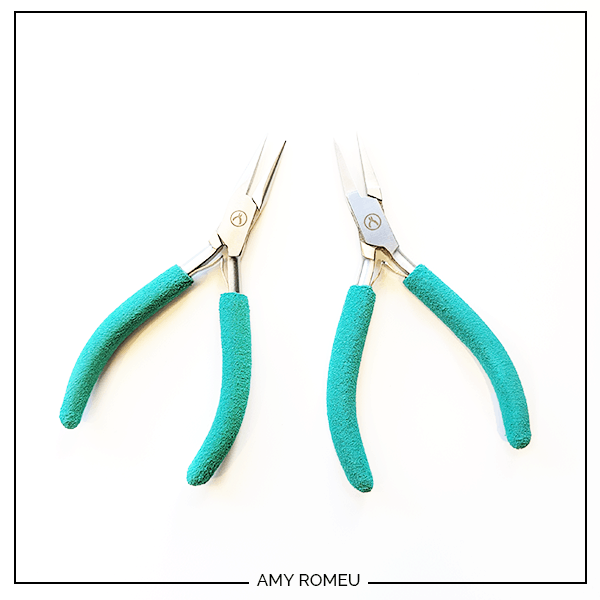
- Two pairs of flat nose pliers – These are to open and close the jumpring so you can attach the initial to the keyring. If you don’t have pliers, but you end up buying the 10mm jumpring assortment I linked above, you can use the included “jump ring open/close tool” instead. If you want to use pliers, you can use any two flat nose pliers you have in your jewelry making tool box .My favorites are Wubbers brand in the “Baby” size. You can see the Baby Wubbers Chain Nose Piers on the left on Amazon here, and the Baby Wubbers Flat Nose Pliers on the right on Amazon here.
Note: Be sure to check out my post Beginner’s Guide To Jewelry Making Tools for all the information you need to know about buying and using jewelry making tools.
PROJECT INSTRUCTIONS
STEP 1 – DOWNLOAD THE SVG CUT FILE
Download the SVG cut files for these glitter letter keychain shapes (available in letters A-Z) from my Resource Library. You can get the password to my library via a link at the bottom of this post.
Save the zipped folder that downloads to your computer. Then unzip the folder to access the folder’s contents. You’ll need to unzip or extract the files FIRST so you can upload the cutting file to Cricut Design Space.
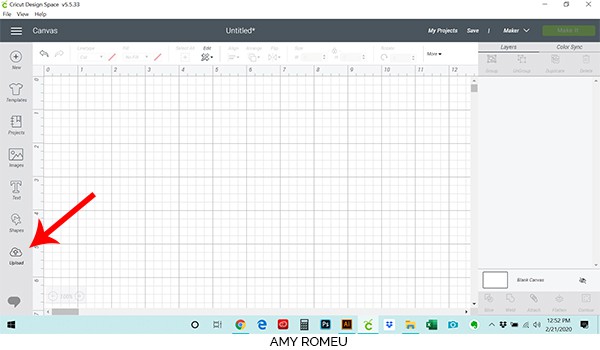
STEP 2 – UPLOAD THE SVG TO CRICUT DESIGN SPACE
After you’ve unzipped the folder and made a note of the file location, open Cricut Design Space and click on UPLOAD from the left hand side menu. The letters are grouped in folders in your download so you’ll upload just the one SVG file that contains the letter you want to cut. Don’t worry, I’ll tell you what to do with the other letters that upload in just a moment.
Click on the UPLOAD IMAGE button, then click CONTINUE.
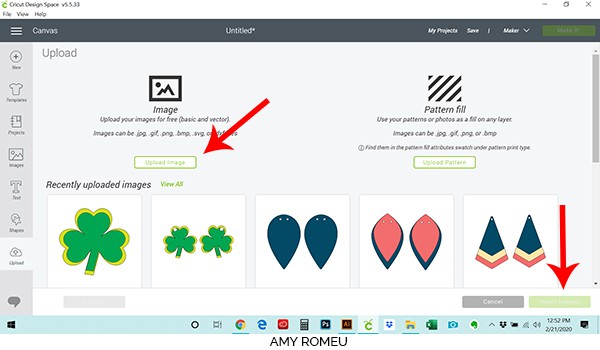
Click BROWSE to locate your file.
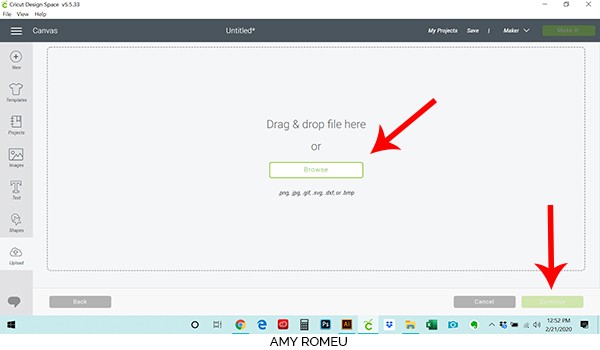
Navigate to where you’ve saved the already unzipped SVG file for this project. Double click on the SVG file with the letter you want to cut to bring it into the upload screen in Design Space.
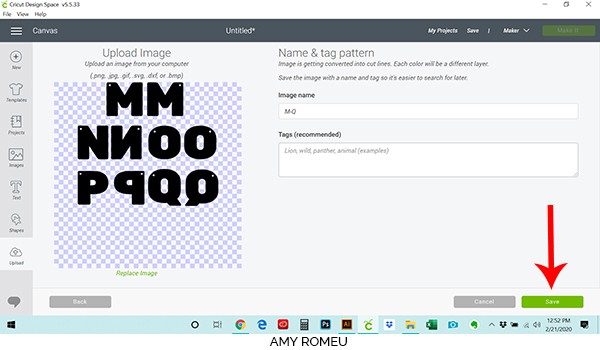
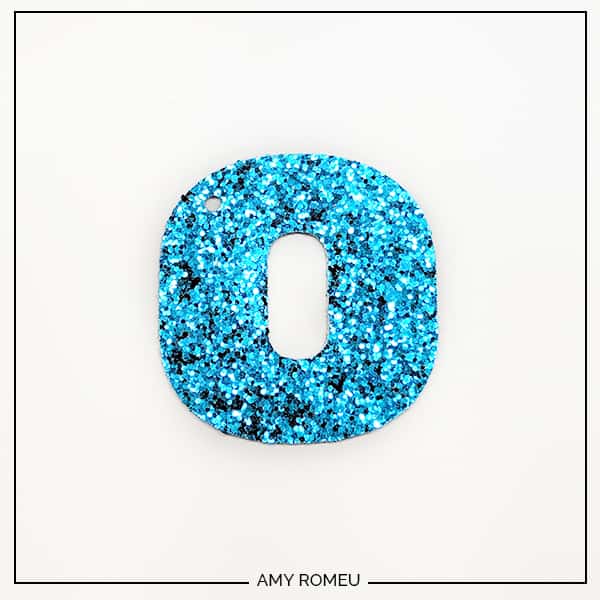
You’ll see a preview of the letters on this particular SVG file. For this tutorial, I’m going to use the letter O. Hit the green SAVE button.
After you’ve selected your file to upload, you’ll see it as the first item in your “recently uploaded designs” row.
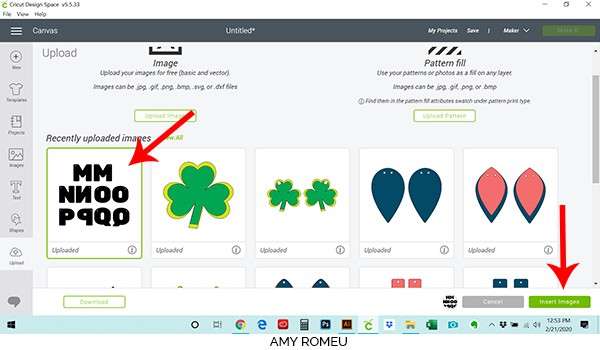
Click on it and then click to highlight the border in green, and then click on the green INSERT IMAGES button in the bottom right corner.
STEP 3 – PREPARE YOUR SVG FOR CUTTING
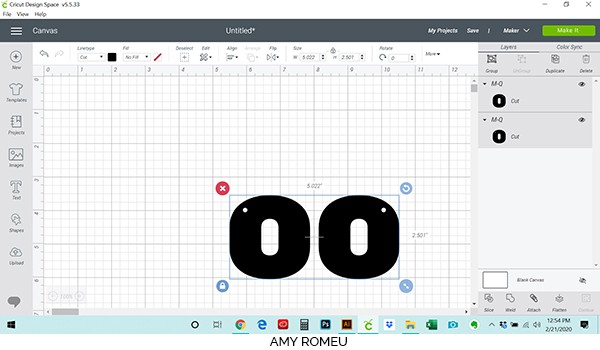
This brings the letter shapes into Cricut Design Space. You don’t need to adjust the size at all, they are already sized perfectly for this project.
Your letters will all be grouped when they first come into Design Space – the outline around all the letters means they are grouped. However, we only want the letter O for this project. So we need to ungroup all the letters so we can delete the ones we don’t need.
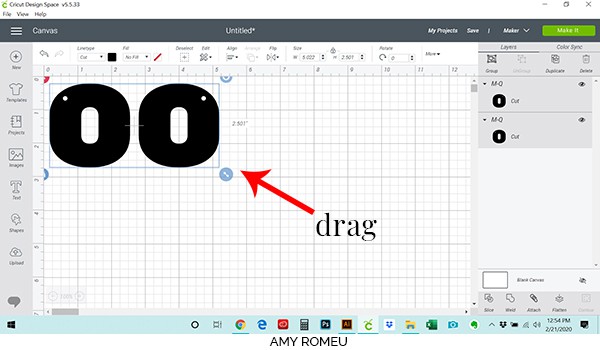
To do that, first drag the grouped letters up to the top left corner of your canvas.
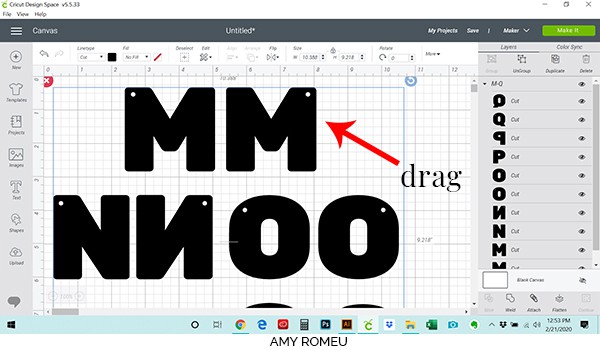
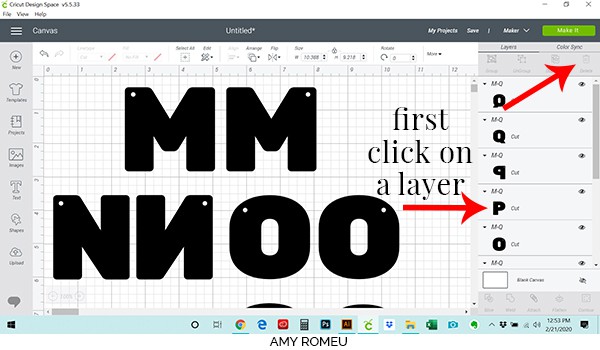
Since your letters are currently grouped, click on the UNGROUP button at the top of the Layers panel on the right hand side.
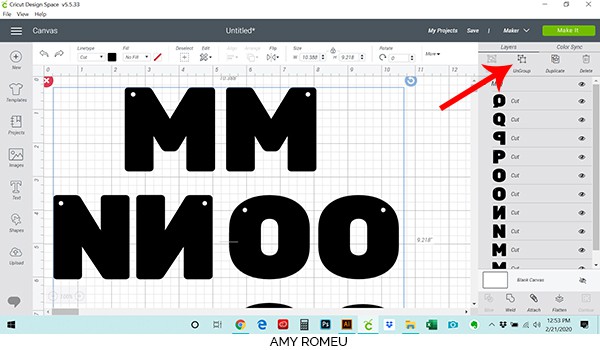
Then click on each letter layer that you want to delete and then click the DELETE button. Repeat this for all the letters you don’t want to cut until only the front and back of the desired letter are remaining.
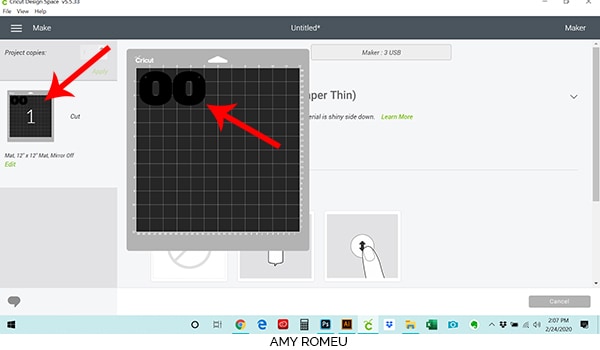
Now drag the letters up to the top left hand corner of your canvas and click the green MAKE IT button.
Once you click MAKE IT, you’ll be taken to a preview of your cutting mat.
Hover your mouse over the little mat preview on the left hand side. The mat preview will enlarge and you’ll be able to see exactly where your letters will cut on your mat. From this enlarged view, make a note of the size of the material you’ll need to cut your shapes completely. The preview for this project shows us our letters will cut from a shape of chunky glitter that’s about 3 inches tall and just over 5 inches wide.
If necessary, you can adjust the location your shapes will cut from on your mat. You can click the green EDIT link under the small mat preview and then drag your shapes to a new location on your mat.
(Why would you want to do that, you wonder? When you cut on your purple sticky mat over and over in the same place on your mat, your mat loses some sticky. If you vary the cutting location from tme to time, you’ll get more longevity from your mat).
ALSO IMPORTANT TO NOTE: Since faux leather cuts face down, as a general rule you want to toggle the MIRROR slider to ON (green) before cutting so your design will cut correctly when you turn your faux leather over. However, for this project which will cut both a front and a back of the initial, that isn’t necessary. You can leave the MIRROR toggled off as shown below.
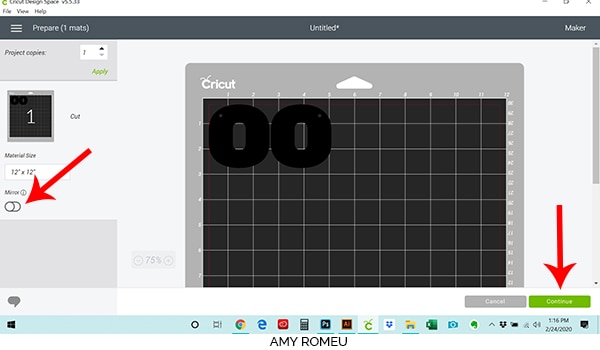
Next, press the green CONTINUE button.
STEP 4 – SELECT YOUR MATERIAL SETTINGS
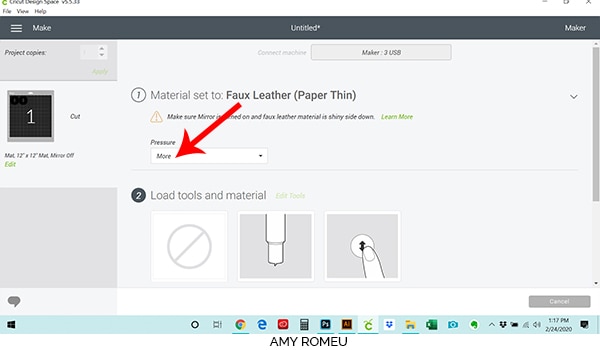
Next we need to choose our material. Since chunky glitter cuts like faux leather, I’m going to use the Faux Leather (Paper Thin) material setting. Chunky glitter isn’t paper thin, but this setting automatically cuts twice, and it seems to work really well on this material so that’s what I use.
If you are using a Cricut Explore Air machine, turn your dial to Custom and then follow the directions below.
If you’ve already cut faux leather with this setting before, you may already have it in your favorite materials. If so, you can go ahead and click on it.
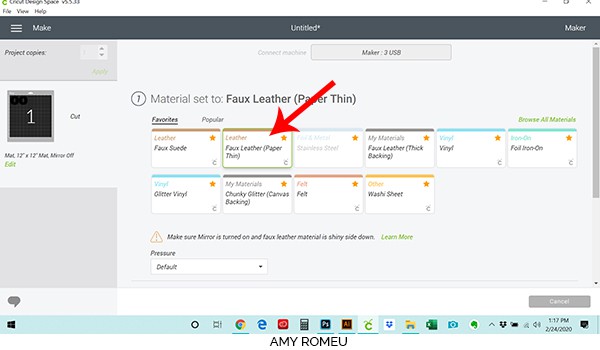
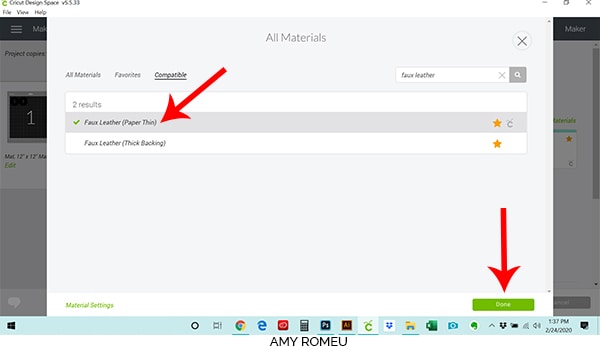
If you haven’t used this setting before, you can find it by clicking on BROWSE ALL MATERIALS on the right.
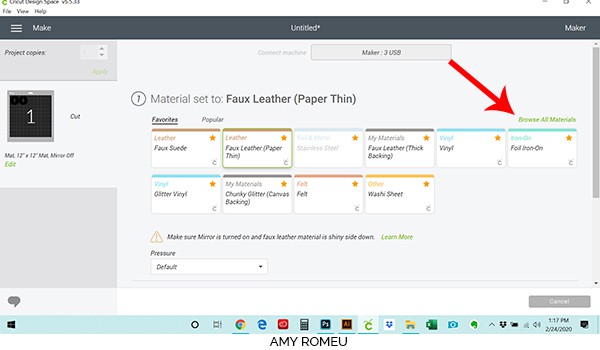
When the “All Materials” screen opens, type “faux leather” in the search box and press ENTER.

Click on Faux Leather (Paper Thin). I recommend clicking on the little star on the right hand side, which will make the star turn yellow. This makes this material a favorite, and it will be easier to choose it as your material next time. Then click the green DONE button.
Now you’ll want to adjust your cut pressure. Select MORE from the dropdown menu.
We need to prepare our mat for cutting before we move on.
STEP 5 – PREPARE YOUR MATS FOR CUTTING
Gather your materials for this next step. You’ll need your sheet of chunky glitter, strong grip transfer tape, and some blue painter’s tape. You’ll also need a purple (strong grip) mat.
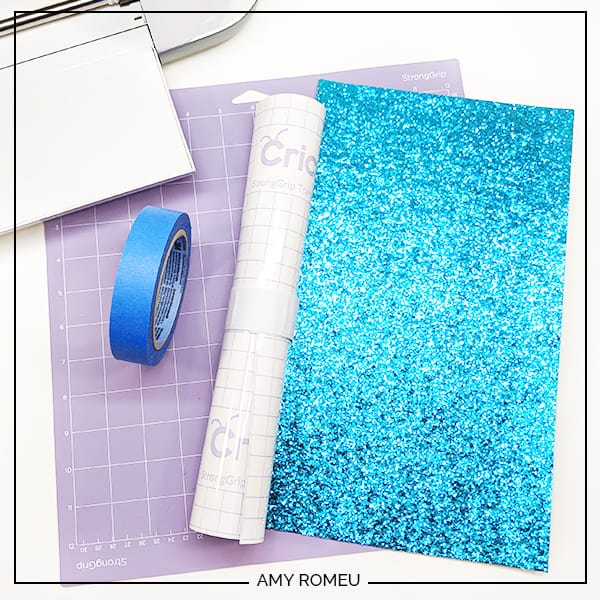
Note: If you’re wondering what the white band is around my transfer tape roll, they are my favorite way to keep my rolls of vinyl organized! Believe it or not, they are simple white slap bracelets! They are great for keeping my vinyl rolls neatly wound. You can get slap bracelets in lots of colors, but I prefer the all white slap bracelets from Amazon here.
One of my tricks for cutting faux leather and vinyl is to trim your large material into a smaller size piece. Smaller pieces of material seem to stick better when they are taped down to the cutting mat.
So cut your glitter vinyl sheet to to just slightly larger than the size you noted earlier. I generally add a half inch on all sides. Then cut a piece of strong grip transfer tape a little larger than the glitter sheet.
The strong grip transfer tape is the KEY to protecting your mat from glitter residue – it’s the best trick ever! Basically, the transfer tape sticks to the mat, and the chunky glitter sheet sticks to the transfer tape. After you remove your cut glitter sheet, just peel off the transfer tape and throw it away. Your mat will be glitter free! It’s genius.
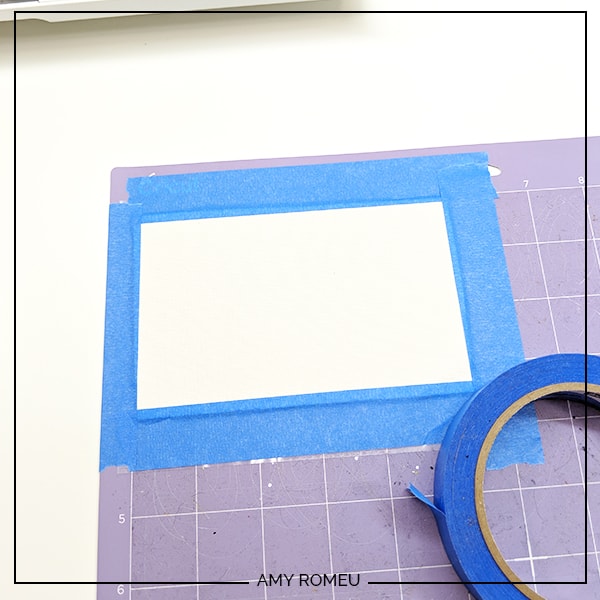
To set this up, place your Cricut strong grip transfer tape STICKY SIDE UP on at the top left corner of your Cricut purple strong grip mat. I placed my transfer tape outside of the area I knew I would be cutting just a little bit.
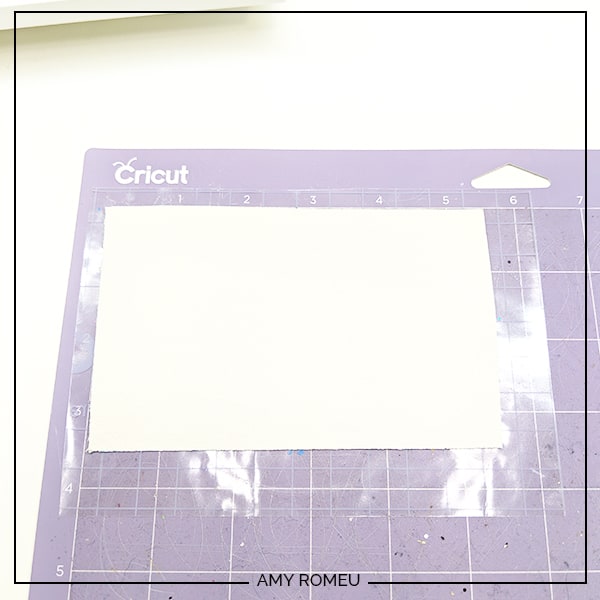
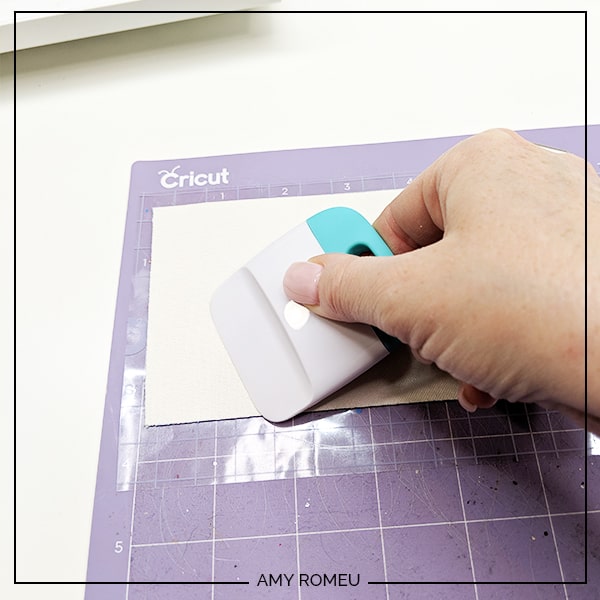
I use my scraper to rub all over the back of the glitter sheet to really press it down onto the transfer tape and onto the mat.
Then tape the sides down with blue painters tape. This is what your fully prepped mat will look like.
It’s time to load your mat into your machine. I like to move the white star wheels down the roller bar to the side of the material that’s going to cut. You can see the star wheels are going to roll over the blue tape and not the material for this cut.
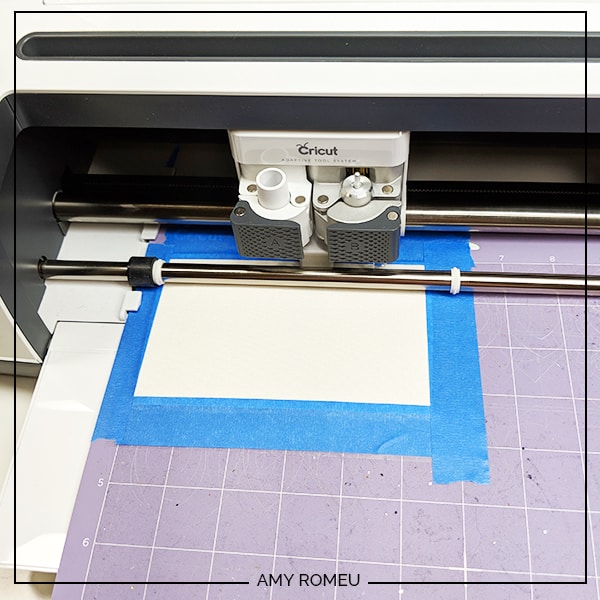
Load your mat into your machine by hitting the load button (two arrows) on your Cricut Maker.
Then hit the GO button (the Cricut face) on your Explore Air 2 or Cricut Maker and your letters will start to cut.
STEP 6 – CUT YOUR SHAPES WITH YOUR CRICUT
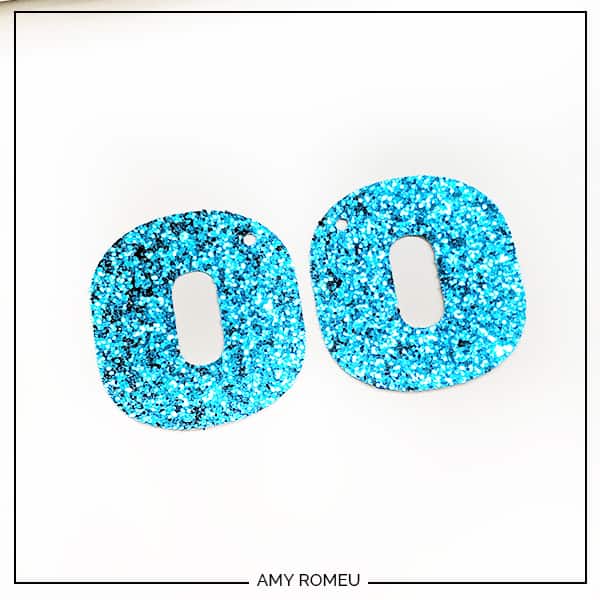
After your machine finishes cutting your glitter letters, unload your mat by pressing the two arrows/unload button again). You’ll see the double cut helped to cut the letters and the holes nicely.

Carefully remove the letter shapes from your mat. Then lift the rest of the glitter sheet from your mat and discard the used pieces. If you have any large pieces left from the cut out, save them for another earring or jewelry project down the road.
Don’t forget to remove the clear transfer tape from your mat. See how that kept all of the messy glitter off of your mat? Cool trick, right?
If you need to trim any stray canvas threads from around your letters, you can trim the excess material with some small pointed scissors. I like to use my 4 inch curved tip Fiskar scissors handy for tasks like these.
Now it’s time to glue!
STEP 7 – GLUE THE INITIAL KEYCHAIN TOGETHER
I like using Art Glitter Glue to glue the backs of faux leather or chunky glitter pieces together because the backings of these materials are really just fabric. Art Glitter Glue doesn’t have any glitter in it, it’s just a great fabric glue. The bottle is available on Amazon here with a precision tip, which in my opinion is a must have for applying glue on very small jewelry pieces!
Amazon sometimes doesn’t have Art Glitter Glue available as Prime item. If I can’t get it soon and I’m too busy lazy to run to the craft store, I also use E6000 with precision tips (on Amazon here) or Aleene’s Quick Dry Tacky Glue (on Amazon here). Both of the glues hold just as well.
Apply whatever glue you choose to the back of one letter shape, making sure to get near all of the edges and the hole, but not too close!

Match up the front and back letter shapes and press them together. You can easily wipe up any glue that seeps out from the edges with a napkin or damp cloth.
Place your glued letter keychain underneath a heavy book to dry overnight.
After your letter keychain has dried completely, it’s time to color the edges of the keychain with a color coordinated Sharpie marker. I like this package from Amazon here with several assorted Sharpie colors. Don’t forget to to color the inside of the letter and the inside of the keyring hole!

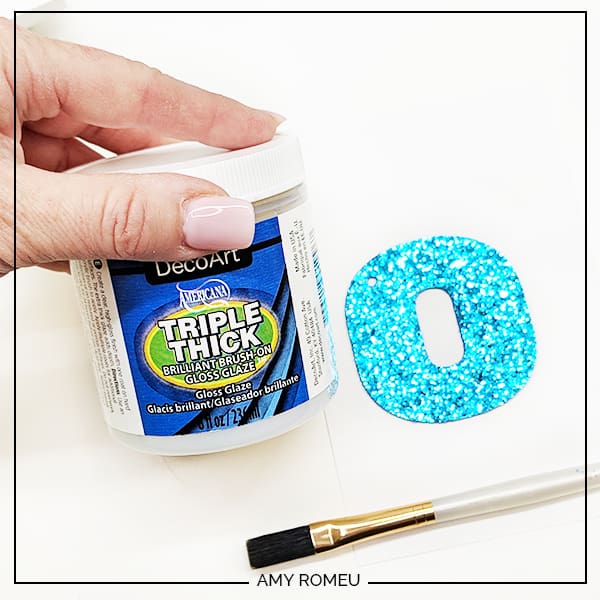
STEP 8 – CLEAR COAT YOUR LETTER KEYCHAIN
This step is where the magic happens! Clear coating the keychain gives it that thick, glossy look that mimics an acrylic keychain, so it’s well worth it in my opinion. Give yourself time to do this step so your layers of glaze can dry – if you are making these as party favors like I am, don’t try to make them the night before the party!
For this step I reached out to my friend Jennifer Swift from Well Crafted Studio, one of my favorite art/craft blogs. She’s an expert in so many artistic mediums, so I knew I could pick her brain about what product would work best on chunky glitter, and she delivered! Her first suggestion was Triple Thick Gloss Glaze by DecoArt, which I used for this project and I really like. It’s available on Amazon here.
She also suggested Mod Podge Dimensional Magic (on Amazon here) and Mod Podge Hard Coat (on Amazon here) as good products to help achieve a thick, glossy look on our keychains. So if you have either of these products in your craft closet, give them a try on this project.
So, this Triple Thick Gloss Glaze by DecoArt is great. It brushes on smoothly and dries very glossy and thick. I also love that it’s soap and water clean up.
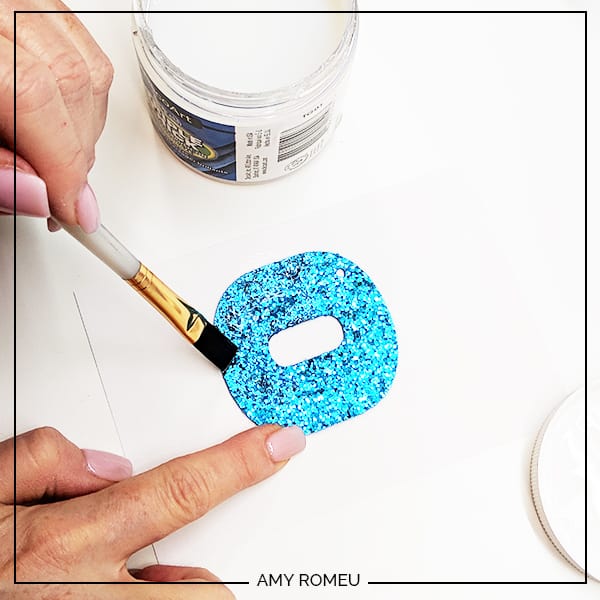
Use a wide, flat paintbrush to brush the glaze all over one side of your letter. Be careful not to goop up the keyring hole, and try to brush the surface evenly to avoid puddles of the glaze. It’s better to do a few thin coats than one really gloopy coat.
Now, I live in Florida, where it is ridiculously humid all the time, so your drying time between coats may be faster than it was for me. I suggest cutting a small swatch of chunky glitter and testing out using the glaze first for best results.
For this glitter blue O, I applied 4 coats in total to each side over the course of a few days. After I coated the front, I let it dry for a few hours and then coated the back. I let the letter dry overnight and then repeated the front and back coating again. I think doing 2 coats on each side is the minimum, and it took 4 coats on each side for the glitter surface to become pretty smooth. More coats also help the keychain feel sturdier, too. Just don’t be in a rush to glaze or your glaze could get cloudy.
Once your initial is coated to your satisfaction and dry, it’s time to attach the letter to the keychain hardware.
STEP 9 – ATTACH YOUR KEYCHAIN HARDWARE
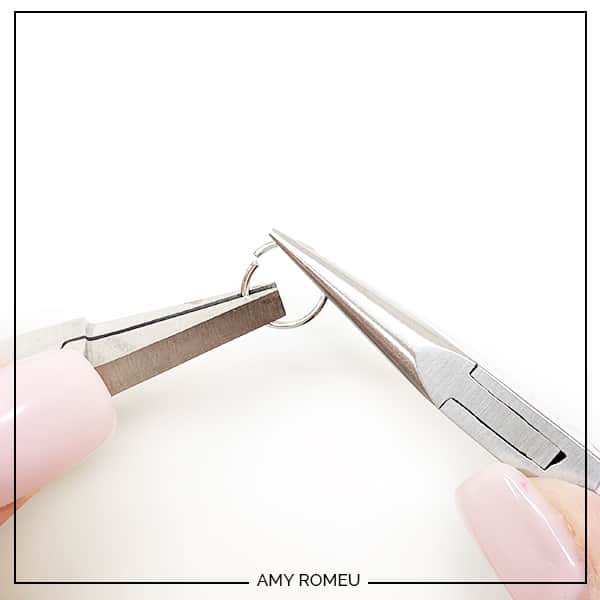
For each keychain, you’ll need the keyring hardware and two jump rings (one jump ring if you aren’t using the tassel). If you don’t have the swivel key chain I used
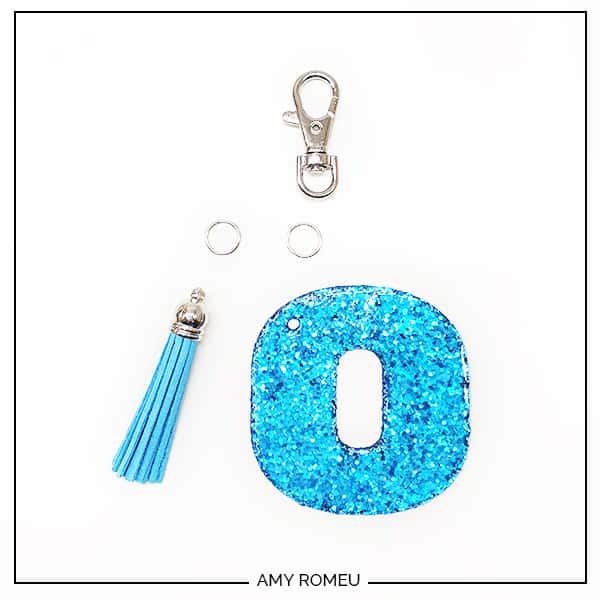
Use pliers to open a jump ring, slide on the letter, add the letter to the key ring, and close the jump ring again. It’s easiest to open and close jump rings using two pair of pliers, like this.
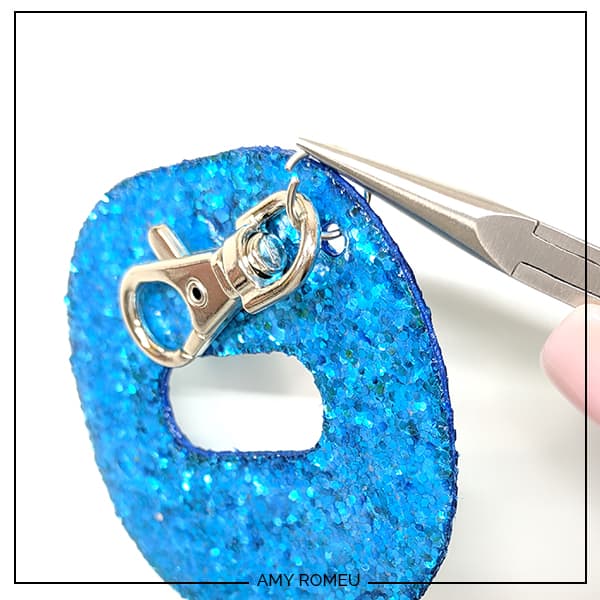
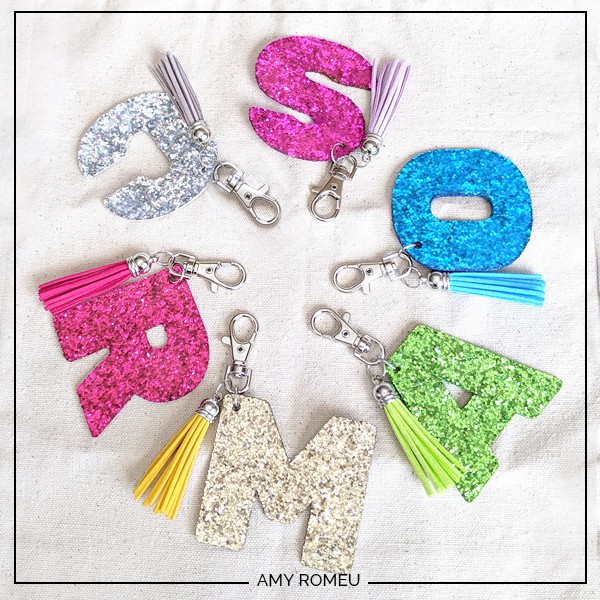
Repeat this process with the tassel, if you’re using one. That’s it! How cute is this Cricut glitter letter keychain? I think my daughter’s friend are going to love them.

Are you going to try this project? If you do, I hope you’ll post a comment and attach a photo so I can see your creation!
If you liked this project and want to see all of my Cricut Jewelry tutorials, click here.
If you liked this project and want to see all of my Keychain tutorials, click here.
Until next time… and happy creating!

Want the FREE SVG file you so you make these CRICUT GLITTER LETTER KEYCHAINS yourself?
Want to remember this? Post this CRICUT GLITTER LETTER KEYCHAINS project to your favorite Pinterest board!
Thank you SO MUCH for your tutorial on the faux leather initial letter keychains! I just made some for my daughter and grand daughters. They’re on their way from California to Ohio as I type this. I also used your tutorial and made some non-glitter faux leather keychains for my grandsons. They turned out amazing1
That’s amazing, Donna! I’m so glad you liked this project!
Hello Amy,
I have just completed making 12 letter keychains and I am “over-the-top” pleased with how they turned out. (I also appreciated your links to purchase the necessary components!)
I followed your tutorial step-by-step! Fabulous! I have also made several of the key fob wristlets with faux leather – YOU are fabulous with your instructions and detail. Thank you for such fun and useful projects!
Thank you so much for the kind words, Cynthia! I’m thrilled you enjoyed this project! You made my day.