
Beginner’s Guide To Jewelry Making Tools

The Beginner’s Guide To Jewelry Making Tools
Naturally, I receive a lot of questions about beading and jewelry making. Without a doubt, the topic I’m asked about most often is about jewelry making tools – specifically, exactly what tools a beginner should buy to start making jewelry.
I understand why buying tools can be confusing! The craft store bead aisles are full of different tools from a variety of vendors. Many of them look similar. How is a beginner to know which ones to buy, and why?
I get it! I’m here to help answer that question by guiding you every step of the way as you shop for your first set of jewelry making tools. It doesn’t matter where you plan to shop – your local craft store, your local bead store, or online.
In this post, I’ll give you the specific features to look for when tool shopping, and I’ll give you my recommendations for the 3 must have tools you’ll need to get started jewelry making right now.
I also created a FREE Jewelry Making Tools Shopping Guide that you can print and take with you when you go shopping for tools! It’s #105 in my Free Resource Library. You can get the library password emailed to you instantly by filling out the form at the bottom of this post.
Before we get to that, though, first let’s talk about the most commonly asked questions readers have about buying tools for jewelry making.
What kinds of jewelry will I be able to make with jewelry making tools?
The tools we will talk about here will allow you to make basic earrings, bracelets, and necklaces. You’ll be able to attach earring hooks, put clasps on bracelets and necklaces, and hang charms and dangles on earrings, necklaces and bracelets. With the 3 must have tools I’ll tell you about later on in this post, you’ll be amazed at how many jewelry pieces you’ll be able to make!
Can I buy good jewelry making tools on a budget?
Absolutely! There are lots of options and price points for the jewelry making tools you’ll need to buy. As with anything else, keep your budget in mind and buy the best you can afford at the time.
For example, you’ll see a lot of Wubbers brand jewelry making pliers in my toolbox (they are the ones with teal colored handles in the photo above). They are great quality and I love using them! However, they are pricier than the pliers I started out using, and more expensive than the ones you will find at Michael’s or Hobby Lobby.
But that’s ok! I have used $8 pliers and $45 pliers. Both will perform the same task, but the more expensive one will generally last longer and have a few extra features. But don’t think that you need to spend a fortune at the very start. You don’t. Buy what you can and upgrade as you go.
Do I have to live near a bead store to buy good jewelry making tools?
No! The great thing is jewelry making tools are available from so many places these days. Once you know what you are looking for, you can go into Michael’s, Joann, or Hobby Lobby and walk out with the jewelry making tools you need to get started.
Or, if you are a die hard Amazon shopper, you can buy all of your tools online, most with Prime shipping. Of course, all the jewelry making tools you’ll need can be purchased online at your favorite online bead store, or in person. The choice of where to shop for jewelry making tools is up to you!
Can’t I just use the tools my husband or boyfriend has in the garage for jewelry making?
Nope. While you may have access to some tools that do the same functions as the ones listed above, they will be super-sized versions made for non-jewelry making tasks.
His wire cutters for example, will cut your beading wire, but they won’t be able to make a sharp and clean flush cut right up against your beads like jewelry making wire cutters will. His flat nose pliers will probably have teeth inside the jaws that will scratch up your jewelry wire and components.
You may save a couple of bucks by using his tools, but you’ll end up frustrated and unable to perform the detail oriented work required to professionally finish your jewelry pieces.
Take it from me, it’s best to invest a little money into tools that are specifically designed (and sized) for making jewelry. Start off with the right tools for the job and you won’t be disappointed!
Are there any important features I should look out for when shopping for jewelry making tools?
Yes! There are 3 features I always recommend customers look for when purchasing tools for beading and jewelry making:
#1 Cushioned Hand Grips
Cushioned hand grips are foam coverings on the handles of the tool, regardless of the type of tool (pliers, cutters, etc.). Cushioned hand grips give a little when you squeeze the handles together, which provides you with more movement and flexibility as you use the tool. They are also more comfortable, too. When you start making a lot of beaded jewelry, you’ll be so glad you have cushioned hand grips!
See the photo below for a comparison between pliers with hard plastic hand grips and cushioned hand grips.

#2 Spring Mechanism Between The Handles
You can see the spring mechanism on the wire cutters on the right in the comparision photo above. Again, this feature is available on all kinds of pliers, not just wire cutters.
The spring mechanism allows the jaws of the tool to spring back open after you release your hand grip, instead of manually having to spread the the hand grip open again when your hands are full of the jewelry piece you are working on! That spring open action is a small thing, but you will miss it if don’t have it!
#3 Smooth Jaws in Pliers
In other words, no teeth! The pliers you will want to buy will have smooth jaws. If you’re thinking, what the heck does that mean… see the photo below to see an example of the flat nose pliers you DON’T want, ones with little grooves or teeth inside the jaws.
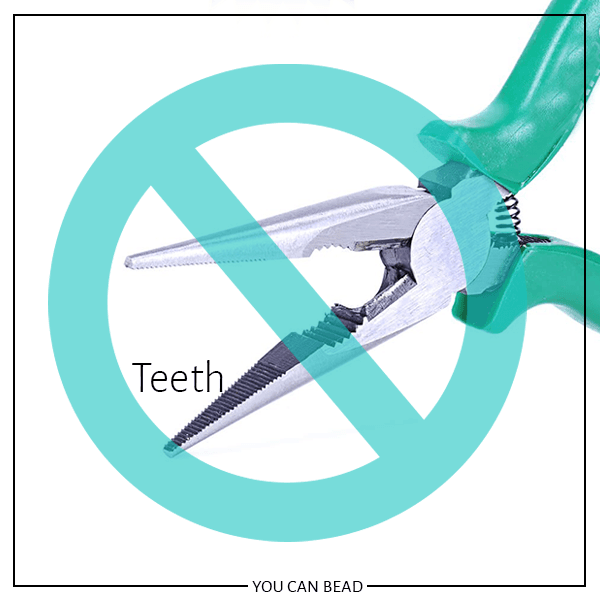
See the little grooves inside the jaws of these needle nose pliers? Those grooves will press into your earring wires, earring hooks, and jump rings and damage or scratch the metal finish of your finished jewelry piece.
By the way, your hubby certainly has a pair of these in his toolbox… and this is a great example of why I strongly recommend buying your own jewelry making tools.
So that’s it! My top 3 features to look for when you are buying jewelry making tools. When you do your tool shopping, I strongly suggest you look out for these 3 key elements for best results.
This page contains some affiliate links (which means if you make a purchase after clicking a link, I will earn a small commission at no additional cost to you). Read my full disclosure policy here.
I’m ready to get started. Exactly which tools do I need?
Great question! If you’ve read this far (hooray!) you must be interested in getting started with making your own jewelry. That’s great! But I know shopping for jewelry making tools online and in stores can be overwhelming. Does going into the store and seeing this confuse you?

I know it does for a lot of beginning jewelry makers. But I’m here to make your jewelry making shopping easy! If you’d like to have the key features to look for in jewelry making tools handy when you go shopping, I’ve got you covered!
I created a printable Shopping Guide for Jewelry Making Tools to help you know exactly what to look for when tool shopping! It’s #105 in my free Resource Library – get the password at the bottom of this post.
Now, keep reading to learn about the only three tools you must have to get started making jewelry right away.
3 Must Have Jewelry Making Tools
Now that we know what features are important, let’s talk about the three tools that, once you have them and you know how to use them, will let you make countless bracelets, earrings and necklaces. If that sounds like information that will help you, read on!
Keep in mind as I show you each of the pliers, you should pay attention to the shape and the function, NOT the brand. There are many different manufacturers of each kind of tool described below, and I don’t want you to get hung up on the brand when you start shopping. It’s the shape and function you need.
In order to make the most common, basic types of jewelry – earrings, bracelets, and necklaces – you’ll need the following 3 tools as a bare minimum to get started. Let’s go through each one at a time.
Must Have Jewelry Making Tool #1: Round Nose Pliers
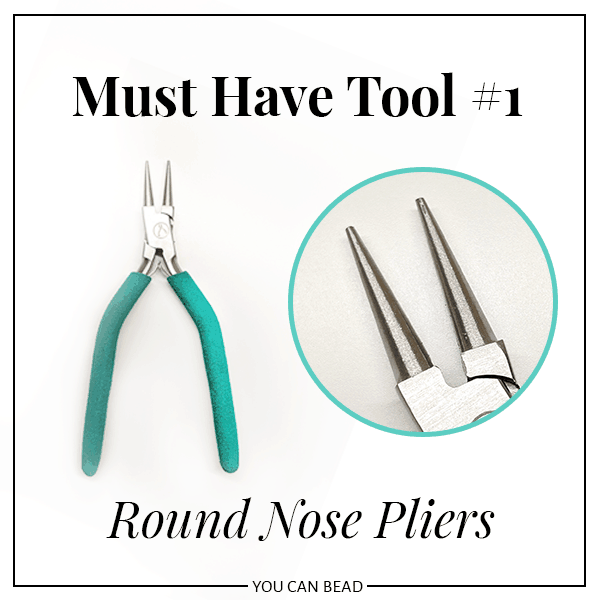
Round nose pliers have two long, skinny cone shaped tips at the end. They are used for rounding wire into smooth loops. The cone shaped tips are useful because you can make different sized loops depending on where you wrap your wire on the cone shaped tip.
The jewelry making tasks you’ll use round nose pliers for are:
- making loops at the top of earring wires which you will connect earring hooks onto
- as a second tool to assist with making nice, consistently sized loops when finishing bead wire bracelets and necklaces
- making wire loops when connecting beaded chain (think of a rosary necklace and the connecting beads)
My recommendations:
The Round Nose pliers I use and recommend are the Baby Wubbers Round Nose pliers. They are available here from Amazon. They are also available here from Fire Mountain Gems, one of my go-to online bead stores.
TIP: “Baby” just refers to the size – Wubbers pliers are available in two sizes, Baby and Classic. Classic size is much bigger. I have both sizes and I find the Baby size fits better in my hand. I plan to write a post about Wubbers pliers soon, and when I do, I’ll link it here.
From Michael’s, I like the Beadalon Ergo Round Nose Pliers here and the Beadalon Sparkle Round Nose Pliers here.
Good budget friendly options are this pair of Beadthoven Round Nose Pliers from Amazon and this pair from Joann.
Round nose pliers vs. looping pliers
TIP: It’s important to note in our mention of round nose pliers that round nose pliers are NOT the same as looping pliers. Looping pliers are pictured below.
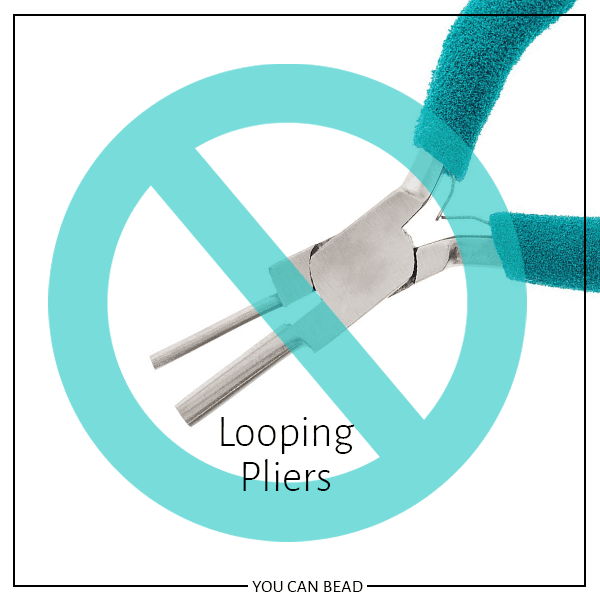
Looping plier tips are not cone shaped like round nose pliers. The tips are round and tubular. The looping pliers in the photo above have one tip that is a uniformly sized tube. The other tip is a long open C shape (picture a stalk of celery) that the other tip fits into, which helps form the loop.
They are made for making consistently sized loops, but only one loop size per pair of looping pliers like the one shown above. While they are a great advanced tool you may want to purchase one day, they won’t have the versatility round nose pliers do for beginning jewelry makers. (We will cover looping pliers, the different kinds and uses in a later post.)
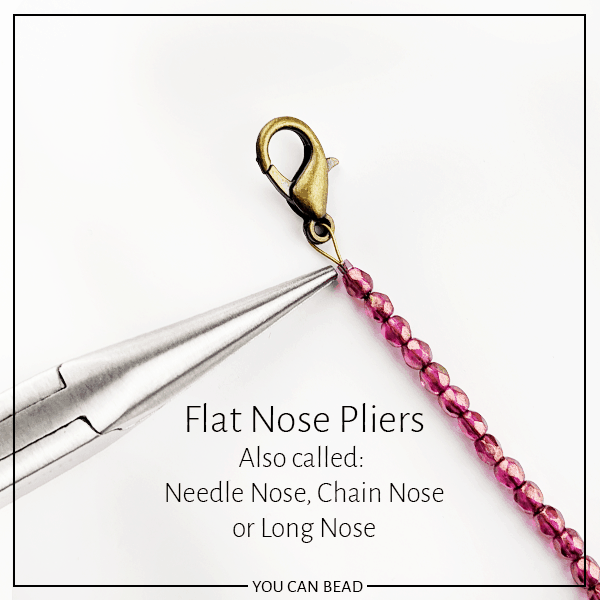
Must Have Jewelry Making Tool #2: Flat Needle Nose Pliers
Flat nose pliers – also called “chain nose” or needle nose” pliers – have jaws that are flat inside. They are very useful and versatile tools. I use my flat nose pliers for jewelry making more than any other tool.
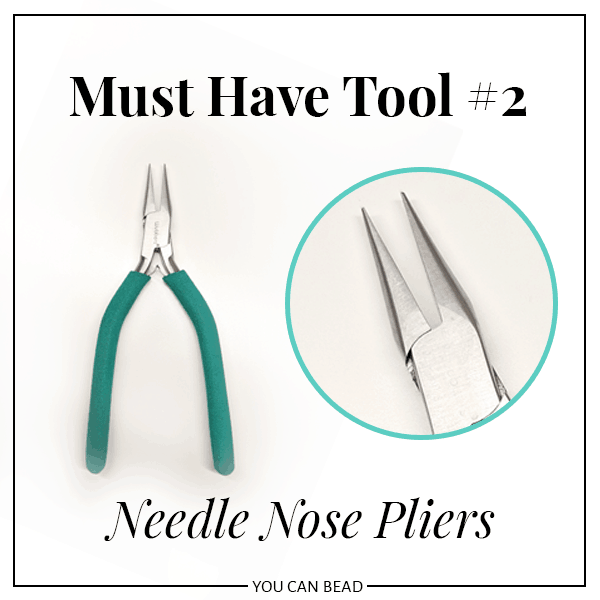
Don’t worry about the name differences (flat nose, chain nose, needle nose). Just look for the shape shown in the photo above.
The jewelry making tasks you’ll use flat nose pliers for are:
- flattening crimp beads, an essential part of putting clasps on necklaces and bracelets
- opening and closing jump rings (connectors for clasps, charms, and more)
- opening and closing earring hook loops to attach dangles or drops
- holding jewelry elements in place as you work on them
They come in a few variations, and I’ll tell you which one I recommend you get first in a moment. Whichever variation you choose, however, remember it’s important that you get flat nose pliers that have smooth jaws (no teeth – also called “serrated”). We talked about this earlier in this post as one of the key features to look for in jewelry making tools.
Flat Nose Pliers: Why Size Matters
There are two basic types of flat nose pliers: wide and needle nose (or chain nose). Wide nose is just that, wide, and needle nose pliers are pointed at the tips. See the photos below:
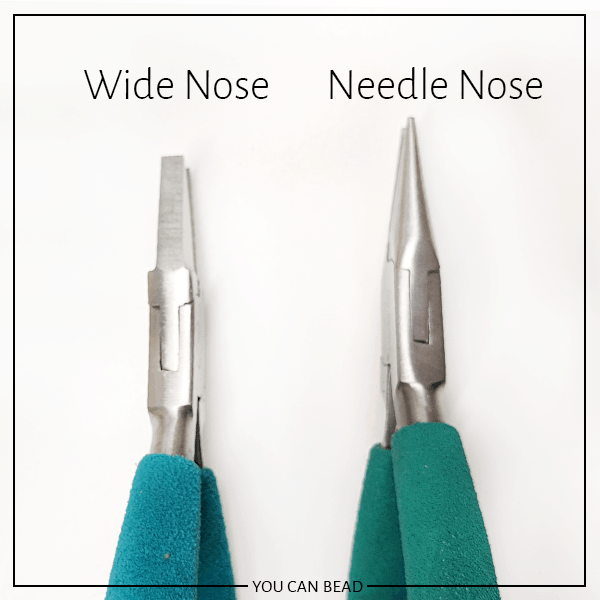
I would recommend the needle nose flat nose pliers (also called chain nose or long nose) as one of your 3 must have jewelry making tools to start making beaded jewelry.
The reason is: one major beaded jewelry making task is putting clasps on necklaces and bracelets by smashing crimp beads, small soft metal tubes, onto your beading wire after looping the wire through your clasp. There are special crimping tools for accomplishing this step, but if you are just getting started, the pointed ends of flat nose pliers can perform the same function.
While both tools are good to have, and I recommend you have both as soon as you can, you just need one to start.
With flat nose pliers, you are able to get the pliers into a very small area to crimp the bead and keep your beading wire taut. Wide flat nose pliers are too wide to be able to accomplish this task effectively (but the perfect tool for other tasks, as you’ll see in future posts!).
Flat Nose Pliers: not too narrow!
TIP: Some needle nose pliers have REALLY thin jaws, which is too much of a good thing. See the photo below for an example. They are great for getting into very small spaces, but they aren’t as versatile as the as the narrow triangular shape of the pliers shown in the photo above. With the pliers shown above, you can get into small spaces with the narrow tip, but also get a wider grip on jump rings for example with the wider base.
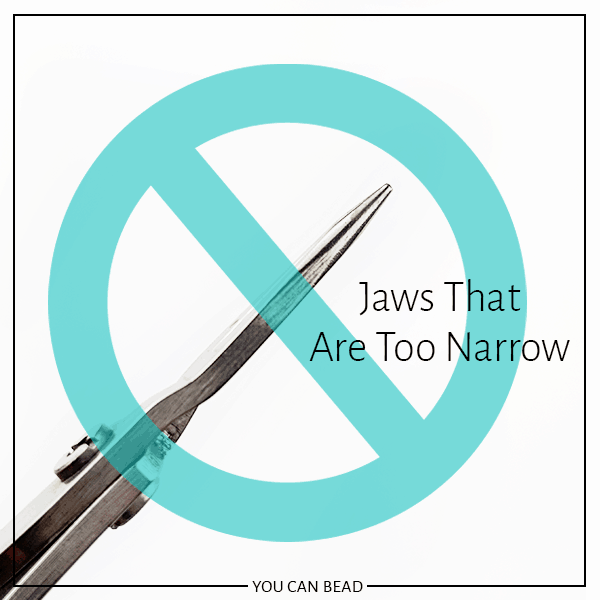
Very narrow jaw flat nose pliers are a useful specialty tool, and you may want to add them to your jewelry making tools down the road. But I don’t recommend you purchase them as your go-to pair or flat nose pliers.
My recommendations:
The Flat Nose pliers I use and recommend are the Baby Wubbers Chain Nose pliers. They are available here from Amazon.
I also like the Beadalon Slim Chain Nose Pliers. They can be found on Amazon here.
A good budget friendly option is the Precision Comfort Needle Nose Pliers from Hobby Lobby here. They have ergonomic padded handles and are a great starter pair of pliers.
Again, don’t stress about the exact name for these pliers. If you’re shopping online, or in store at your local craft store, they will have lots of options for you. Just look for the recommended shape of the jaws (remember, no teeth inside!) and you’ll be fine.
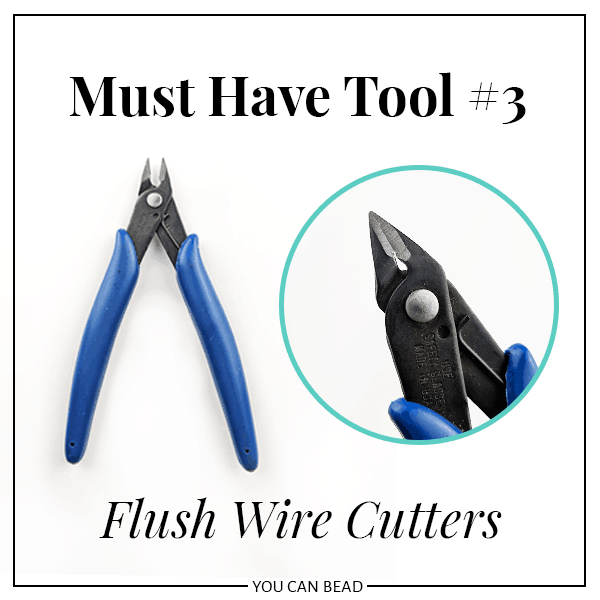
Must Have Jewelry Making Tool #3: Flush Wire Cutters
Flush wire cutters are an essential jewelry making tool. You don’t want to use scissors when cutting wire for beading projects!
The jewelry making tasks you’ll use flush wire cutters for are:
- cutting beading wire to make necklaces and bracelets
- cutting earring wires when making beaded earrings
If you’ve already checked out hubby’s tools in the garage, I’m sure you’ve seen he has wire cutters. You may be tempted to use them, but… we already talked about why you shouldn’t use his tools for jewelry making. Right? Right!
What does “flush” mean?
So, the key to getting wire cutters for jewelry making is that they should be flush cutters. What the heck does that mean? Well, when making jewelry, we want to be able to cut our wire off as close as we can to the finished jewelry piece. If we don’t, there will be a sharp wire tail that sticks out and scratches the person who wears your bracelet or necklace.
Since our cutters will butt up against beads when we are cutting and limit our maneuverability, we need the cutting blades to be as close to the beads as we can. Flush cutters are designed so the area that cuts will sit flush, or right up against a bead, which is what we want. Cutters that are not flush will cut a small distance away from the beads and you’ll have that nasty, scratchy wire tail remaining.
Does that make sense? Would it help to see a photo? No problem. Check out this picture of the rusty, old wire cutters from our garage toolbox.
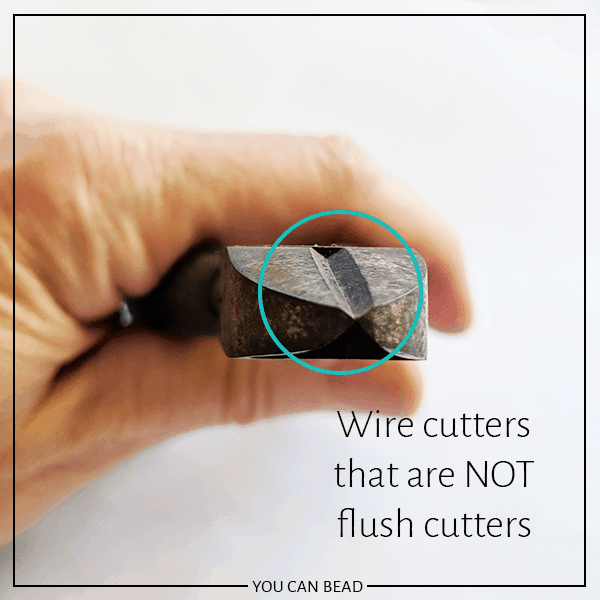
See the v-shaped notch that is cut out between the jaws of the wire cutters? That notch means these wire cutters are not flush. Compare that with this close up photo of the jaws of flush wire cutters here:

Flush cutters will allow you to cut wire as close as you need to, resulting in the most professional look for your jewelry.
TIP: Not all flush wire cutters cut the same! I’ve found one kind has more durable blades than the other. Both are good for jewelry making in different situations. Let’s discuss!
Cutting hard and soft wire
Here’s a photo of the two most common types of wire cutters you’ll see in the marketplace. The left pair with the blue handles are very popular and available everywhere. I really like them, but I’ve found they are easily damaged when cutting thick headpins or eyepins (for making earrings) or thick wire for wire wrapping. They are best used for cutting soft, flexible beading wire that is used for stringing necklaces and bracelets. This way you are able to get a nice, clean cut without a lot of pressure and squeezing.
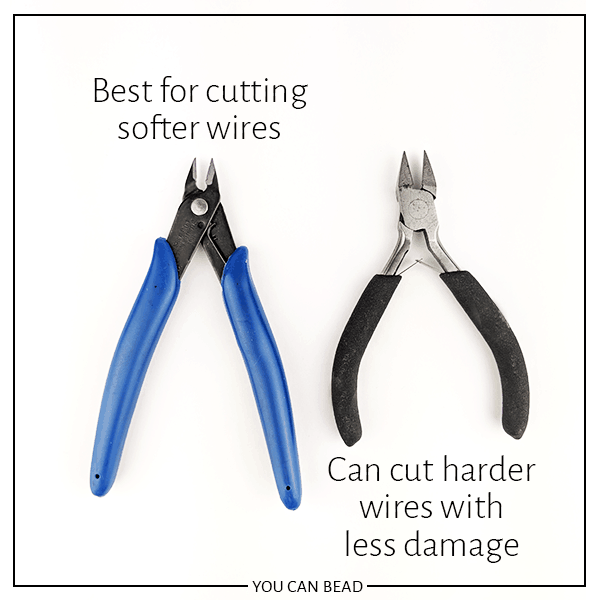
The ones on the right are more durable, and I use those when I need to cut thick, hard wire. You’ll need a stronger grip for these and the cut will be a little less precise.
I have both and use them for different reasons. If you are just starting out, ask yourself what you think you’ll be making the most. When you are making earrings, I would go with cutters like the ones on the right. If it’s mostly necklaces and bracelets made with soft, flexible beading wire, choose the ones on the left.
That being said, don’t stress about the wire cutters too much. As long as they are flush cutters and fit comfortably in your hand, you’ll be fine. Unlike my round nose and flat nose pliers, wire cutters are jewelry making tools that I replace at least once a year. My opinion is not to stretch the budget on them and plan to replace them as needed.
My recommendations:
For cutting soft bead wire, I recommend a wire cutter like Beadalon Nippers, available from Amazon here, and from Michaels here.
For making earrings or other projects with hard wire, you’ll want another pair of cutters just for hard wire, like the Darice Precision Jewelry Side Cutters from Amazon here, or these cutters from Fire Mountain Gems.
That’s it! Those are the 3 must have tools to get started making earrings, necklaces, and bracelets! Once you have those three tools, you’re ready to start creating beaded jewelry right away!
Ready to get shopping?
As you can see from all the information I’ve presented in this post, there are lots of factors to take into consideration when buying your first set of jewelry making tools.
However, you shouldn’t feel overwhelmed if you want to get started making jewelry. You can get started right away making necklaces, bracelets, and earrings with the three tools I talk about above. So go get them, and get busy making jewelry!
I hope this post has been helpful as you shop for jewelry making pliers. If you have any questions, please let me know in the comments below!
Finally, before you go tool shopping, be sure to get my Shopping Guide for Jewelry Making Tools. It’s #105 in my free Resource Library. Get the password below!
Until next time… and happy creating!

Want my FREE Printable Jewelry Making Tools Shopping Guide?
It’s #105 in my Resource Library! You’ll receive the password for the Resource Library instantly after filling out the form below!
Want to remember this? Post this Beginner’s Guide to Jewelry Making Tools to your favorite Pinterest board!
What about my hubby’s vaping tools? Would they be sufficient for jewelry making since they’re for small wires and such?
Hi, Darcy! I’m sorry, I don’t know what vaping tools look like, but if they work for you, go for it! 🙂
No matter how much I log in, read or search, I’m not finding a …Free jewelry making tools shopping list…
Is it actually a list? Can it be emailed?
Hi, are you able to view the contents of my resource library? You should have received a link and a password after filling out the form.
The list you are looking for is #105 in my library. Scroll down to locate it, then click on the blue headline under the number #105 and the list will automatically download to your device.
If you need additional assistance, please send me an email at [email protected] so I can assist you!
Thank you.
Amy
What about a 3 in one tool?
Amy I have been getting your emails for years and say to myself “I’m going to try to make earrings soon”. I purchased an email kit a year or so ago because I saw you on a craft special that you were a guest. I finally got into your free library. It’s like a kid in a candy store! Love It, Love It, Love It! lol Your beginner’s ultimate guide to jewelry making is awesome! I wanted to know what tools that was in my kit, was use for or how to used it. With your guide, questions and answers, it help me a lot. I can not believe that I have not try to make any earrings. Then, I get your email regarding your 25 Days of Christmas. I have the leather kit. Your surprises everyday has been a blessing. So far, I made three of the specials. Time is just so short when you working. So glad you never took me off your mailing list. Thanks again for the in depth tutoring along with the supplies list, It helps a lot to see the steps by steps, as well as your youtube channel. Good night!
I found your website doing research so that i can buy a jewelry making kit for my daughter-in-law. Thank you for your recommendations! Most kits have many additional tools. Besides the three tools you recommended, what are others you would recommend?
Thank you.
Best regards,
Andrea