
Pumpkin Cricut Halloween Earrings
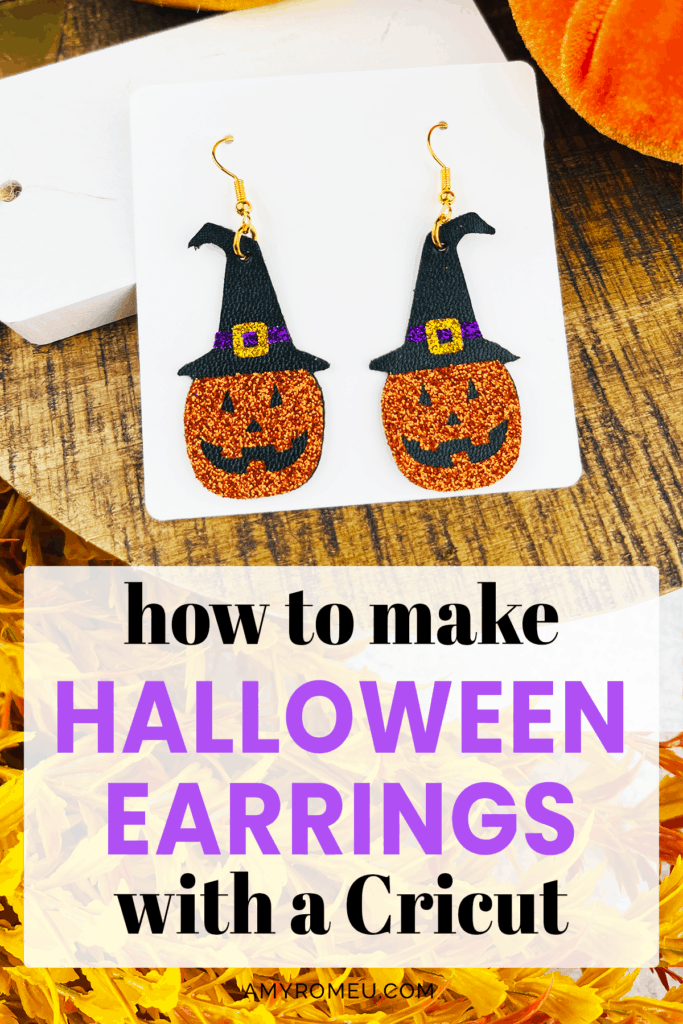
I admit it, I’m crazy about Halloween crafting! I love making all the Halloween earrings with my Cricut! Even though I have a popular Halloween Earrings SVG bundle in my shop, I can’t stop from creating even more Halloween Earring SVG designs. This one is really fun and easy to make, so I can’t wait to share it with you.
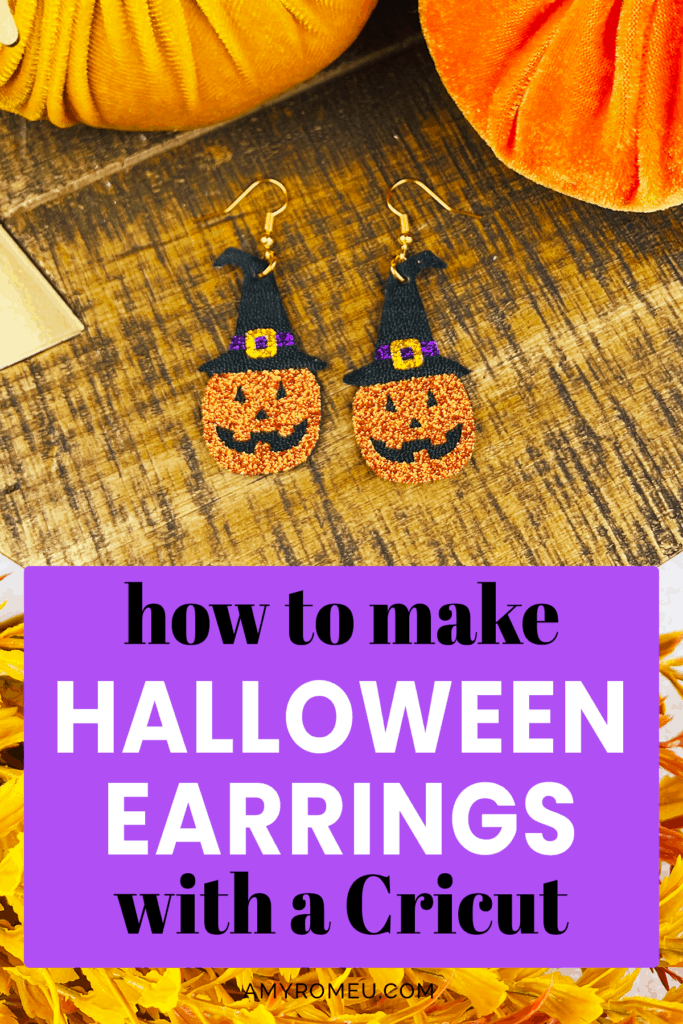
I’ve designed this cute Halloween Jack O’Lantern and Witch Hat earrings to be made from faux leather and heat transfer vinyl.
You can cut faux leather with a Cricut Maker or Maker 3, or Cricut Explore Air 2 or Explore 3, or even the Cricut Joy! I’ll walk you through how to make these fun DIY Halloween earrings with your Cricut step by step.
I’ll also show you two different earring hook options to try – one more traditional, and the other, trendy and stylish.
If you’d rather watch a video for this project, click here.
So if you’re ready to try making these Cricut Halloween earrings with faux leather and heat transfer vinyl, let’s get started!
This page contains some affiliate links (which means if you make a purchase after clicking a link, I will earn a small commission at no additional cost to you). Read my full disclosure policy here.
CRICUT HALLOWEEN PUMPKIN EARRINGS MATERIALS LIST
- A Cricut cutting machine (or another cutting machine of your choice). I used the Cricut Maker, but you can use the Cricut Maker 3, the Explore Air 2 or Explore 3, or the Cricut Joy.
- The Cricut Maker 3 is available on Amazon here or the Cricut website here.
- The Cricut Maker is available on Amazon here or the Cricut website here.
- The Cricut Explore 3 is available on Amazon here or the Cricut website here.
- The Cricut Explore Air 2 is available on Amazon here or the Cricut website here.
- The Cricut Joy is available on Amazon here or the Cricut website here.
- Black faux leather (Smooth if possible)
- Foil Iron-On in Purple
- Glitter Heat Transfer Vinyl in Copper (Orange), Purple, and Gold
- Purple Cutting Mat
- Green Cutting Mat
- Weeding Tools
- Cricut Easy Press Mini
- Cricut Easy Press Mat (8×10 size)
- Gorilla Glue Super Glue
- Earring Hole Punch
- Earring Hooks (Gold and Silver)
- Jump Rings, Gold
- Jump Rings, Silver
- Jump Rings, Assorted Metal colors
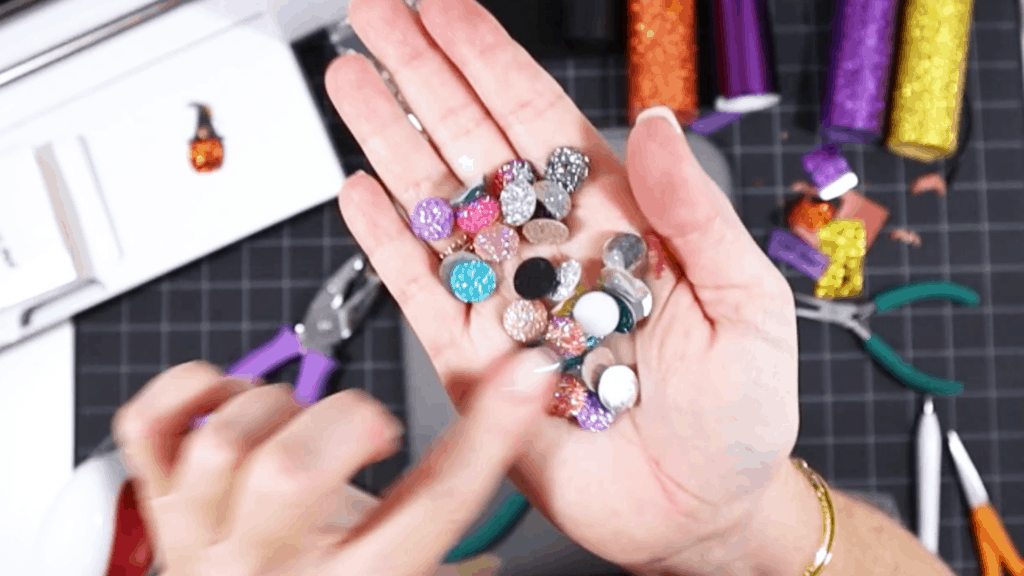
- Stainless Steel Bezel Studs in Assorted Sizes with Parallel Loops (important!)
- Druzy cabochons, 12mm size (use with Stainless Steel Bezel Studs above)
- Druzy cabochons, 10mm size
- Druzy cabochons, 8mm size
- Flat Nose Pliers
- Wide Flat Nose Pliers
- Teflon Cover Sheet or Parchment Paper.
- Design #187 from my free Resource Library. You can get the password by filling out the form below or at the bottom of this post.
How to Make Cricut Halloween Pumpkin Earrings
STEP 1 – Get the Free Halloween Earring Template
Download the free Halloween pumpkin earring template (Design #187) from my free resource library. You can get the password by filling out the form above.
STEP 2 – Upload The Halloween Earring Template to Cricut Design Space
Save the zipped folder that downloads to your computer. You’ll need to unzip or extract the files FIRST so you can upload them to Cricut Design Space.
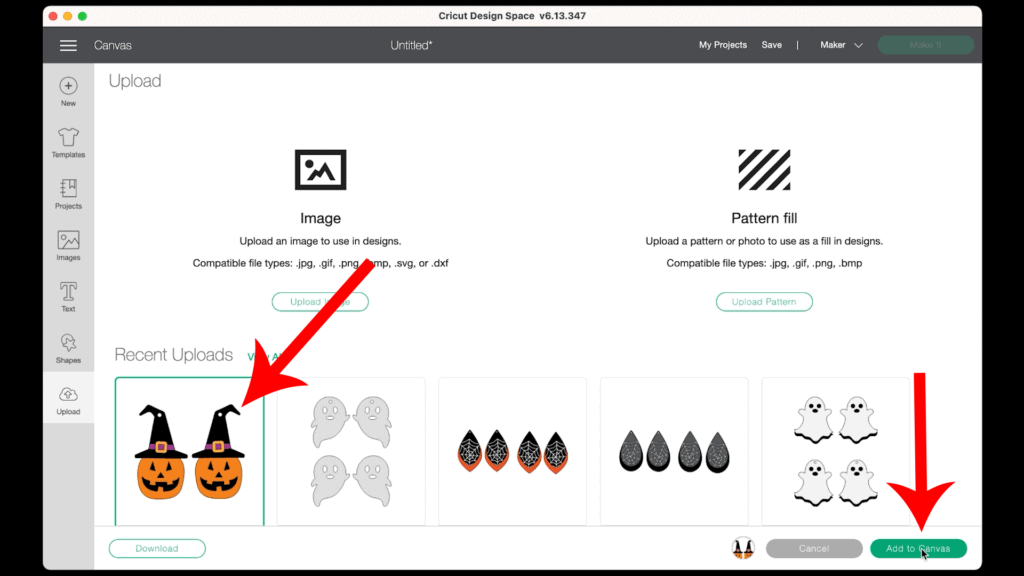
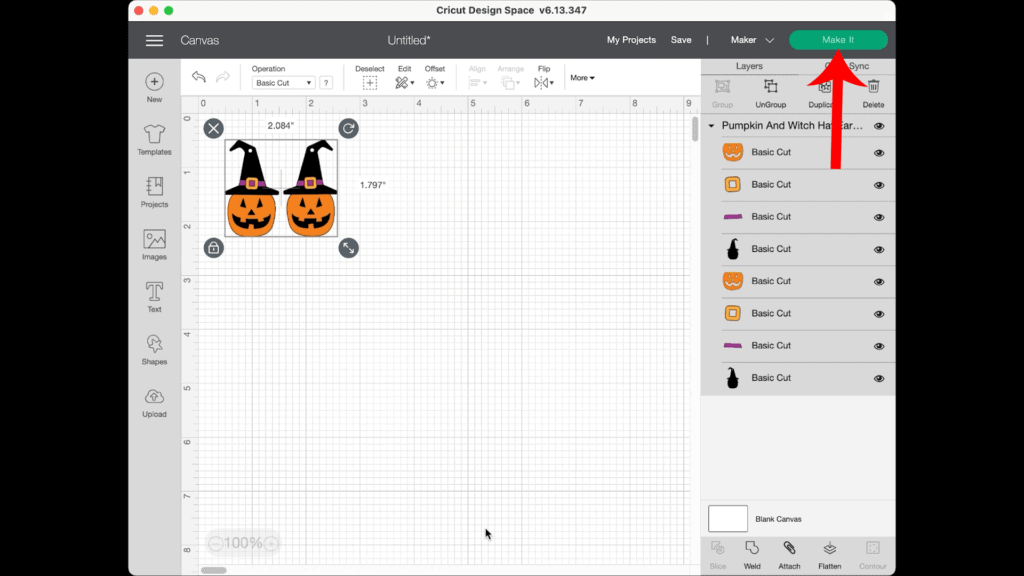
After you’ve uploaded the Halloween pumpkin earrings SVG file onto the canvas, you will see in the Layers panel that this design has four different layers.
The black layer will cut from black faux leather.
The orange, purple, and gold layers will cut from glitter heat transfer vinyl. You could also substitute solid colored HTV if you prefer.
If the earrings upload much larger than they should (which happens sometimes for some reason in Cricut Design Space), resize them to the measurements shown in the photo above.
Then click on the green “Make It” button.
STEP 3 – Prepare to Cut Earring Shapes from Faux Leather in Cricut Design Space
The mat preview screen will show all the cutting mats separated by color on the left hand side. It is not necessary to mirror the mats for this project.
I will cut the black faux leather mat first.
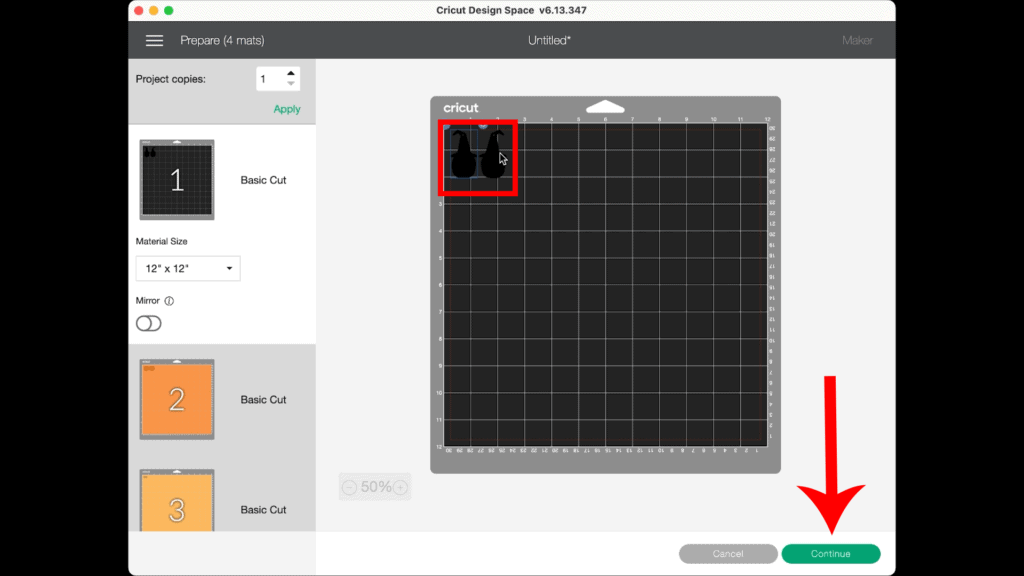
Click on the black mat and make a note of the size material the shapes will need to cut from (in this case, about 3 inches tall and about 3 inches wide).
Click the “Continue” button.
Note: Cricut Explore Air 2 users will need to turn the dial to “Custom” before choosing Faux Leather (Paper Thin).
Note: Cricut Joy users should check out my tutorial on How to Make Earrings with the Cricut Joy with more specific instructions for Joy users.
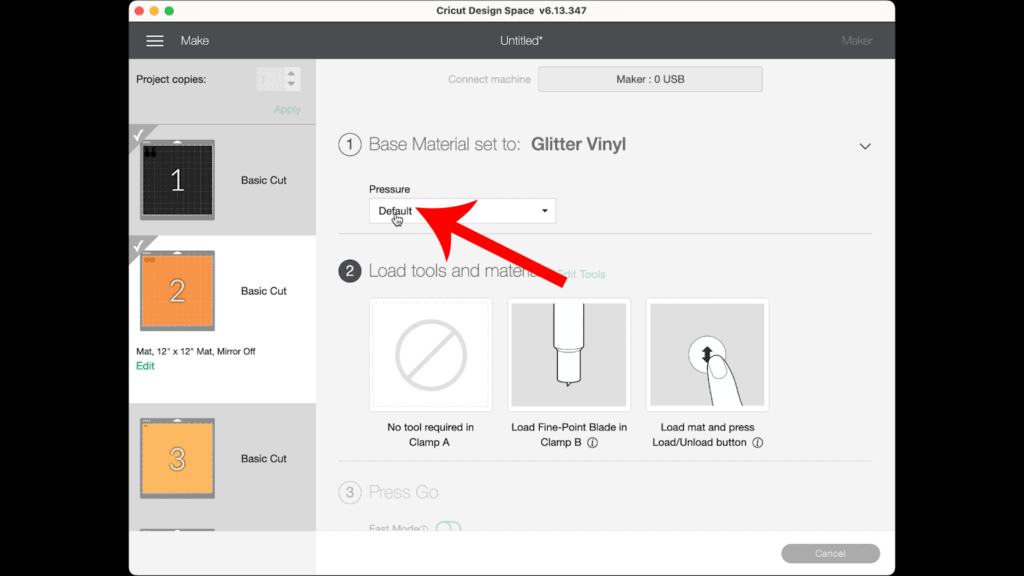
On the Material Selection screen, choose Faux Leather (Paper Thin) as the material setting. If you don’t have this material setting as a favorite, click “Browse All Materials” to search for it and select it. Then select “More” from the Pressure dropdown menu.
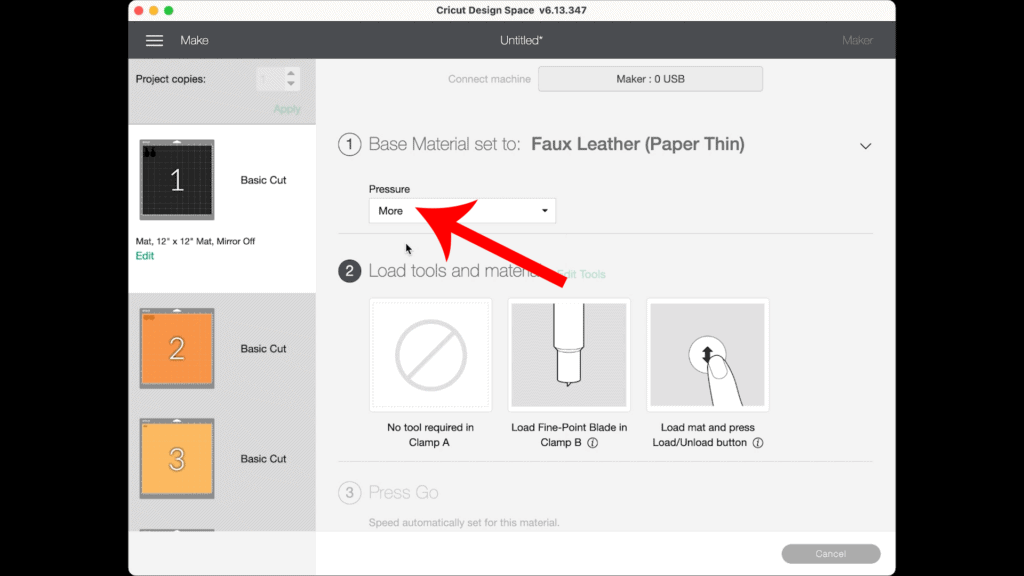
Cut a piece of faux leather just slightly bigger than the size you noted in the mat preview screen. Cutting the faux leather down to size helps you get a better cut because it stays in place better on the cutting mat than a large piece does.
STEP 4 – Pressing a Back on the Faux Leather Before Cutting (Optional)
Optional: You can press heat transfer vinyl onto the back of the faux leather before cutting the shapes, if desired.
Adding a back to the faux leather gives your earrings more stiffness (which helps keep them from curling) and also adds some interest and a professional look.
To do this, cut a piece of foil or solid heat transfer vinyl the same size as the faux leather piece you’ve already cut.
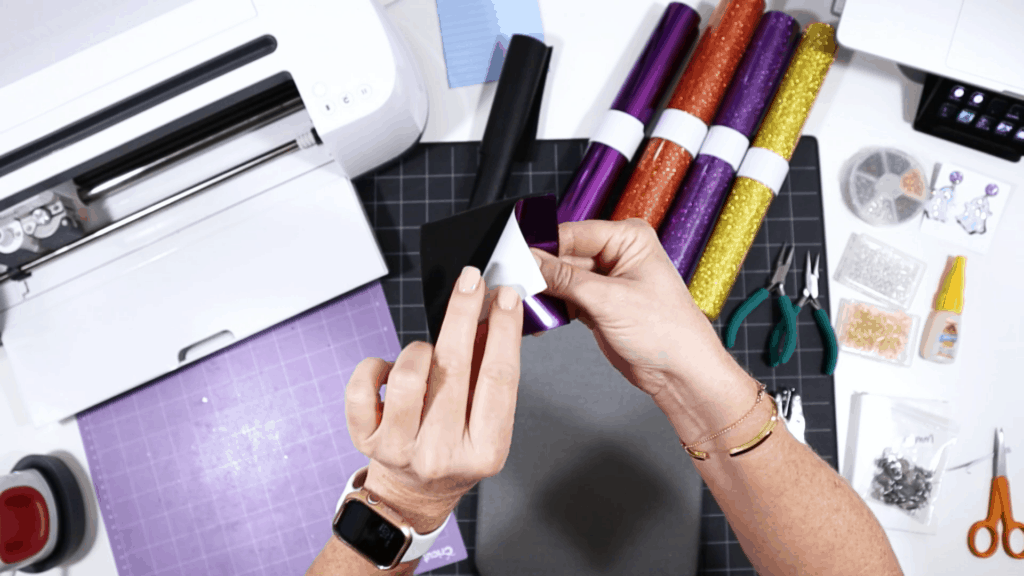
Place the faux leather and heat transfer vinyl back to back on a heat pressing pad, iron on side up. Cover with a Teflon sheet or piece of parchment paper.
Using an Easy Press Mini on Low or an Easy Press set to about 265 degrees, press the HTV to the back of the faux leather. Press for about 5-10 seconds.
Carefully peel away the clear cover sheet from the iron on. Cover with the Teflon sheet once more and press again for a few seconds.
STEP 5 – Making Faux Leather Cuts
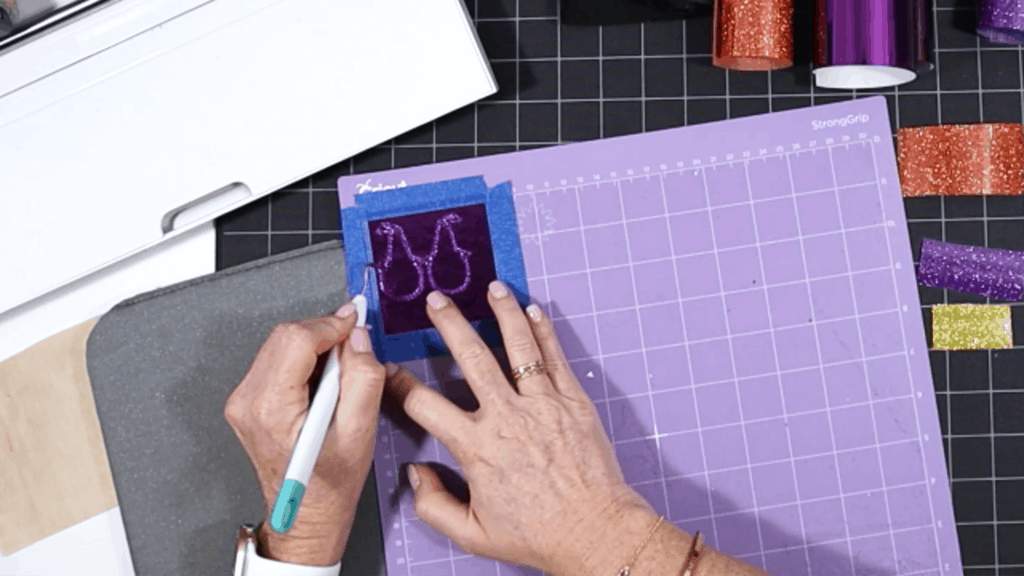
Place the trimmed piece of faux leather “pretty side” down on a purple mat and press it down all over with your fingers. Then tape the faux leather down on all sides with blue painter’s tape.
Load the mat into the Cricut by lining up the mat with the guides and pressing the double arrows button. The machine will pull the mat into the machine.
Note: Make sure the Cricut’s star wheels are off to the side before starting the cut so they don’t leave indentations in the faux leather.
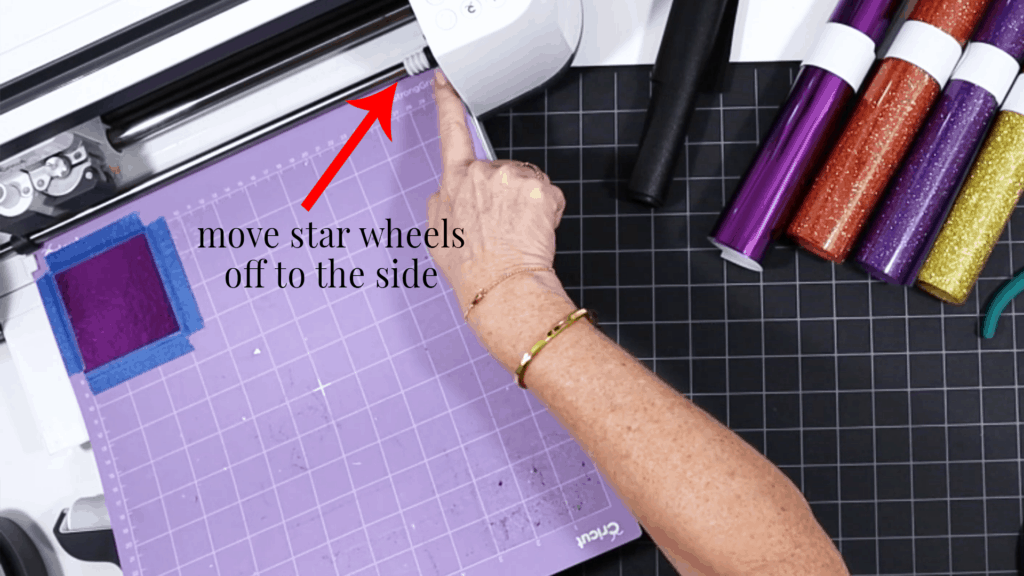
Press the C button to begin the cut.
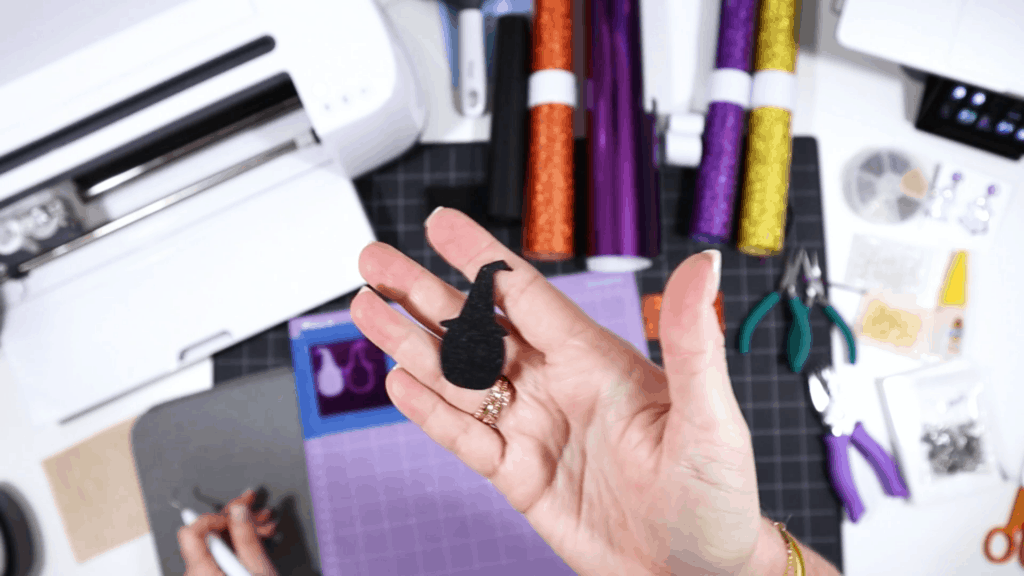
After the cut is complete and before unloading the mat, use a weeding tool to carefully lift the edge of the faux leather shape to see if the cut was complete.
If not, press the C button again to repeat the cut.
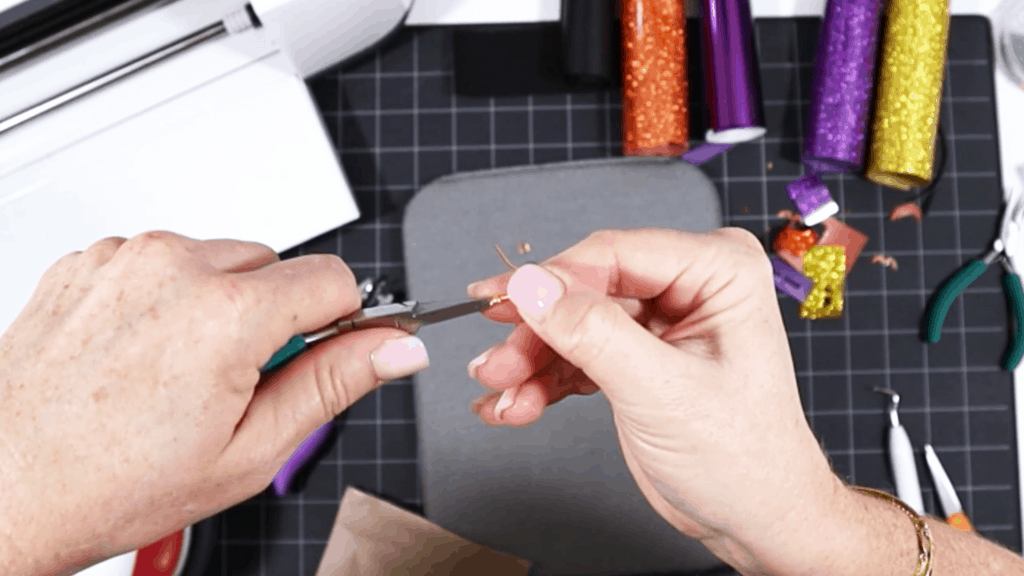
Unload the mat and remove the faux leather pumpkin earring shapes. You can trim any stray fuzz from the faux leather backing with small curved scissors.
STEP 6 – Cut Glitter Heat Transfer Vinyl Shapes
Return to Cricut Design Space to cut the glitter heat transfer vinyl mats.
I like to use the Glitter Vinyl setting with “Default” pressure and then repeat the cut once if necessary.
Place the glitter heat transfer vinyl for the first mat shiny side down on a green standard grip cutting mat.
Load the green mat into the Cricut and press the C button to begin the cut. When the cut is complete, unload the mat and remove the cut glitter vinyl.
Weed away the excess heat transfer vinyl and cut the pumpkin earring shapes circles.
Repeat for the other two colors of glitter heat transfer vinyl and set aside.
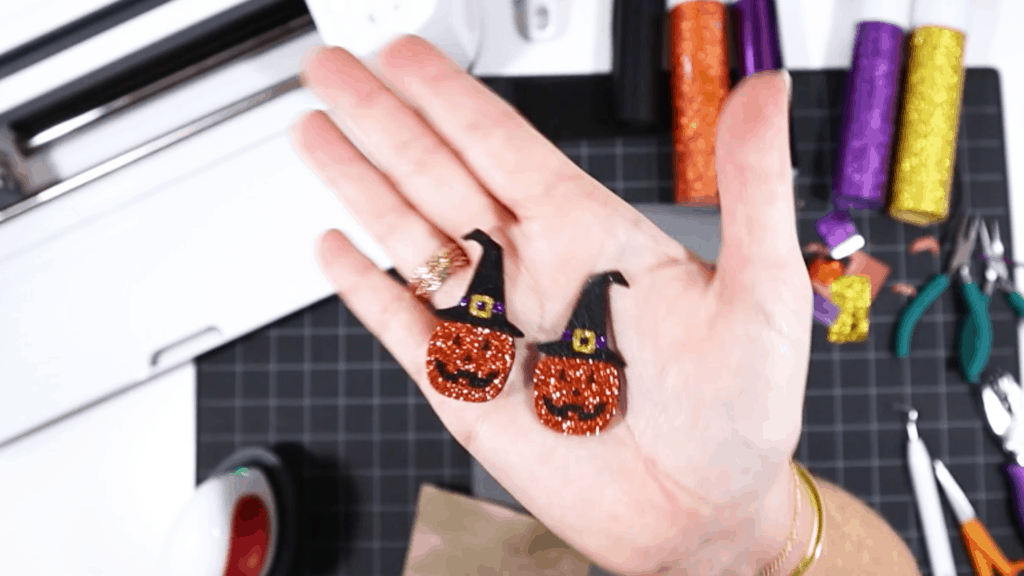
STEP 7 – Press The Glitter HTV to the Faux Leather Earrings
Once the glitter HTV shapes are weeded, it’s time to press them into place.

Place the pumpkin vinyl layers on top of the faux leather shapes. Cover with a Teflon sheet or cover sheet.
Press for 10-15 seconds, allowing the glitter HTV to adhere properly to the faux leather backing. Then carefully peel away the glitter vinyl cover sheet. Repeat with the the hat band layer, and then the buckle layer.
STEP 8 – Make The Earring Holes
If the Cricut didn’t cut the earring holes all the way through, use a 1/16″ hole punch or a sharp object to punch the earring holes.
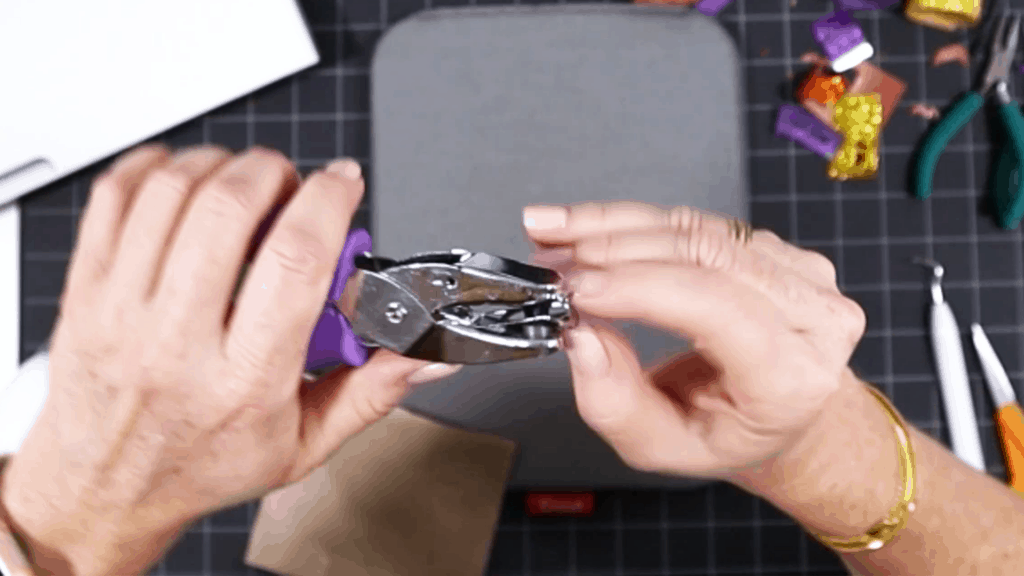
STEP 9 – Attach the Traditional Earring Hooks
Now it’s time to assemble your earrings!
I’ll show you two options. The first is using traditional earring hooks.
You’ll need small jump rings, earring hooks, and two pairs of flat nose pliers.
To connect the earring hooks to the pumpkin earrings, you’ll first need to turn the bottom loop on the fishhook sideways so your earrings will hang correctly.
You’ll do this using one pair of flat nose pliers. While holding the hook firmly between two fingers, grip the entire earring loop between the pliers and twist your wrist 90 degrees. Repeat with the second earring hook.
For more step by step directions on attaching earring hooks, be sure to visit my post on how to make faux leather earrings hang straight.
Now use flat nose pliers to open the jump ring. I like to use two pliers, one in each hand. Grip each side of the jump ring with a pair of pliers, making sure the opening in the jump ring is facing up (the twelve o’clock position).
Rotate one wrist forwards or backwards, so the jump ring creates an opening but doesn’t bend out of it’s circle shape.
When the jump ring is open, slide the pumpkin earring onto the jump ring. Then slide the earring hook onto the jump ring and close the jump ring again.

Pay attention to which side is the front of your earring as you do this to be sure your earring and hook are both facing the right direction.
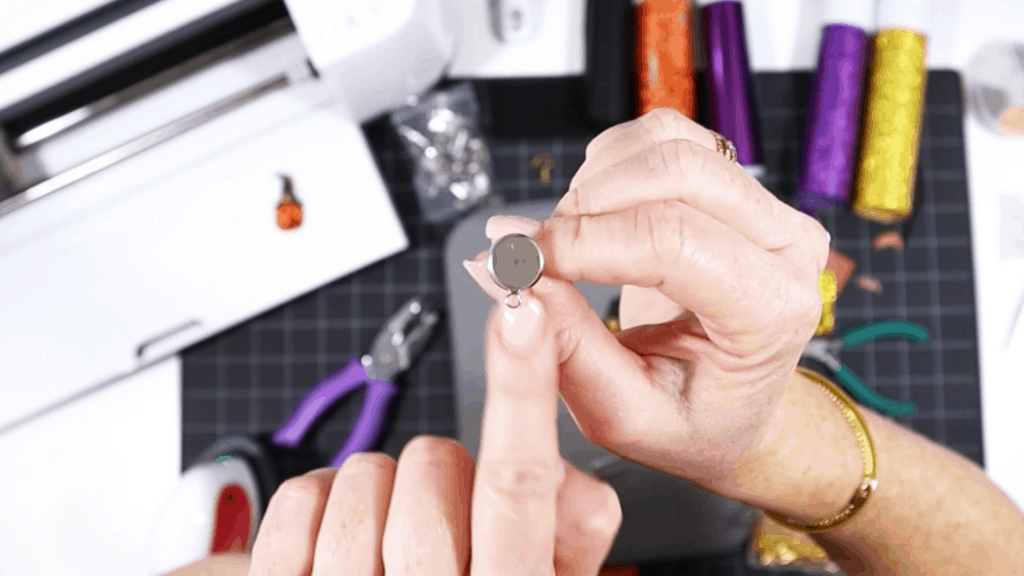
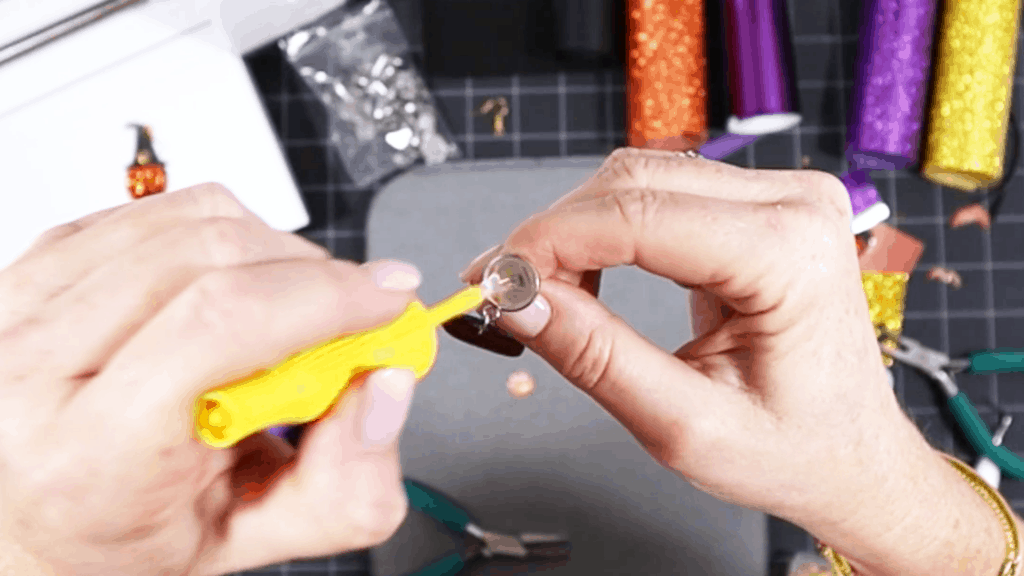
STEP 10 – Attach the Stud Earring Posts
Another option is to attach a stainless steel stud earring post to the Halloween earrings.
These are popular earring posts now and can easily be customized by gluing in a colorful Druzy cabochon.
Be sure to check the links in the materials section for links to the exact stainless steel studs I purchased. They have the earring loop facing a very specific direction.
For this variation, first attach the faux leather pumpkin earring to the stud loop using a jump ring as described in Step 9.
Select your Druzy cabochon and test that the size fits in your stud earring post.
Then brush some Gorilla Glue super glue (the one with the Yellow Top) onto the stud post base and insert the cabochon.
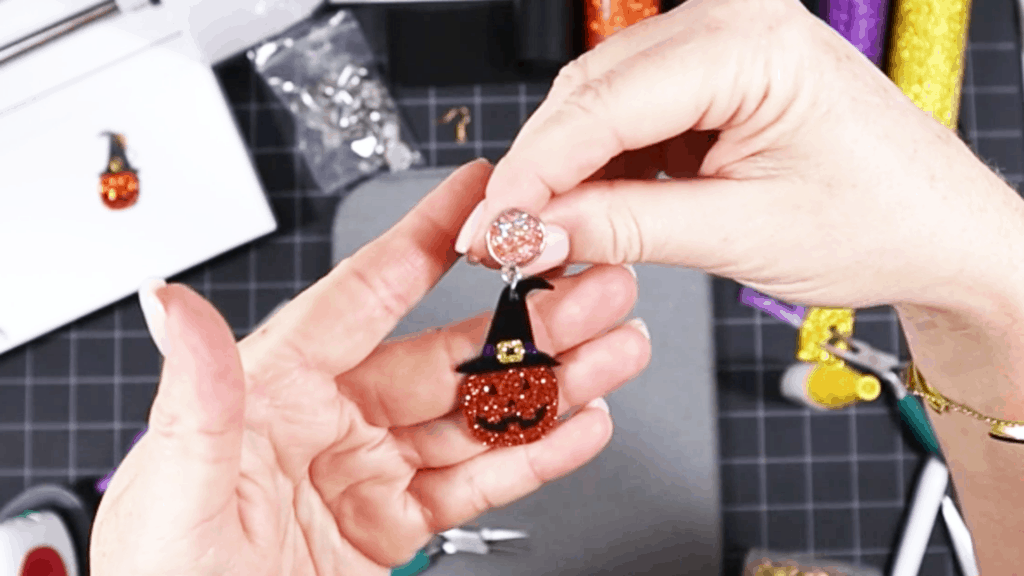
Repeat for the second earring.
That’s it! The Halloween earrings are finished!
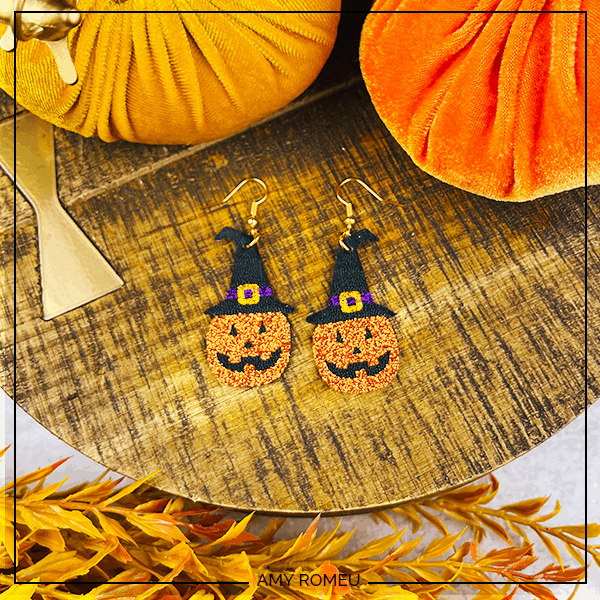
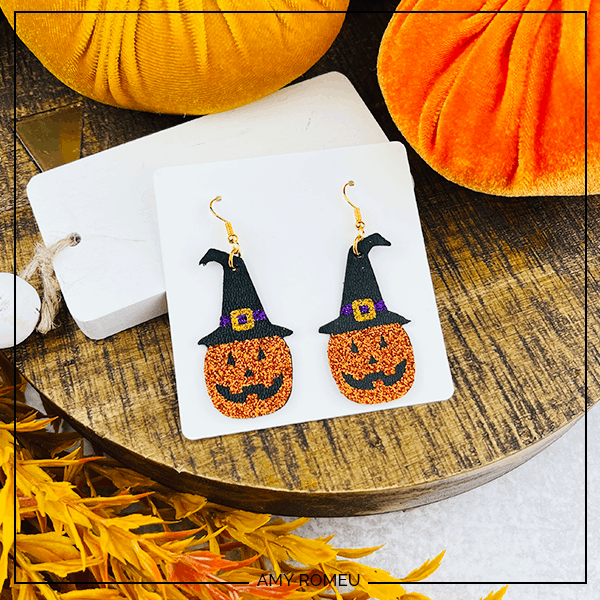
Aren’t these Halloween Pumkpin & Witch Hat earrings cute? If you do make this project, I would love to see your finished earrings. Please share a photo of them in the comments, or tag me on Instagram: @amyromeucrafts
Want to see all of my Cricut earring & jewelry tutorials? CLICK HERE

WANT THE SVG FILE SO YOU MAKE THESE CRICUT HALLOWEEN EARRINGS YOURSELF?
It’s Design #187 in my FREE Resource Library. Get instant access by filling out the form below!
Want to remember this? Post this CRICUT HALLOWEEN EARRINGS project to your favorite Pinterest board!
how can i sign up for you web site
I love this design and I will definitely be using glitter. I love watching your tutorials. They are easy to understand.