
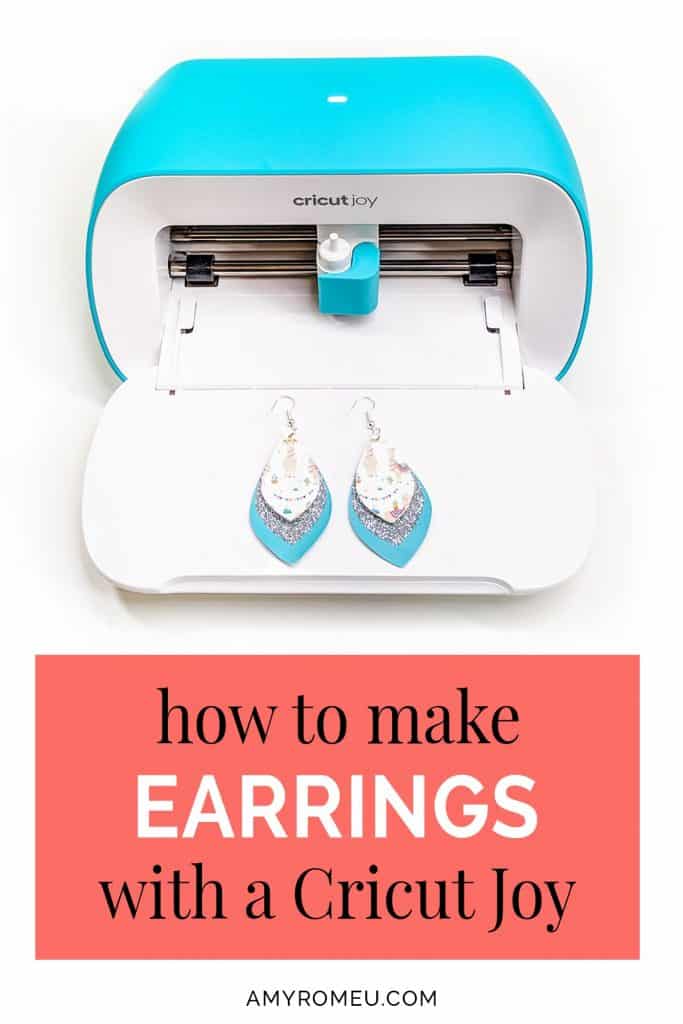
How to Make Earrings with the Cricut Joy
How to Make Earrings with the Cricut Joy
I have to admit, I did not think I was going to get a Cricut Joy when it first came out. But when I watched some Cricut Joy videos with my daughter and I saw how interested she was, and I realized it would make a great birthday present for her. She’s a March baby so the timing is perfect. Imagine her surprise when a little box of “joy” arrived with her name on it! She immediately dove right in and has already made some cute vinyl stickers, as well as a zippered pouch and a pillowcase. Watching her create with the Cricut Joy got me thinking… could I use the Cricut Joy to make faux leather earrings?
Now I know the Cricut Joy doesn’t have a purple strong grip mat, which I usually use to cut faux leather for earrings. But the Joy is the PERFECT size for making earrings, so I knew I had to test it out! I asked my daughter if I could borrow her new Cricut Joy, and she reluctantly agreed to let me use it for ONE day! So here we are. I’ve searched through my faux leather stash to find the happiest, most “joyful” colors and prints I could find. And really, what could be more joyful than llamas?
For this project, I’m going to use faux leather and I’m going to test out the Cricut Joy Smart Iron-On Vinyl in glitter silver. Of course, you can use whatever faux leather you already have, and adding vinyl to your earrings is totally optional.
Finally, if you don’t have a Cricut Joy but you still want to make these earrings, you absolutely can! I’m making these earrings with the Joy’s Fine Point Blade, which also comes with both the Cricut Explore Air 2 and the Cricut Maker. I’ll give you my SVG cut file for these earrings FREE so you can make these versatile and popular earrings for yourself, or to sell! You’ll find out how to download my free SVG file for this project at the bottom of this post.
Want to see all of my Cricut earring & jewelry tutorials? CLICK HERE
Ready? Let’s get started!
This page contains some affiliate links (which means if you make a purchase after clicking a link, I will earn a small commission at no additional cost to you). Read my full disclosure policy here.
CRICUT JOY FAUX LEATHER EARRINGS – Materials List
- A Cricut Joy cutting machine (or another cutting machine of your choice. The Cricut Joy is available on Amazon, here. You can also make these earrings with the Cricut Maker, available at Amazon here, or with the Cricut Explore Air 2.
- Blue painters tape (as needed). This is the key to getting your faux leather to stick well to the green Joy cutting mat. You can get it at any hardware store and most big box or grocery stores. Amazon also has it here.
- Cricut Joy Green Standard Grip Cutting Mat. You’ll get the green mat with the purchase of your Cricut Joy, but you can but extra Joy-sized mats separately on Amazon here.
- Faux Leather in the colors/prints of your choice. I used this solid colored assortment pack from Amazon here. The llama print faux leather is from one of my favorite Etsy shops, Craftyrific.
- Cricut Joy Smart Iron On in the color of your choice (optional). I used Glitter Silver Iron On from Amazon here.
- A weeding tool and a small spatula tool (if you have one). I had all the tools I needed in my Cricut tool set here. You can get also get the basic Cricut tool set at Michael’s here, or from Hobby Lobby, Joann’s, or Walmart.
- A small hole punch (if you plan to punch holes in your earrings after you cut the shapes instead of having the Cricut cut them). This is my go-to hole punch for making Cricut earrings from Amazon here.
- Earring hooks – I used earring hooks from this assortment of earring hooks in different finishes these from Amazon here. Hobby Lobby, Michael’s, and other craft stores, as well as your local bead store, will have lots of earring hooks as well.
- Small jump rings – I used this assortment of 6mm size jump rings in different metal finishes from Amazon here. Again, your local craft store or bead store will have plenty of jump rings to choose from if you want to pick some up in person. You could use 5mm size if that’s what you have, but I wouldn’t go any smaller than 4mm or larger than 6mm for earrings.
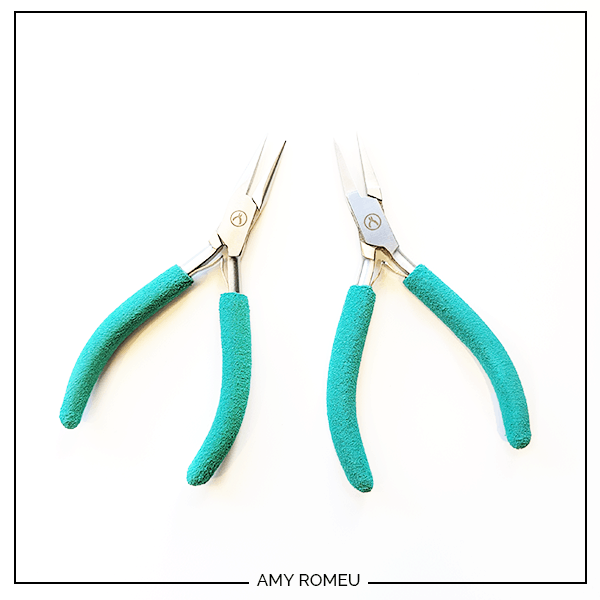
- Two pairs of flat nose pliers – I’m using one pair of wide nose pliers and one pair of needle nose pliers here, but you can use any two flat nose pliers you have in your jewelry making tool box .My favorites are Wubbers brand in the “Baby” size. You can see the Baby Wubbers Chain Nose Piers on the left on Amazon here, and the Baby Wubbers Flat Nose Pliers on the right on Amazon here.
Note: Be sure to check out my post Beginner’s Guide To Jewelry Making Tools for all the information you need to know about buying and using jewelry making tools.
PROJECT INSTRUCTIONS
STEP 1 – Download Free SVG
It’s Design #126 in my FREE Resource Library! You’ll receive the password for the Resource Library instantly after filling out the form below!
Save the zipped folder that downloads to your computer. You’ll need to unzip or extract the files FIRST so you can upload the cutting file to Cricut Design Space.
STEP 2 – Upload SVG To Design Space
After you’ve unzipped the folder and made a note of the file location, open Cricut Design Space and click on NEW PROJECT to get started.
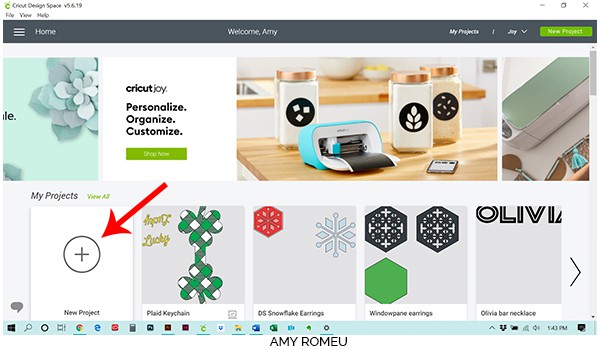
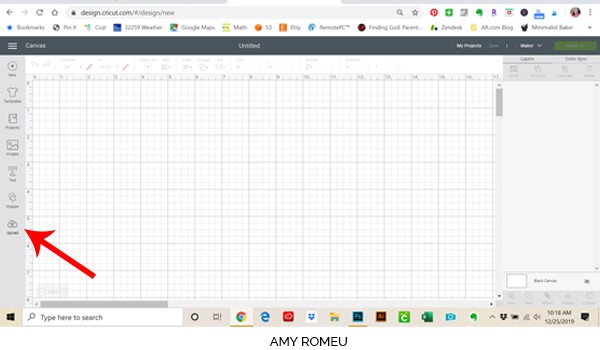
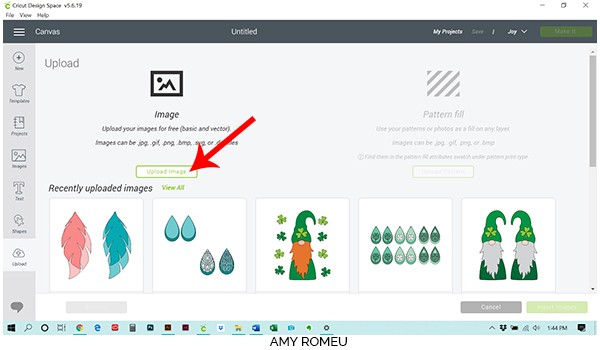
Then click on UPLOAD from the left hand side menu.
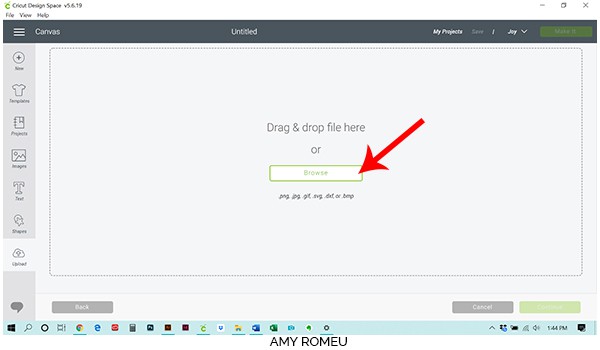
Click on the UPLOAD IMAGE button, then click BROWSE to locate your file.
This earring design has two versions – one with and one without pre-made earring holes. For this project, I’m going to use the version without holes since I’ll be punching them with a hole punch later. You can choose whichever version you want. The Joy – just like the Maker or the Explore Air 2, will cut the holes, but probably not 100% perfectly. It’s up to you if you want the hole marks to be there so you know where you should punch holes with your hole puncher.
Navigate to where you’ve saved the already unzipped SVG file for this project. Double click on the SVG file to bring it into the upload screen in Design Space.
If you get an error message that says “unsupported file type,” you may have clicked on the wrong file, or your SVG file is still zipped.

You’ll see a preview of the earring shapes for this project. Hit the green SAVE button.
After you’ve selected your file to upload, you’ll see it as the first item in your “recently uploaded designs” row.
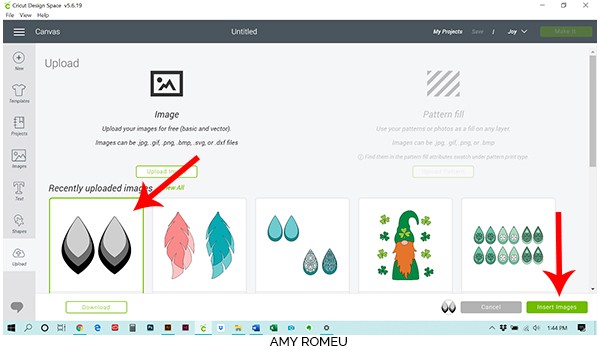
Click on it so it is outlined in green. Then click on the green INSERT IMAGES button in the bottom right corner.
STEP 3 – Prep SVG For Cutting
This brings the three layered earring shapes into Cricut Design Space, formatted specifically for the smaller sized Cricut Joy mat.
First drag the earring shapes up to the top most left corner of the screen. You’ll be placing your material to cut on your mats in the upper left hand corner.
Make sure the Cricut Joy is your chosen machine in the upper right hand corner of your screen (next to the green MAKE IT button). If not, select the Joy as your machine before moving on to the next screen. Then click MAKE IT.

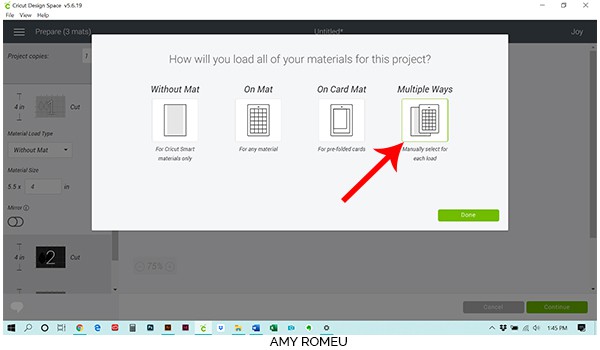
Now you’ll tell the Joy how you want to cut your materials – on a mat, without a mat, or if you’ll be choosing these selections separately. Since I’m going to cut glitter iron-on and faux leather for these earrings, I’ll be choosing the materials separately.
If you will be cutting all of these shapes from faux leather only, you can select ON MAT instead.
Now you’ll set up each mat one at a time, depending on the layer and the material you’ll be using.
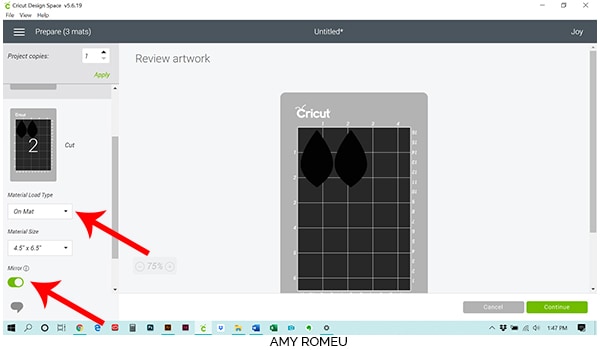
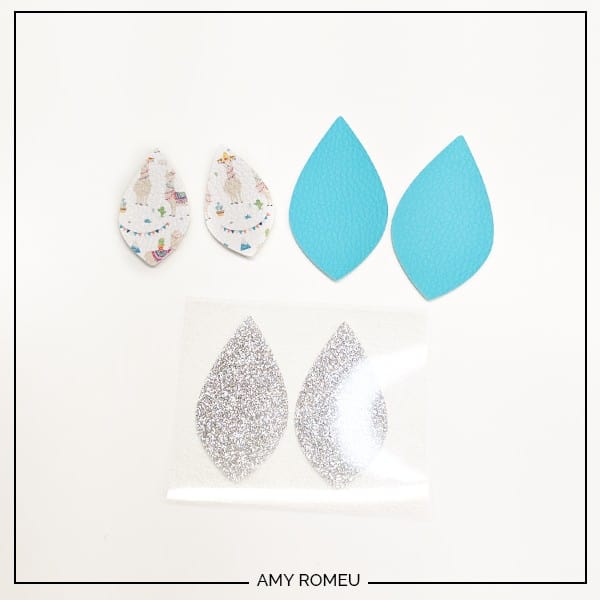
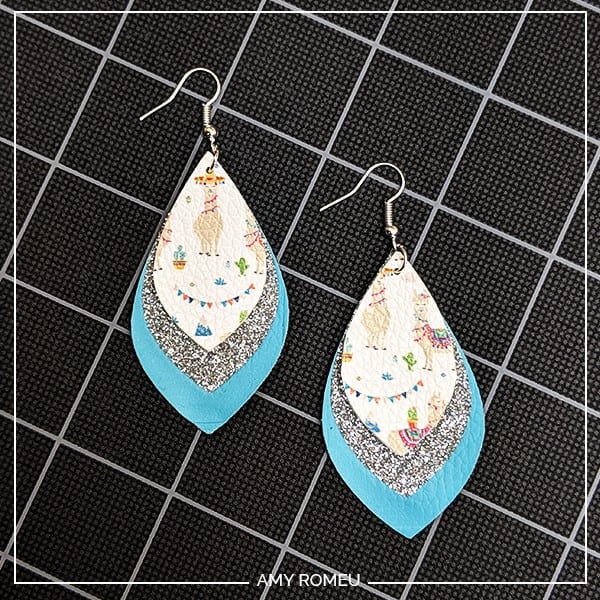
In this cut file, the light grey is the top layer (faux leather), the medium grey is the middle layer (glitter iron on), and the black is the bottom layer (faux leather).
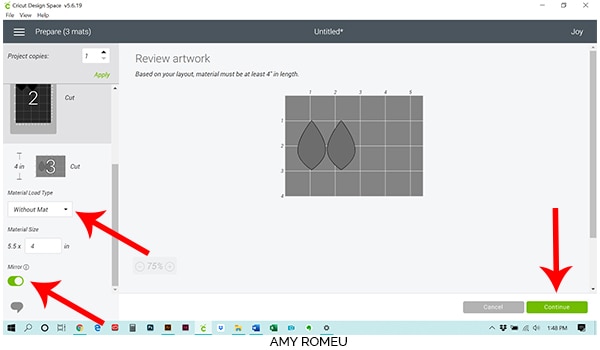
Click on each mat in the mat preview and choose the correct setting. Faux leather layers will cut on a mat, and the Cricut Joy Smart Glitter Iron On will cut without a mat. (If you aren’t using the Joy Smart Iron On product, you can still cut the vinyl using a mat.)
Also toggle the green MIRROR button to on for each layer.
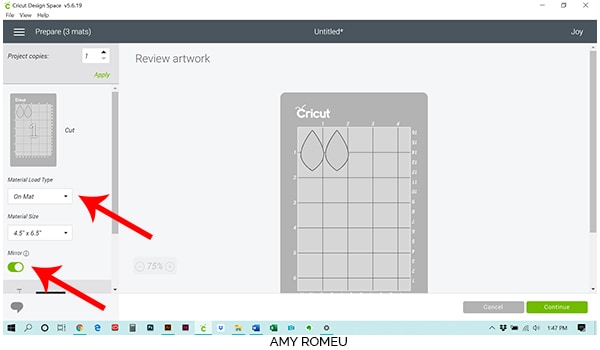
Remember the mat preview doesn’t always show the mats in layer order. Here, Mat #2 in the preview is actually the bottom layer in our earrings. This layer will cut from faux leather on a mat.
Once you’ve chosen the cutting type and mirrored each mat, click the green CONTINUE button.
STEP 4 – Material Selection & Custom Settings
Next we need to choose our material for each mat. In my mat order shown above, the first mat will cut from faux leather on a mat.
NOTE: Your mats may come into Cricut Design Space in a different order, or you may be choosing to use different materials than I am, so use the color coding in the SVG file as your guide. Remember the black shapes are the back layer, medium grey is the middle, and light grey is the top.
On the Materials screen, click on BROWSE ALL MATERIALS on the right.
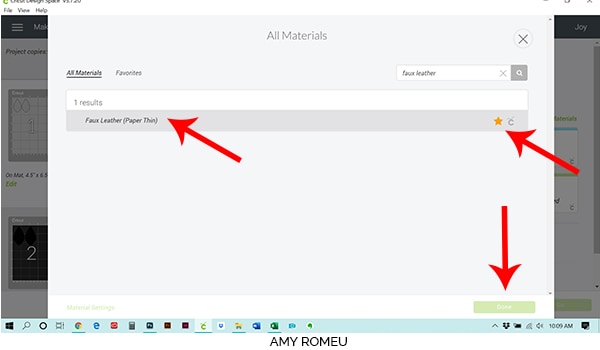
On the next screen, type “faux leather” in the search box.
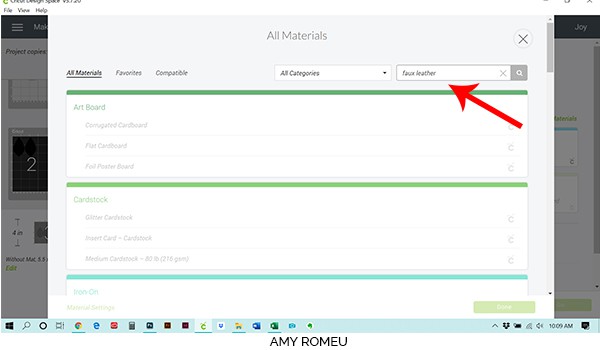
NOTE: If you type “faux leather” and get no results, it’s because you’ve selected “no cutting mat” on the previous screen. The Joy is smart and knows it can only cut faux leather on a mat. In that case, go back to the mat preview and double check the mat cut selection for the mat you are trying to cut.
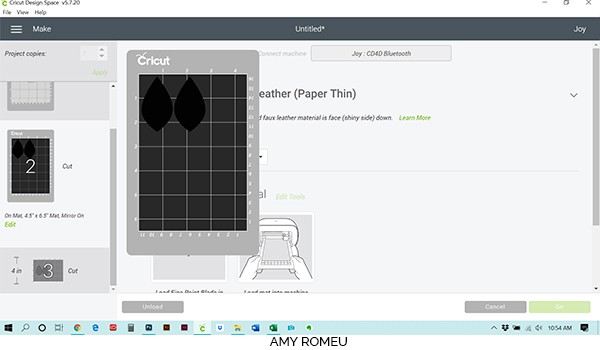
Once you’ve typed Faux Leather, it should pop up on the screen as Faux Leather (Paper Thin). This is the material setting I use 95% of the time when cutting faux leather (no matter if I’m using the Maker or the Explore Air 2). While the faux leather material is NOT paper thin, this setting is an automatic double cut, which seems to do the trick, especially for simple shapes like these.
Click on Faux Leather to select it as your material. I also recommend clicking on the yellow star, which will make this material a “favorite” of yours and easy to find when you have to cut your next faux leather mat. Then click the green DONE button.
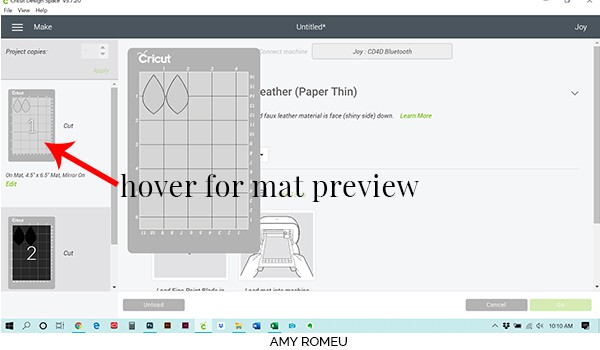
You’ll come back to your mat preview screen. On a desktop, you can hover your mouse over the small mat on the left hand side to see a larger preview. Take note of the size of material you need to cut these shapes on this mat. For this cut, we need a piece of material just larger than 2 inches square.
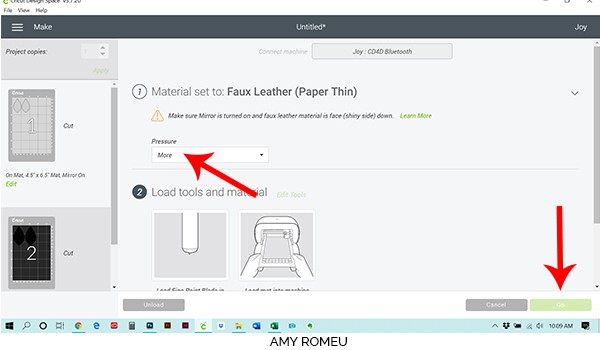
I like to select “More” as the cutting pressure, but you may be ok with just the “Default” setting. You’ll have to do a few test cuts to get a feel for how your Joy cuts your particular material.
The next step is to load your material on the mat. We’ll do that in the next step. Once the mat is loaded, you’ll be able to press the green GO button, but not yet!
STEP 5 – Prepare Mats For Cutting
Gather your materials for this next step. You’ll need your Cricut Joy small green mat, your faux leather, and some blue painter’s tape.
Cut your faux leather just slightly larger than the measurements you noted earlier. Press it pretty side down firmly to your mat. Then tape the faux leather down all the way around with blue painter’s tape.
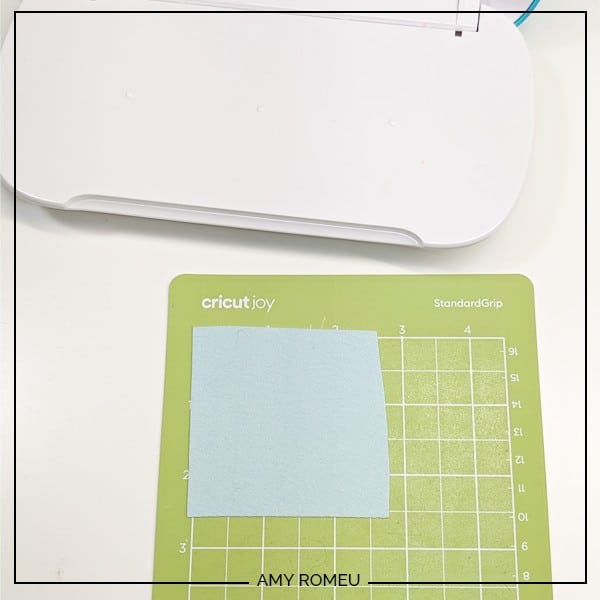

Load your mat into the Cricut Joy. Then press the GO button, and your machine will start cutting.
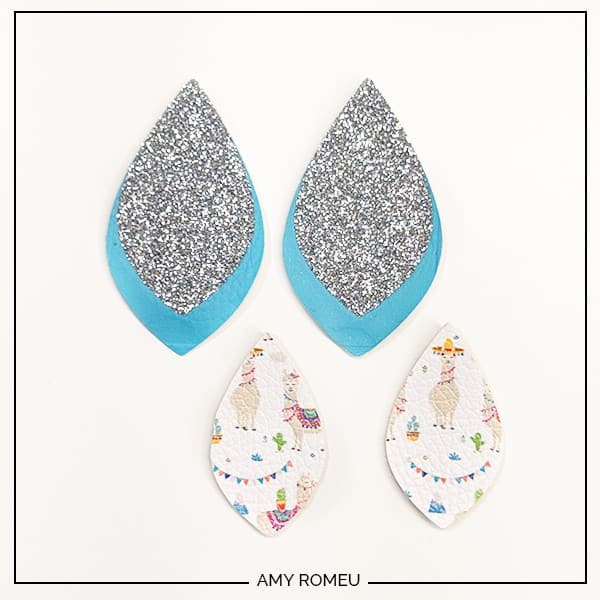
When the Joy is finished cutting, it will prompt you to unload the mat. Remove your earring shapes.
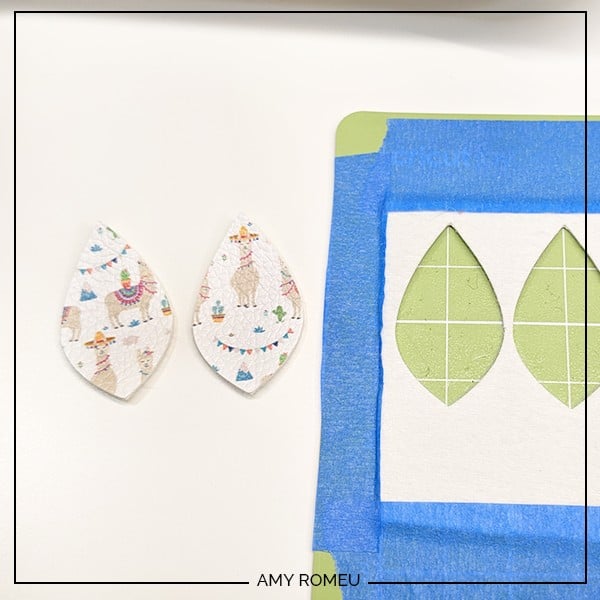
The next mat to cut is the black shapes, which are the back layers of the earrings. I cut those from faux leather also, so I just repeated the steps for cutting the first mat by selecting Faux Leather as my material. After the bottom layer shapes cut, unload the mat and remove the earring shapes.
The third mat is the center layer of the earrings, and I’m going to cut these shapes from Cricut Smart Iron-On Glitter. I’ll iron the shapes on to the bottom faux leather earring layer. If you don’t want to use iron on, you don’t have to! You can just cut this layer from faux leather also. It’s up to you.
You can also cut glitter vinyl using a mat – that’s what my daughter has been doing with all of my large rolls of glitter vinyl! Don’t feel like you have to use the Smart materials with the Joy if you already have glitter vinyl on hand.
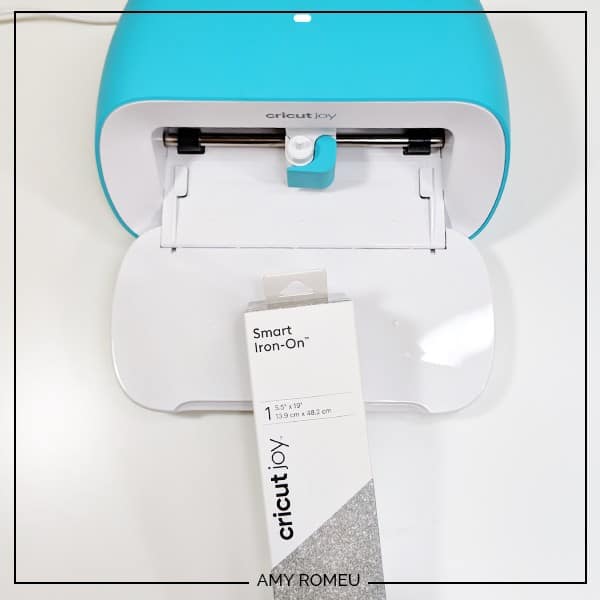
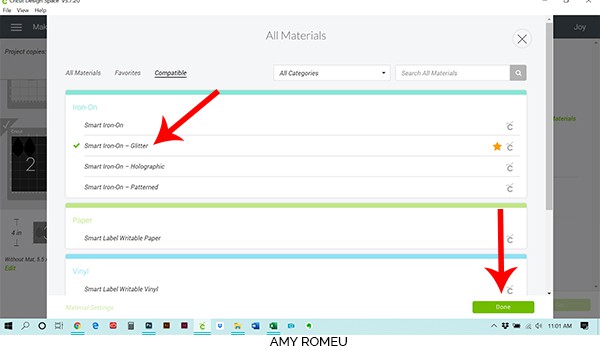
If you are going to use Smart Iron-On – Glitter like I did, you’ll need to select is as your material. Choose Browse All Materials. If you don’t see Smart Iron-On – Glitter, you can search for it in the search box. When you find it, click the yellow star to make it a favorite. Then click the green DONE button.
Cricut Design Space will remind you to make sure the material is mirrored, and to put the iron on shiny (glitter) side down. Remember this material cuts without a mat.

Press the green GO button and the Joy will start cutting the glitter iron on.
When the Cricut Joy is finished cutting, Design Space will prompt you to unload your mat. Trim the glitter vinyl from the large sheet and weed away the excess.
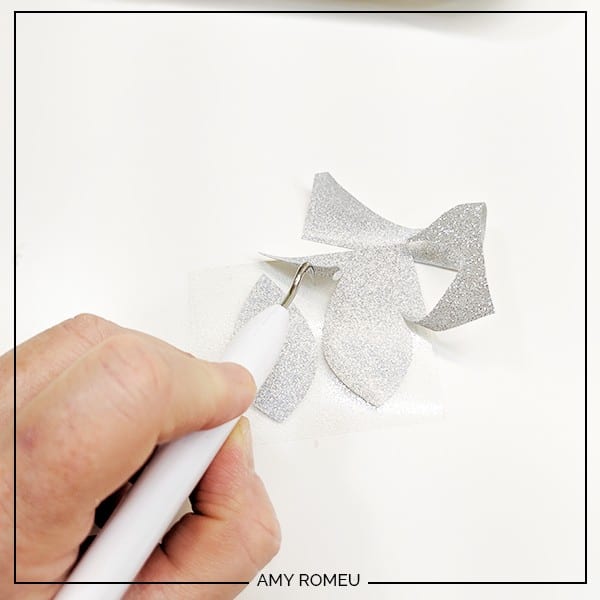
Now your earring shapes are ready for the next step.
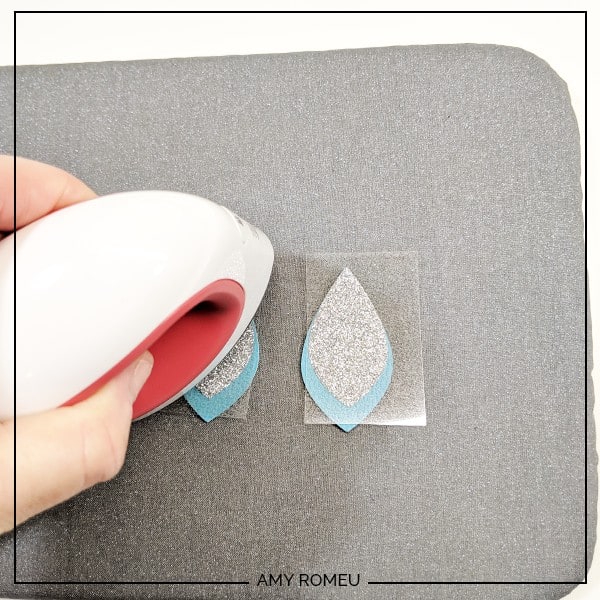
STEP 6 – Heat Press Glitter Vinyl to the Earrings
I’m using my Cricut Easy Press Mini to press the iron on glitter shapes to the faux leather. I’m also using the Easy Press Pressing Pad and a small teflon sheet to cover the earrings before pressing them – I’m not using the teflon sheet in the photos, though, so you can see what I’m doing.
Move the Easy Press continually over the earrings as you press the glitter layer to the faux leather layer.
The Cricut Heat Press Guide recommends using Low heat, pressing for 30 seconds, and then peel cool.
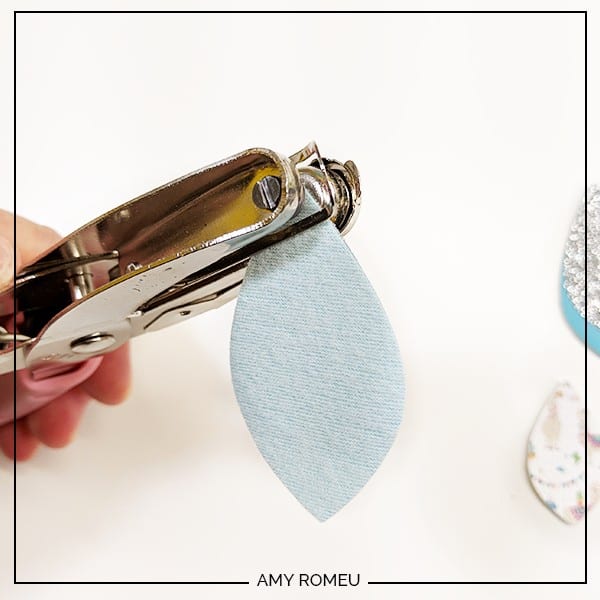
STEP 7 – Punch Earring Holes
I use a 1/16″ paper punch for all of my faux leather earring holes. I got it from Amazon here. I like to punch one earring hole first, and then use it as a template to punch the other layers.
STEP 8 – Attach Jump rings & Earring Hooks
Now it’s time to assemble the earrings. You’ll need small jump rings, earring hooks, and two pairs of flat nose pliers.
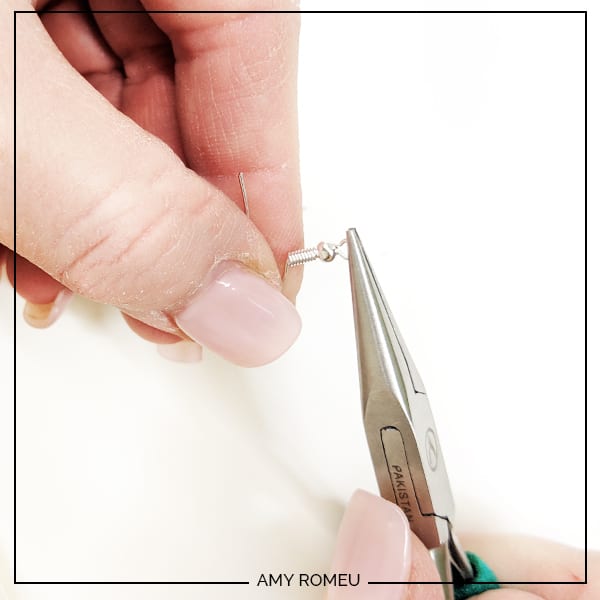
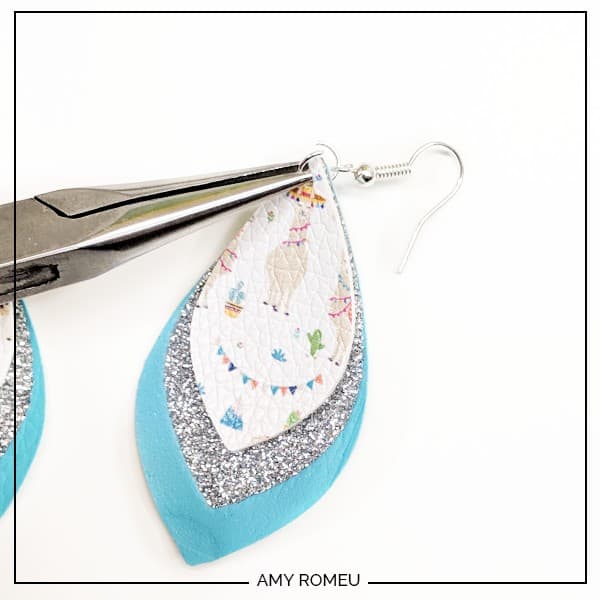
First you need to turn the bottom loop on the fishhook sideways so your earring will hang correctly. See the image below to see how the orientation of the earring hook has to change so your earrings will hang correctly.

You’ll do this using one pair of flat nose pliers. While holding the hook firmly between two fingers, grip the entire earring loop between the pliers and twist your wrist until the loop is perpendicular to the earring post. Repeat with the second earring hook.
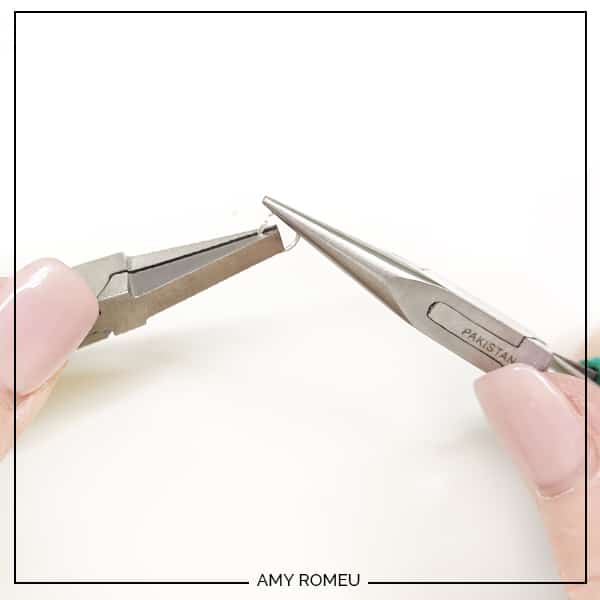
Now you’ll need to open your small jump ring to slide the faux leather earring shapes and the earring hook on. Using two pliers, grip each side of the jump ring, making sure the opening in the jump ring is facing up (the twelve o’clock position).
Rotate one wrist forwards or backwards, so the circle creates an opening but doesn’t bend out of it’s circle shape.
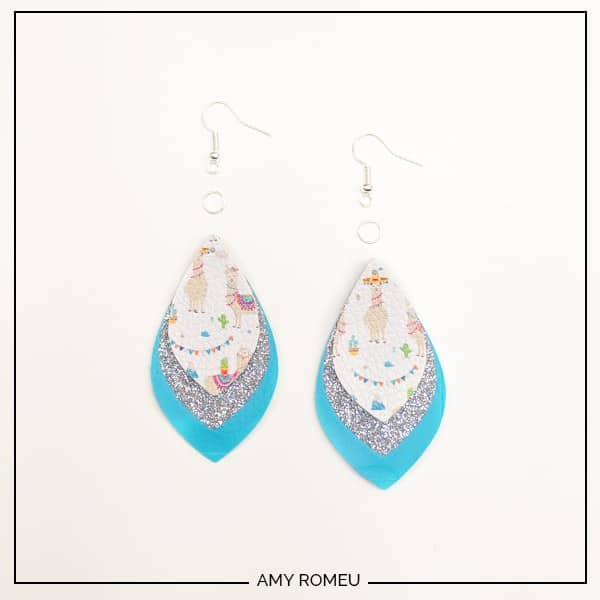
Slide your faux leather earring shapes in size order onto your jump ring, then slide your earring hook onto the jump ring.
Pay attention to which side is the front of your earring as you do this. Double check your shapes and hook are all facing the right direction.
Then use your two pliers to close the jump ring again using a wrist twist in the opposite direction. This takes a little practice, but you’ll get it!
Repeat with the other earring. That’s it!
Are you going to try this project? If you do, please post a comment and attach a photo of your finished earrings and let me know if you liked making earrings with the Cricut Joy!
If you liked this project and want to see all of my Cricut Jewelry tutorials, click here.
Until next time… and happy creating!

Want the FREE SVG file you so you make these CRICUT JOY EARRINGS yourself?
It’s Design #126 in my FREE Resource Library! You’ll receive the password for the Resource Library instantly after filling out the form below!
Want to remember this? Post this CRICUT JOY EARRINGS project to your favorite Pinterest board!
Does faux leather be us with cricut joy
Hi, Priscilla! Yes, you can cut faux leather with the Cricut Joy! My tutorial shows you exactly how I did it! Thank you.
Amy
I cannot get my Joy to cut through the faux leather sheet. I used this tutorial and it will cut the back side of the leather but doesn’t cut through the leather itself. What am I doing wrong?
Hi, Heather!
Thanks for your message. Are you repeating the cut as necessary? Often it takes 2 or 3 repeated cuts to completely cut through the faux leather.
If it’s not cutting through at all, it could be that the faux leather piece is too thick, or your blade is not inserted correctly into the blade holder.
Thank you.
Amy
What do I need to type into the search box to find the SVG file for these earrings?
Hi, Amy. The SVG for the Cricut Joy earrings is Design #126 in my Resource Library. Thank you.
Amy
Hello! I just got a new Cricut Joy and am still learning how to use it. I’m super excited to try making these earrings! Thank you for sharing 🙂 What is the thickest (in millimeters) faux leather that can be cut with a Cricut Joy? Is it 0.7 mm? 1 mm? Maybe something less or in between?
Hi, JP! Thanks for your comment. I’m not sure what mm size, honestly. I cut all the same faux leathers with my Joy that I do with my larger machines. The only faux leathers I haven’t been able to cut with the fine point blade (the blade in the Joy, the Maker, and the Explore Air 2) is the double sided faux leather. Everything else – including chunky glitter – will cut on the Joy. 🙂 I hope that helps!