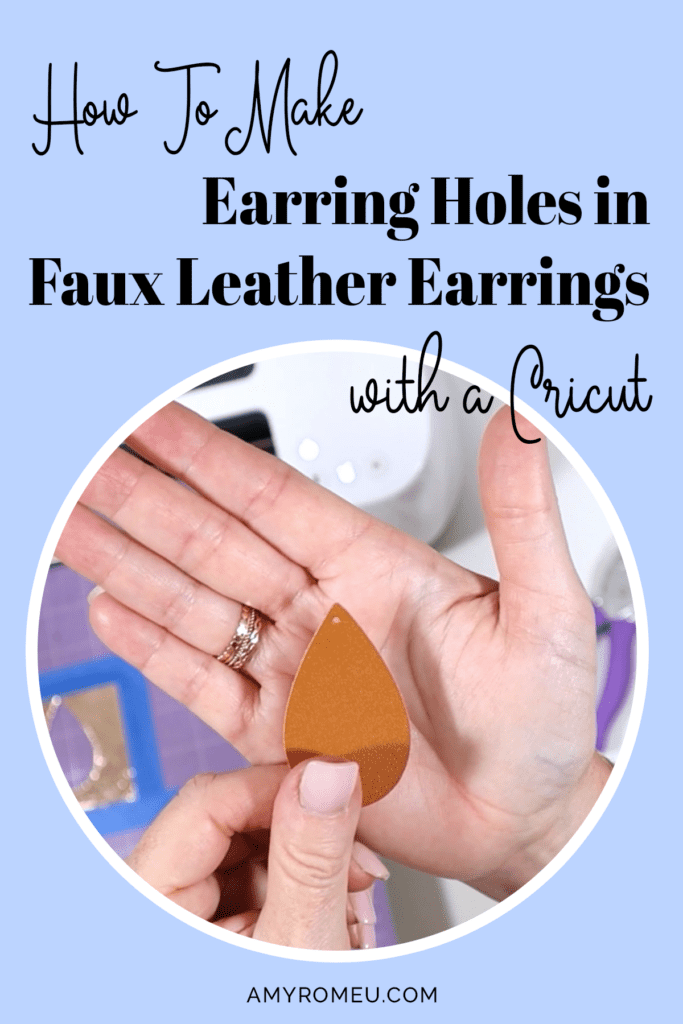
How to Make Holes in Faux Leather Earrings
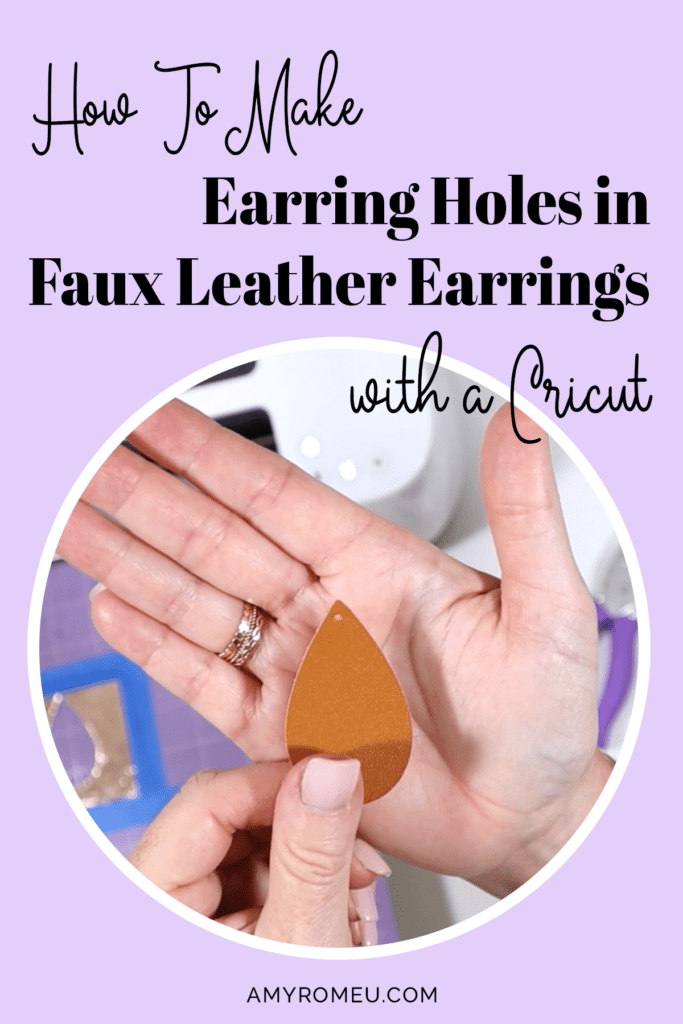
How to Make Earring Holes with a Cricut
Are you interested in making faux leather earrings, but have questions like how to make holes in earrings on a Cricut, what size hole punch to use for faux leather earrings, or how to keep faux leather earring holes from tearing?
I had all the same questions when I started making earrings with my Cricut and needed to put holes in my faux leather earrings. So I started experimenting.
I soon learned that the Cricut can cut faux leather earring holes, but it doesn’t always cut the earring holes all the way through. Also, there are times you may want to move the hole to another location or change the earring size (which requires a resized earring hole).
As a result of my trial and error, I’ve put my best tips about how to put earring holes in faux leather earrings into this post for you. If you’d rather watch a YouTube video, you can do that here:
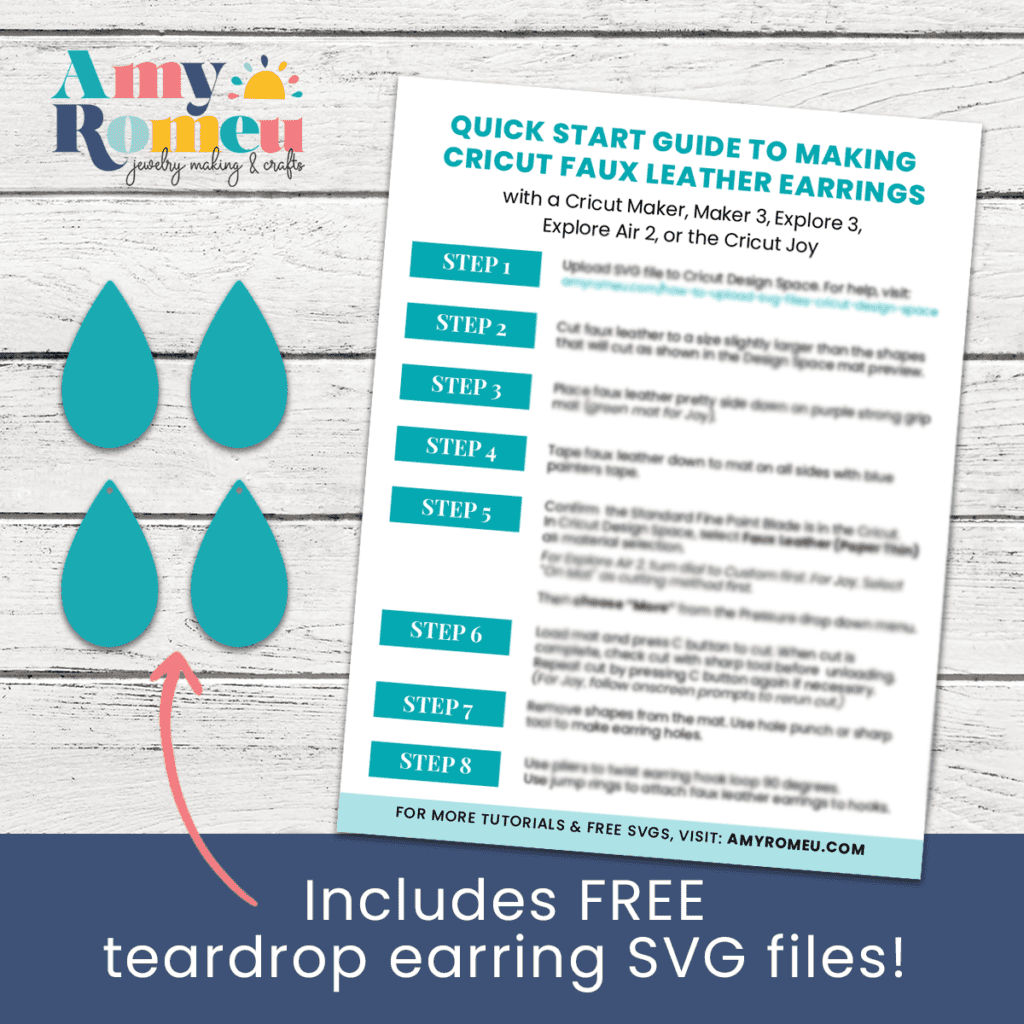
If you want to follow along and test out some of the earring holes tips I’ll be sharing in this post and in my YouTube video, you’ll want to get my printable Cricut Earrings QuickStart Guide and my most popular teardrop earring SVG file, completely free! You can click the button below to request both the SVGs and the Quickstart Guide be sent straight to your inbox:
How to Put Earring Holes in Faux Leather Earrings
This page contains some affiliate links (which means if you make a purchase after clicking a link, I will earn a small commission at no additional cost to you). Read my full disclosure policy here.
CRICUT FAUX LEATHER EARRINGS MATERIALS LIST
- A Cricut cutting machine (or another cutting machine of your choice). I used the Cricut Maker, but you can use the Cricut Maker 3, the Explore Air 2 or Explore 3, or the Cricut Joy.
- The Cricut Maker 3 is available on Amazon here or the Cricut website here.
- The Cricut Maker is available on Amazon here or the Cricut website here.
- The Cricut Explore 3 is available on Amazon here or the Cricut website here.
- The Cricut Explore Air 2 is available on Amazon here or the Cricut website here.
- The Cricut Joy is available on Amazon here or the Cricut website here.
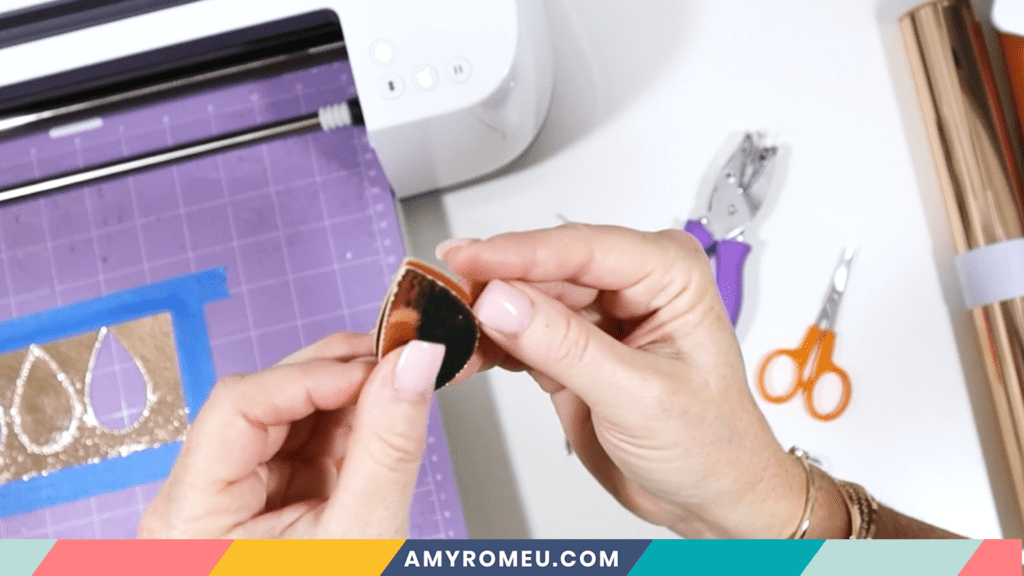
- The brown faux leather I used for these earrings is on Amazon here.
- The Cricut Rose Gold foil iron-on I used for the back is on Amazon here.
- Purple Cutting Mat
- Green Cutting Mat
- Weeding Tools
- Cricut Easy Press Mini
- Cricut Easy Press Mat (8×10 size)
- Earring Hole Punch (or this one)
- Earring Hooks
- Jump Rings, Gold or Jump Rings, Silver
- Flat Nose Pliers and Wide Flat Nose Pliers
- Teflon Cover Sheet or Parchment Paper.
MANUAL vs. MACHINE EARRING HOLES
There are basically two ways to make earring holes in faux leather earrings.
The first way is to let the cutting machine, like a Cricut or Silhouette, cut the earring holes. You’ll either need an earring SVG shape that already has the hole incorporated into the design, or you can add your own earring hole to the SVG before cutting. More on this in a bit.
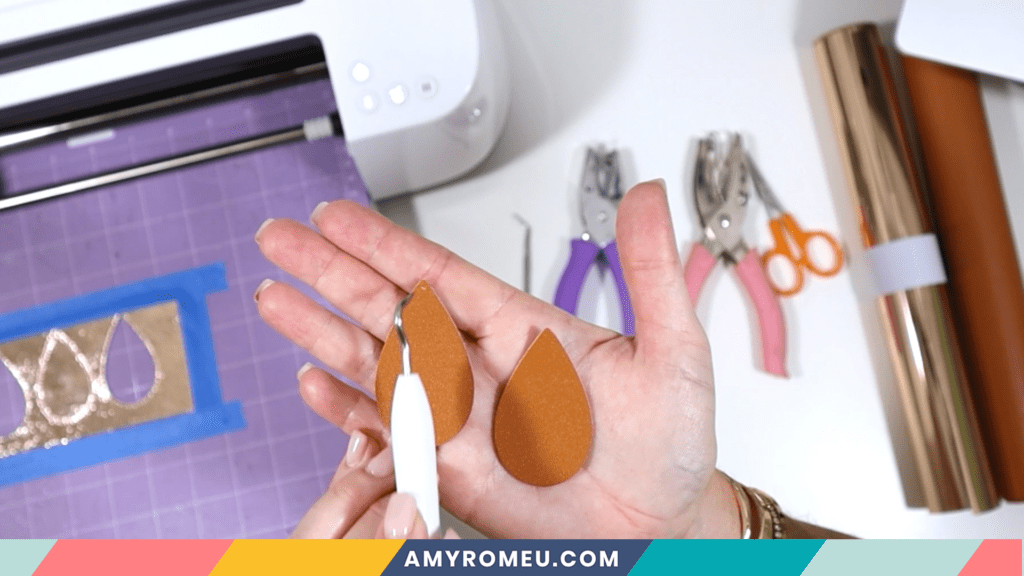
The second way is to make the earring holes in faux leather earrings manually. You can do this in a pinch with a sharp object like a safety pin or the tip of your weeding tool.
But if you plan to gift or sell your earrings, you’ll want to make a minimal investment in a tool that will punch the earring holes neatly and consistently.
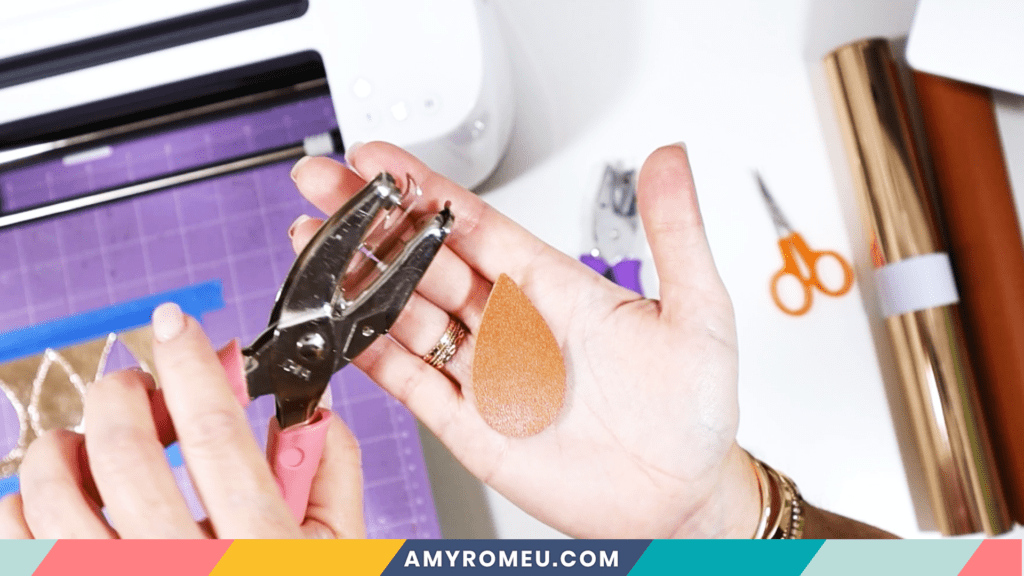
I use a 1/16″ hole punch from Amazon to make earring holes in faux leather earrings. It looks like this:
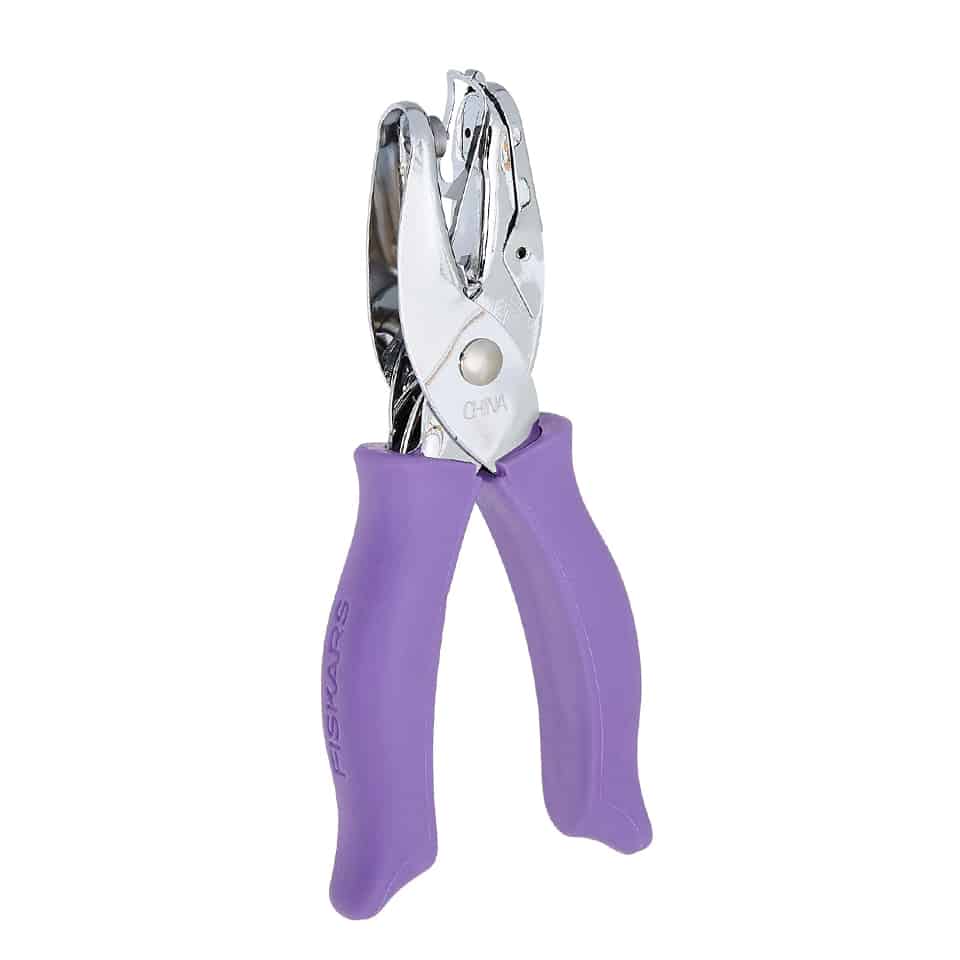
The availability of my favorite hole punch changes from time to time, so I’ve bought others. Sometimes they have different colored handles, but they all work the same way.
This one works well, too.
These hole punches are marketed as “paper punches” but I regularly use mine to punch through two layers of faux leather at a time. They are very durable and last a long time.
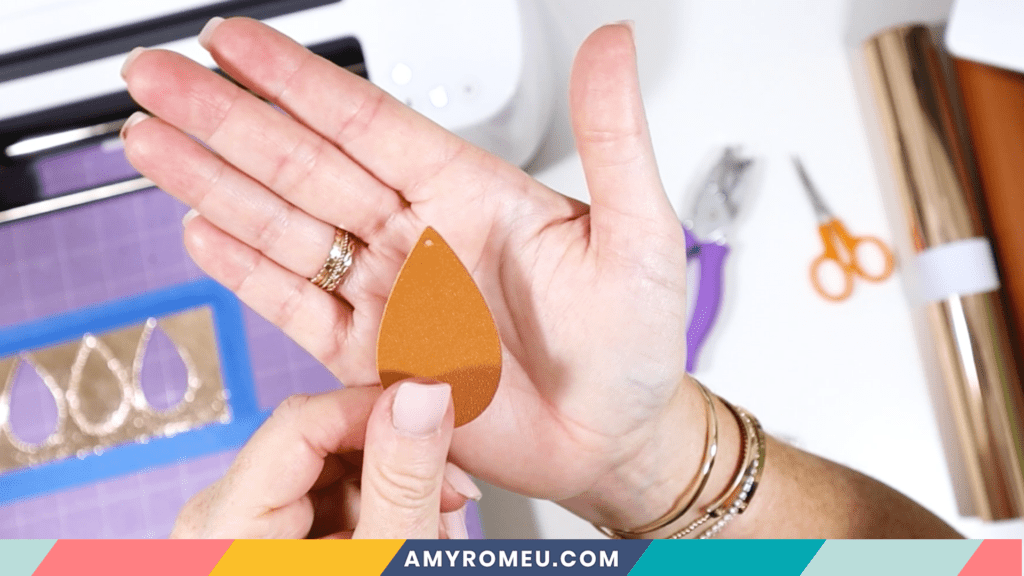
To use them, carefully line up the desired location for the earring hole with the post of the hole punch. Gently squeeze and release.
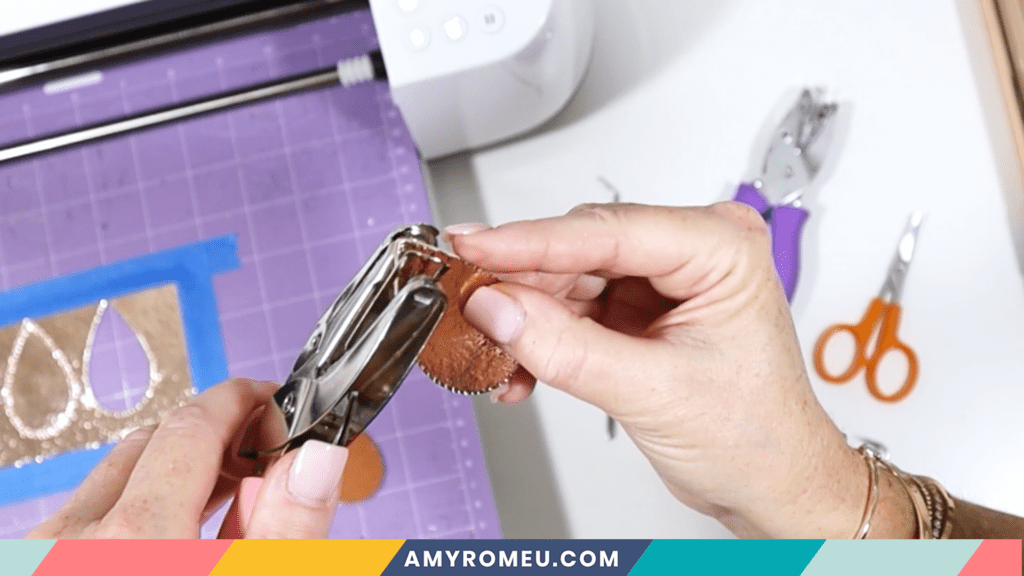
I like to put both earring halves front to front and punch both holes at the same time. This ensures both holes are in the same location on the earring blanks.
WHICH WAY IS BETTER?
Most people wonder which way is best – machine cut or manual.
But I’ve found it’s best to use a combination of the machine cut and manual hole punching techniques.
This is largely because the Cricut doesn’t always cut the earring hole completely through. If the hole isn’t cut completely, it’s necessary to manually punch the earring hole, and the 1/16″ hole punch results in a nice, clean earring hole cut.
So then why wouldn’t you just punch all of the earring holes using a hole punch?
What I like to do is let the Cricut make the earring hole cut first even if I know it may not cut all the way through. Then I follow up with the hole punch if necessary because that way I know exactly where the hole should be made. This created perfect earring hole placement so the earrings look professional, symmetrical, and they hang the exact same way.
HOW DO YOU KEEP AN EARRING HOLE FROM CUTTING WITH A CRICUT?
Now that you know how to make earring holes in faux leather earrings… what if you want change or hide the current earring hole, or create your own earring hole?
You can do all of these things easily in Cricut Design Space.
Sometimes you may want to “hide” an earring hole in a faux leather earring SVG to keep it from cutting. Why would you want to do that? Here are some reasons:
- This could be because the hole is too close to the edge and you want to keep the earring hole from tearing.
- It also could be because you prefer using the hole punch to make the earring holes in faux leather earrings.
- Or you may want to resize the earring SVG and you’ll need a new, appropriately sized earring hole.
- Or you may want to change the location of the earring hole altogether (if you want the earrings to dangle a different way, for example).
No matter the reason, you can easily hide an earring hole to keep it from cutting by using the “Contour” feature in Cricut Design Space.
After uploading your earring SVGs to Cricut Design Space, you have to first UNGROUP them so you can manipulate them individually.
Select all of the grouped earring shapes and then click UNGROUP at the top of the Layers panel.
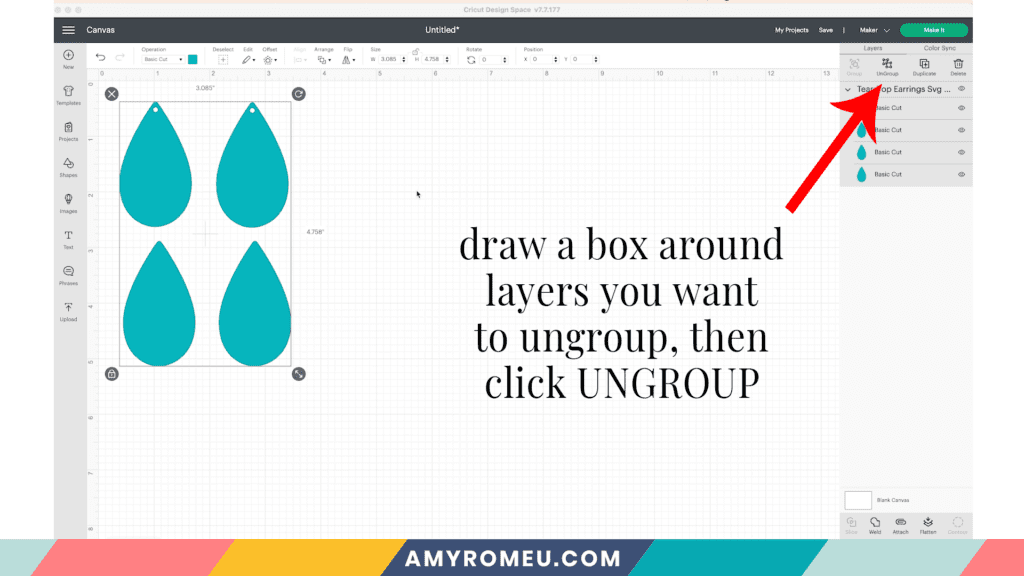
Then click on one of the earring shapes with a hole and click on CONTOUR below the Layers panel.
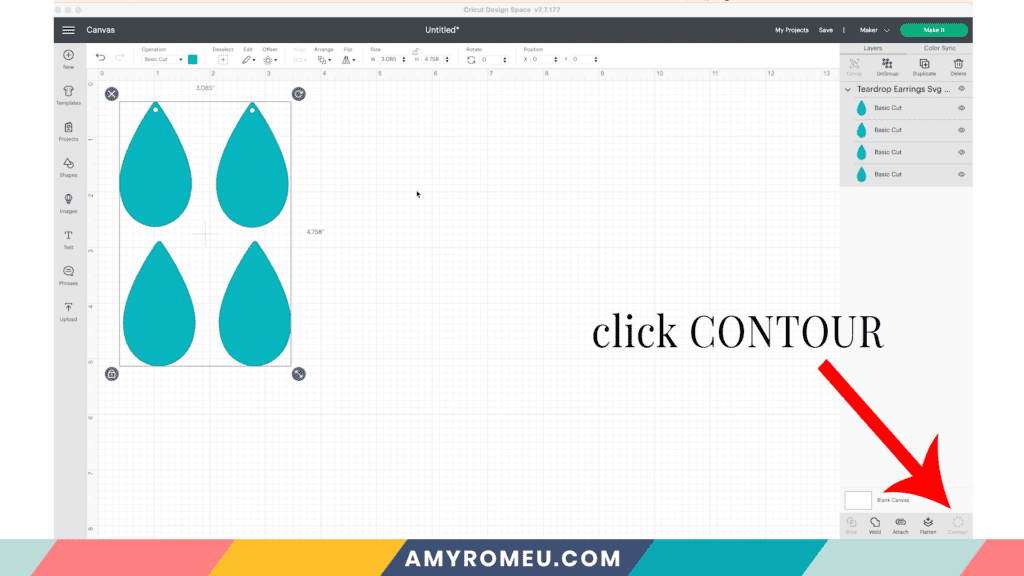
The Contour panel will pop up and you’ll be able to see all of the cuts the selected shape is made of.
You can click on the small circle (the earring hole) either on the image of the earring itself, or on the layers panel inside the Contour menu.
The hole will become greyed out and will disappear from the earring shape on the canvas.
Close out of the CONTOUR window to return to the canvas.
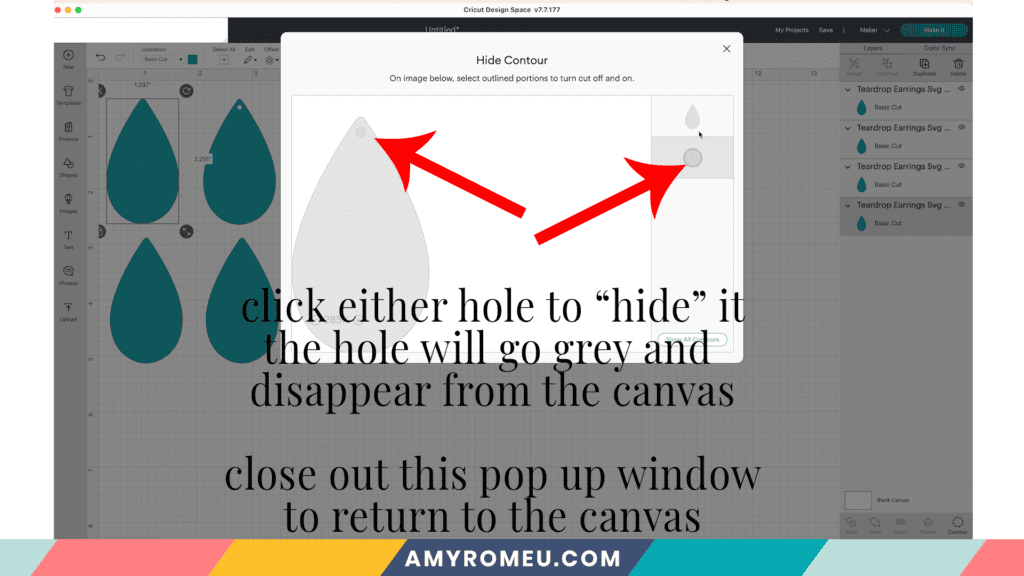
Now the earring hole is hidden and will not cut. Repeat this process for any other earring holes you don’t want to cut.
HOW DO YOU MAKE YOUR OWN EARRING HOLES WITH A CRICUT?
You may need to create your own earring hole for a variety of reasons mentioned above.
This is also easy to do in Cricut Design Space.
First click on the SHAPES option from the side panel. Then select the circle shape.
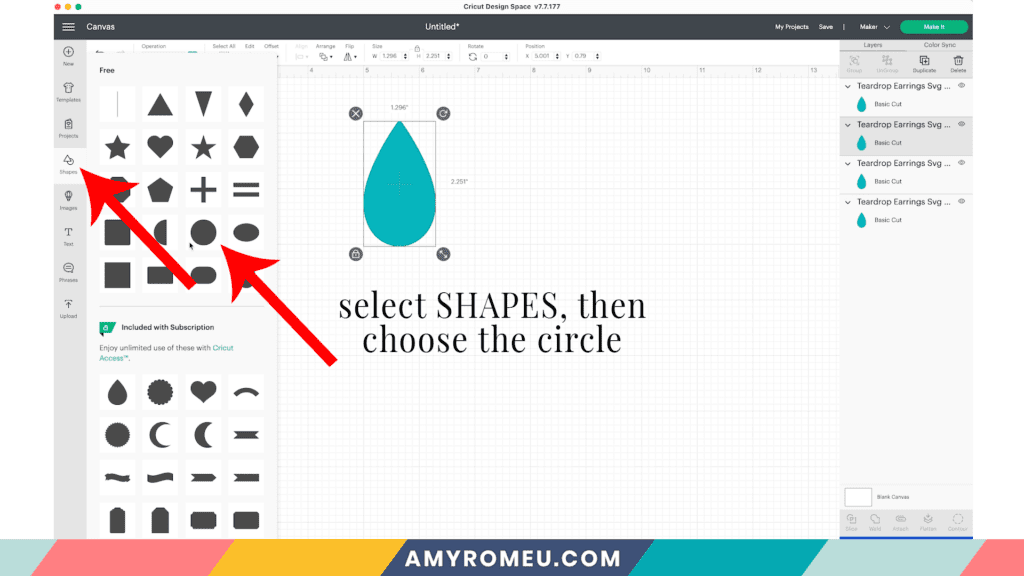
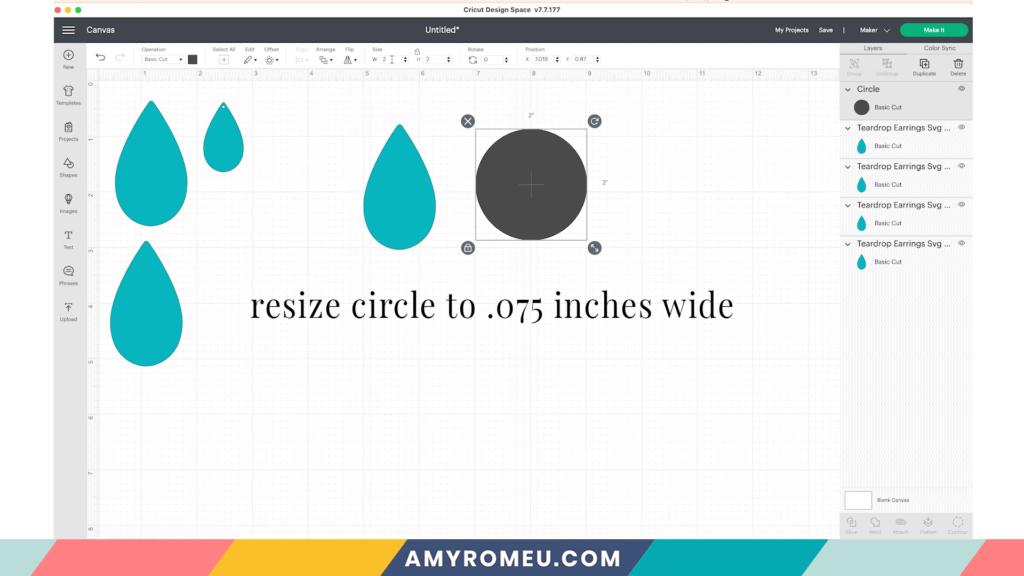
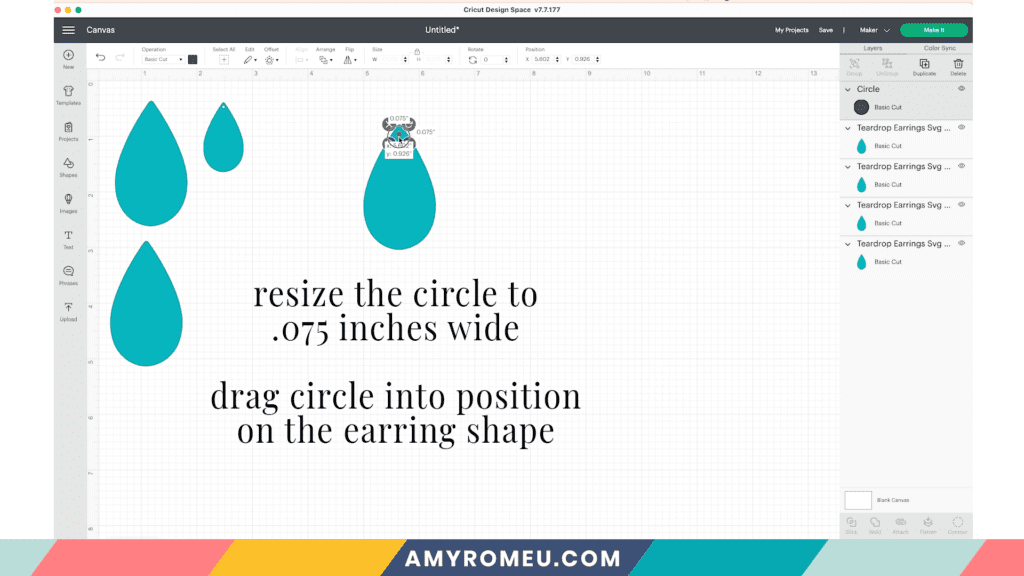
The circle that imports onto your canvas will be too large for an earring hole. Resize the circle to be .075 inches wide and .075 inches tall (be careful – .075 is not the same thing as .75).
Drag the new, smaller circle into the general location of the top of the earring shape.
The key is to position the hole as far away from the edges as you can while still being able to connect a jump ring through the hole. This may take some practice.
Once the earring hole is resized and in the right position away from the top edge of the earring shape, select both the earring shape and the circle. While both shapes are selected, click ALIGN from the top menu. Then choose CENTER HORIZONTALLY.
This will align the earring hole with the vertical center of the earring shape.

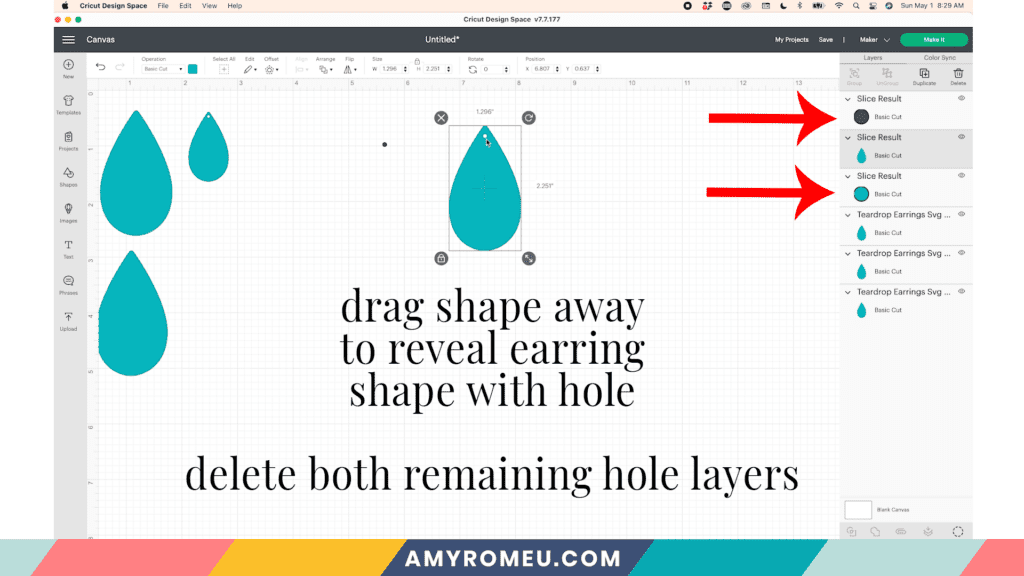
Then while both shapes are still selected, click SLICE at the bottom of the Layers panel.
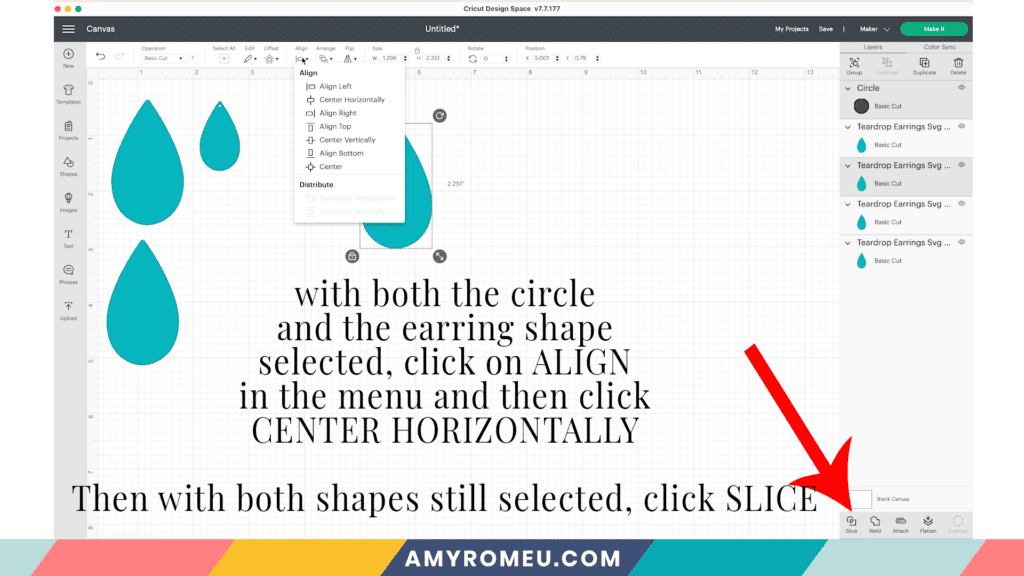
Slicing will cut out the circle shape from the earring shape. You may not see any changes on your canvas right away, but your Layers panel will change.
Instead of two shapes – an earring and an earring hole – you’ll now have a third shape – the cut out remains after the slice action.
You can see this better if you drag the earring shape to a new location.
You can now delete both remaining hole layers from your canvas.
I always like to make ONE earring shape with a hole first, then DUPLICATE that shape to create the second earring.
That’s it! You’ve made a pair of earring shapes with holes.
If you want to watch how I create simple earrings from a completely new shape in Cricut Design Space, be sure to watch the YouTube video at the top of this post.
WANT TO LEARN MORE ABOUT MAKING FAUX LEATHER EARRING WITH A CRICUT?
If the idea of endlessly searching the internet for information on how to make faux leather earrings with a Cricut sounds frustrating, I totally get it! I felt that way, too, when I was just starting out. That’s why I created my Cricut Earrings Made Easy Workshop. This instant access workshop has all the information you need to get started making earrings with your Cricut. It also includes step by step video tutorials, a printable workbook, and 12 of my best selling earring cut file templates, so you can get started making earrings right away.
If you want to learn more about the Cricut Earrings Made Easy Workshop, click the link below!
WANT TO LEARN HOW TO MAKE EARRINGS WITH A CRICUT?
My best selling workshop Cricut Earrings Made Easy is available now!
Includes instant access, step-by-step video tutorials and 12 of my best selling earring template SVG cut files. Printable workbook, convenient shopping list with links, and more.

Finally, I want to offer you my FREE Printable Cricut Earrings QuickStart Guide with all the essential steps you need to take to make your first pair of earrings with a Cricut. Instructions include the Cricut Maker, the Maker 3, the Cricut Explore Air 2, the Explore 3, and the Cricut Joy.
You’ll also get a free pair of teardrop earring shapes to experiment with!
Just click on the button below to get your FREE Cricut Earrings Quickstart Guide & Teardrop SVG file sent to your email inbox right away:
I hope you found this post helpful! If you have any questions about making faux leather earrings, or if you want to show me what you’ve created, I’d love to hear from you! Please reach out to me at [email protected].
Until next time… and happy creating!

WANT TO REMEMBER THIS? PIN HOW TO MAKE HOLES IN FAUX LEATHER EARRINGS TO YOUR FAVORITE PINTEREST BOARD!