
DIY Personalized Photo Keychain

DIY Personalized Photo Keychain
I am a sucker for personalized gifts. I admit it! Anything with a name or a photo, and I’ll all over it. If you love personalized photo gifts as much as I do, then you’ll love this DIY Photo Keychain tutorial! I made these personalized photo keychains with faux leather and a Cricut cutting machine, but you don’t need a cutting machine for this project. You can absolutely cut the materials by hand – I’ll show you how in this tutorial.
If you are using a Cricut to make these, you can add your own custom text to your personalized photo keychain as well. I’ll show you how to do that easily using heat transfer vinyl and the text tool in Cricut Design Space.
I used my Cricut Maker, but you can also make them with the Explore Air 2, or even the Cricut Joy (check out this post for info on exactly how to cut faux leather with the Cricut Joy here.)
These personalized photo keychains make great gifts, for the holidays, or anytime of year. If you want to try this project yourself, I’m giving you my original SVG cut files for four keychain shapes FREE! You’ll find out how to download my photo keychain SVG templates for this project in the Materials section of this post, and at the very bottom of the tutorial.
If you’d rather watch a video tutorial, you can watch the YouTube video here:
Want to see all of my Cricut earring & jewelry tutorials? CLICK HERE
Ready? Let’s get started!
This page contains some affiliate links (which means if you make a purchase after clicking a link, I will earn a small commission at no additional cost to you). Read my full disclosure policy here.
DIY Personalized Photo Keychain – Materials List
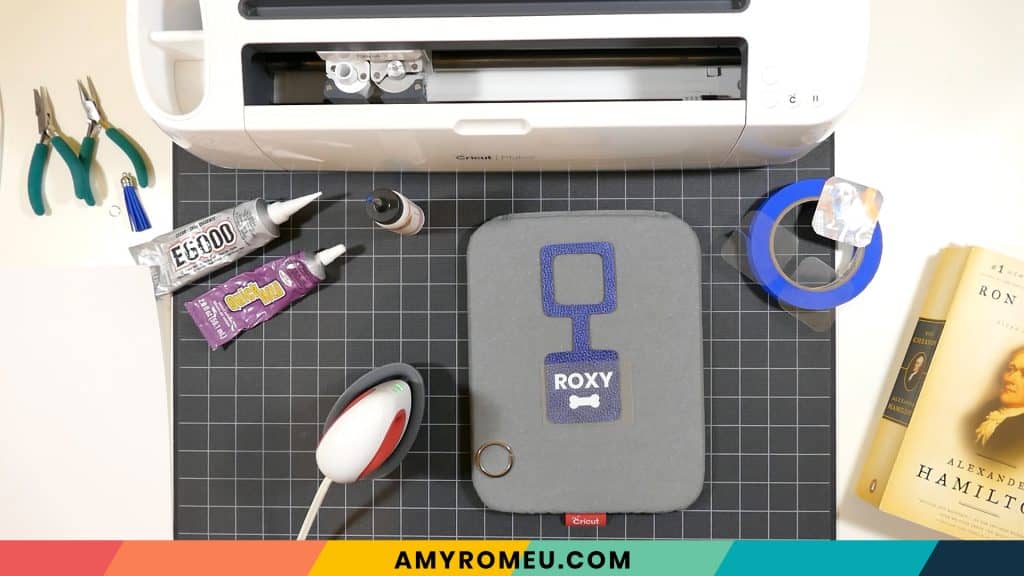
If cutting by hand, you just need the following from the supply list: scissors, glue, faux leather, mylar sheets, and a key ring. A jump ring and tassel are optional.
- A Cricut. I have the Cricut Maker, available at Amazon here. You can also use the Cricut Explore Air 2 or even the Cricut Joy, on Amazon here. You can see all of these machines available on Cricut.com here.
- Cricut Strong Grip (Purple) Cutting Mat. Get a purple mat on Amazon here, or at any craft store. (If you are using the Cricut Joy, you’ll use the green cutting mat instead.)
- Cricut Standard Grip (Green) Cutting Mat, available on Amazon here. This is the mat that comes with the Cricut.
- Faux Leather of your choice. For this project, I used this matte metallic navy blue faux leather from this assorted pack from Amazon. For the other keychains in the photo, I used this red pebbled faux leather from Amazon, and this brown smooth faux leather and this black and white buffalo plaid faux leather from one of my my favorite Etsy shops here.
- HTV Vinyl in the color of your choice. You can use Cricut Every Day Iron On from here or Siser EasyWeed from Amazon here. You can also use glitter heat transfer vinyl, or even permanent vinyl if that’s what you have on hand.
- Mylar/acetate sheets (to create a window that protects the photo). You can cut these by hand, or with a cutting machine. I bought these mylar stencil sheets from Amazon here.
- Blue painter’s tape. This will help keep your faux leather firmly in place on your cutting mat, without damaging your mat or your material. You can get it at any hardware store, or you can get it on Amazon here.
- A Cricut Easy Press or a Cricut Easy Press Mini (what I use to make earrings and keychains). I bought my Easy Press Mini from Amazon here.
- If you will be using the Easy Press Mini, you’ll need an EasyPress Mat to safely press your items on. I use the 8×10 size, available on Amazon here.
- A weeding tool or a sharp pointed tool and craft scissors. I use the weeding tool and scissors from my Cricut tool set here.
- Glue. My favorite is Art Glitter Glue with the precision tip. It doesn’t have glitter in it! You can get it on Amazon in a small bottle here or as a large and small bottle set here. The screw on precision tip allows you to squeeze very small amounts of glue in very small spaces. You could also use E6000, Aleene’s Quick Dry Tacky Glue, or Quick Hold .
- A keyring. I used 1.25 inch size key rings from Amazon here.
- Faux suede or faux leather tassels (optional) – I used silver-tone topped tassels from this tassel assortment package on Amazon here and these gold-tone topped tassels here.
- Large jump rings (optional) – for attaching the tassel to the key ring. I used these 10mm size jump rings from Amazon.
- Two pairs of flat nose pliers – I’m using the Baby Wubbers Chain Nose Pliers from Amazon here and the Baby Wubbers Flat Nose Pliers from Amazon here. These are very high quality pliers that will last you a long time!
- The photo keychain templates templates, design #152 in my Resource Library. To get the password via email instantly, fill out the form below, or the form at the bottom of this post.
Note: Be sure to check out my post Beginner’s Guide To Jewelry Making Tools for all the information you need to know about buying and using jewelry making tools.
PROJECT INSTRUCTIONS
STEP 1 – Download Keychain SVG Files
Download the SVG templates for these photo keychain shapes from my Resource Library. You can fill out the form above or at the bottom of this post to get the password to my Resource Library.
Save the zipped folder that downloads to your computer.
You’ll need to unzip or extract the files FIRST before you can upload the personalized photo keychain designs to Cricut Design Space. Make a note of the file location after you unzip it so you can find it in the next step.
STEP 2 – Cut Your Photo To Size
I recommend using a photo printed on photo paper for this project. You can get photos printed at many local places for pennies, or even by mail. Photo prints are sturdier and the print quality is better than prints from a home printer made on regular copy paper. I sent my photo to my local Walgreen’s 1 hour photo department. Easy Peasy!
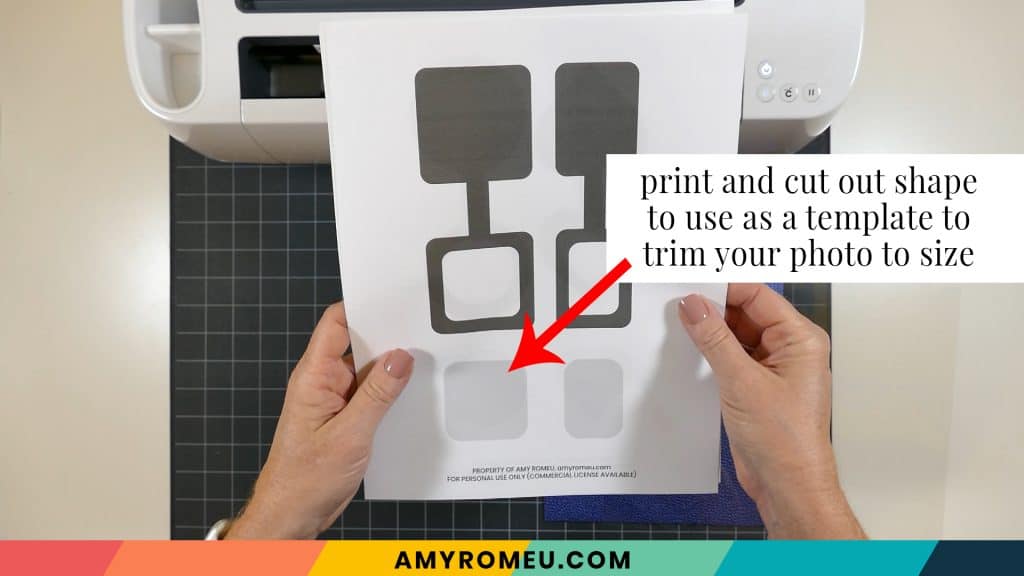
After you have your photo printed, you can trim it to size using the PDF templates I include in the download folder. Simply print out the PDF for the keychain shape you want to cut. Then trim out the grey shape. Use the grey template to place over your photo and then trim around it to cut your photo to size.
OPTIONAL – Use Canva to Resize Your Photo for Printing
NOTE: If you have a photo print that is too large for the keychain design, you can print it at a smaller size for this project. To create a smaller sized version of your desired photo, you can use a free program like Canva to resize your photo smaller before sending it to the photo center.
Click on Create a Design, Custom Size, and then enter 6 x 4 inches, the size of a standard photo print.

Upload your photo and the correct photo template from the folder you downloaded from my website’s library. Then drag both the photo and the template onto the canvas. Don’t resize the photo template!

Drag your uploaded photo onto the canvas, and drag your photo as small as necessary.
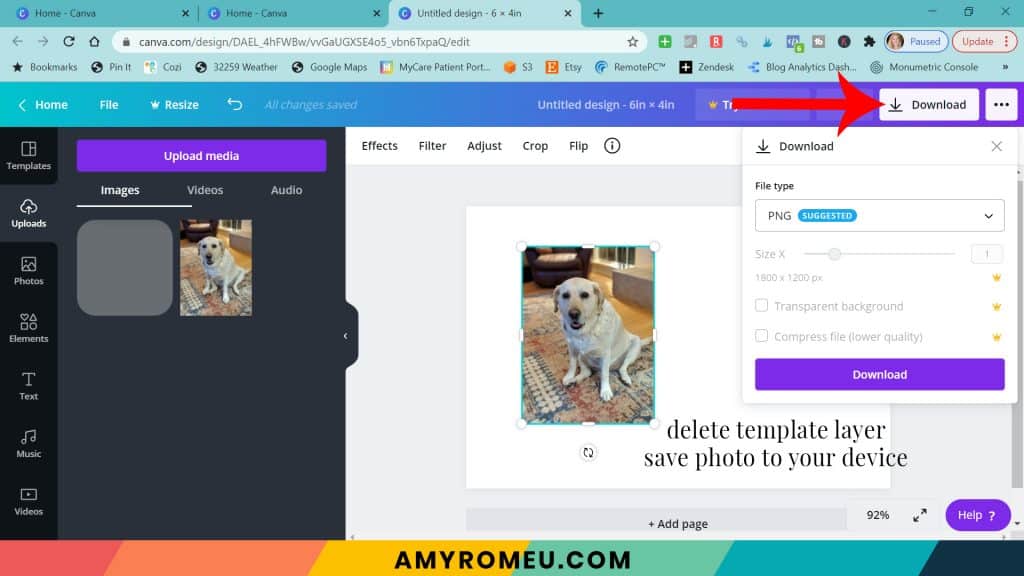
Then drag the photo template over the photo. It is see-through so you can see where it is on the photo. Then click on the photo and use the corner resizing handles to drag the photo smaller.

Then delete the photo template. Click DOWNLOAD in the top right to download your 4×6 print to your device. Choose PNG or JPG as the file format.
Your photo studio will print the photo as shown, with lots of white space. Trim your photo out with scissors.
STEP 3 – Cut the Faux Leather Keychain Shape
If you are cutting your keychain shapes by hand: use the PDF template you printed earlier to cut out the keychain shape with scissors or an X-Acto knife. Use the grey photo template to cut TWO shapes from the mylar sheet. Skip ahead to Step 8 to assemble the keychain.
If you’ll be cutting the faux leather and mylar sheets with a Cricut cutting machine: Upload the keychain SVG file to Cricut Design Space. For step by step directions on how to upload the SVG file to Cricut Design Space, click here.
Once the keychain shapes have been uploaded, delete the shapes you don’t want to cut by clicking on the layers and then click DELETE.

Make a copy of the the mylar window shape by selecting it and then clicking DUPLICATE.
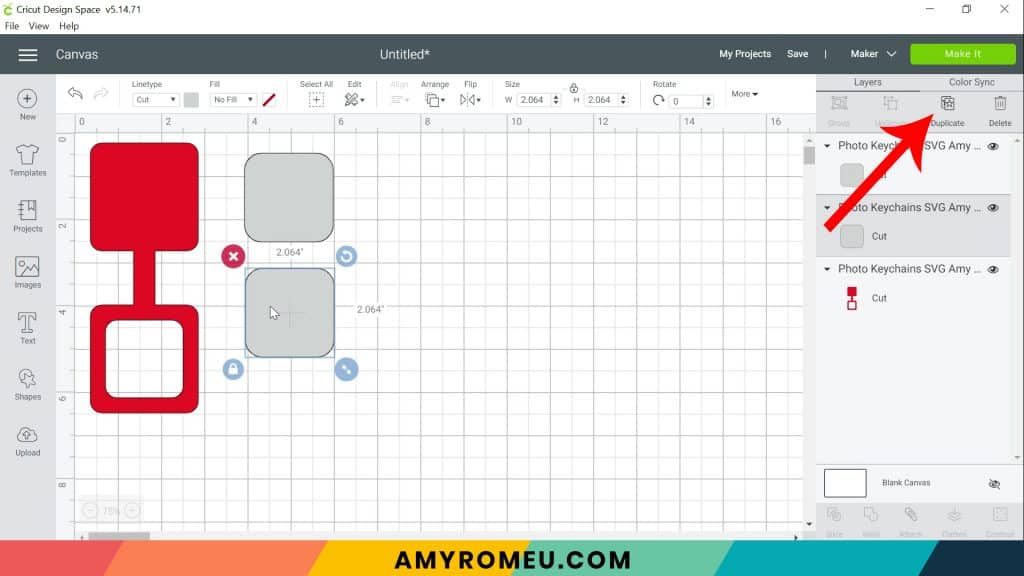
You should have one keychain shape and two mylar window shapes on your canvas. Click the MAKE IT button.
In the mat preview screen in Cricut Design Space, you’ll see the mylar mat and the faux leather mats are separated. Click on the faux leather mat. Then drag the keychain shape away from the top left corner of the mat so you have at least 3/4 of an inch between the edge of the keychain shape and the top and left edges of the mat. This will allow room for you to tape the material down to the mat.

It isn’t necessary to mirror any mats for this project, so just make a note of what size material you’ll need to cut the faux leather shapes completely (about 8 inches tall and 4 inches wide).
Click the CONTINUE button.
STEP 4 – Choose Material Settings
If you are using the Cricut Explore Air 2, turn your dial to CUSTOM. If you are using the Cricut Maker, continue on. For the Cricut Joy, follow the material selection steps for faux leather in this post.
On the next screen in Cricut Design Space, choose Faux Leather (Paper Thin) as the material setting. If you don’t already have the Faux Leather (Paper Thin) material setting in your Favorites, click on Browse All Materials, search for Faux Leather (Paper Thin), and then click on it to select it.

Change the Pressure setting to MORE in the dropdown menu.

Once the material settings are selected, it’s time to prepare the faux leather mat for cutting.
STEP 5 – Prepare & Cut The Faux Leather Mat
Cut a piece of faux leather to the size you noted in the mat preview screen. Place it pretty side down on the purple Cricut cutting mat in the same location on the mat as shown in the mat preview (top left corner here). Be sure to move the white star wheels on the roller bar off to the side so they don’t roll over the faux leather.
Then tape the faux leather down to the mat on all sides using the blue painter’s tape.

Load your mat into the Cricut by lining up the cutting mat under the mat guides. Press the double arrow button to feed the mat into the machine.
When your mat is loaded correctly, press the flashing C button to start the cut.
When the cut is complete, and before you unload the mat, use your weeding tool to check one corner of the keychain shape to make sure it cut completely. If it didn’t, you can rerun the cut again by pressing the C button. If necessary, repeat the cut more than once.

Unload the mat by pressing the double arrows button and remove the faux leather shapes. Set them aside and return to Cricut Design Space.
STEP 6 – Cut the Mylar Shapes
In Cricut Design Space, click on the mylar shapes mat. Choose Acetate or Foil Acetate as the material setting and select MORE pressure.
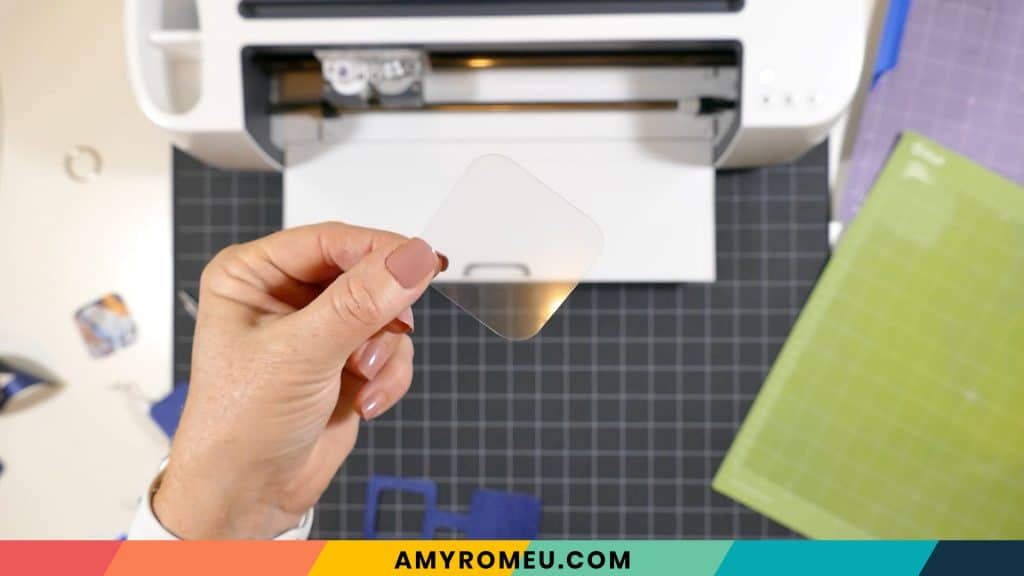
Place the mylar sheet on a green cutting mat. Load the mat into the Cricut and press the C button to begin the cut. Then unload the mat and remove the cut mylar shapes. Set them aside.
OPTIONAL – Add Text to the Keychain Design
If you want to add text to your personalized photo keychain you can easily do that using the text tool in Cricut Design Space. Choose a font that will be easy to weed (wide, block letters, nothing with thin lines) and type out your desired text. I used Cricut Sans, a free Cricut font, and selected BOLD to make the letters thicker.
Adjust the letter spacing as desired. I like to move the letters closer together so I can make the line of text larger. Then size your text box as large as it can be without being bigger than the back of your keychain shape. I like to leave at least a quarter of an inch of room on either side of my text box.

If you want to add a small graphic like the dog bone, I’ve included the dog bone SVG in the download folder. You can upload the dog bone to your canvas and drag it underneath your text. You can also add a shape like a heart from the left menu panel if you choose. Select your text and the shape and ALIGN them so they are centered. Then click both your text and graphic layer and click ATTACH so they cut in the same location as shown on your mat.
Be sure to MIRROR the text from the mat preview screen before you cut!
Cut your vinyl on a green cutting mat. For tiny text like this, I like to use the WASHI SHEET material setting. Carefully weed your text using a sharp weeding tool and set it aside.
STEP 7 – Heat Press the Text Layer
If you are adding text to the back of your keychain, you’ll want to press the vinyl now before gluing the keychain together. The reason is if you try to heat press on top of faux leather with glue underneath that hasn’t dried completely, the faux leather can bubble. You don’t want that!
To press the vinyl text onto the faux leather backing, gather your Easy Press Mini or Cricut Easy Press, a heat pressing pad, and a Teflon sheet or piece of parchment paper.
I set the Easy Press Mini on the lowest temperature setting. For the Easy Press, check the recommended temperature guidelines for the specific vinyl you are using here.
Line up the weeded vinyl text on the faux leather keychain shape so it’s centered. Then cover with a cover sheet and press firmly, but not too hard, or else you’ll flatten the texture of the faux leather. Press for 5-6 seconds.

Carefully try to remove the clear cover sheet. If necessary, press again for a few more seconds before peeling the cover sheet off.
Thread the key ring onto the key chain shape now so you don’t have to try and add it later. Now it’s time to glue the personalized photo keychain together!
STEP 8 – Glue the Photo Keychain
Protect your work surface with some scratch paper before you glue. Place your keychain shape pretty side down on the scratch paper.
Before you start to glue, sandwich the photo between the two mylar shapes. This will prevent the front of the photo from damage during use, and the back of the photo from bubbling due to glue contact.
Place the mylar-photo-mylar sandwich in the center of the keychain backing. Don’t glue behind the photo, it isn’t necessary!

I like to use Art Glitter Glue for gluing faux leather (it doesn’t have any glitter in it, and it dries clear). It glues fabric well (which is what the faux leather is, basically) and the bottle comes with a fine tip attachment that is SO helpful! But you can use whatever craft or fabric glue you have for this step.

Spread the glue carefully all around the photo and on the back of the top piece. Try to get close to the edge, but not all the way. The glue will spread a little when you press down.

Carefully fold the top half of the keychain over the bottom half and line up the outside edges. Press the edges together firmly with your fingertips.

The most important part is to press the glued keychain under under something flat and heavy like a book overnight. This step is CRITICAL to making your keychain very flat and well stuck together.
After your keychain is dry, check the edges for any gaps and fill in with glue if necessary.
The faux leather I chose for this project had a dark colored backing, but if your faux leather has a light colored backing, you may not like the edge showing. Use a colored Sharpie marker to carefully color in the edge of your keychain. I know it sounds odd, but it works!

STEP 9 – Attach A Tassel (Optional)
It’s easy to add a tassel to your keychain if you’d like. I used silver-tone topped tassels from this tassel assortment package on Amazon here and these gold-tone topped tassels here.

I’m using a 10mm size jump ring, but you can use a smaller jump ring if necessary, like an 8mm or 9mm instead.
Open the jump ring with flat nose pliers. I like to use two pliers and grip each side of the jump ring, making sure the opening in the jump ring is facing up (the twelve o’clock position).

Rotate one wrist forwards or backwards, so the circle creates an opening but doesn’t bend out of it’s circle shape.
Slide the tassel onto the open jump ring, and then add the keychain.

Use your two pliers to close the jump ring again, using a wrist twist in the opposite direction. This takes a little practice, but you’ll get it!
That’s it! Your personalized photo keychain is complete!


Do you like this project? Are you going to make a personalized photo keychain yourself? If so, please post a comment and attach a photo of your keychain! I would love to see it, and see what text you chose! You can also tag me on Instagram: @amyromeucreative.
Want to see all of my Cricut earring & jewelry tutorials? CLICK HERE
Until next time… and happy creating!

Want the FREE SVG files so you can make these PERSONALIZED PHOTO KEYCHAINS yourself?
Get them from my Resource Library! You’ll receive the password for the Resource Library instantly after filling out the form below!
Want to remember this? Post this DIY PERSONALIZED PHOTO KEYCHAIN project to your favorite Pinterest board!

OMG I love these!! My daughter is working on getting her drivers license and this would be the perfect gift!
Thanks so much!!
Hi, Laura! Thanks for your comment. Yes, this would be a great gift for a new driver. 🙂 Save travels and best of luck to your daughter.
OMG, I was speeding through the email to get to the link for directions and contest and I accidentally hit the “don’t send me emails regarding the 10 days of crafting “. NOOOOOOO, how do I make sure I’m signed up and still receive them? The Gnomes were absolutely adorable, and I’ve been really wanting to make keychains! Can’t wait to see what is in store for us tomorrow!! 🙂
Hi, Karla! No worries. I fixed it for you. You should receive email #3 tomorrow from me at 9am EST. If you don’t, send me an email at [email protected] so I can assist you (but you totally should get it!). Have a great day! Amy
Amy I never thought I’d be thinking of making keychains but after seeing how super cute these are and reading your easy to follow directions I believe family and friends will be finding these in their stockings this year!!
They are so cute and with photos and text will make such a personal gift!!
Thank you so much for sharing your talent with us!!
Hi, Trudy! I’m so glad you like this project! I hope you’ll share some photos with me of the keychains you make. I’d love to see them. Amy
I have a laminating machine, do I have to use acetate or can I just laminate the photo first?
Hi, Suzette! If you have a laminating machine, that would be ideal. Skip the acetate altogether! Great idea.
I cannot find the photo keychain file. I know the password but there is no place to put it in. Please help.
Hi, Cindy. Here’s a link to the library. There’s a box on the page where you enter the password:
https://amyromeu.com/resourcelibrary/
Thank you.
Amy
I also can’t find it or the box to enter the password.
Hi, Lisa. Thanks for your message. The link to enter the library is here: https://amyromeu.com/resourcelibrary/
There’s a box on the page to enter the password, right above the Enter box. Please send me an email at [email protected] if you are still having trouble. Thank you. Amy
I watched your tutorial on Holiday maker Fest and joined you here. I’m enjoying it very much. I ordered some leather last night so I can give it a try with my Cameo4.
Thank you
Sheila
Hi, Sheila!
Thank you for your comment. 🙂 I hope you’ll let me know how cutting the faux leather goes. I really need to get a Silhouette myself so I can learn how to cut faux leather on a different machine. I’m so glad you are enjoying my projects. 🙂
Thank you.
Amy
I can’t find the SVG file.
Hi, Linda.
Thanks for your comment. The SVG file is in my Resource Library. It’s Design #152.
Here’s a link to the library. There’s a box on the page where you enter the password:
https://amyromeu.com/resourcelibrary/
Thank you.
Amy
Well, now I have another great project to make for Christmas!
Oh yeah, I also have to use my laminator (that we just bought) for this, too! I knew I’d find a reason 🙂
Thank you, Amy, for sharing these with us!
Hi, Michele! Thanks for your comment. I love the idea of using a laminator – that’s perfect!
Hello.
I just want to thank you , Amy Romeu, for all your generous help and projects. You take a lot of time to give us all the steps , with pictures ( for me, they are essential) And I really feel tou want us to achieve good results, so , just THANK YOU, from Montreal.
Hi, Rosy! Thank you so much for your comment. You are so kind. You’ve made my day! I love to teach and share, so it makes me happy to know you appreciate my efforts. 🙂 Thank you again.
I love these keychains. I can’t wait to make them for two of my grandsons who just got their driver’s license this year!! Thank you for all your great ideas! Helen
Hi, Helen! Thank you for your comment. I’m so glad you like this project! I hope your grandsons will love it. 🙂
Thank you Amy, I’m loving all this new stuff. I got my order in for my faux and can’t wait to start! I joined after Makerfest and glad I did, you make it all look so easy and I’m filled with hope 🙂
Hi, Sue! Thank you for your message. I’m so excited you are going to try making faux leather crafts! If you have any questions along the way, just let me know. I’m happy to help. Thank you. Amy
I too can not find the SVG file in your library. I appear to be signed into the library and there isn’t a 152. I am able to download other SVG (like the gnome earrings from yesterday)
Do you need to sign up for a new password every time you go to the site??
Hi, Kathy.
Thanks for your comment. You do not need a new password. The file is in the library, however, your browser is not showing you the latest version of the library page. You can try refreshing or reloading the page a few times, or try accessing the library from a different device or browser. If you still don’t see it, please send me an email at [email protected] so I can assist you further. Thank you. Amy
Hi Amy!
Both #152 and #153 is missing in the library….
Refreshed and there it was!
I’m so glad! Thanks for letting me know, Marie!
Hi, Marie! I can assure you the files are in the library 🙂 however, your browser is not showing you the latest version of the library page.
You can try refreshing or reloading the page a few times, clearing your cache, and accessing the library from a different device or browser.
If you still don’t see the files, please send me an email at [email protected] so I can assist you further. Thank you. Amy
Hi Amy,
There is no file #152 in the resource library. The numbers go from #151 to the next file being #154. I even searched the site for 152 & all that comes up is the tutorial, not the file.
Hi, Cindy! The files are the library 🙂 however, your browser is not showing you the latest version of the library page.
You can try refreshing or reloading the page a few times, clearing your cache, or accessing the library from a different device or browser.
If you still don’t see the files, please send me an email at [email protected] so I can assist you further. Thank you. Amy
This is a cute idea! Going to make these for stocking stuffers for my family. Thanks for doing the 10 Days of Crafting, I am loving every minute of it!!!
Hi, Vikki! Thank you for your comment. I’m so glad you like this project. I’m going to be making them as stocking stuffers, too. 🙂 Have a great day!
Amy
The keychains are adorable. Loved your tutorial. I can’t wait to try these, as I’ve never made earrings before. Of course, I’m looking forward to see the rest of the Days of Crafting. Also, I’m so glad you were part of MakerFest otherwise I wouldn’t have found you. Thank you!
Thank you so much for the kind words, Sandy! I’m so glad you are enjoying this event! 🙂
Just ordered the supplies! So excited to try this out for gifts this year!
love the keychains! Is there a way to make them so you can change out the photo’s?
I love this idea! The personalized photo keychain would make such a thoughtful gift. I can’t wait to try this DIY project and add my favorite memories to my everyday essentials. Thanks for sharing such a creative tutorial, Amy!