
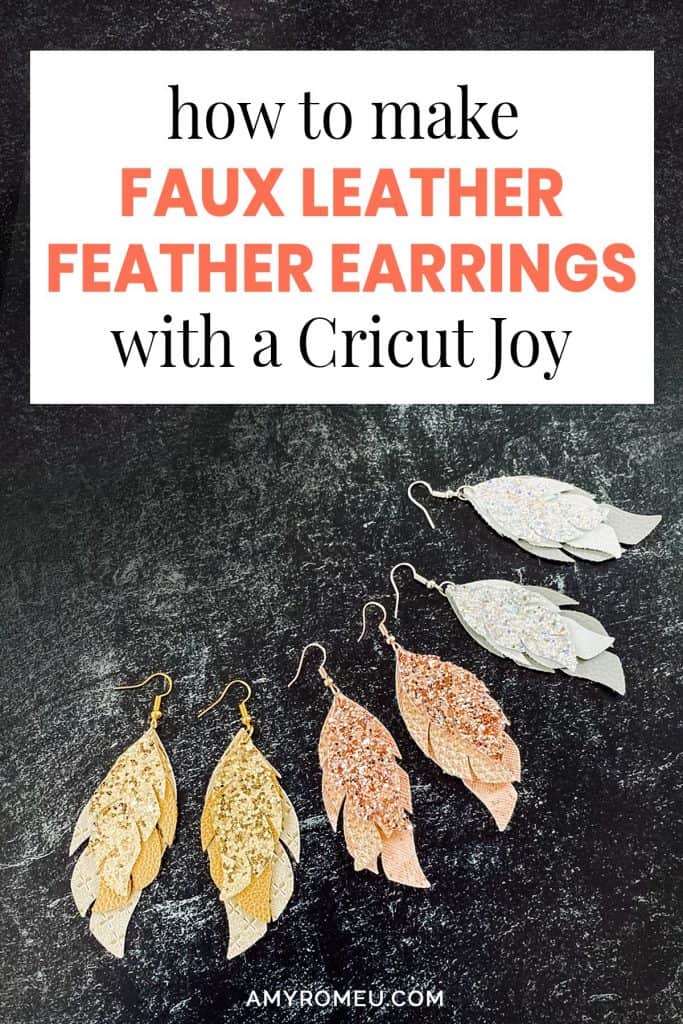
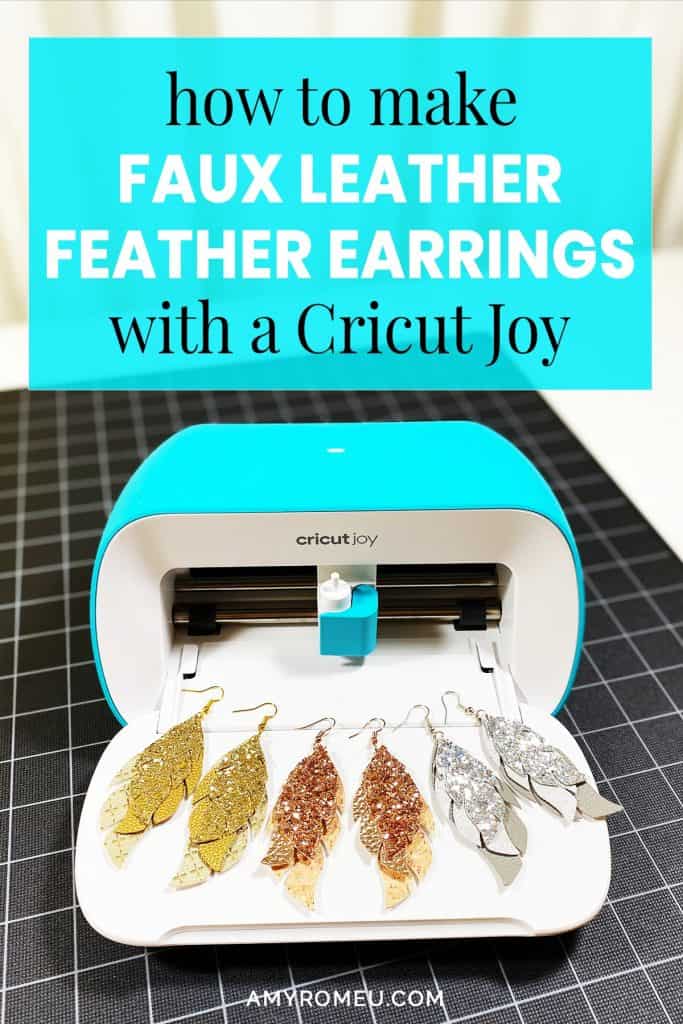
DIY Glitter Feather Cricut Joy Faux Leather Earrings

How to Make Glitter Feather Faux Leather Earrings with the Cricut Joy
Do you have a Cricut Joy yet? As I mentioned in this post, I was hesitant and first to get one, thinking I wouldn’t really use it much. However, after I used it to try out making faux leather earrings with it, I’m hooked! It’s so cute and portable and it works just as well as its big brothers (or big sisters?) – the Cricut Explore Air 2 and the Cricut Maker. While it’s just as easy to make faux leather earrings with the Cricut Joy, there are just a few modifications you need first. I’ve done all the hard work for you and I’m going to show you exactly how to make DIY faux leather earrings with the Cricut Joy it in this post.
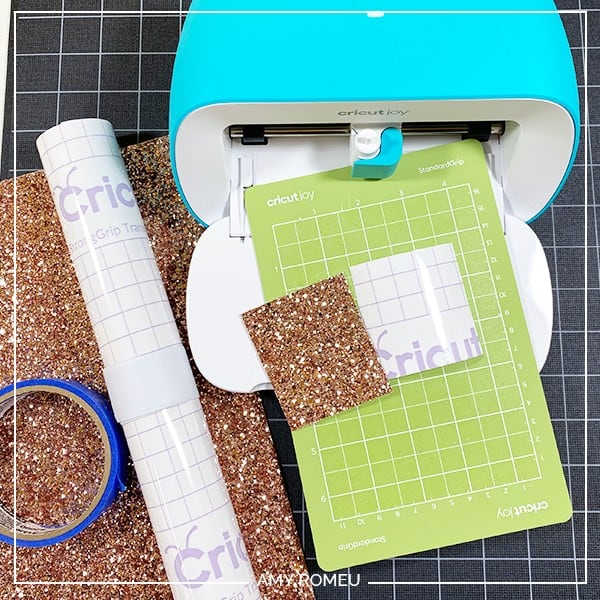
If you’ve made any faux leather earrings with a Cricut, you know it’s best to use the purple strong grip cutting mat. But the Cricut Joy doesn’t have a purple mat, only a green one. However, I’ve found you can still make faux leather earrings with a Cricut Joy when you use some of my key mat preparation techniques that I’ll share with you in this tutorial.
I’ll be using my original layered feather earring design, which looks great layered with two or three different faux leathers. You can either arrange the feathers all facing the same way, or stagger them for a completely different look. I’ll tell you how to get it in the Materials List below.
Finally, I’ll be using chunky glitter faux leather for one of these layers, and I’ll be showing you a very cool trick for keeping your Cricut Joy cutting mat glitter-free so it will last a long time.
Ready? Let’s get started! But first, I wanted to let you know you can also watch my YouTube video on this project below:
Want to see all of my Cricut earring & jewelry tutorials? CLICK HERE
This page contains some affiliate links (which means if you make a purchase after clicking a link, I will earn a small commission at no additional cost to you). Read my full disclosure policy here.
CRICUT JOY FAUX LEATHER EARRINGS – Materials List
- A Cricut Joy cutting machine The Cricut Joy is available on Amazon here or on the official Cricut website here. You can also get one from Michael’s, Joann, Hobby Lobby, Walmart, etc.
- An earring SVG cut file template. I’ll be using my original layered feather earring design from my SVG shop. Of course you can use any other earring cut file SVG you already have, one from Cricut Design Space, or any free SVG from my Resource Library (click here to get a password).
- Blue painters tape (as needed). This is the key to getting your faux leather to stick well to the green Joy cutting mat. You can get it at any hardware store and most big box or grocery stores. Amazon also has it here.
- Cricut Joy Green Standard Grip Cutting Mat. You’ll get the green mat with the purchase of your Cricut Joy, but you can but extra Joy-sized mats separately on Amazon here.
- Faux Leather in the colors/prints of your choice. I used rose gold chunky glitter sheets from the Etsy shop Craftyrific here. The silver and yellow gold glitter sheets are from this assortment of glitter sheets from Amazon here. The metallic faux leather is from this assortment of metallic sheets from Amazon here. The printed cork faux leather (not real cork) is from this assortment of printed cork sheets on Amazon here.
- Cricut Strong Grip Transfer Tape. You can get it on Amazon here. This is used to protect your cutting mat from loose glitter that will stick forever to your cutting mat! It also helps make the green Joy mat stickier so your material will stick better. You’ll see. 🙂
- A weeding tool and a small spatula tool (if you have one). I had all the tools I needed in my Cricut tool set here. You can get also get the basic Cricut tool set at Michael’s here, or from Hobby Lobby, Joann’s, or Walmart.
- A small hole punch (if you plan to punch holes in your earrings after you cut the shapes instead of having the Cricut cut them). This is my go-to hole punch for making Cricut earrings from Amazon here.
- Earring hooks – I used these rose gold earring hooks from Amazon here, and rose gold jump rings from this assortment on Amazon here. For the gold and silver versions, I used earring hooks from this assortment of earring hooks in different finishes these from Amazon here. Hobby Lobby, Michael’s, and other craft stores, as well as your local bead store, will have lots of earring hooks as well.
- Small jump rings – I used this assortment of 6mm size jump rings in different metal finishes from Amazon here. Again, your local craft store or bead store will have plenty of jump rings to choose from if you want to pick some up in person. You could use 5mm size if that’s what you have, but I wouldn’t go any smaller than 4mm or larger than 6mm for earrings.
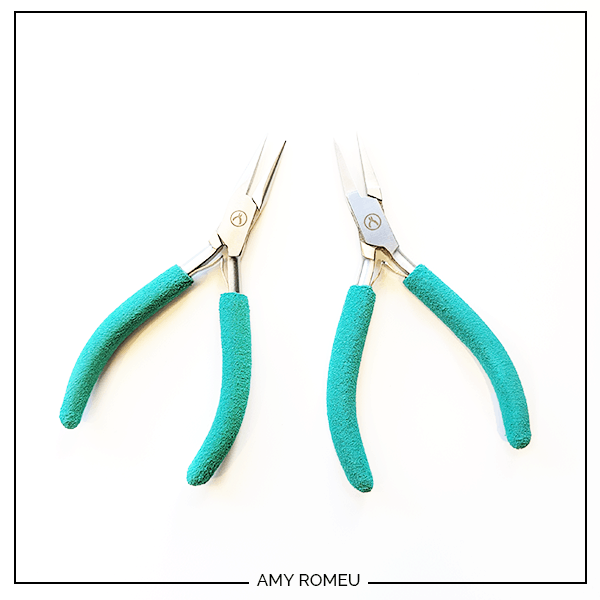
- Two pairs of flat nose pliers – I’m using one pair of wide nose pliers and one pair of needle nose pliers here, but you can use any two flat nose pliers you have in your jewelry making tool box .My favorites are Wubbers brand in the “Baby” size. You can see the Baby Wubbers Chain Nose Piers on the left on Amazon here, and the Baby Wubbers Flat Nose Pliers on the right on Amazon here.
Note: Be sure to check out my post Beginner’s Guide To Jewelry Making Tools for all the information you need to know about buying and using jewelry making tools.
PROJECT INSTRUCTIONS
STEP 1 – Unzip the SVG File
If you’ve purchased my layered feather SVG file, save the zipped folder that downloads to your computer after your order is complete. You’ll need to unzip or extract the files FIRST so you can upload the cutting file to Cricut Design Space.
If you’re using an SVG file you already have, or an earring shape design from Cricut Design Space, you can skip ahead to the next step.
STEP 2 – Upload SVG To Design Space
After you’ve unzipped the SVG folder and made a note of the file location, open Cricut Design Space and click on NEW PROJECT to get started.
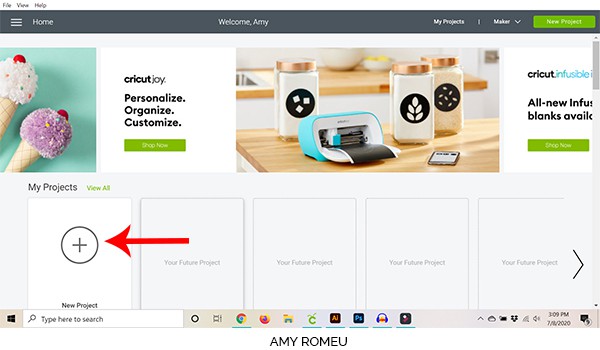
Then click on UPLOAD from the left hand side menu.
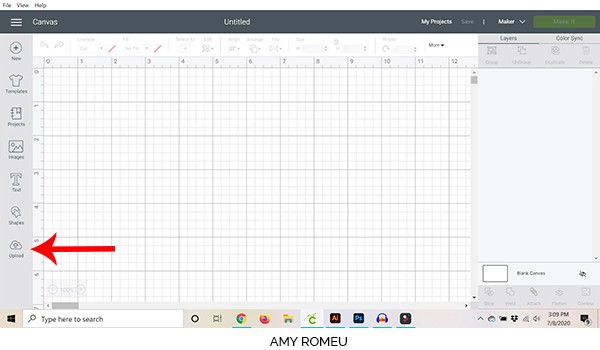
Click on the UPLOAD IMAGE button, then click BROWSE to locate your file.


NOTE: If you are using my feather earring SVG cut file template, you’ll see there are four files in the download folder. There are two design versions – one is layered with the feathers in opposite directions, and one with the feathers hanging in the same direction. Then each of those two design versions have SVGs with and without pre-made earring holes.
For this project, I’m going to use the file called “Earring 1 no holes.” This has the feathers laying in opposite directions, without holes, since I’ll be punching them with a hole punch later. You can choose whichever version you want.
The Cricut Joy – just like the Cricut Maker or the Cricut Explore Air 2, WILL cut the holes, but probably not perfectly. Every machine is different.
Navigate to where you’ve saved the already unzipped SVG file for this project. Double click on the SVG file you want to use to bring it into the upload screen in Design Space.
If you get an error message that says “unsupported file type,” you may have clicked on the wrong file, or your SVG file is still zipped.
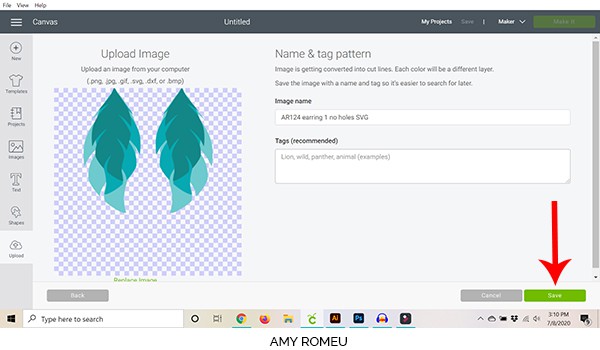
You’ll see a preview of the earring shapes for this project. Hit the green SAVE button.
After you’ve selected your file to upload, you’ll see it as the first item in your “recently uploaded designs” row.
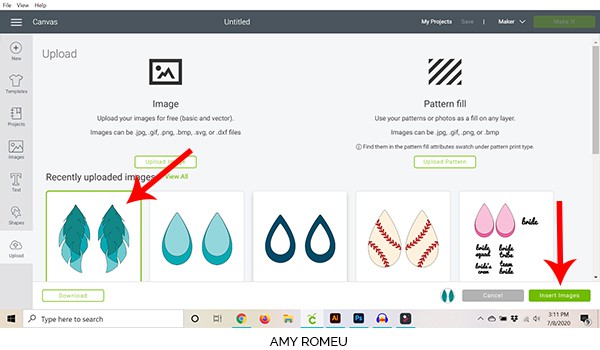
Click on it so it is outlined in green. Then click on the green INSERT IMAGES button in the bottom right corner.
STEP 3 – Prep SVG For Cutting
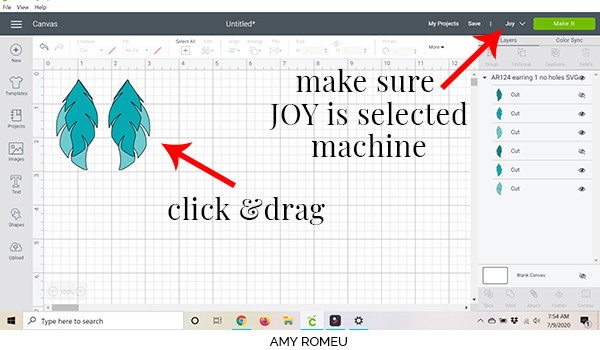
This brings the three layered earring feather shapes into Cricut Design Space.
First drag the earring shapes up to the top most left corner of the screen. You’ll be placing your material to cut on your mats in the upper left hand corner.
Then you need to make sure the Cricut Joy is selected as the cutting machine! Look for the word “Joy” next to the green Make It button.
If the Cricut Joy is not your desired machine, click the dropdown menu to select it. You may need to re-establish the Bluetooth connection to your Joy. Be sure Cricut Design Space is connected to your Cricut Joy before moving forward.
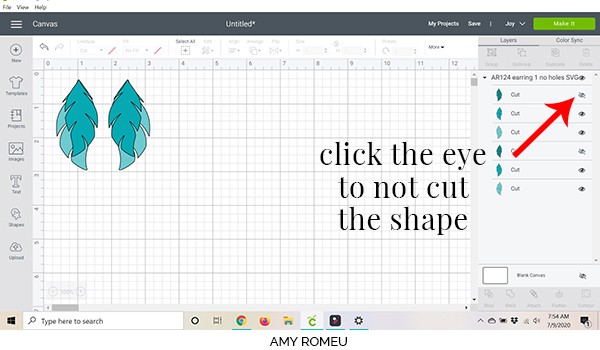
If you want to resize your earrings, you can drag the border around the shapes larger or smaller now. If you don’t want to cut all three layers, click on the eye icon next to the layer you want to keep from cutting, like this:
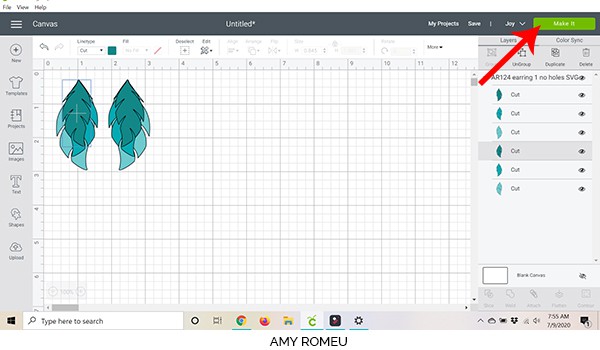
Once you’ve made any adjustments to the design, and confirmed the Joy is selected as your machine, click the MAKE IT button.
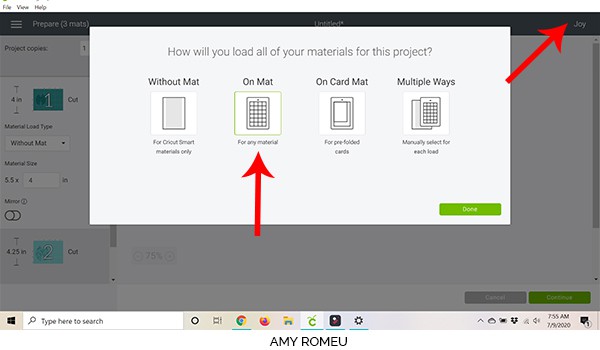
STEP 4 – Cricut Joy Material Selections
Now you’ll tell the Joy how you want to cut your materials – on a mat, without a mat, or if you’ll be choosing these selections separately. Since this project will use faux leather for all three layers, I’ll be cutting all of the layers using the same setting.
Click on ON MAT to select it. If you don’t see this screen in Cricut Design Space, you may not have the Cricut Joy selected as your machine, or your Cricut Joy is not connected to Cricut Design Space. You can check which machine you’ve selected in the top right hand corner of your screen.
Now you’ll set up each cutting mat one at a time, depending on the layer order shown in Cricut Design Space.
STEP 5 – Prepare Cricut Joy Mats in Cricut Design Space
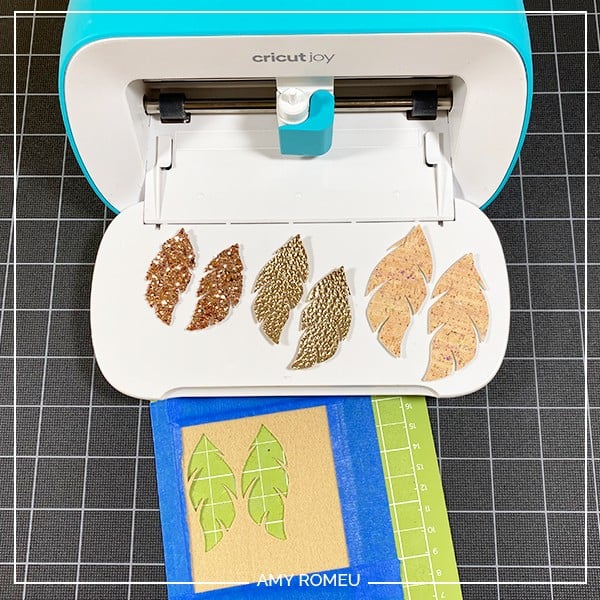
In this cut file, the dark teak is the top layer (smallest feather), the medium teal is the middle layer, and the light is the bottom layer (largest feather).
You can cut the layers from whatever material you’d like. I’m going to cut the top layer from a chunky glitter faux leather sheet and the bottom two layers from faux leather sheets.
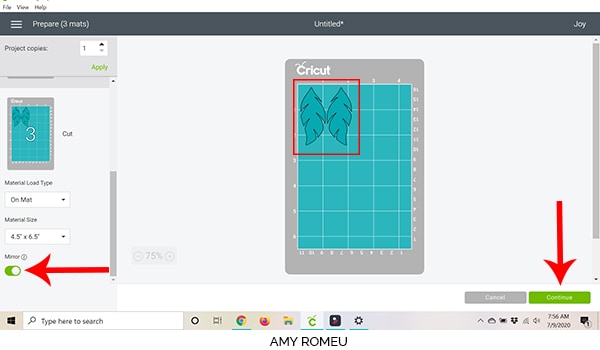
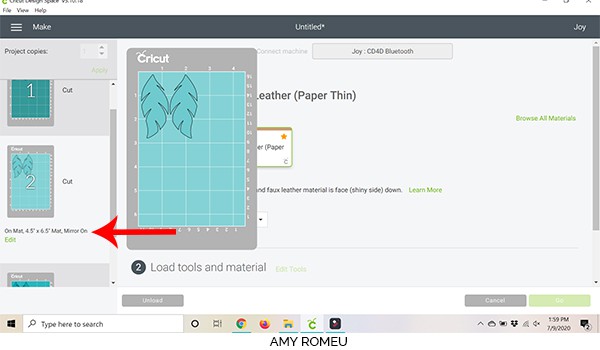
The first mat preview will appear. It’s important to note that the mats don’t necessarily cut in the same order as the layers in the design.
In this tutorial, the first mat is going to cut the top feather shapes, the second mat will cut the bottom feather shapes, and the third mat will cut the middle feathers.
Toggle the MIRROR button for each mat right now so you don’t forget later. You can scroll down and click on each mat one at a time, then click on MIRROR.
Also, make a note of what size faux leather material you’ll need to cut out each pair of earring shapes. You’ll be trimming the faux leather down to size and taping it to the mat for optimal cutting.
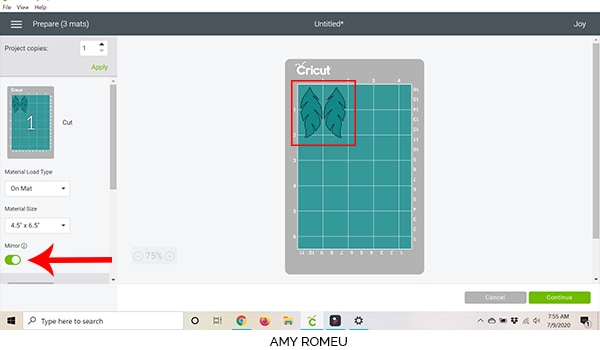
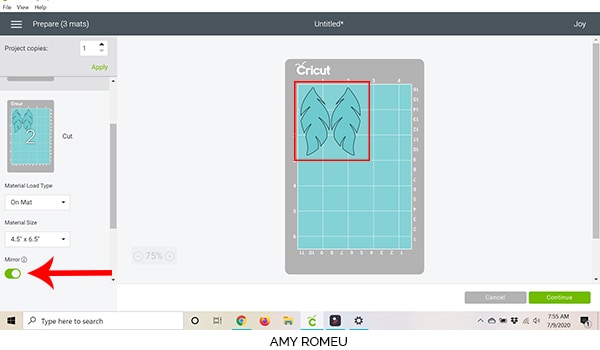
When you’ve mirrored the last mat and noted the size material to cut, click the green CONTINUE button.
STEP 6 – Make Material Selections in Cricut Design Space
Next we need to choose our material for each mat.
On the Materials screen, click on BROWSE ALL MATERIALS on the right.

On the next screen, type “faux leather” in the search box.
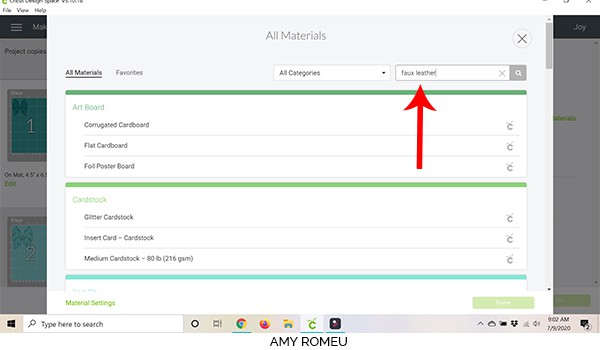
NOTE: If you typed “faux leather” and got no results, it’s because you’ve selected “no cutting mat” on the previous screen. The Cricut Joy is very intuitive, and knows it can only cut faux leather on a mat. In that case, go back to the mat preview and double check the mat cut selection for the mat you are trying to cut.
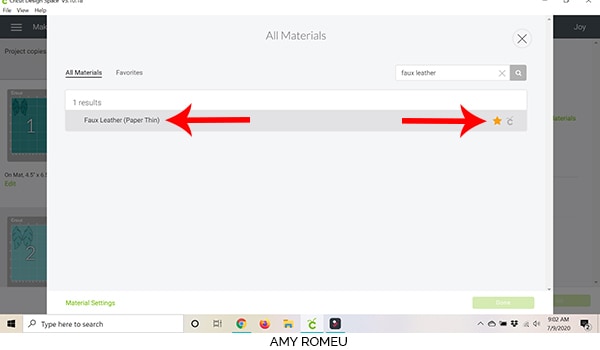
Once you’ve typed Faux Leather, it should pop up on the screen as Faux Leather (Paper Thin). While the faux leather material is not really “paper thin,” this setting is an automatic double cut, which seems to do the trick, especially for simple shapes like these.
Click on Faux Leather (Paper Thin) to select it as your material. I also recommend clicking on the yellow star, which will make this material a “favorite” of yours and easy to find when you have to cut your next faux leather mat. Then click the green DONE button.
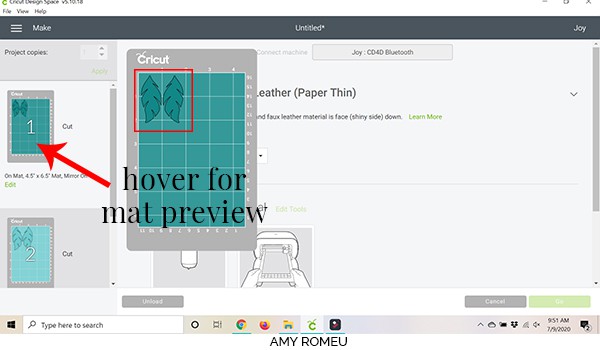
You’ll come back to the mat preview screen. If you didn’t note the size material to cut for the first mat, you can hover over the mat in the mat preview for a larger view.
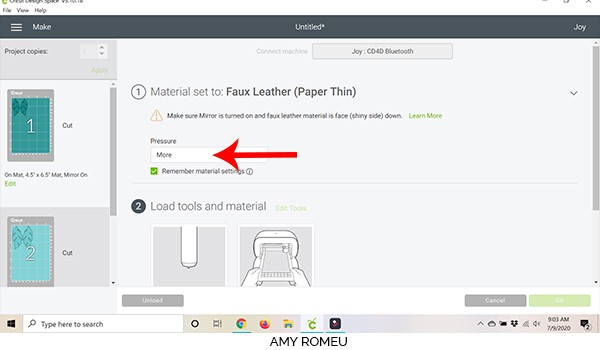
You’ll see your material selection of Faux Leather (Paper Thin). I also like to select “More” as the cutting pressure, but you may be ok with just the “Default” setting. You’ll have to do a few test cuts to get a feel for how your Joy cuts your particular material.
Since all three layers of these earrings will cut using the same material settings, I’ve checked the “remember material settings” box.
The next step is to load your material on the mat. We’ll do that in the next step. Once the mat is loaded, you’ll be able to press the green GO button, but not yet!
STEP 7 – Prepare Glitter Faux Leather Mat For Cutting
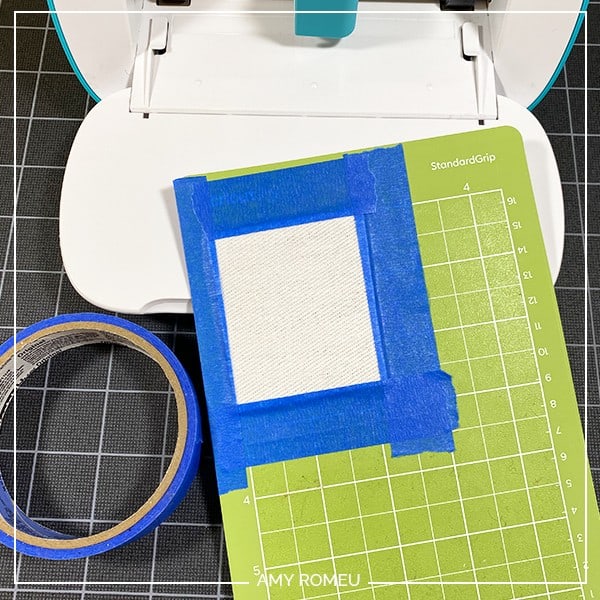
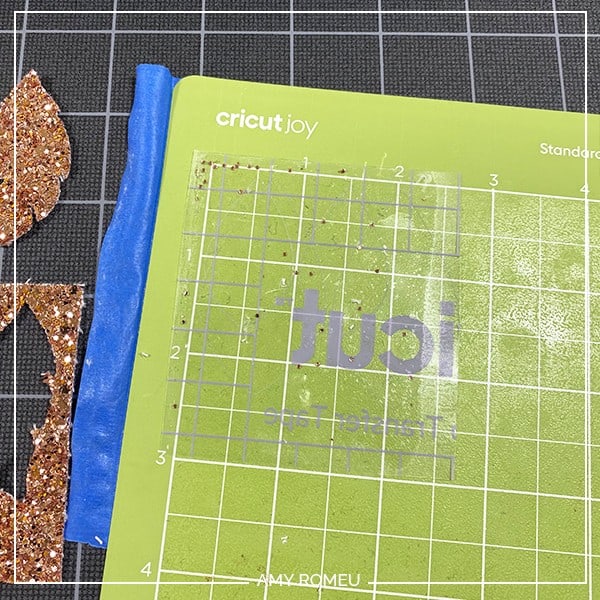
Gather your materials to prepare your first mat for cutting. You’ll need your Cricut Joy small green mat, faux leather of your choice, and some blue painter’s tape. Since I’ll be cutting glitter faux leather for this layer, I’m also going to use some Cricut Strong Grip Transfer Tape.
Note: If you’re wondering what the white band around my Cricut Strong Grip Transfer Tape is, it’s a white slap bracelet! They are great for keeping my vinyl rolls neatly wound. You can get slap bracelets in lots of colors, but I prefer the all white slap bracelets from Amazon here.
Cut your faux leather just slightly larger than the measurements you noted earlier in the mat preview screen. (If you are using glitter faux leather, also cut a piece of Cricut Strong Grip Transfer Tape slightly larger than the glitter faux leather.)
For non-glitter faux leather: place the faux leather pretty side down on the mat in the location shown in the mat preview screen.
For Glitter faux leather: press the transfer tape STICKY SIDE UP on the mat in the same location shown in the mat preview screen. Then place the glitter faux leather GLITTER SIDE DOWN on the transfer tape.
Press the material down firmly onto the mat. Then tape the faux leather down on all sides with blue painter’s tape.
Load your mat into the Cricut Joy. Then press the GO button, and your machine will start cutting.

When the Joy is finished cutting, it will prompt you to either unload the mat or recut. I always like to check the cut with a weeding tool or my fingernail to see if the cut went all the way through.
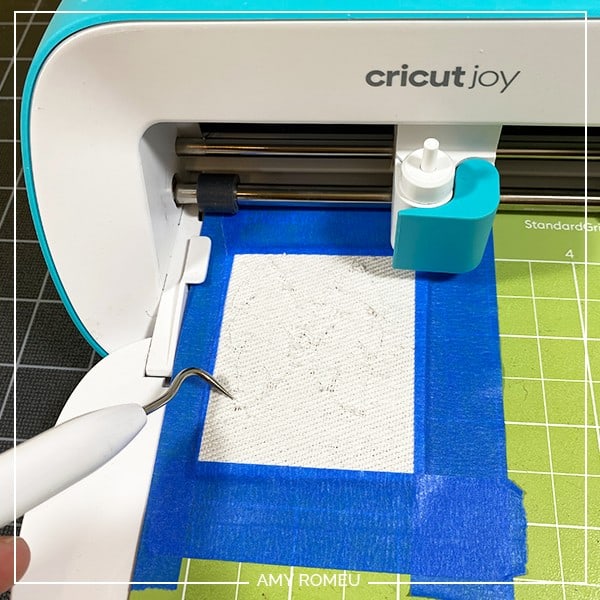
For this material, which is a very thick, canvas backed chunky glitter, I opted to run the cut again, so I clicked RERUN in Cricut Design Space.
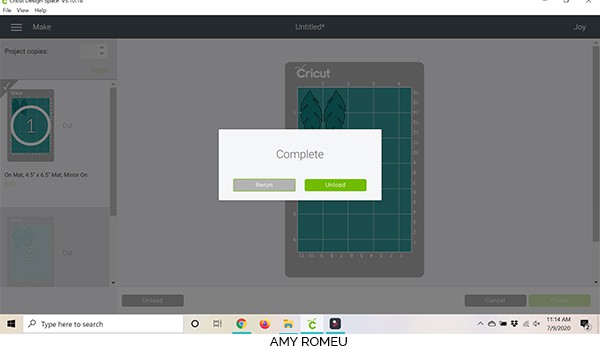
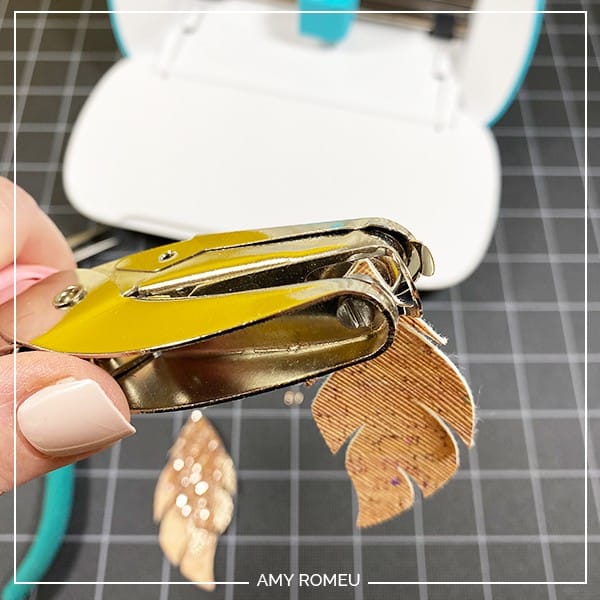
The Cricut Joy will make the second pass of cuts again. Then unload the mat and carefully remove the glitter faux leather shapes from the mat.
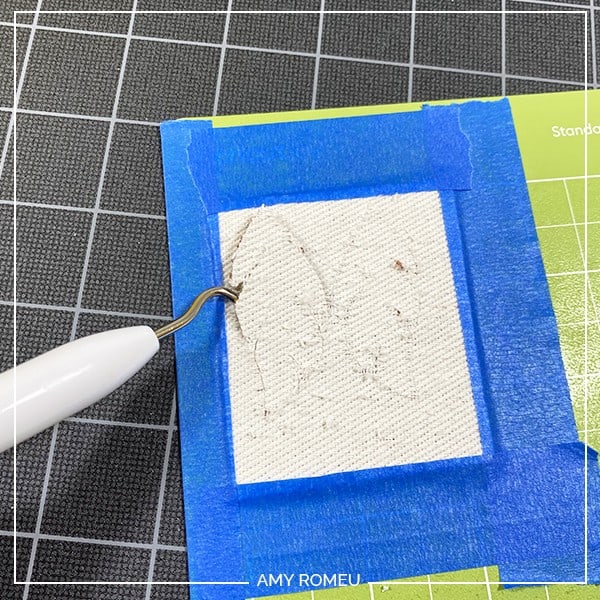
You’ll see the excess glitter is now stuck to the transfer tape, not your mat! Isn’t that smart? I love that tip.
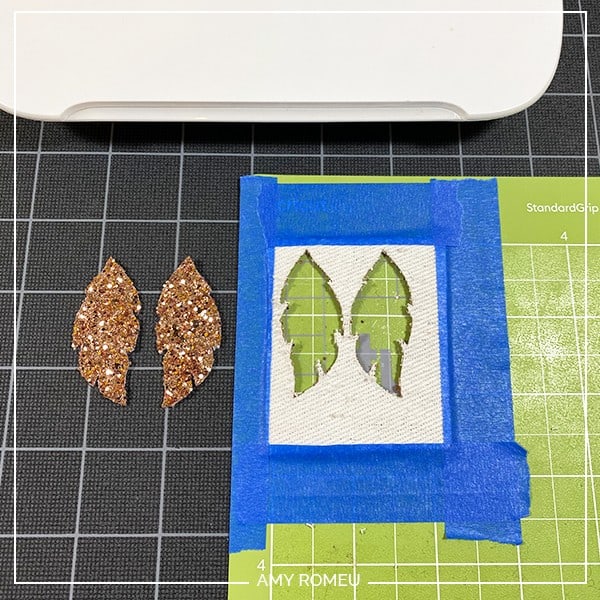
Carefully remove the blue painter’s tape pieces so you can reuse them for the next two layers. Peel off the excess glitter faux leather and the used transfer tape and discard. You may need to trim up the glitter feather earring shapes to clean up any loose ends or sharpen any cut lines that didn’t go all the way through.
The next mat to cut is the bottom layer. Double check that the layer is mirrored and the setting is “ON MAT.”
I’m using the cork printed faux leather for this layer, and the same material and mat settings as the first layer. This faux leather won’t damage my mat in any way, so I’m going to skip the transfer tape layer and place the faux leather pretty side down directly on the mat.
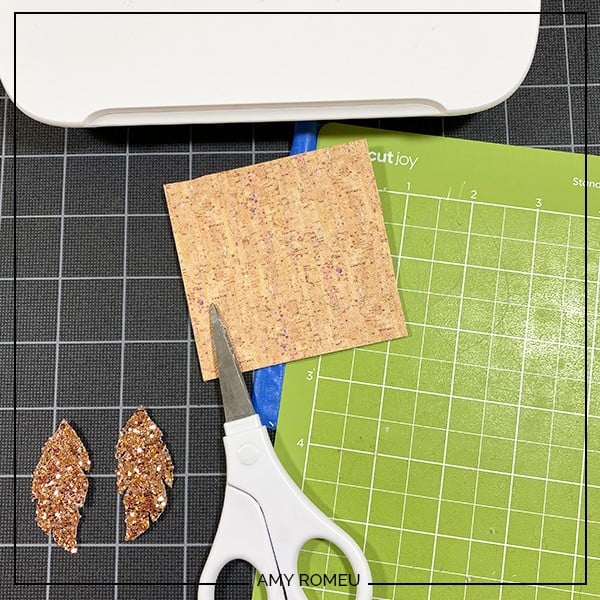
After the bottom layer shapes cut, unload the mat and remove the earring shapes. This material didn’t need to be cut a second time. The shapes popped right up when I tested them after the first cut.
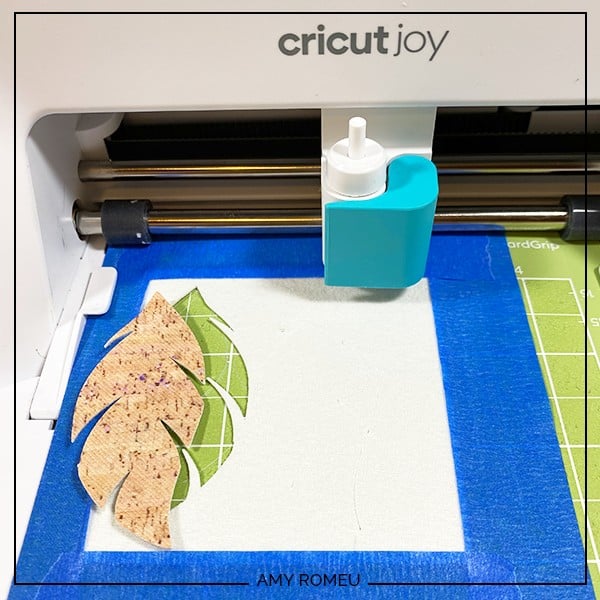
The third mat to cut is the middle layer of the earrings, and I’m going to cut these shapes from metallic faux leather. This material also will cut from one round of cuts and won’t need a repeat cut.

Repeat the same steps to cut the third mat. Remove the earring shapes and set them aside.
STEP 8 – Punch Earring Holes
I use a 1/16″ paper punch for all of my faux leather earring holes, from Amazon here. I like to punch one earring hole first, and then use it as a template to punch the other layers. Then use the first set of earring holes as a template to punch the holes in the other earring.
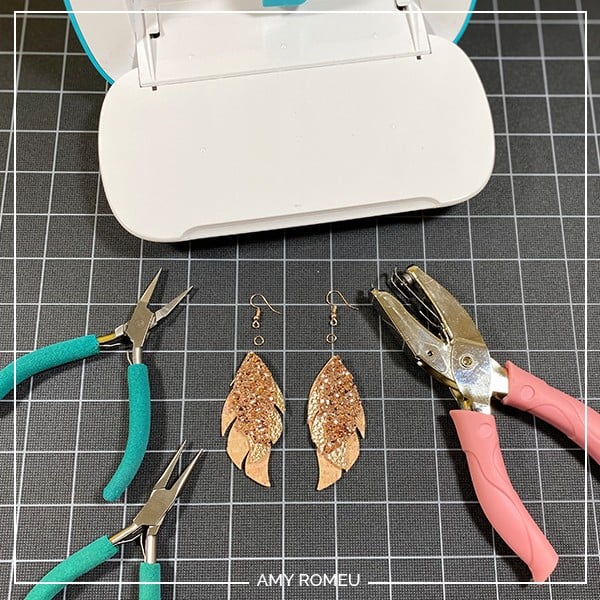
STEP 9 – Attach Jump rings & Earring Hooks
Now it’s time to assemble the earrings. You’ll need small jump rings, earring hooks, and two pairs of flat nose pliers.
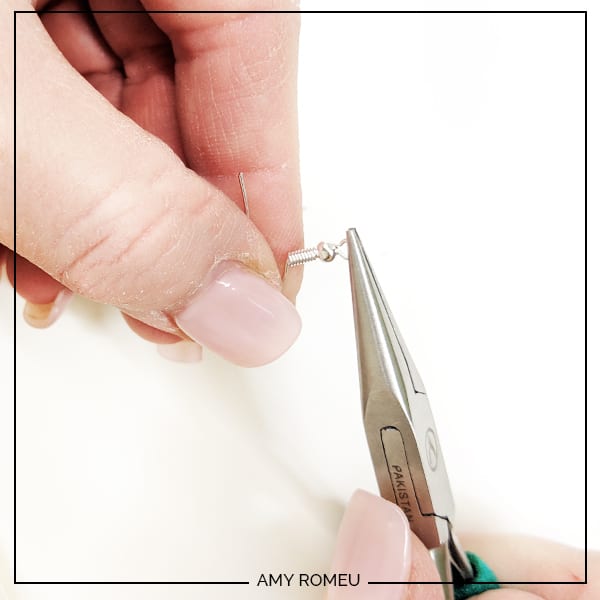
First you need to turn the bottom loop on the fishhook sideways so your earring will hang correctly. See the image below to see how the orientation of the earring hook has to change so your earrings will hang correctly.
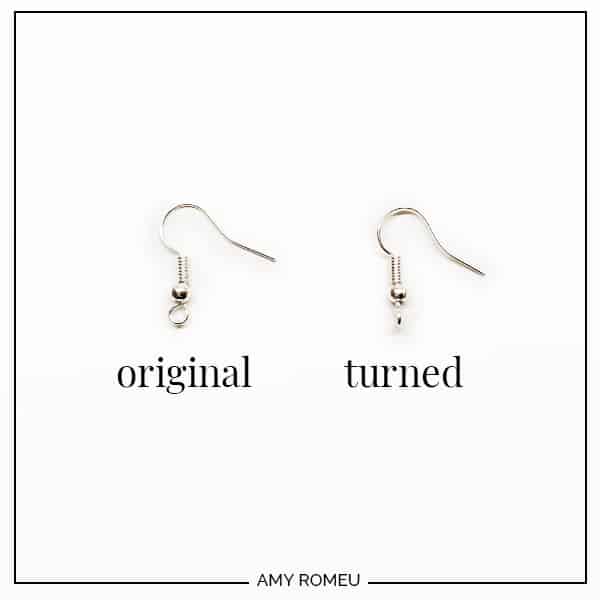
You’ll do this using one pair of flat nose pliers. While holding the hook firmly between two fingers, grip the entire earring loop between the pliers and twist your wrist until the loop is perpendicular to the earring post. Repeat with the second earring hook.
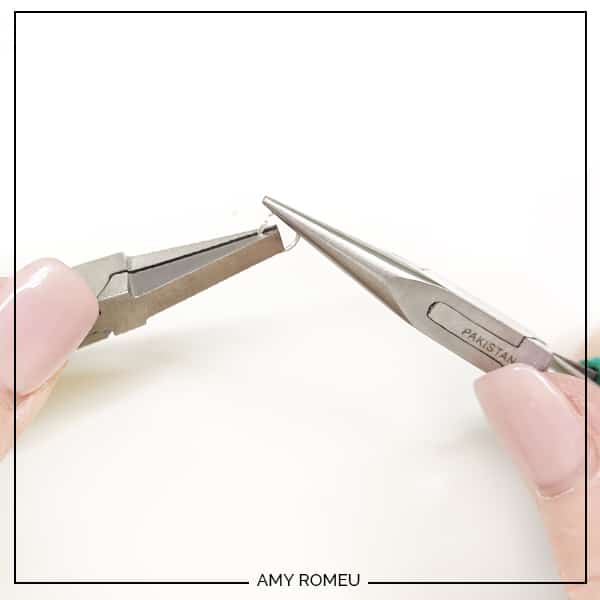
Now you’ll need to open your small jump ring to slide the faux leather earring shapes and the earring hook on. Using two pliers, grip each side of the jump ring, making sure the opening in the jump ring is facing up (the twelve o’clock position).
Rotate one wrist forwards or backwards, so the circle creates an opening but doesn’t bend out of it’s circle shape.
Slide your faux leather earring shapes in size order onto your jump ring, then slide your earring hook onto the jump ring.
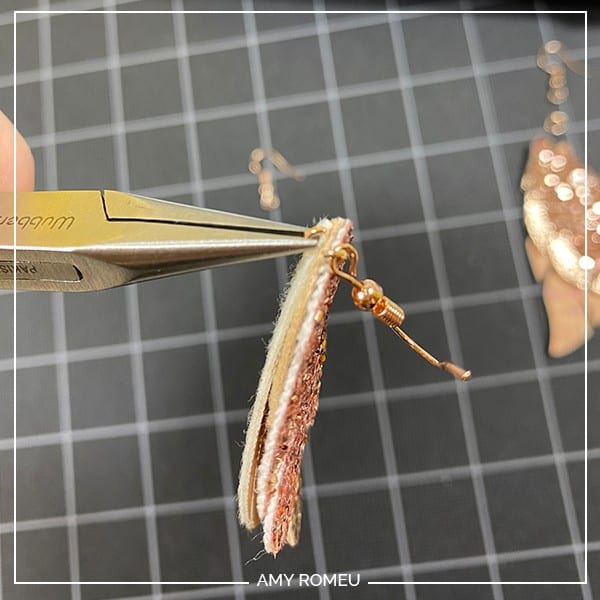
Pay attention to which side is the front of your earring as you do this. Double check your shapes and hook are all facing the right direction.
Then use your two pliers to close the jump ring again using a wrist twist in the opposite direction. This takes a little practice, but you’ll get it!
Repeat with the other earring. That’s it!
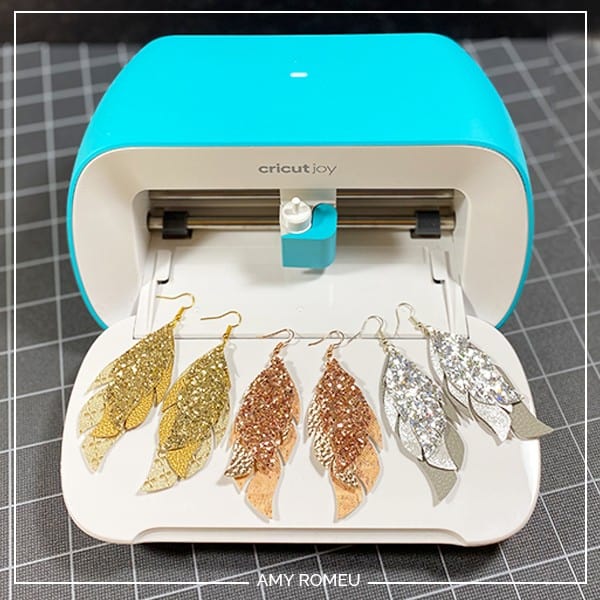
Which pair of Cricut Joy Faux Leather Earrings do you like best – glitter gold, glitter rose gold, or glitter silver? Let me know in the comments!

If you liked this project and want to see all of my Cricut Jewelry tutorials, click here.
Until next time… and happy creating!

Want to remember this? Post this DIY GLITTER FEATHER CRICUT JOY FAUX LEATHER EARRINGS project to your favorite Pinterest board!
I have a Cricut joy only. I have ordered an earring kit from Amazon to try my first go round of earrings. So excited that I can do it on the joy!
Thanks for your comment, Kari! I’m so glad you are going to try making earrings on the Cricut Joy!
I came across your site accidentally and glad I did. I love your tutorials. I’m a beginner and tried my hand at making faux leather earrings. Your tutorial touched on most of the issues I had. One question I have is, I like to make my earrings about an inch long/big and that makes it lighter and tends to easily come off the ear. Any recommendation on how to weight it down? Thank you!
Hi, Grace! Thank you for your comment. I’d suggest adding a backing to your earrings to add a little weight and structure. I have a YouTube video about 4 different ways you can add a back to faux leather earrings. Here’s the link: https://youtu.be/Q1IK6EfA6c8
Thanks again! Amy
I could not fine the one for how to design and cut by hand? Help me please. I love these.
Hi, Yvonne! Many of my files include printable PDF patterns that you can print out and then lay over a piece of faux leather and cut the shapes out with sharp, small scissors. Then you can follow the rest of the tutorial (punching the earring hole, attaching the earring hooks) as show in the tutorial. I hope that helps! Thank you! Amy
Where do I get the sharper blade for the joy or do you use the blade it comes with with faux leather
Hi, Barb! Thanks for your comment. I cut faux leather with the fine point blade that comes standard with the Cricut Joy. No need for a different blade. It’s the same blade that comes with the Maker and the Explore Air 2, and it’s the blade I use for 99% of my Cricut jewelry projects.