
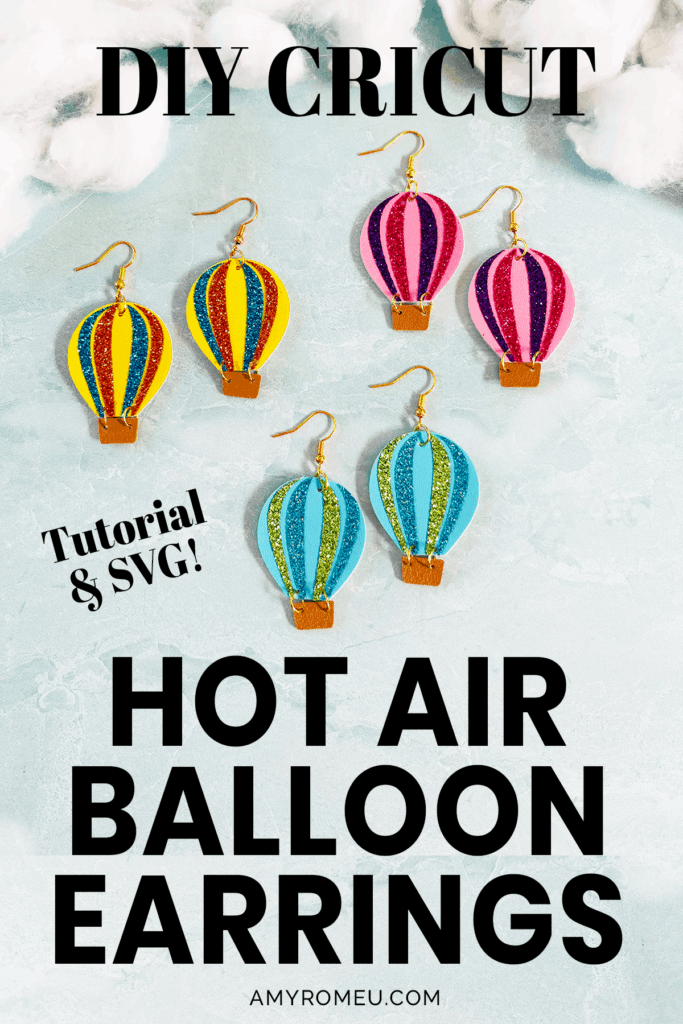
DIY Hot Air Balloon Earrings
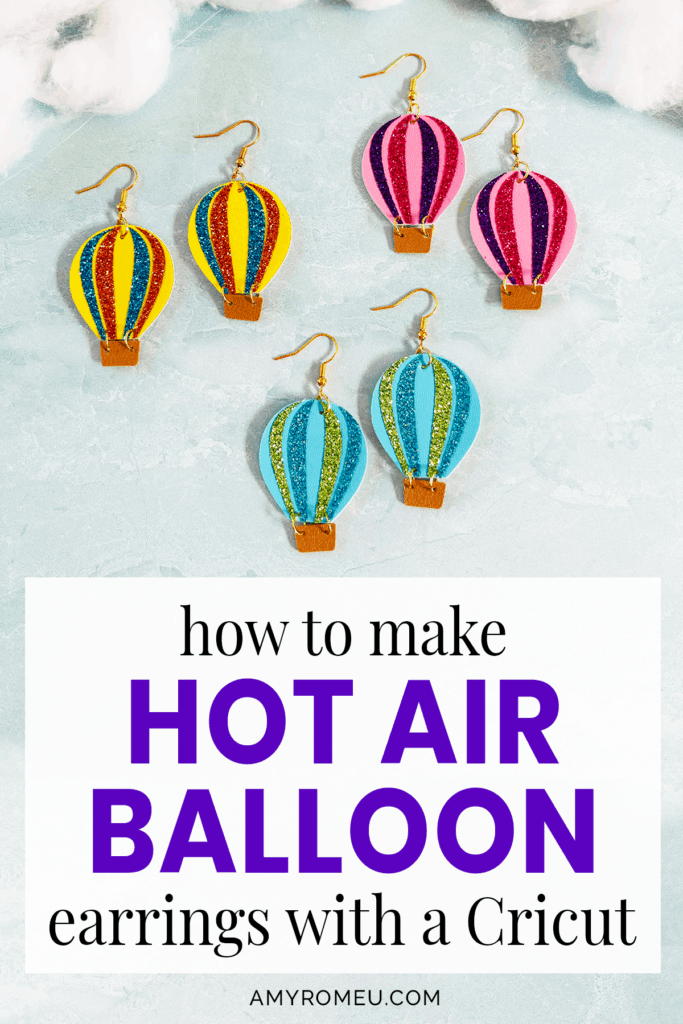
How to Make Cricut Hot Air Balloon Earrings
Have you ever been on a hot air balloon ride? If not, would you like to? I went on with my mother as a surprise trip for her birthday many years ago. It really was a magical experience. I had never thought to make DIY hot air balloon earrings, but when one of my readers reached out and asked if I had a hot air balloon earring SVG, I knew I had to create one for her.
I used faux leather and heat transfer vinyl for this fun earring project – the best part is you can customize the balloon with an endless variety of colors! If you want to learn how to make DIY Hot Air Balloon Earrings with a Cricut, keep reading. I’ll give you my step by step instructions and tell you exactly what materials I used to make this project.
You can also download my FREE original SVG file for this project from my Resource Library – it’s Design #182. I’ll have a link to get the library password in the Materials section below.
Ready? Let’s get started!
Want to see all of my Cricut earring & jewelry tutorials? CLICK HERE
This post contains some affiliate links (which means if you make a purchase after clicking a link, I will earn a small commission at no additional cost to you). Read my full disclosure policy here.
Hot Air Balloon Earrings – Materials List
- A Cricut cutting machine (or another cutting machine of your choice). I used the Cricut Maker, but you can use the Cricut Maker 3, the Explore Air 2 or Explore 3, or the Cricut Joy.
- The Cricut Maker 3 is available on Amazon here or the Cricut website here.
- The Cricut Maker is available on Amazon here or the Cricut website here.
- The Cricut Explore 3 is available on Amazon here or the Cricut website here.
- The Cricut Explore Air 2 is available on Amazon here or the Cricut website here.
- The Cricut Joy is available on Amazon here or the Cricut website here.
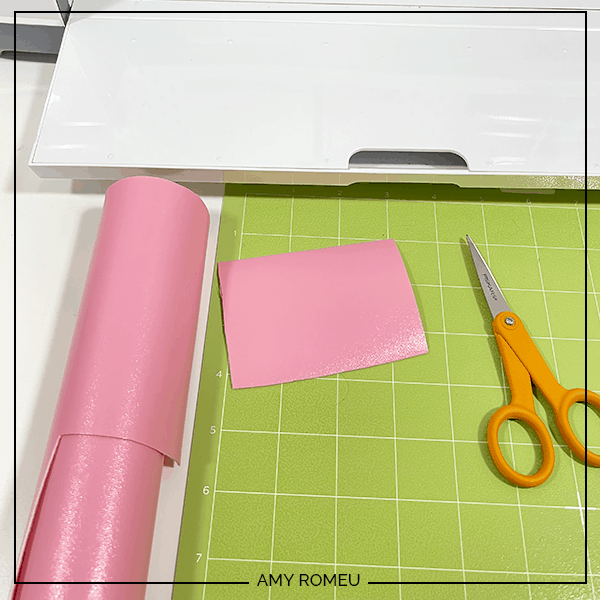
- Smooth faux leathers in the color of your choice. Heat transfer vinyl presses better to smooth faux leather so try to use it instead of textured faux leather. I used this smooth faux leather from Amazon for the balloons. For the basket, I used this faux leather in the color “Latte” from one of my favorite Etsy sellers here.
- Heat Transfer Vinyl in the rainbow colors of your choice. I used Siser Glitter Heat Transfer Vinyl in the following colors: Hot Pink, Mermaid Blue, Copper, Light Green, Purple and Old Blue.
- Cricut Strong Grip (Purple) Cutting Mat. You can buy these on Amazon here.
- Cricut Standard Grip (Green) Cutting Mat. Available on Amazon here.
- Blue painter’s tape. This will help keep your faux leather in place on your mat. This is just regular painter’s tape from the hardware store, or you can get it on Amazon here.
- A weeding tool. I use the weeding tool that came with my Cricut tool set from Amazon here.
- Cricut EasyPress Mat. I like the 8×10 size for making earrings.
- Small scissors. These Fiskars 4″ curved scissors are my favorite.
- A small hole punch (for punching earring holes in the faux leather when the earrings are fully assembled). This is my favorite earring hole punch from Amazon.
- Earring hooks – I used these these gold tone earring hooks from Amazon here. The same hooks in silver tone are here.
- Small jump rings – I used jump rings from this assortment of 6mm size jump rings in different metal finishes from Amazon here.
- Two pairs of flat nose pliers – My favorites are Wubbers brand in the “Baby” size. The pliers I use daily are the Baby Wubbers Chain Nose Pliers and the Baby Wubbers Flat Nose Pliers.
The SVG file template for these Hot Air Balloon earrings. It’s Design #182 in my FREE resource library. You can get the password and the link to the library instantly by filling out the form below, or the form towards the bottom of this post.
Hot Air Balloon Earrings – PROJECT INSTRUCTIONS
STEP 1 – Download the SVG Cut Files
Download my free Hot Air Balloon Earrings SVG file (Design #182) from my Resource Library. Save the zipped folder that downloads to your computer. Then unzip the folder to access the folder’s contents. You’ll need to unzip or extract the files FIRST so you can upload the cutting file to Cricut Design Space.
STEP 2 – Upload the SVG File to Cricut Design Space
In Cricut Design Space, click on New Project, then Upload, then Browse to locate the unzipped SVG file on your device. Click on it to select it and upload it to Design Space. The SVG file will appear in your “Recent Uploads” row. Click on it to highlight it, then click INSERT IMAGES.
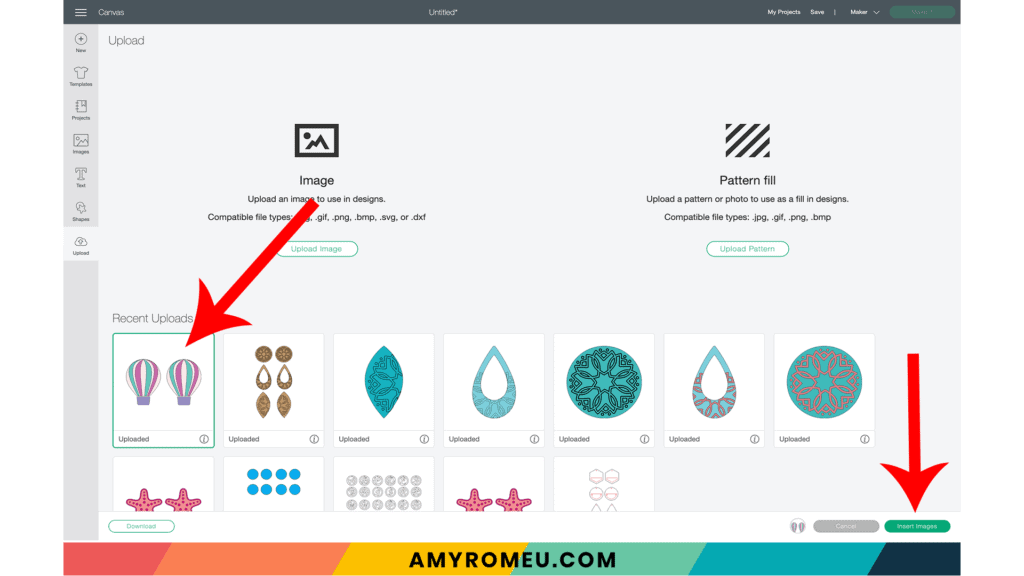
If you need help uploading a file to Cricut Design Space, click here.
My hot air balloon earrings design is created with a faux leather bottom layer (balloon and separate basket) with two layers of heat transfer vinyl pressed on top of the balloon. The balloon and basket layers will be connected by jump rings.
The hot air balloon SVG should look like this on your canvas. Sometimes SVGs come into Cricut Design Space at the wrong size. If that’s the case, change the design size to the measurements in the picture below.
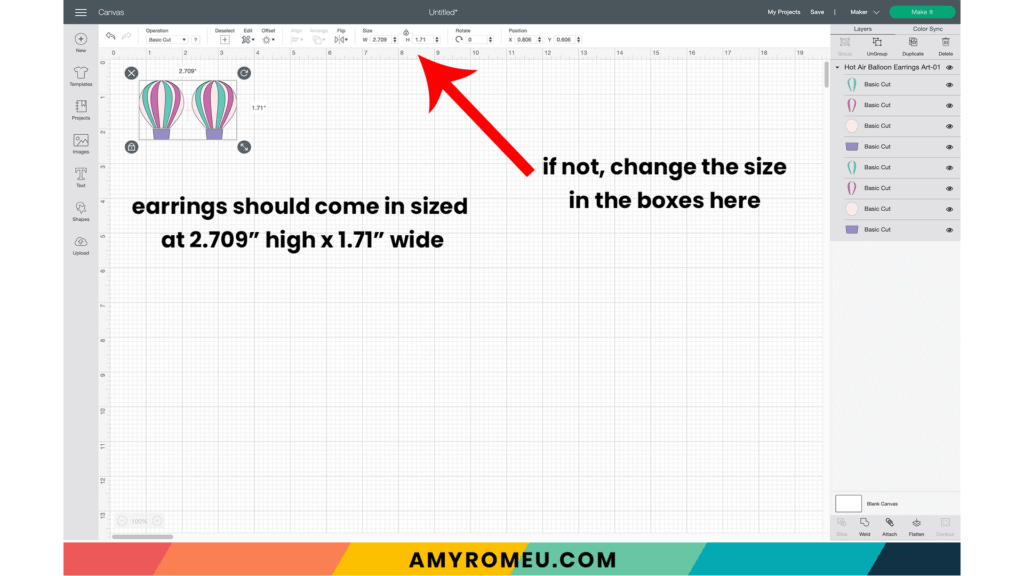
You’ll note there aren’t any earring holes in the design. That’s because we’ll be punching the holes later with a hole punch.
This design will cut on 4 different mats – two faux leather mats (the balloon and the basket) and two heat transfer vinyl mats (the balloon stripes).
Click the MAKE IT button to continue.
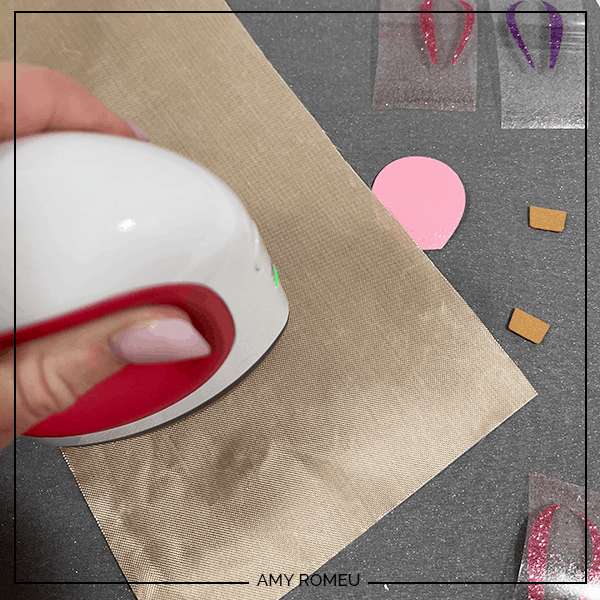
STEP 3 (optional) – Press HTV to the Back of the Faux Leather Before Cutting
I often press heat transfer vinyl to the back of my faux leather before cutting it when I make most earrings. It makes the back look for finished, it adds some structure to the earring, and it can add extra interest or a pop of color. This step is totally optional, though, and if you don’t want to do add a backing, skip ahead to Step 4.
If you want to learn more about how to to add a back, check out my YouTube video on how to add a back to faux leather earrings below.
STEP 4 – Make Material Selections
Here is a breakdown of which mats will cut from what materials:
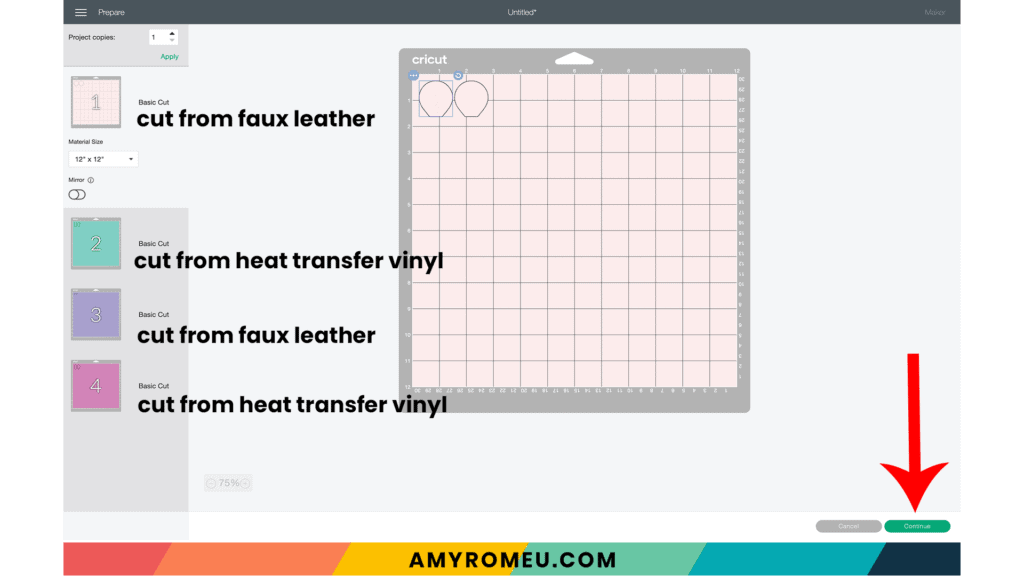
I always cut the faux leather mats first. It is not necessary to mirror any of the mats. Select the balloon mat (light pink in the above image) and click CONTINUE.
I use the material setting Faux Leather (Paper Thin) when cutting faux leather with my Cricut. I use the standard fine point blade that comes with the Cricut Maker and the Explore Air 2.
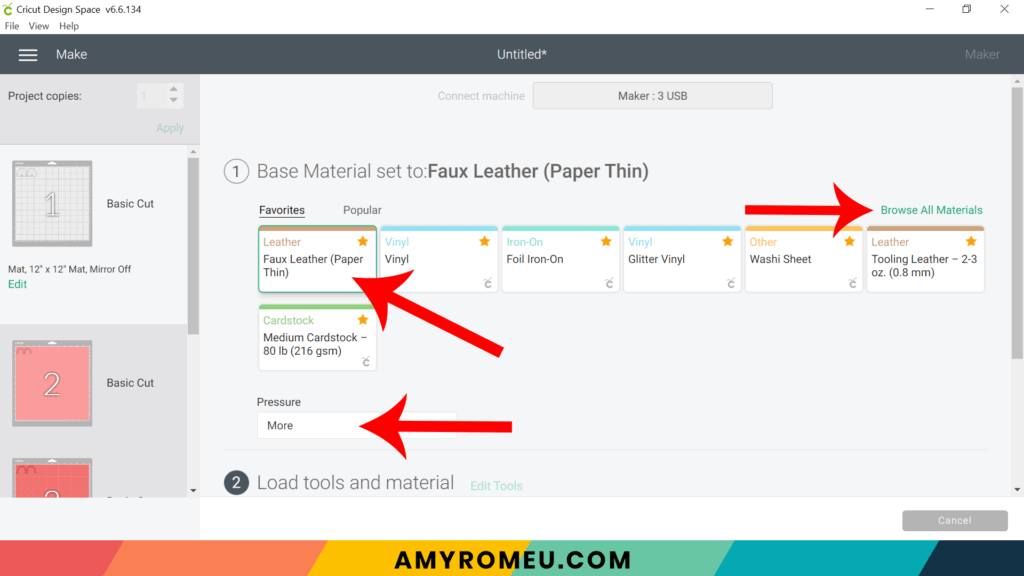
To find this Faux Leather material setting in Cricut Design Space, click on “Browse All Materials” to search for this setting. Type “faux leather” in the search bar and click on the magnifying glass.
Note: If you’re using a Cricut Explore Air 2, turn your dial to “Custom” so you can choose Faux Leather (Paper Thin) as the material setting. If you’re using the Cricut Joy, set the machine to cut “with a mat” and then select Faux Leather (Paper Thin) as the setting. Use the green Joy sized mat.
After you’ve selected Faux Leather (Paper Thin) as your material, choose MORE from the Pressure dropdown menu.
STEP 5 – Prepare Mats for Cutting
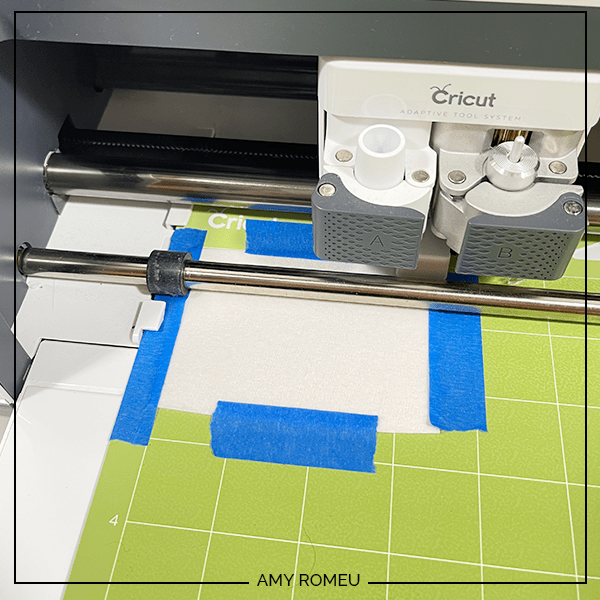
Cut a piece of faux leather and place it pretty side down (foil/vinyl side up if you added a backing in Step 3) on a sticky purple cutting mat in the location shown in the mat preview screen.
NOTE: I forgot to switch mats and used a green mat instead – but it was VERY sticky because it was BRAND NEW. If you have a purple mat, I strongly suggest you use it instead of a green one. But if you have a NEW green mat, it will work, too. 🙂
Use blue painter’s tape to tape the faux leather down to the mat on all sides.
NOTE: Gently push your white star wheels on the roller bar off to the side so they don’t roll over the faux leather while cutting.
Load the taped mat into the Cricut by aligning the mat between the mat guides and then pressing the double arrows button.
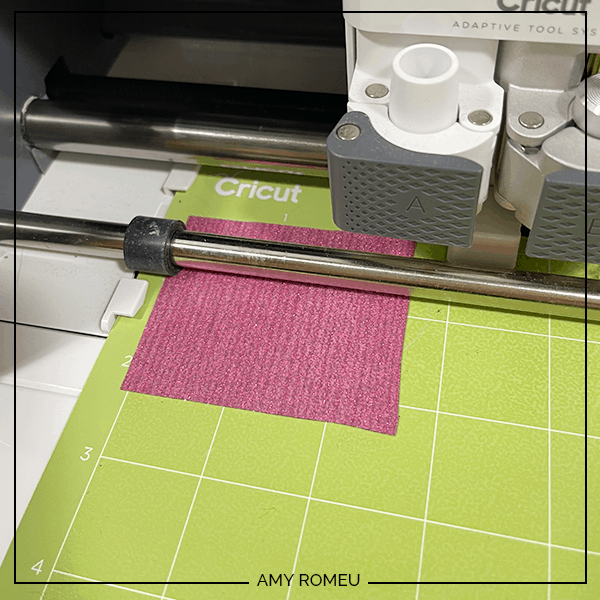
STEP 6 – Cut Faux Leather Mats
The “C” Cricut button will start to flash, indicating the machine is ready to cut. Press the C button to begin the cut.
When the cut is finished, but before you unload the mat, use a sharp tool (I’m using my weeding tool) to carefully lift the edge of the earring shapes to see if they cut all the way through.
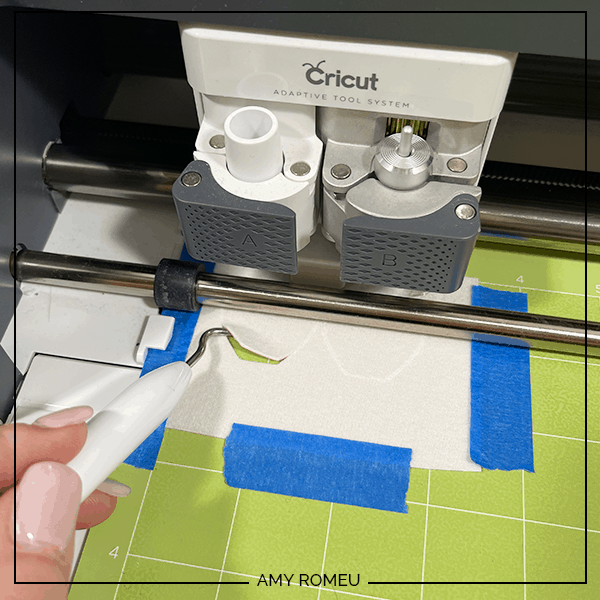
If they did, then click the double arrow button to unload the mat.
If they didn’t, just press the C button again to repeat the cut. You can repeat the cut as many times as necessary as long as you haven’t unloaded the mat.
Once the cut is complete, remove the cut earring shapes from the cutting mat.
Repeat this process for the other faux leather mat so you can use the same cut settings.
If there are any fuzzies on the back of your cut faux leather pieces, you can trim them with small curved scissors like these. These are my favorite scissors from Amazon for trimming faux leather.
STEP 7 – Cut Vinyl Mats
Return to Cricut Design Space to cut the vinyl mats using the green standard grip cutting mat. Vinyl goes shiny side down on the mat. Your material settings will vary based on the vinyl you have chosen.
I cut glitter heat transfer vinyl using the Glitter Vinyl setting and “Default” cut pressure. Repeat the cut once if your glitter HTV is thick like mine is.
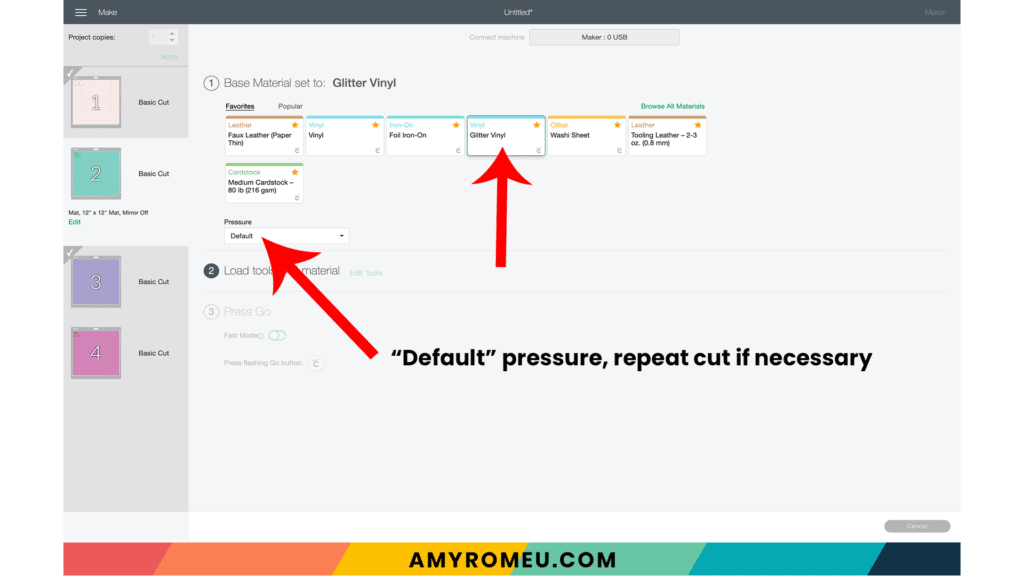
If you are using regular heat transfer vinyl, I suggest cutting with the “Washi Sheet” setting and “Default” pressure. Again repeat the cut one time as needed.
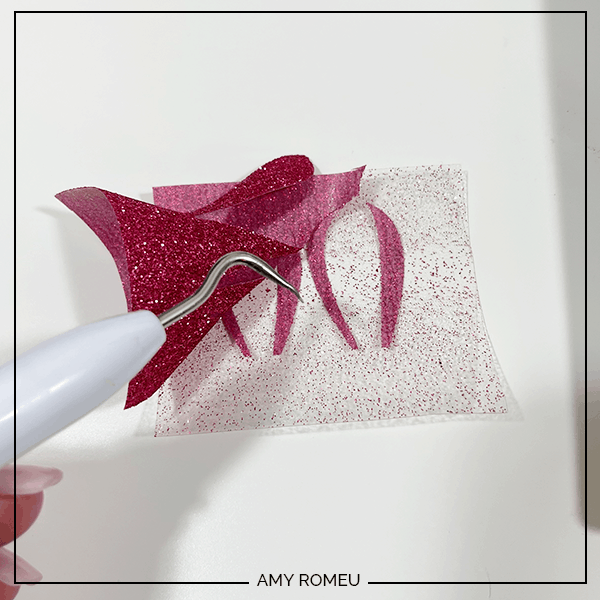
Cut and weed all of the vinyl layers and set aside.
STEP 8 – Press the Vinyl onto the Faux Leather
Now to press the stripes onto the hot air balloon earrings.
First line up the two vinyl layers on top of each other and match them up to the image on your canvas in Design Space to know where they go.
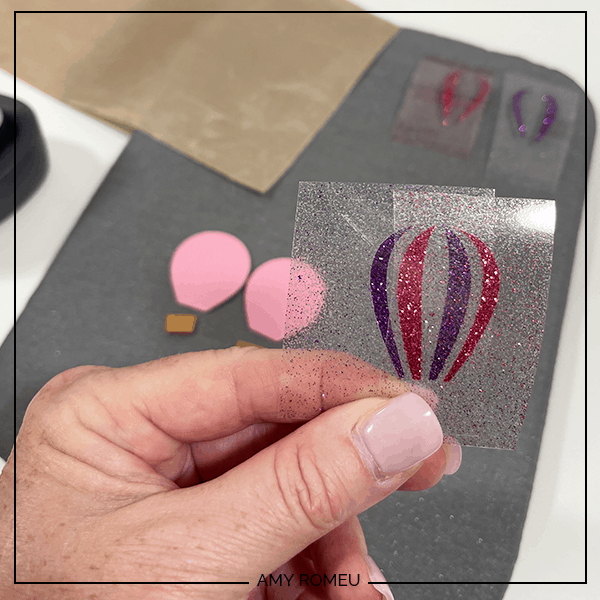
Place one vinyl layer onto the faux leather balloon layer.

Cover with a Teflon sheet or cover sheet like parchment paper (not wax paper).
I use an Easy Press Mini (on the lowest temperature setting) to press earrings. You can also use a regular Easy Press or even an iron, on a low setting, NO steam. I recommend 275 degrees for an Easy Press.
Whatever you are using to press, you want to make sure you aren’t pressing too hard or for too long so you don’t flatten or damage the faux leather.
Gently press for 5-7 seconds, just long enough for the layer to stick down to the faux leather.
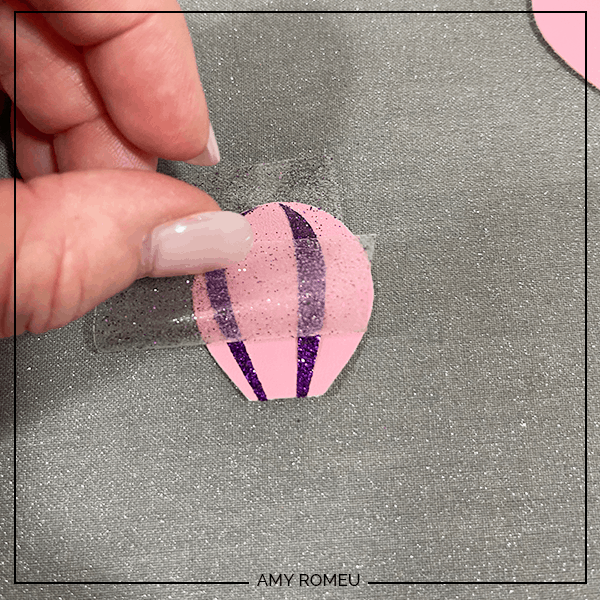
Peel the cover sheet off carefully. If the vinyl lifts, carefully place the cover sheet back down and press for a few more seconds. Peel the clear cover sheet and discard.
Layer on the second set of balloon stripes and repeat the pressing process.
When you’ve done all the layers, cover again with a cover sheet and press for 3-4 seconds. Your earring will look like this:
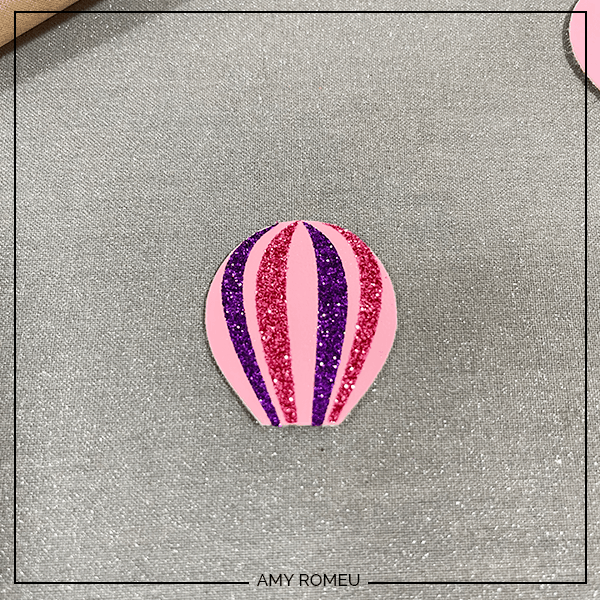
Repeat with the other earring.
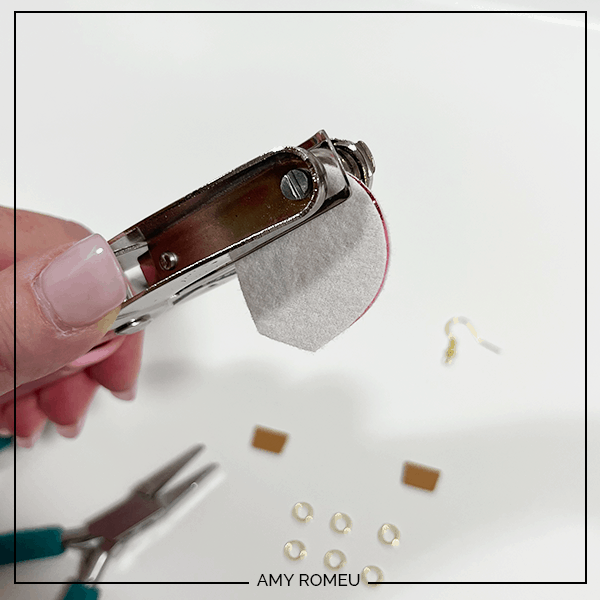
STEP 9 – Punch Holes
This hot air balloon earring design calls for 5 holes in each earring. One for the earring hook at the top of the balloon, two at the bottom of the balloon and two at the top of the basket.
The yellow dots indicate the hole locations (the dots are large so you can see them better – your holes shouldn’t be that large on your earrings).
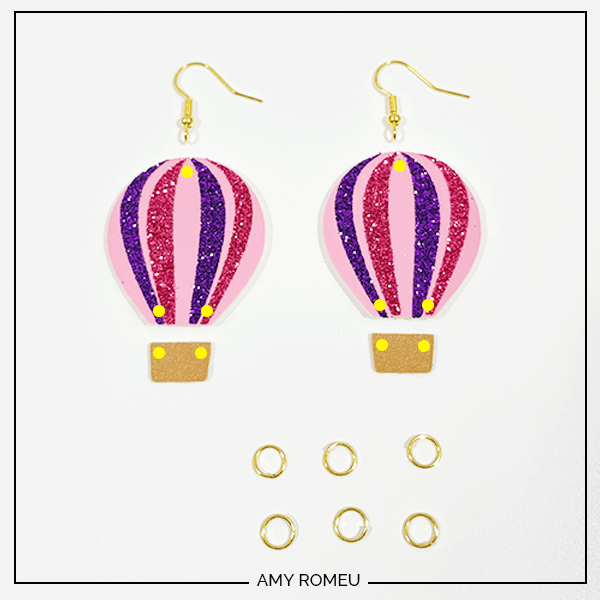
Use a sharp object or a 1/16″ hole punch like this hole punch or this hole punch to make the earring holes.
Now it’s time to attach the earring hooks.
STEP 10 – Attach the Earring Hooks
To attach the earring hooks, you’ll need 10 6mm jump rings, earring hooks, and two pairs of flat nose pliers.
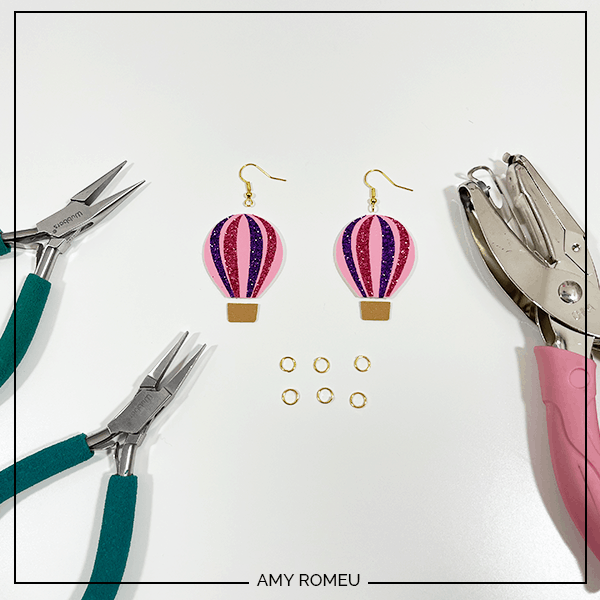
To connect the earring hooks, you’ll first need to turn the bottom loop on the fishhook sideways so your earrings will hang correctly.
For more details on this technique, visit my post about how to make faux leather earrings hang straight here. Or you can watch this video on YouTube:
After you’ve turned your earring hook loops, add the earring hook. Be sure the hook is facing in the right direction.
Attach the basket to the balloon using two jump rings on each earring. I like to use two pliers to open and close jump rings more easily.

Repeat with the second earring. That’s it!
Aren’t these hot air balloon earrings cute? If you do make this project, I would love to see your hot air balloon earrings. Please share a photo of them in the comments, or tag me on Instagram: @amyromeucrafts
Want to see all of my Cricut earring & jewelry tutorials? CLICK HERE

WANT THE SVG FILE SO YOU MAKE THESE CRICUT HOT AIR BALLOON EARRINGS YOURSELF?
It’s Design #182 in my FREE Resource Library. Get instant access by filling out the form below!
Want to remember this? Post this CRICUT HOT AIR BALLOON EARRINGS project to your favorite Pinterest board!
Hello Amy,
Thank you for creating these earrings for me. I will be making them in the next couple days and I will send you pics. Again Thank You So Much for this design.!!!!!!!
Dina
Dina – thank you for the inspiration! I’m so glad you like this design. 🙂 Amy