DIY Cricut Patriotic Earrings
How to Make DIY Patriotic Earrings with a Cricut
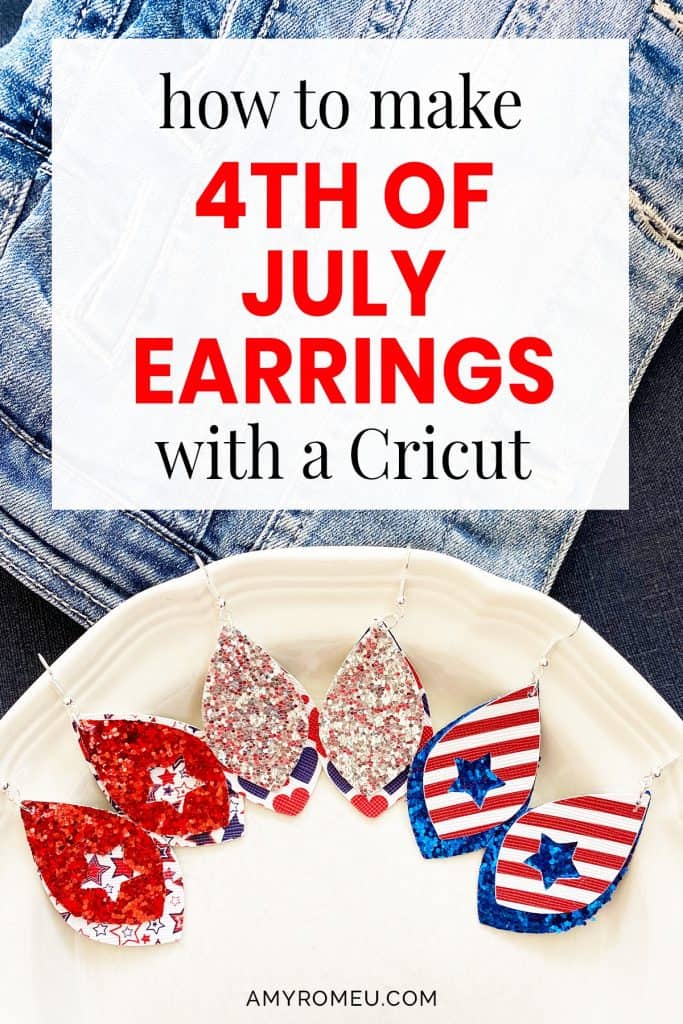
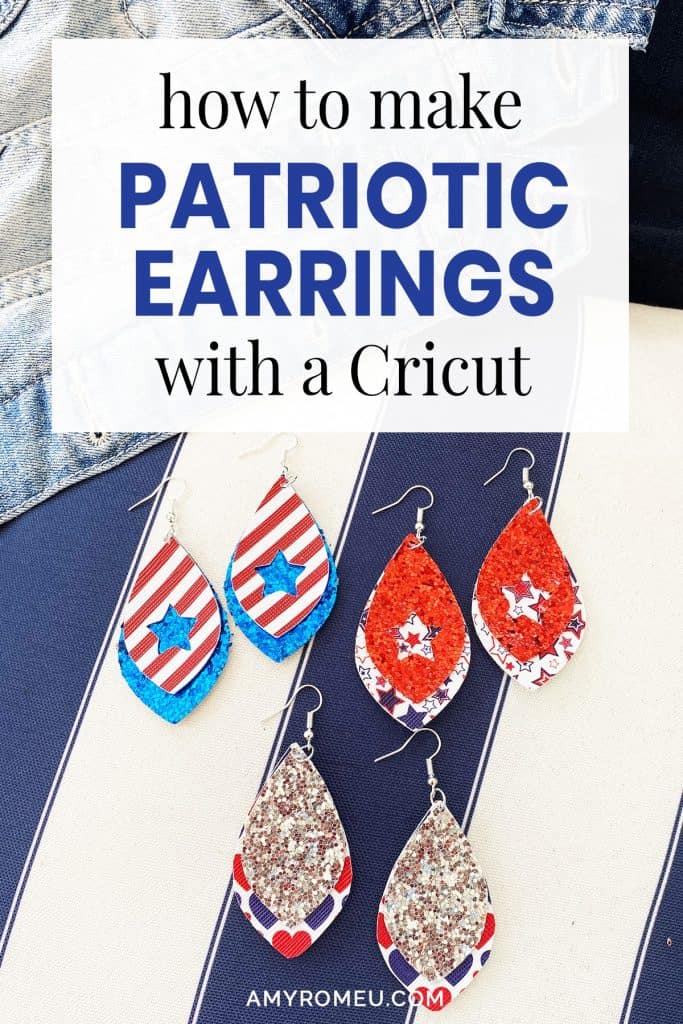
It’s almost Memorial Day, and even though we won’t be having a big family gathering this year, I still want to celebrate in style! I’m extra proud of myself for getting my act together early this year and making these patriotic earrings, because I’ll have them to wear for July 4th, Patriot’s Day, Election Day, and Veteran’s Day too! If you want to learn how to make these DIY Patriotic Earrings with a Cricut, I’m going to show you how in this post!
If you haven’t made faux leather earrings with your Cricut yet, this tutorial is a great beginner project. You can make these Faux Leather Patriotic earrings with the Cricut Maker, an Explore Air 2 or even the new Cricut Joy! (See my post below about a few small modifications to make when making faux leather earrings with a Cricut Joy.)
To see my post about how to make faux leather earrings with the Cricut Joy, click here!
In this tutorial, I’ll give you my step by step instructions and tell you exactly what materials I used to make this project.
Also, I love to share my designs, so I’ll give you my SVG cut file for these patriotic earrings FREE so you can get started making your own Memorial Day earrings, 4th of July earrings, or Election Day earrings right away!
You can download my SVG file for this project at the bottom of this post.
Ready? Let’s get started!
Want to see all of my Cricut earring & jewelry tutorials? CLICK HERE
This page contains some affiliate links (which means if you make a purchase after clicking a link, I will earn a small commission at no additional cost to you). Read my full disclosure policy here.
DIY Cricut Patriotic Earrings – Materials List
- A vinyl cutting machine. I have the Cricut Maker, which you can get at Amazon here or at Cricut.com. You can also use the Cricut Explore Air 2 or even the new Cricut Joy!
- Patriotic colored faux leather like this assortment from Amazon, or this one.
- Cricut Strong Grip (Purple) Cutting Mat. You can buy these on Amazon here, or at Michael’s here. They are also available at Hobby Lobby, Joann’s, and Walmart.
- Cricut Strong Grip Transfer Tape. This is to protect your mat from the chunky glitter residue as well as hold your chunky glitter sheet firmly to your cutting mat. I like the Cricut brand – make sure it is the Strong Grip version – because it’s super sticky. I bought mine from Amazon here.
- Blue painters tape. This will help keep your faux leather and glitter sheets in place on your mat. You can get it at any hardware store and most big box or grocery stores. Amazon also has it here.
- A weeding tool. I use the weeding tool that came with my Cricut tool set from Amazon here.
- A small hole punch (for if the Cricut doesn’t cut the holes all the way through, which happens sometimes!). This is my go-to hole punch for making Cricut earrings from Amazon here. It’s called a “paper punch,” but I use it to punch earring holes in all kinds of faux leather easily.
- Earring hooks – I used earring hooks from this assortment of earring hooks in different finishes these from Amazon here. Hobby Lobby, Michael’s, and other craft stores, as well as your local bead store, will have lots of earring hooks as well.
- Small jump rings – I used this assortment of 6mm size jump rings in different metal finishes from Amazon here. Again, your local craft store or bead store will have plenty of jump rings to choose from if you want to pick some up in person. I recommend using 6mm or 5mm jump rings for these earrings.
- Two pairs of flat nose pliers – My favorites are Wubbers brand in the “Baby” size. You can see the Baby Wubbers Chain Nose Piers on the left on Amazon here, and the Baby Wubbers Flat Nose Pliers on the right on Amazon here.
Note: Be sure to check out my post Beginner’s Guide To Jewelry Making Tools for all the information you need to know about buying and using jewelry making tools.
- My free earring templates for this design. They are Design #132 in my blog’s SVG Library. Get the library link and password emailed to you instantly by filling out the form below.
Want instant access to my Free Resource Library full of SVG files?
Just Enter your name and email Below!
By signing up, you’ll get instant access to my FREE SVG Library with hundreds of crafting SVG templates! You’ll also get my weekly newsletter full of crafting ideas, tutorials, and inspiration! Unsubscribe anytime.
PROJECT INSTRUCTIONS
STEP 1 – DOWNLOAD THE SVG CUT FILE
Download the SVG cut file (Design #132) for these patriotic earrings earrings from my Free SVG Library. You can get the password to my library via a link at the bottom of this post.
Save the zipped folder that downloads to your computer. Then unzip the folder to access the folder’s contents. You’ll need to unzip or extract the files FIRST so you can upload the cutting file to Cricut Design Space.
STEP 2 – UPLOAD THE SVG FILE TO CRICUT DESIGN SPACE
When you open Cricut Design Space, click on NEW PROJECT to get started. Then click on UPLOAD from the left hand side menu.
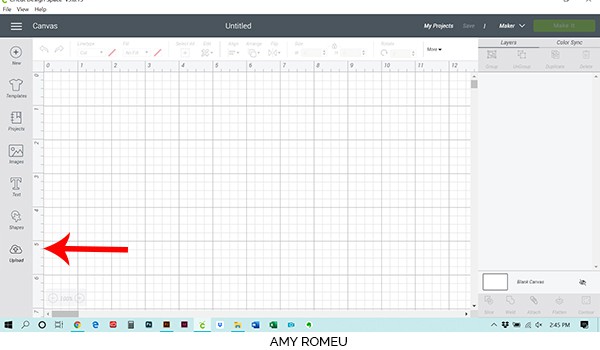
Click on the UPLOAD IMAGE button, then click BROWSE to locate where your unzipped SVG files are saved on your computer.
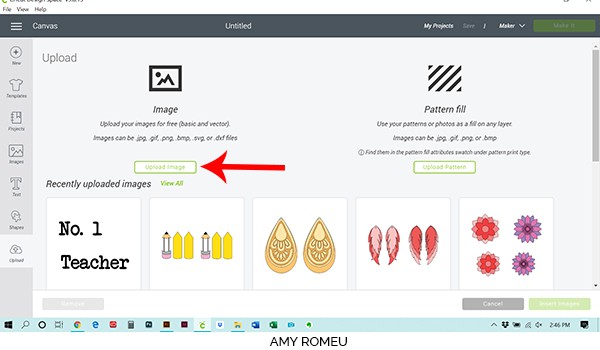
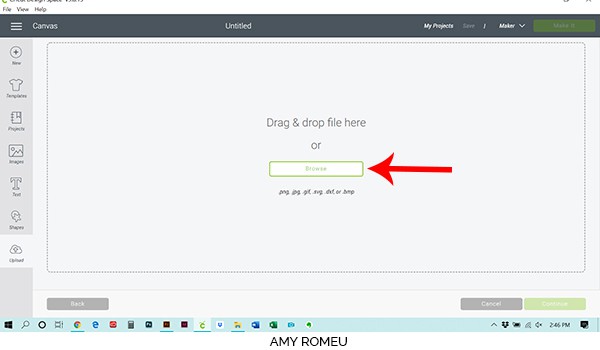
Double click on the SVG file to bring it into the upload screen in Design Space. If you get an error message that says “unsupported file type,” you may have clicked on the wrong file, or your SVG file is still zipped.
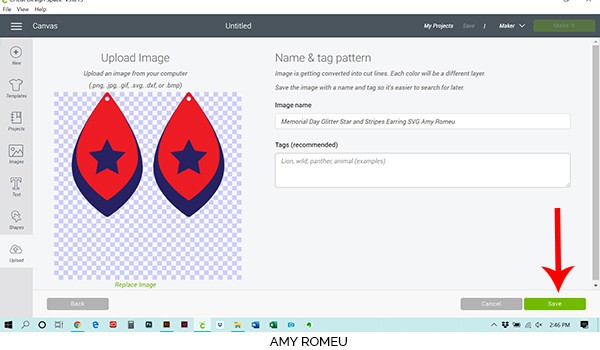
You’ll see a preview of the patriotic earring shapes for this project.
Hit the green SAVE button.
After you’ve selected your file to upload, you’ll see it as the first item in your “recently uploaded images” row.
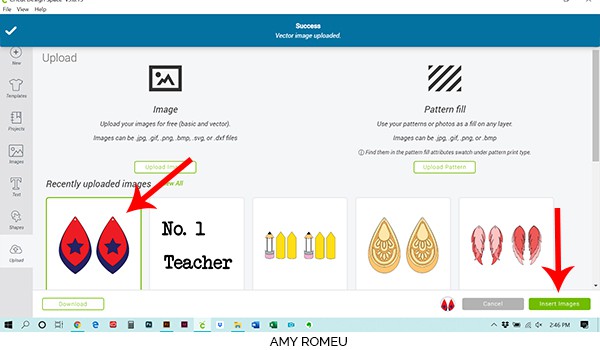
Click on the patriotic earring shapes so they are surrounded by a green box. Then click the green INSERT IMAGES button.
This brings the shapes you’ll cut for the earrings into Cricut Design Space. Drag your artwork to the upper left corner of your mat. It isn’t necessary to resize your earrings, but you can if you want to. You can resize them by clicking and dragging on the arrows in the bottom right corner. Keep in mind if you resize them, you’ll be resizing the earring holes, too. In that case, you can hide the earring holes to keep them from cutting with the Cricut and punch the earring holes manually with a hole punch. More on how to hide the earring holes in the next part!
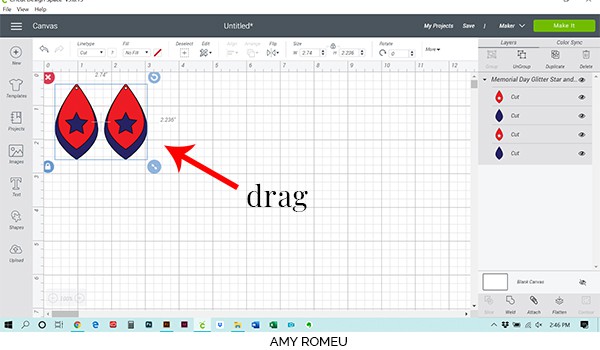
If you want to cut the earring shapes as shown (with the earring holes and the star cut outs, click the green MAKE IT button and skip ahead to Step 4. If you want keep the stars or the earring holes (or both) from cutting, you can do that in the next step, Step 3.
STEP 3 – Optional: How to Keep Earring Holes or Stars from Cutting
To hide the cutout stars or earring holes, you’ll use the CONTOUR feature. First UNGROUP the earring shapes by selecting them all with your cursor and then clicking UNGROUP from the top of the Layers panel.
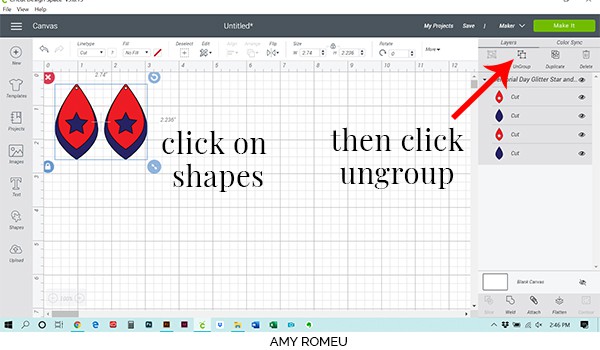
When the shapes have been ungrouped, click on just one of the earring shapes that has the part you want to hide, or contour. Then click on CONTOUR in the lower right hand corner of the Layers panel.
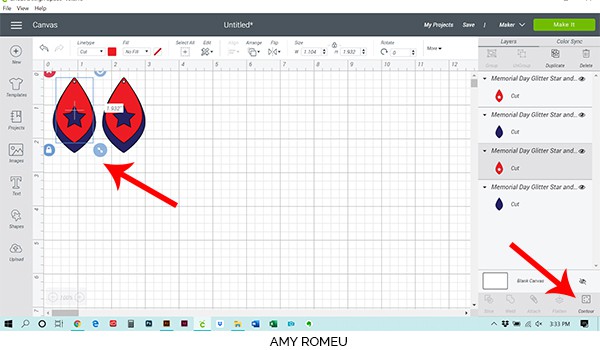
The Coutour window will appear. You may want to zoom out first so you can see the entire shape and it’s elements that you can hide.
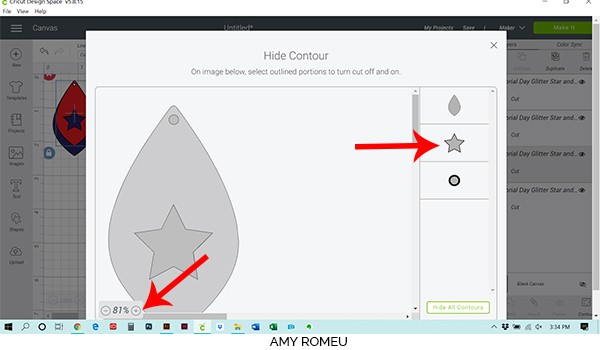
Click on the shape or element you want to hid from the options shown on the right side of the screen. Now the preview will show that shape greyed out in the cutting preview:
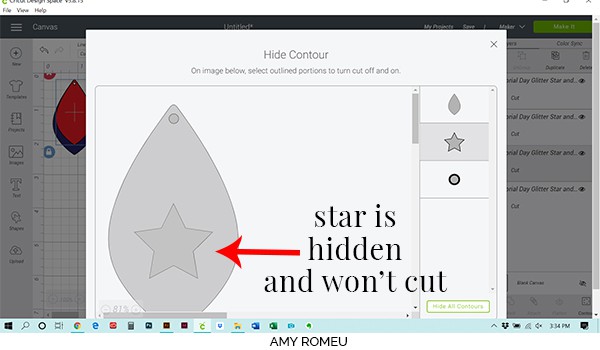
Close out this screen and you’ll return to the canvas. You should see the shape is now hidden from view:
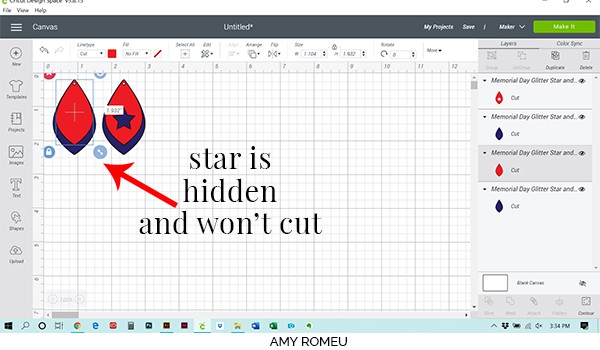
Repeat the contouring steps with the other earring. Then click the green MAKE IT button.
STEP 4 – Mat Preview
The mat preview screens will load. The Cricut will cut each material on its own mat.
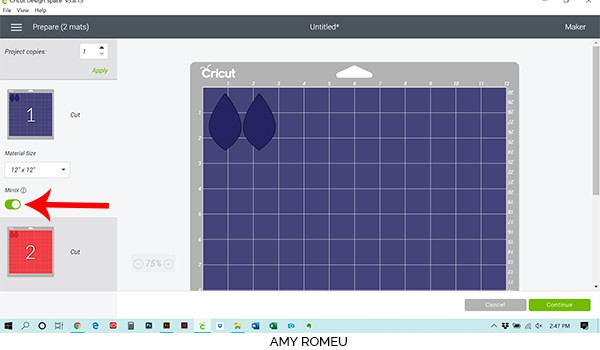
Make a note of this size you need to cut your faux leather material so the earring shapes will cut out completely. I like to add about a half inch to the measurement to be safe.
Before continuing, I strongly recommend clicking on both mats in the preview on the left and toggle every green MIRROR button on, so I don’t forget to do it later. Honestly, this project doesn’t have text or shapes with specific left or right sides, so you don’t really even have to mirror for this project. I still do it though to reinforce the habit. 🙂
Once you cut your materials to size, press the green CONTINUE button.
STEP 5 – Make Material Selections
Now you’ll select your material. I use the same material setting for both smooth faux leather and glitter faux leather, which makes this project pretty easy.
Note: If you’re using a Cricut Explore Air 2, turn your dial to “Custom” so you can choose the setting recommended below. If you’re using the Cricut Joy, set the machine to cut with a mat and then select the material setting below. You won’t have a purple cutting mat, but follow the directions below using the green mat.
I already have my preferred material selection – Faux Leather (Paper Thin) – saved as a favorite material in Cricut Design Space as seen below.
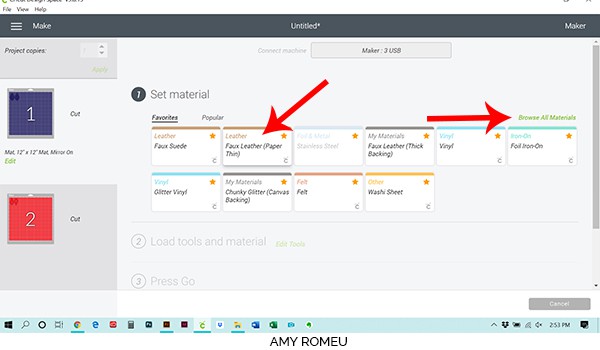
If you do, too, click on Faux Leather (Paper Thin) now. If you don’t, click on “Browse All Materials” to search for this setting and select it.
After you’ve selected Faux Leather (Paper Thin) as your material, you are ready prepare your mat and make the cut.
STEP 6 – Prepare Mats for Cutting
Note: In this project, the glitter blue material will cut first. If you aren’t using glitter faux leather, skip this next part about using strong grip transfer tape.
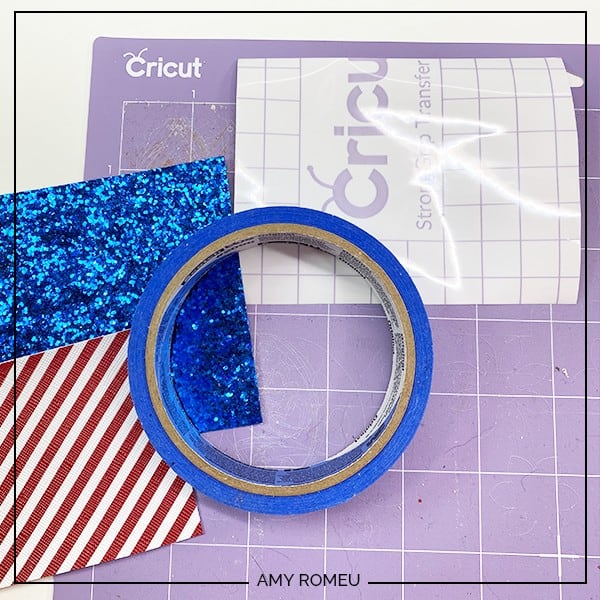
To protect your cutting mat from lots of glitter residue, I like to put strong grip transfer tape down on my cutting mat before placing the glitter on the mat to cut. Cut a piece of strong grip transfer tape slightly larger than your glitter material that will cut, and place it STICKY SIDE UP on your mat in the location the glitter shapes will cut from.
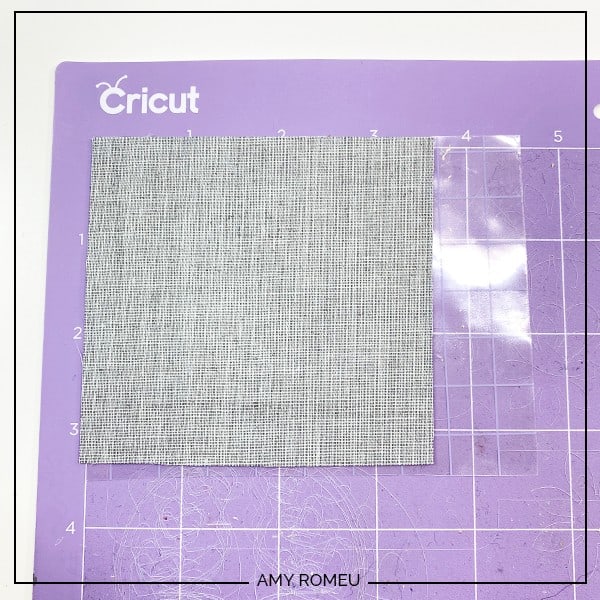
Then place your glitter material glitter side down onto the sticky side of the transfer tape, like this:
Now tape all around the glitter faux leather with blue painter’s tape. Press the material down to your mat firmly with your hands.
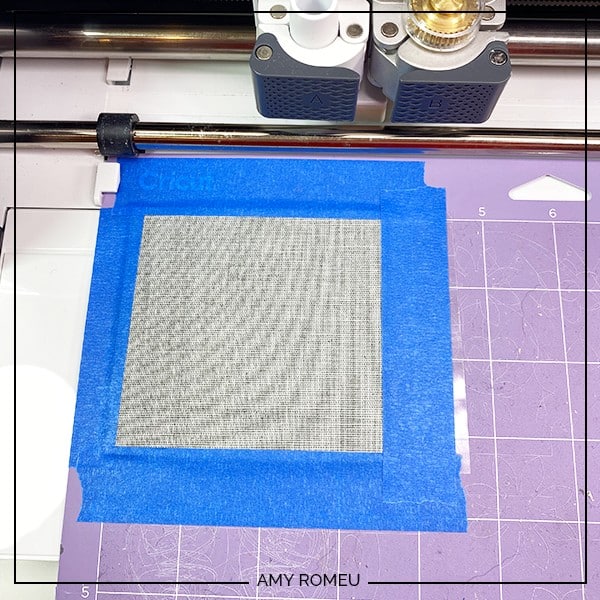
Load the mat into the Cricut by lining the mat between the mat guides and then pressing the double arrows button. If the mat doesn’t go in straight, or one side isn’t under the guides, press the double arrows button again to unload the mat. (Confession: that’s what I did the first time I used my Cricut!)
The “C” Cricut button will start to flash, indicating the machine is ready to cut. Press the C button to begin the cut.
When the cut is finished, click the double arrow button again to unload the mat. You’ll see the shapes have cut out of the glitter beautifully. Remove the shapes from the mat and you’ll see the loose glitter has stuck to the transfer tape, which you can easily remove.
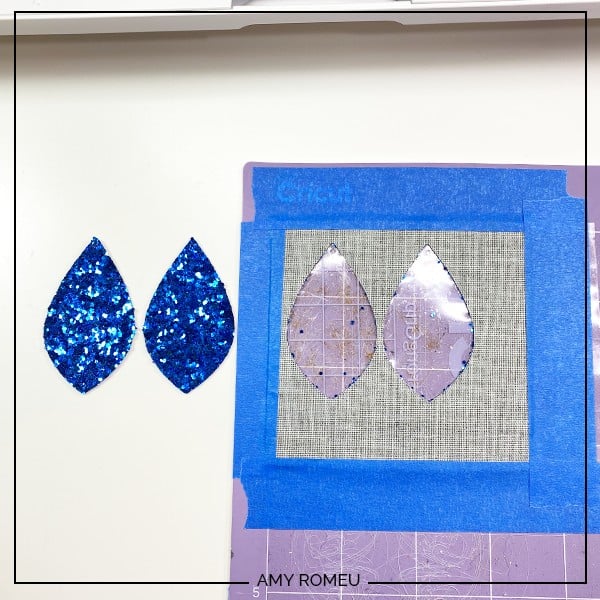
Set these shapes aside and prepare the next mat for cutting. Place the second piece of faux leather down on the mat in the location shown on the mat preview. Select your material setting as Faux Leather (Paper Thin) again and load the mat into the machine. Press the C button to cut. When the cut has finished, unload the mat and remove the shapes.
STEP 7- Optional: Punch the Earring Holes
Note: If you had your machine cut the earring holes, you may be disappointed to see they didn’t cut all the way through, or not well at all. Don’t worry! That happens a lot. I used to get very frustrated at how the Cricut cut earring holes, but then I bought a hole punch and I never worried about it again.
If the Cricut cuts the holes perfectly, great! If it cut them almost perfectly, try trimming any remaining material that is keeping the hole attached. If the hole didn’t punch well at all, at least you have a guide mark to know where to place your manual hole punch. Easy, peasy!
This is my favorite hole punch. It makes 1/16″ inch size holes, which are perfect for earrings. I got it from Amazon here. It’s called a “paper punch,” but I only use it for making earring holes and it works really well on all kinds of materials.
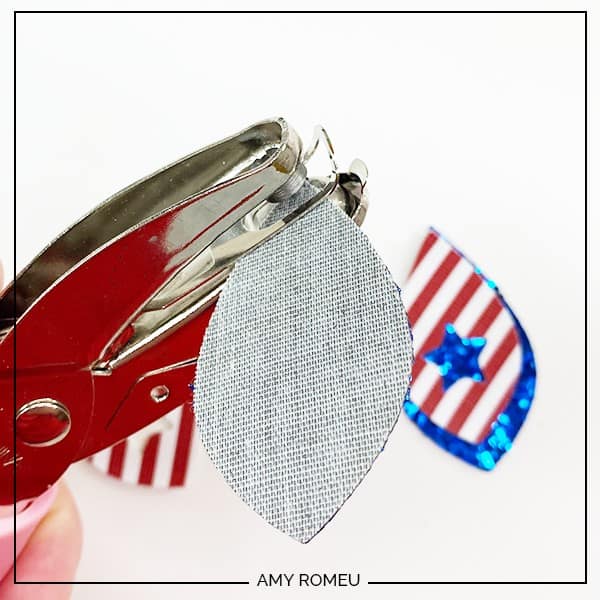
Once all of your earring holes are ready to go, it’s time to attach the earring hooks.
STEP 8 – Attach the Earring Hools
Now it’s time to assemble your earrings!
You’ll need small jump rings, earring hooks, and two pairs of flat nose pliers.
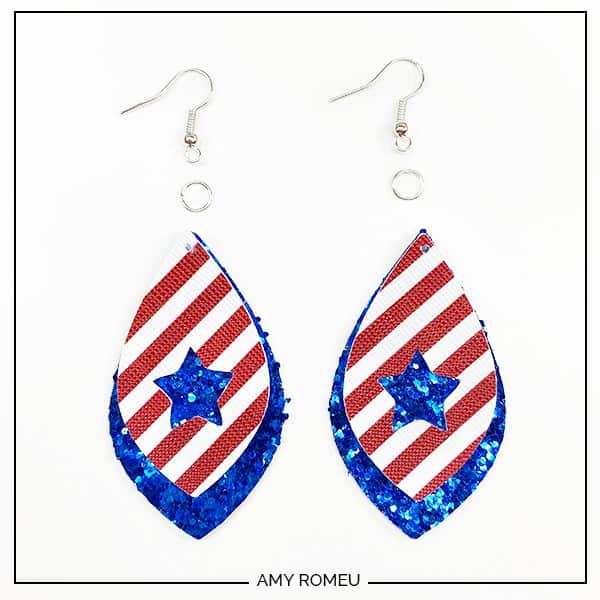
To connect the earring hooks, you’ll first need to turn the bottom loop on the fishhook sideways so your earrings will hang correctly. See the example image below to see how the orientation of the earring hook has to change so your earrings will hang straight.
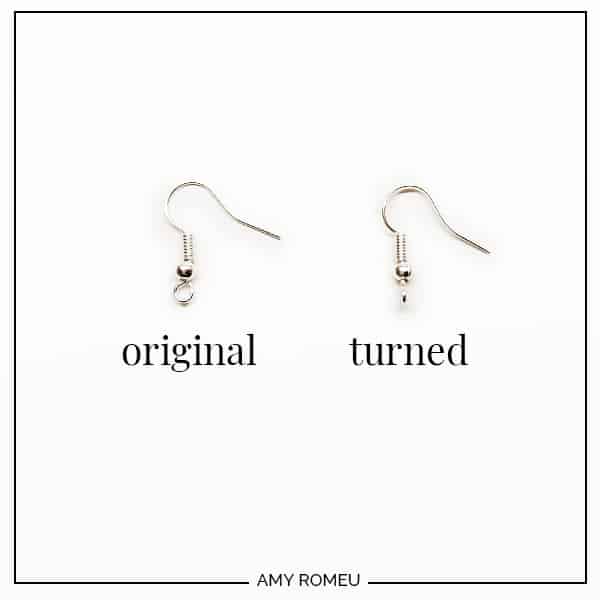
To see more about this, visit my post about how to make faux leather earrings hang straight here.
You’ll do this using one pair of flat nose pliers. While holding the hook firmly between two fingers, grip the entire earring loop between the pliers and twist your wrist until the loop is perpendicular to the earring post. Repeat with the second earring hook.

Once your earring hooks are turned, use your two pliers to open your jump rings, as shown below. It’s important to open them without distorting the original circle shape of the jump ring. You can do this by twisting only one wrist forward to open the jump ring like a door. To close the jump ring, you reverse the wrist movement to close the jump ring again.
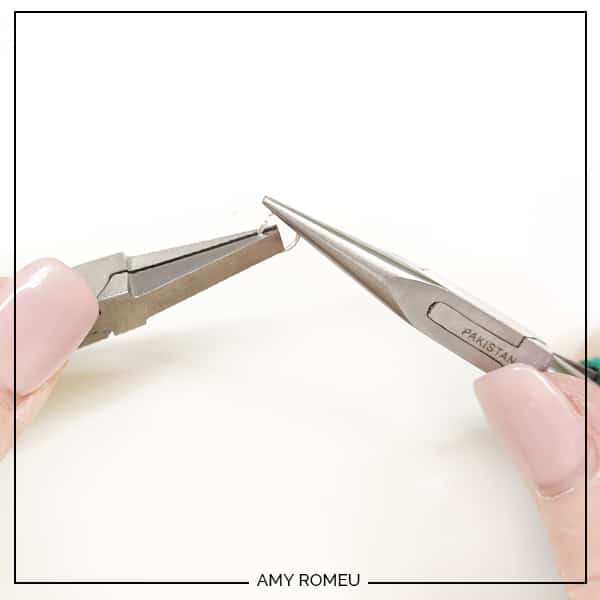
Once your jump ring is open and you’ve twisted the loop at the bottom of the earring hook, loop the jump ring through the earring holes, add the earring hook, and close the jump ring again.
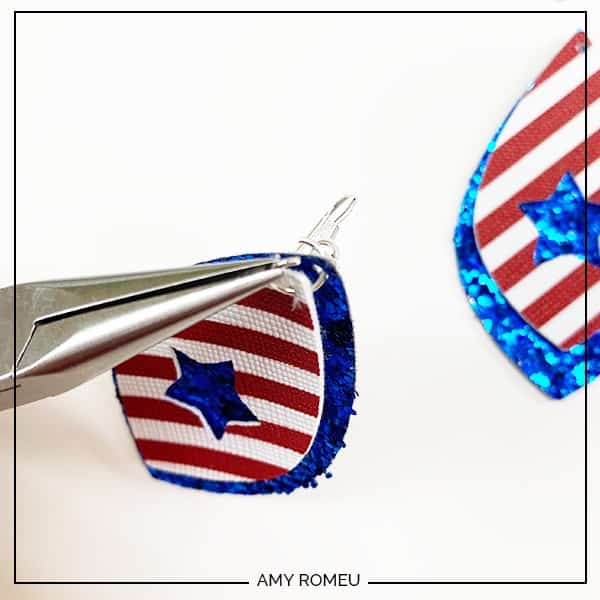
Repeat with the second earring. That’s it! Weren’t these patriotic earrings easy to make?
I made three different pairs, and I can’t decide which one I like best! You can see below I made some with the star cutout, and some without (by contouring – or hiding – the star before cutting).
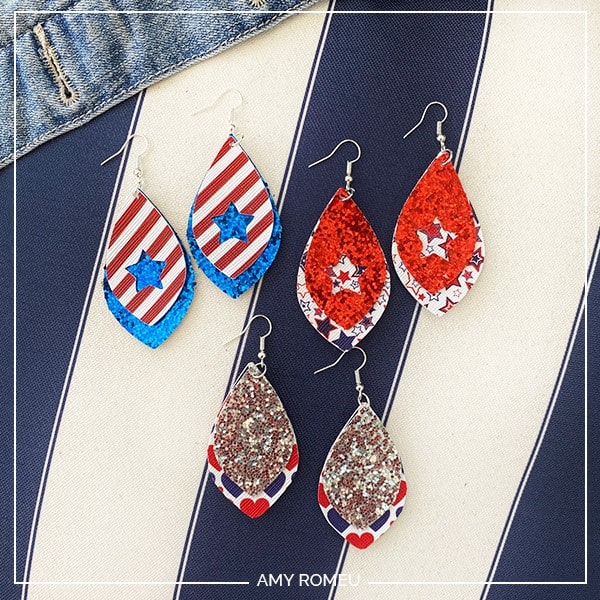
If you do make this project, I would love to see your earrings! Please share a photo of them in the comments, or tag me on instagram: @amyromeucrafts
Want to see all of my Cricut earring & jewelry tutorials? CLICK HERE
Until next time… and happy crafting!

WANT THE FREE SVG FILE SO YOU MAKE THESE PATRIOTIC EARRINGS YOURSELF?
It’s Design #132 in my FREE SVG Library! You’ll receive the library link and password instantly after filling out the form below.
Want instant access to my Free Resource Library full of SVG files?
Just Enter your name and email Below!
By signing up, you’ll get instant access to my FREE SVG Library with hundreds of crafting SVG templates! You’ll also get my weekly newsletter full of crafting ideas, tutorials, and inspiration! Unsubscribe anytime.
Want to remember this? Post this DIY PATRIOTIC FAUX LEATHER EARRINGS project to your favorite Pinterest board!
