
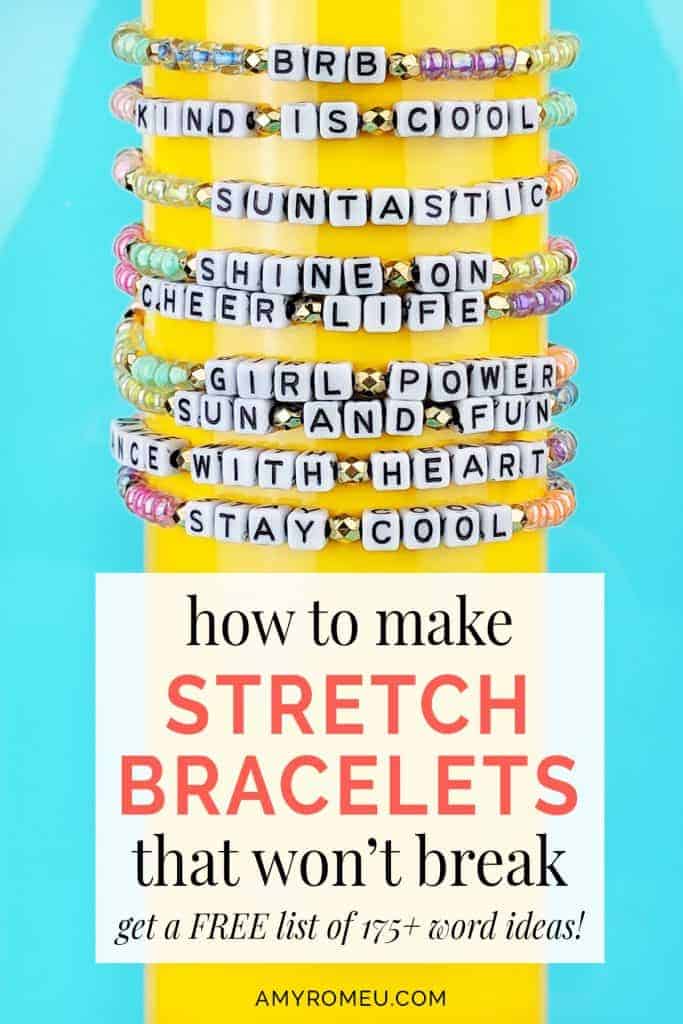
How To Make Stretch Bracelets (That Won’t Break)
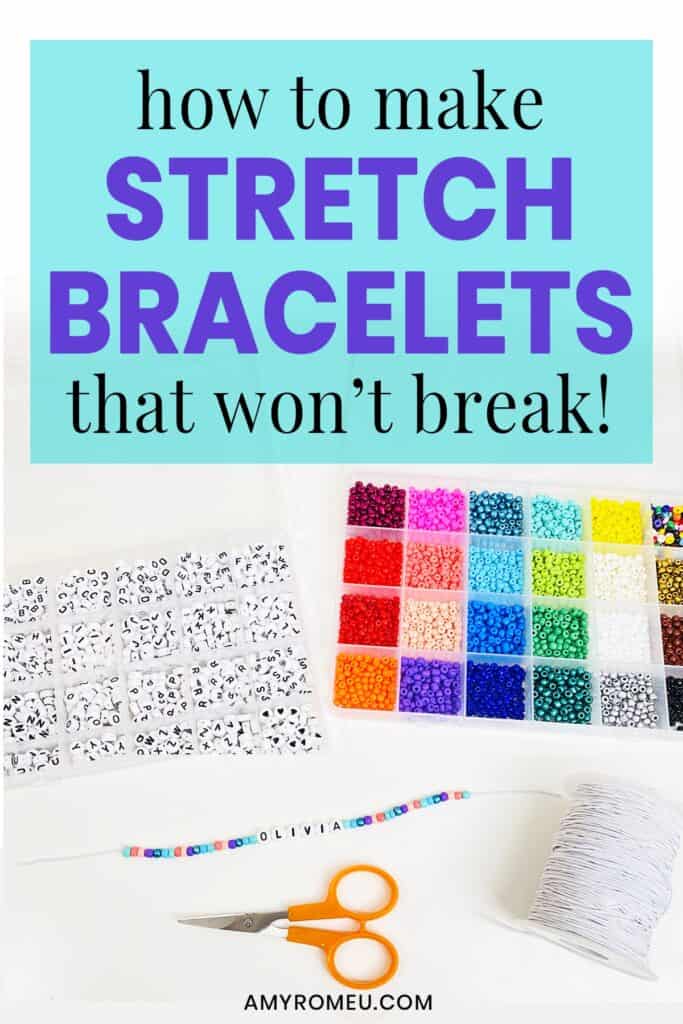
How To Make Stretch Bracelets (That Won’t Break) – a Fun Summer Kids’ Craft
Stretch bracelets – made from elastic cord – can be so fun to make, but yet so frustrating to finish off. Am I right? Whether you want to make stretchy bracelets to wear yourself, or your kids want to make them as an easy summer craft, there is a super simple way to make stretchy bracelets that will last and won’t break!
Let me show you how with this fun kids letter bead bracelet project – and I’ll share my special hack so your stretch bracelets won’t break!
If you are going to make these at home, you’ll want to grab my big list of 175+ fun words and phrases that are perfect for girls’ stretch bracelets with letter beads! If you or your kids need some ideas or inspiration, I’ve got you covered! You can download the list for FREE from a link at the bottom of this post.
If you’d rather watch a YouTube video on How to Make Stretch Bracelets That Won’t Break, click here:
Ok, let’s get started!
This page contains some affiliate links (which means if you make a purchase after clicking a link, I will earn a small commission at no additional cost to you). Read my full disclosure policy here.
Materials Needed for Stretch Bracelets with Letter Beads
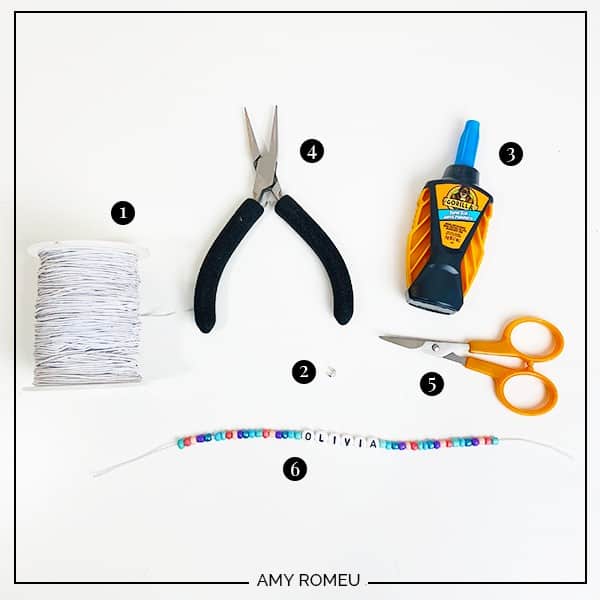
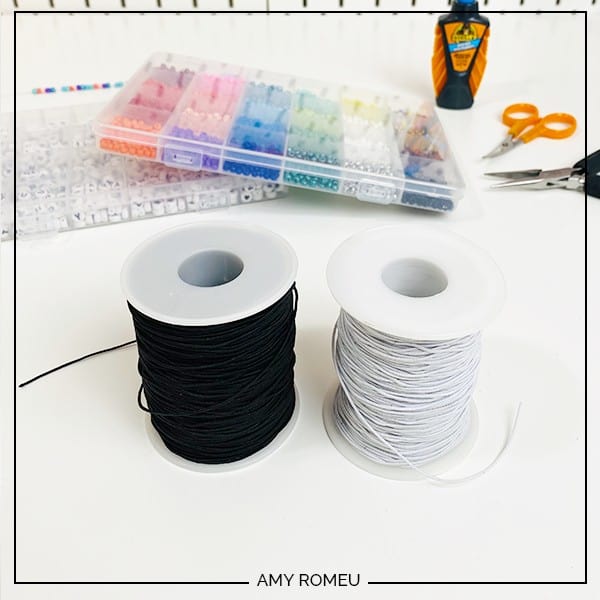
1. Elastic bead cord. I bought a 2 pack of this cord with a White and Black spool from Amazon. Just the White spool is sold separately here. This cord is .8mm thick, which is an ideal cord for most letter bead projects.
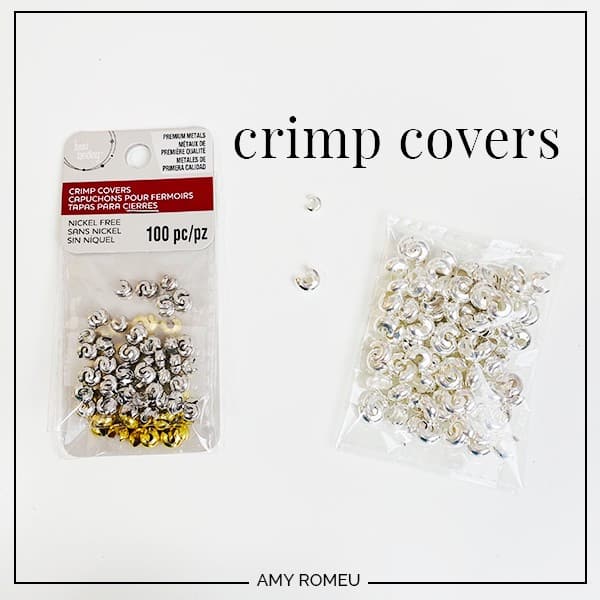
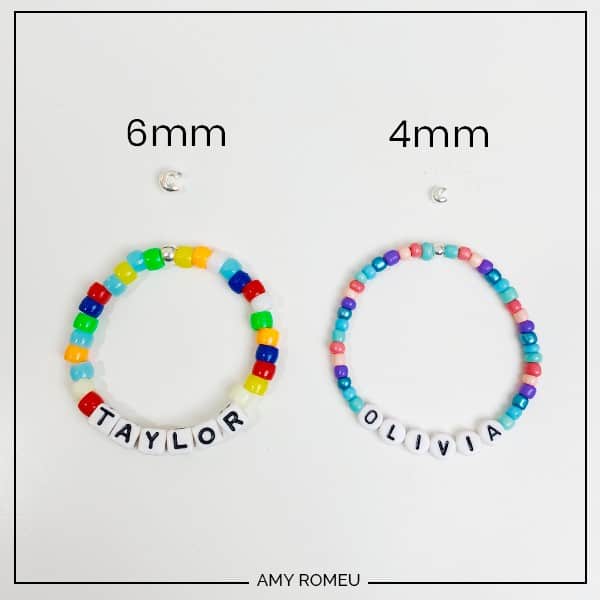
2. Crimp covers. These are the KEY to making this project work! I use 4mm crimp covers from Amazon for seed bead bracelets. Click here to see them in silver finish and click here for gold finish.
For a bracelet with the larger pony beads, use 6mm size crimp covers. They are available on Amazon in silver finish here and in gold finish here.
(Note: Crimp beads are NOT the same as crimp covers).
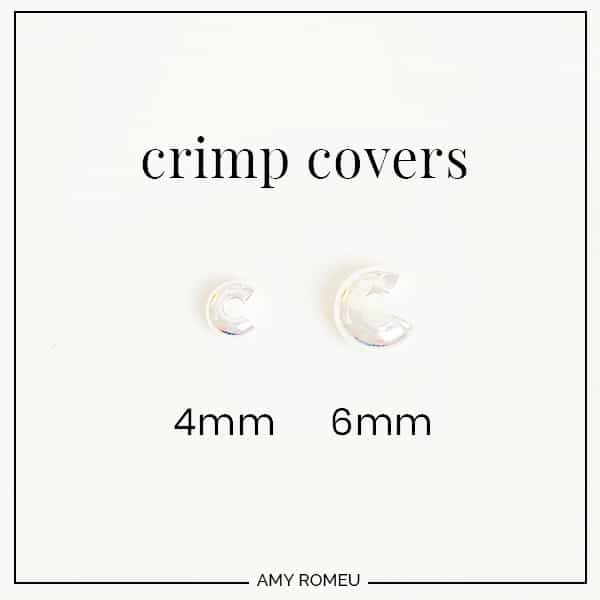
Crimp covers are meant to be used in jewelry strung on beading wire. Since wire can’t be knotted, it has to be finished with a crimp bead, a small metal tube. They aren’t very attractive once crimped, so a crimp cover goes over the crimp and, once closed, looks like a bead. It makes wire beaded jewelry look finished.
However, for this project, we will use a crimp cover as an elastic knot cover, which will keep our stretch bracelet from breaking!
The cord knot will fit inside the crimp cover, and the cover will be closed shut with your pliers so the two open ends will meet. The end result will be look like a round bead, and your knot will be safely covered inside the bead shape. Voila!
3. Super fast drying glue. This is for your knot, and works great with this kind of elastic cord. Only the tiniest drop is necessary! You’ll want a liquid and not a gel formula. I used Gorilla Super Glue with a Precision Tip from Amazon here. You can also use Krazy Glue, nail glue, or Super Glue.
4. Needle nose or flat nose pliers. Also called chain nose pliers. They have cone shaped jaws that are flat on the inside. I use these and these from Amazon, but any needle nose jewelry making pliers will do!
You can also get them at most major craft stores in the jewelry making department. You can even use the ones in your garage toolbox in a pinch!
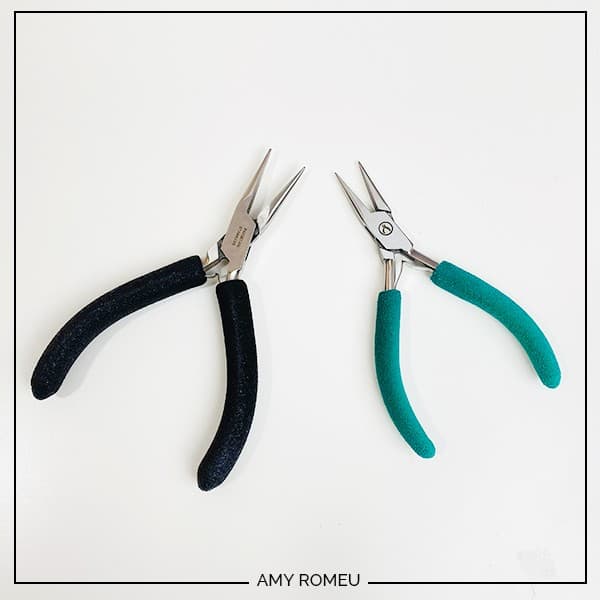
For more information about jewelry making tools and which ones are the 3 must haves, check out my Beginners Guide to Jewelry Making Tools post here.
5. Small scissors. These Fiskars 4″ curved scissors are my favorite.
6. Letter beads and seed beads in kits like this one, this one and this one.
Or you can buy just a box of letter beads like this one here.
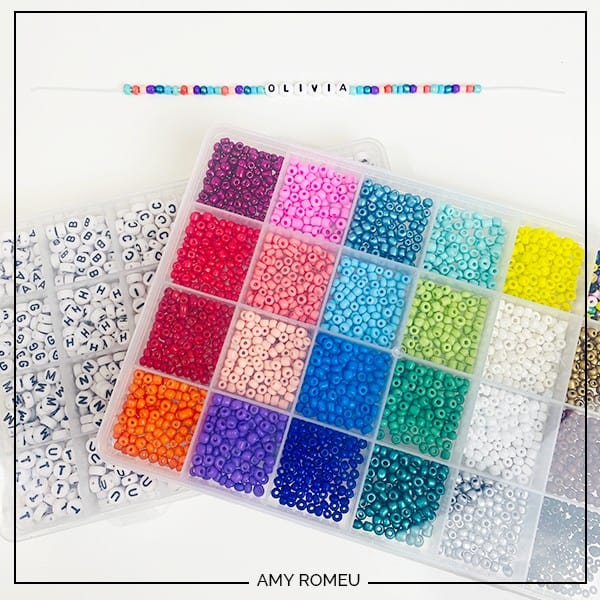
Of course you can use beads you have on hand or most any bead kit you find at the craft store.
How to Make Stretch Bracelets that Won’t Break – PROJECT INSTRUCTIONS
STEP 1 – PLAN BRACELET DESIGN
Download my free list of 175+ Sayings for Letter Bead Stretch Bracelets to get the ideas flowing! It’s #108 in my Free Resource library. You can get the password and the library link emailed to you instantly by filling out this quick form:
Choose your beads to spell out your desired phrase. The longer the word or phrase, the less room you’ll have for colorful beads, so I suggest a word or phrase shorter than 15 letters. It’s up to you, of course!
Cut a length 12 inches of your .8mm elastic cord. Don’t worry, your bracelet will be much shorter, but I’ve found it’s much easier to string beads (especially for kids) if they have some extra room on their string as they bead.
STEP 2 – STRING LETTER BEADS
Thread your letter beads on your cord first. Then add seed beads to each side.
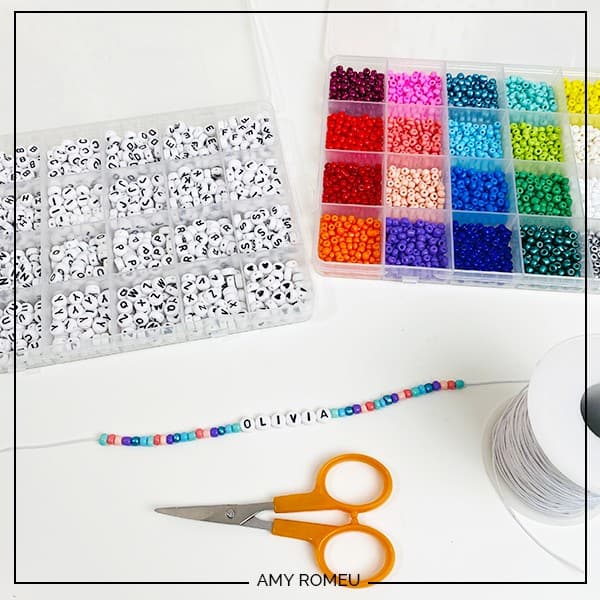
TIP: It’s best to use a work surface like a table or a lap tray for the stringing part. To keep the beads from falling off the string, start with a small piece of tape at one end of the cord. String the beads in the middle first and then add the colorful seed beads evenly to one side. Carefully remove the tape, place tape on the beaded end, and then bead the other end.
STEP 3 – SIZE THE STRETCH BRACELET
Have someone else wrap the bracelet carefully around the wearer’s wrist. Try to make the cords ends and the last beads meet. There should some slack in the bracelet and the last beads should almost touch with room for one more bead, the crimp cover.
If you need to take some beads off, take them off from each side so there is still the same amount of seed beads on each side of the letters. Do the same thing if you need to add more beads – add the same amount of beads to each side. We like our bracelets to be symmetrical, thank you very much.
You’re ready to tie up your bracelet when there’s a space that’s the size of one bead, which will be your crimp cover. In a regular bracelet, you’ll need to leave a larger gap, but not with these stretchy bracelets.
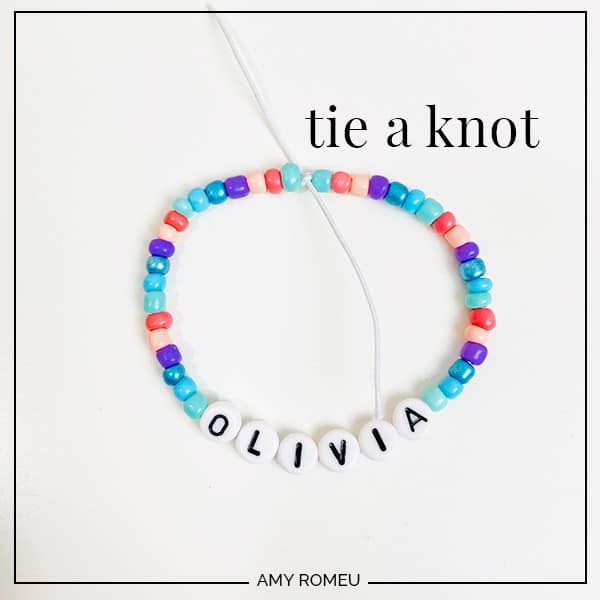
STEP 4 – TIE BRACELET KNOT
Time to tie your elastic cord into a knot. Just make a simple overhand knot and pull it tight. No need to get fancy and bust out your guidebook to boater’s knots here – if the knot gets too big, it won’t fit inside the crimp cover.
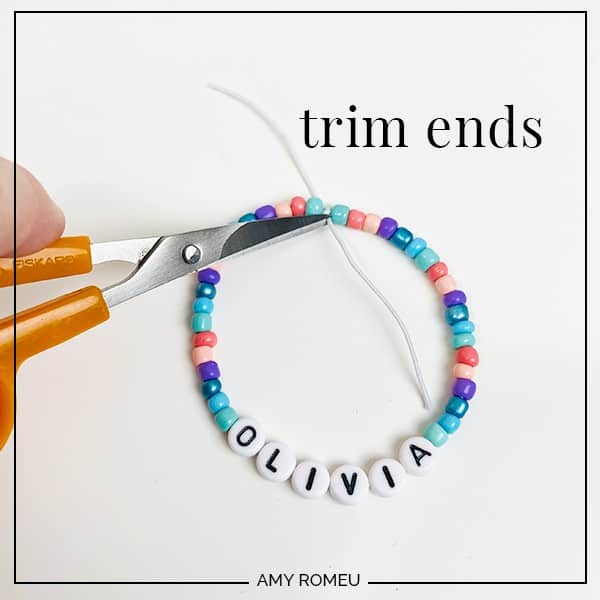
STEP 5 – TRIM AND GLUE KNOT
Now you want to trim your elastic cord ends first and then add a dab of glue. I used my favorite Fiskars 4″ curved orange craft scissors (available on Amazon here) but you can use any scissors that will help you cut as close as possible to the knot.
Wait – why do you want to trim first and glue second? So you can apply glue to the trimmed cord ends for added stability.
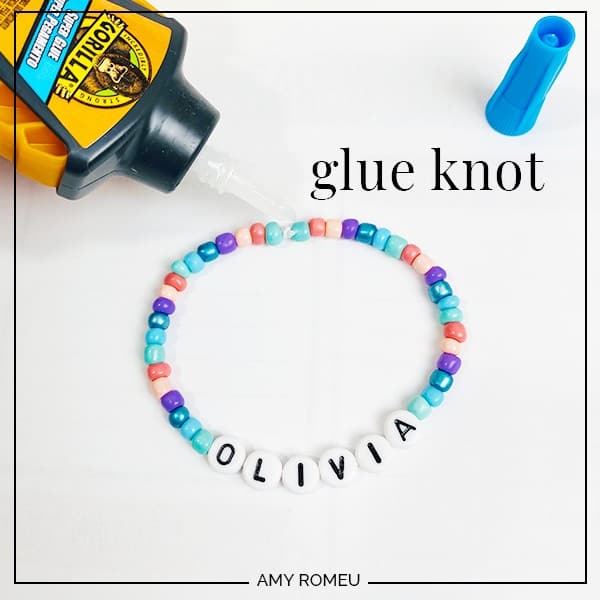
I used Gorilla Super Glue, which you can get here on Amazon, but you can use any kind of fast drying glue that is more liquid-y than goopy. (Yes, those are professional jewelry making terms.)
Liquid glue will seep into the thread covering of the elastic cord and not add any bulk. Goopy glue will make your knot bigger, which will make it harder to fit it into the crimp cover.
Let the glue dry for a few minutes before moving on to the next step.
STEP 6 – PUT KNOT INSIDE CRIMP COVER
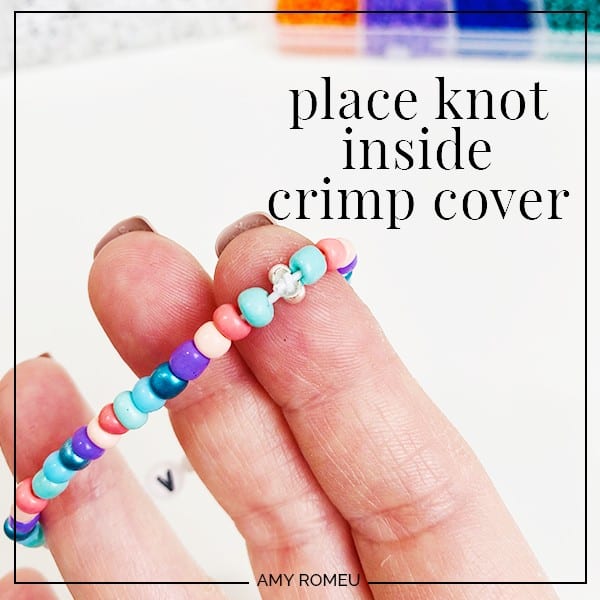
Now it’s time to put your knot inside the crimp cover. You’ll place the crimp cover around the knot, making sure as much of the knot as possible fits inside.
You want the cord to line up with the holes on the sides of the crimp cover.
If your cord isn’t coming through the hole gap, it will get severed when you crimp the cover closed. Your kid will cry and there will be chaos in your house. Trust me. I know.
STEP 7 – CLOSE CRIMP COVER WITH PLIERS
Take your needle nose pliers and place the jaws around the sides of the crimp cover. Check again that your knot is entirely inside the crimp cover, and the cord is lined up with the holes. Gently squeeze the jaws closed.
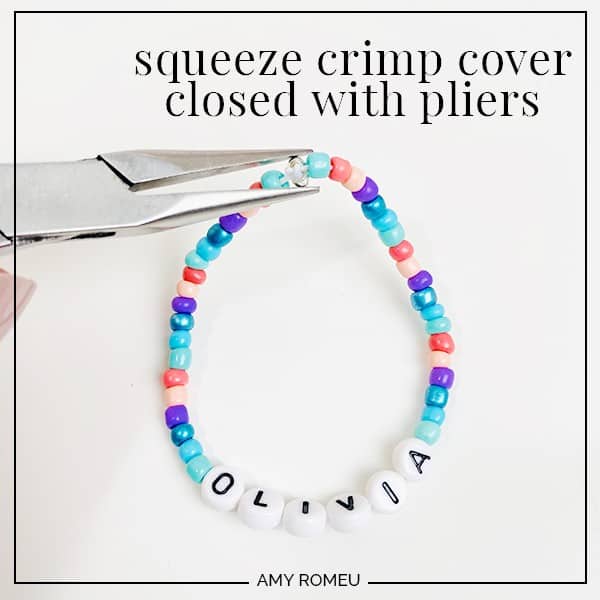
Be careful not to squeeze too hard – you can crimp the cover too far and it will be misshapen. It also could cut your cord.
That’s it!
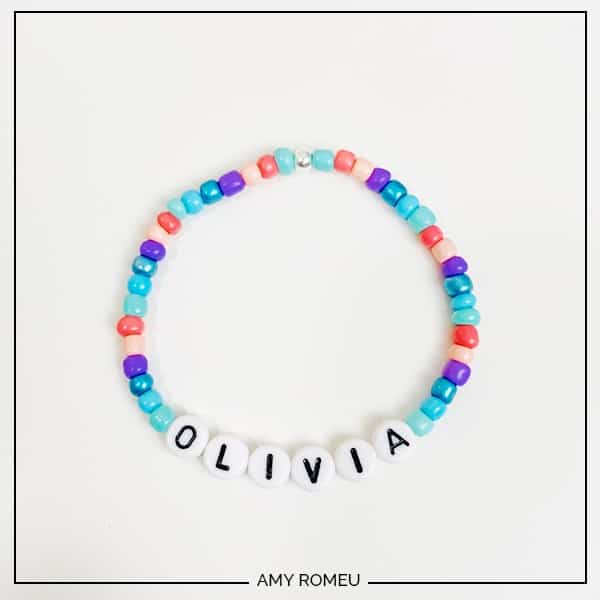
Here are two different name stretchy bracelets made from large and small letter beads. The larger bead bracelet uses the 6mm crimp cover.
With a project this simple and easy, why stop and one stretch bracelet? My daughter has made a BUNCH of them. Fun and simple stretch bracelets make for a great birthday party activity, rainy day fun, a sports of club activity. The possibilities are endless!
If you’re going to make this project, don’t forget to grab my FREE list of 175+ letter bead sayings, your summer beaders will love it! It’s #172 in my free Resource Library. Get the password below!
If you liked this project, be sure to check out my other kids’ beading tutorials, including How To Make Stackable Bracelets with Beads, Tassels & Charms, here.
Let me know in the comments if your kids enjoyed this project, and tell me what words and phrases they used! I love to hear when you enjoy my tutorials and projects!
Until next time… happy crafting!

Want the FREE list of 175+ sayings for stretch bracelets?
It’s #172 in my Free Resource Library! You’ll receive the password for the Resource Library instantly after filling out the form below!
Want to remember this? Post this How To Make Stretch Bracelets That Won’t Break tutorial to your favorite Pinterest board!

This was so helpful! Thank you!
This was so helpful!! Thank you for such a detailed tutorial. We love our bracelets!
Thank you for the comment, Courtney! I’m so glad you found this information helpful.
Best regards,
Amy
Great tutorial! The easiest I’ve seen out there. I appreciate the links to the products.
Very good info, especially appreciated the crimp tube information.
Thanks for the hack – I’ve never thought to try that. Some people recommend using crimp tubes instead of knots on elastic, but that never made any sense to me since elastic (especially the plastic kind) is so much more slippery than wire. I have had luck so far recently using two knots, spaced about one inch apart, that I add super glue to.
Thank you so much for sharing!