
How to Make a Fall Leaves Necklace with a Cricut

How to Make a Fall Leaves Necklace with a Cricut
Happy Fall, y’all! It’s still very hot and in the 90’s here in in Florida, but a girl can dream, right? You all have LOVED my fall leaf earring tutorial so much, that I decided to make a matching layered Fall Leaf Necklace with Faux Leather and my Cricut. If you want to learn how to make this Fall Leaf Necklace along with me, I’m going to show you how in this post!
If you haven’t cut faux leather with your Cricut yet, this necklace is a good beginner project, I promise! You can make this Faux Leather Fall Leaves Necklace with the Cricut Maker, an Explore Air 2 or the Cricut Joy! (See my post below if you are using the Cricut Joy – there are a few extra steps you’ll want to know before cutting faux leather with a Cricut Joy.)
To see my post about how to cut faux leather with the Cricut Joy, click here!
In this tutorial, I’ll give you my step by step instructions and tell you exactly what materials I used to make this project.
Also, since I love to share, I’ll be sharing my original SVG cut file for the leaves I cut for this Fall Leaves Necklace project! You can grab it from my FREE Resource Library from a link at the bottom of this post.
If you’d rather watch a video tutorial, click on my YouTube video below:
Want to see all of my Cricut earring & jewelry tutorials? CLICK HERE
This post contains some affiliate links (which means if you make a purchase after clicking a link, I will earn a small commission at no additional cost to you). Read my full disclosure policy here.
Cricut Fall Leaves Necklace – Materials List
- A Cricut cutting machine. I have the Cricut Maker, which you can get at Amazon here or at Cricut.com. You can also use the Cricut Explore Air 2 or even the new Cricut Joy!
- Faux leather in Fall colors. I used five different colors of faux leather from my craft supplies for the leaves in this necklace. The solid colored faux leathers are from one of my favorite Etsy shops, Thicket Company. I used Thicket Company’s faux leather sheets in Mustard, Mandarin, and Caramel. The matte metallic burgundy is from this assortment pack on Amazon here.
You could also use fall colored faux leather from Amazon. My favorite smooth faux leather from Amazon which comes in several great fall colors is this one.
- Cricut Strong Grip (Purple) Cutting Mat. I buy mine on Amazon here.
- Blue painter’s tape. Regular, old hardware store blue tape. Amazon also has it here. This will help keep your faux leather in place on your mat.
- A weeding tool. I use the weeding tool that came with my Cricut tool set from Amazon here.
- A small hole punch (for punching the holes in the faux leather leaves). This is my go-to hole punch for all of my faux leather crafting, available on Amazon here.
- 18-24 inches of chain with links. I used some of this Vintaj Natural Brass chain I had in my craft stash. It’s available here on Amazon in a 2 foot length. You can use any chain you like! I suggest you use a chain that has large enough links that you can hook each leaf to a link in the chain, so you can space out all the leaves like I did in this project.
- Small jump rings – I used the antique gold jump rings from this assortment of 6mm size jump rings in different metal finishes from Amazon here. I recommend using 6mm or 5mm jump rings for these leaf charms.
- Two pairs of flat nose pliers – My favorites are Wubbers brand in the “Baby” size. My everyday use pliers are the Baby Wubbers Chain Nose Piers and the Baby Wubbers Flat Nose Pliers.
- The SVG file template for this Fall Leaves Necklace project. You can get it FREE from my Resource Library by filling out the form at the bottom of this post.
How To Make a Fall Leaves Necklace with a Cricut – PROJECT INSTRUCTIONS
STEP 1 – Download the SVG Cut File
Download the FREE SVG cut file for the fall leaves necklace from my Resource Library. Search my library for the words “Fall Leaves Necklace” to find it.
Save the zipped folder that downloads to your computer. Then unzip the folder to access the folder’s contents. You’ll need to unzip or extract the files FIRST so you can upload the cutting file to Cricut Design Space.
STEP 2 – Upload the SVG File to Cricut Design Space
When you open Cricut Design Space, click on NEW PROJECT to get started.

Click on the UPLOAD IMAGE button, then click BROWSE to locate where your unzipped SVG files are saved on your computer.

Double click on the fall leaves necklace SVG file to bring it into the upload screen in Design Space. If you get an error message that says “unsupported file type,” you may have clicked on the wrong file, or your SVG file is still zipped.

You’ll see a preview of the fall leaf shapes for this necklace project.
Hit the green SAVE button.
After you’ve selected your file to upload, you’ll see it as the first item in your “recently uploaded images” row.

Click on the fall leaf shapes so they are surrounded by a green box. Then click the green INSERT IMAGES button.
This brings the leaf shapes you’ll cut for the necklace into Cricut Design Space. Drag your artwork to the upper left corner of your mat. The leaves are already colored and staggered in size for you. If you want to cut more than 5 different colors of faux leather, you can recolor some of the leaves to cut on additional mats. To do that, just click on Ungroup at the top of the layers panel. Then click on the individual leaves you want to recolor and select a new color for them.

Once you are happy with the leaves as they are, click the green MAKE IT button.
STEP 3 – Preview the Cutting Mats & Cut the Faux Leather To Size
The mat preview screens will load. The Cricut will cut each different color faux leather on its own mat. It’s not necessary to mirror the mats for these project.

Scroll through each mat in the mat preview on the left and make a note of this size material you’ll need to cut your faux leather material so the leaf shapes will cut out completely. For example, in this first mat preview for the orange leaves above, the size material to cut is a little over 7 inches wide and about 3 inches tall.
Cut each color of faux leather to the sizes you noted above – allow a little extra just to be safe! Once your materials are cut to size, press the green CONTINUE button.
STEP 4 – Make Material Selections
Now you’ll select your material for the first mat. I use the same material setting for all of the faux leather layers in this project, so it makes things really easy. 🙂
Note: If you’re using a Cricut Explore Air 2, turn your dial to “Custom” so you can choose the setting recommended below. If you’re using the Cricut Joy, set the machine to cut “on mat” and then select the material setting below. There isn’t a Joy sized purple cutting mat, but you can follow the directions below using the green mat.
I already have my preferred material selection – Faux Leather (Paper Thin) – saved as a favorite material in Cricut Design Space as seen below.

If you do, too, click on Faux Leather (Paper Thin) now. If you don’t, click on “Browse All Materials” to search for this setting. Type “faux leather” in the search bar and click on the magnifying glass.
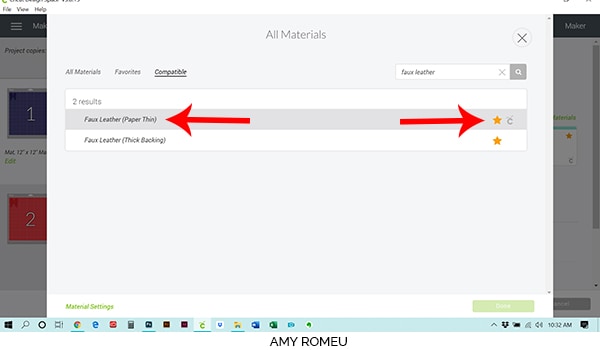
When Faux Leather (Paper Thin) appears, click on it to select it. Click on the yellow star on the right if you want to add this material setting to your “Favorites” so you can find it easily again in the future. Then click DONE.
After you’ve selected Faux Leather (Paper Thin) as your material, choose MORE from the Pressure dropdown menu.
Now it’s time to prepare your mats for cutting and cut the different color faux leather leaves for this Fall Leaves Necklace.
STEP 5 – Prepare Mats for Cutting
Place your cut piece of faux leather for the first mat in the top left corner of a sticky purple cutting mat.


Now tape all around the faux leather with blue painter’s tape. Press the material down to your mat firmly with your hands.

Load the prepared mat into the Cricut by lining the mat between the mat guides and then pressing the double arrows button.
The “C” Cricut button will start to flash, indicating the machine is ready to cut. Press the C button to begin the cut.
When the cut is finished, but before you unload the mat, use a sharp tool or your fingernail and carefully lift the edge of one of the leaf cuts to see if it cut all the way through. If it did, then click the double arrow button to unload the mat.

If the faux leather did not cut all the way through, press the C button again to repeat the cuts.
Remove the faux leather leaves from the mat and set them aside.

Prepare each of the other cutting mats the same way. Use the same material setting, Faux Leather (Paper Thin) again. Remember to check each cut before you unload the mat so you can repeat the cut if necessary.
Once you have all of your leaves cut, it’s time to punch holes in them for the jump rings.
STEP 6 – Punch Holes in the Leaves
I use a 1/16″ hole punch to punch the holes in these faux leather leaves, only because often the Cricut struggles to cut such tiny holes in faux leather.
There are two 1/16″ punches I use: this hole punch and this hole punch. They both punch through faux leather very cleanly.
Punch the hole in the top of one leaf, making sure the hole isn’t too close to the edge. Repeat for all the other leaves.


STEP 7 – Plan Out The Fall Leaves Necklace Design
Once all of your leaves have holes punched, it’s time to plan out the placement of the leaves.
I used a 20 inch chain, and decided I wanted 8 inches of leaf charms in the front of the necklace. If you want the leaves to go all the way back to the clasp of the necklace, cut more leaves.
I laid the chain flat on my work surface and marked the center point with blue tape. I then marked 4 inches to the left and right of the center to designate my 8 inch area for leaves.

Then I organized the leaves by placing the largest leaf in the center, then balancing the next largest leaves to the left and right of center, and so on.

Then I filled in the gaps with the smaller leaves, making sure not to put the same leaf style or color next to each other.

STEP 8 – Attach the Leaves to the Necklace Chain
Once you’ve planned the leaf placement, you’ll need small jump rings and two pairs of flat nose pliers to begin attaching jump rings to the leaves.
Firmly grip each side of a 6mm jump ring with two pair of flat nose pliers. Make sure the opening of the jump ring is facing up in the 12:00 position. Then twist one wrist to open the jump ring slightly without distorting the original circle shape of the jump ring.

With the jump ring open, slide the largest leaf onto the jump ring, and then connect the jump ring to the chain link in the center of the necklace chain.


Then use the second pair of pliers again to grip both sides of the jump ring and twist the jump ring closed again.
Continue adding leaves to the chain links until the necklace is full to your liking with vibrantly colored autumn leaves!
Then using the flat nose pliers again, open a jump ring and attach it to one end of the chain, and attach the lobster claw clasp to the other end of the chain using another jump ring. That’s it!


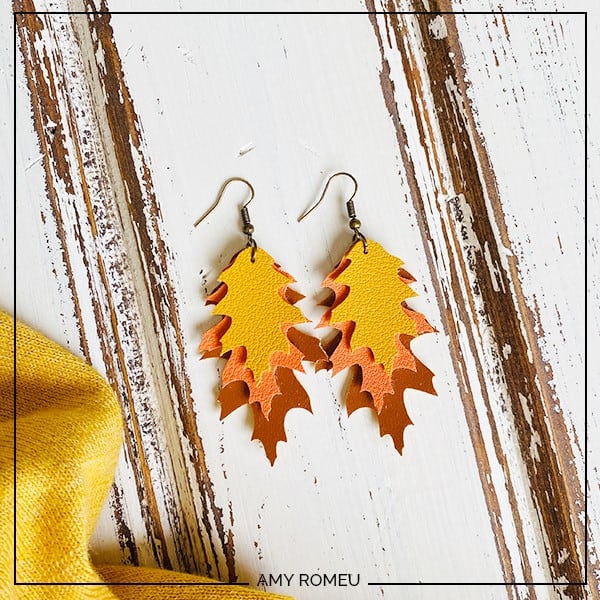
If you liked this project, you may also like my coordinating fall leaf earrings project, shown below. Click here to read my Fall Leaf Earrings tutorial!


If you do make this project, I would love to see your fall leaves necklace! Please share a photo of them in the comments, or tag me on Instagram: @amyromeucreative
Want to see all of my Cricut earring & jewelry tutorials? CLICK HERE

WANT THE SVG FILE SO YOU MAKE THIS FALL LEAVES NECKLACE YOURSELF?
GET IT FROM MY RESOURCE LIBRARY! YOU’LL RECEIVE THE PASSWORD FOR THE RESOURCE LIBRARY INSTANTLY AFTER FILLING OUT THE FORM BELOW!
Want to remember this? Post this DIY FALL LEAVES NECKLACE project to your favorite Pinterest board!

I don’t have the leather as yet. Do I need to buy different colors or can I get them in one package with all the colors? Thank you. Peace and happiness to you.
Hi, Mary! You can use any faux leather you like for this project. I linked to the colors that I used, but Amazon has many different assorted color packs of faux leather that would work, too. It just depends on what colors and prints you prefer. Thank you for your comment! Amy