
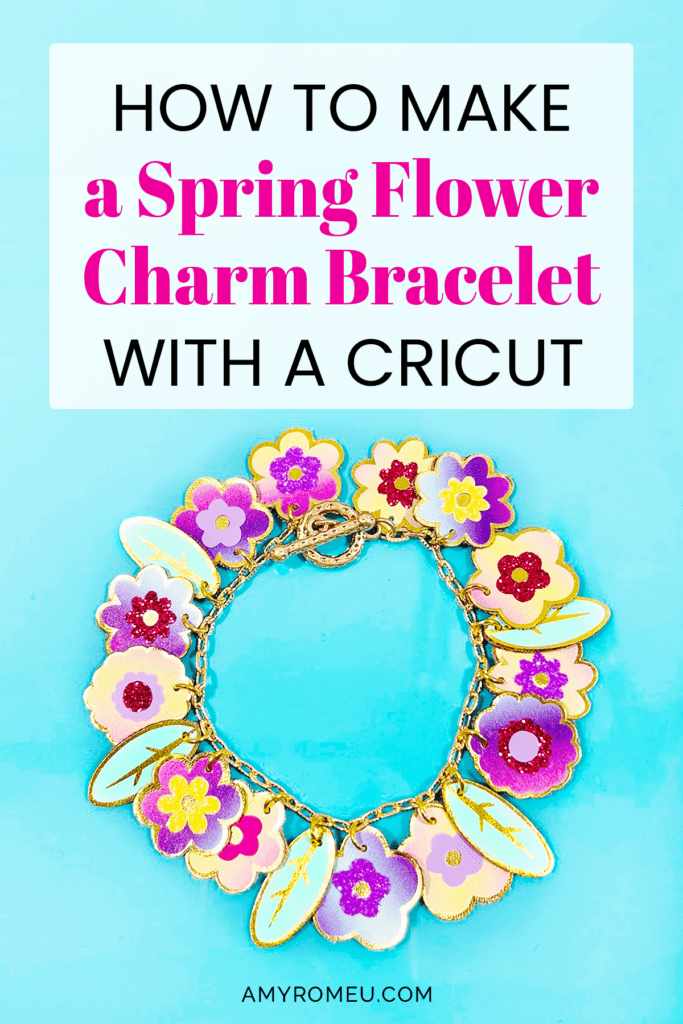
How to Make a Faux Leather Spring Flowers Charm Bracelet with a Cricut
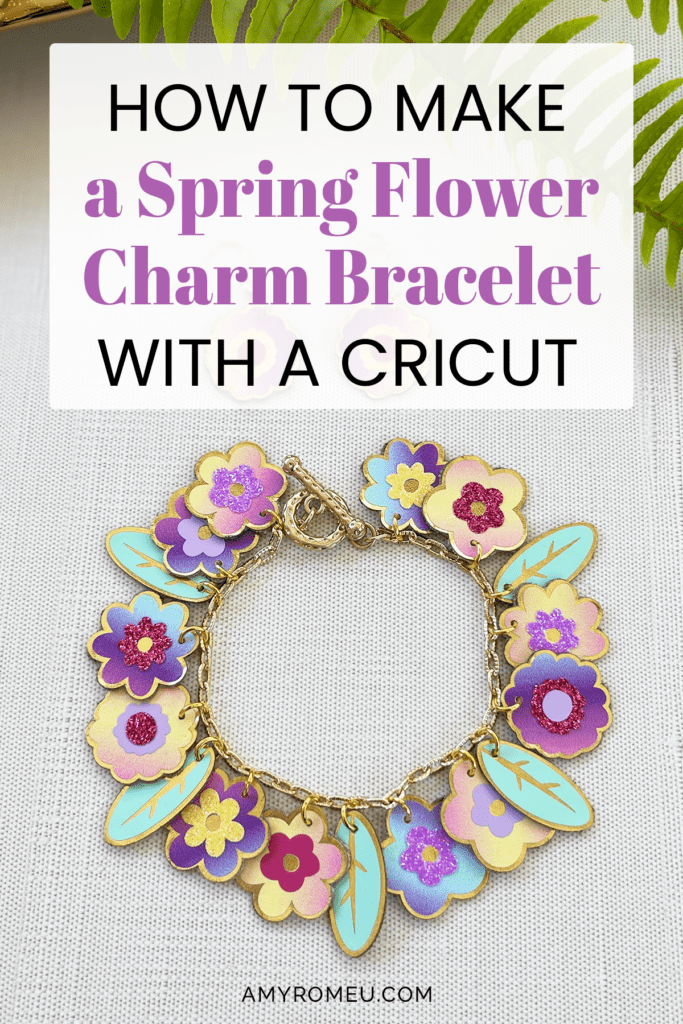
I’ve always been obsessed with charm bracelets, and when I started making jewelry with my Cricut, I knew I wanted to recreate the charm bracelet look. Can you believe this Spring Flowers Charm Bracelet is made from faux leather, heat transfer vinyl, and a Cricut?
This Cricut Faux Leather Spring Flowers Charm Bracelet is a fun project to make with faux leather and heat transfer vinyl. You can make it with a Cricut Maker, Maker 3, Explore Air 2 or Explore 3, or even the Cricut Joy.
I’ll have the free charm bracelet SVG template for you in my Resource Library – I’ll tell you exactly how to get it in the Materials section below.
So if you’re ready to try making this Cricut Faux Leather Spring Flowers Charm Bracelet, let’s get started!
This page contains some affiliate links (which means if you make a purchase after clicking a link, I will earn a small commission at no additional cost to you). Read my full disclosure policy here.
CRICUT SPRING FLOWERS CHARM BRACELET MATERIALS LIST
- A Cricut cutting machine (or another cutting machine of your choice). I used the Cricut Maker, but you can use the Cricut Maker 3, the Explore Air 2 or Explore 3, or the Cricut Joy.
- The Cricut Maker 3 is available on Amazon here or the Cricut website here.
- The Cricut Maker is available on Amazon here or the Cricut website here.
- The Cricut Explore 3 is available on Amazon here or the Cricut website here.
- The Cricut Explore Air 2 is available on Amazon here or the Cricut website here.
- The Cricut Joy is available on Amazon here or the Cricut website here.
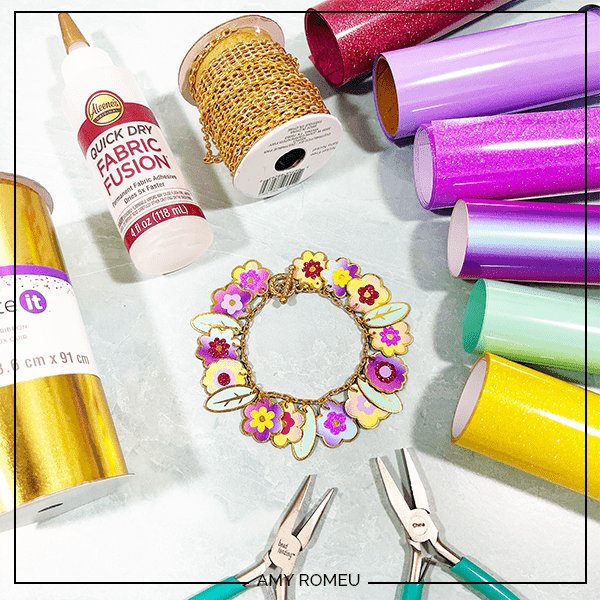
- Smooth faux leather of your choice – I used this metallic faux leather ribbon from Michaels but you can use any smooth faux leather you like.
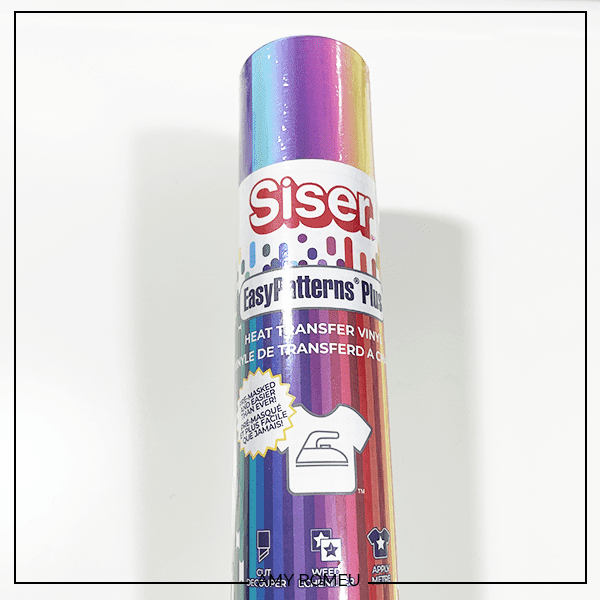
- Siser EasyPatterns Plus HTV – I used Ombre Unicorn from Michael’s. The Rainbow Gradient print or the printed HTV of your choice would work, too.
- Glitter Heat Transfer Vinyl in the colors of your choice – I used Siser Glitter HTV in Neon Purple, Blush, and Lemon Sugar
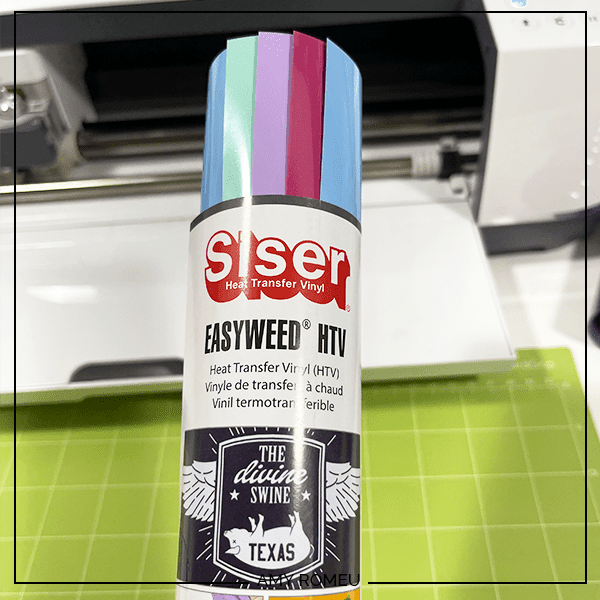
- Siser Easyweed Heat Transfer Vinyl in Mint, Lilac, and Pink – I bought this sampler from Michael’s
- Aleene’s Quick Dry Fabric Fusion Glue or another good fabric glue like Art Glitter Glue
- Bulk chain (I used this one from Michael’s)
- Toggle Clasp (I used one from this set from Michael’s)
- Purple Cutting Mat
- Green Cutting Mat
- Weeding Tools
- Cricut Easy Press Mini
- Cricut Easy Press Mat (8×10 size)
- Earring Hole Punch
- Earring Hooks
- Jump Rings, Gold or Jump Rings, Silver (6mm size to 8mm size work best)
- Flat Nose Pliers and Wide Flat Nose Pliers or this pliers kit from Michael’s
- Teflon Cover Sheet or Parchment Paper.
- Design #196 from my free Resource Library. You can get the password by filling out the form below or at the bottom of this post.
NOTE: This design is for PERSONAL USE ONLY. If you’d like to sell earrings made from my Spring Flowers Charm Bracelet SVG template, you may purchase a Commercial Use License from my shop here.
How to Make Faux Leather Spring Flowers Charm Bracelet with a Cricut
STEP 1 – Get the Free Spring Flowers Charm Bracelet Template
Download the free Spring Flowers Charm Bracelet template (Design #196) from my free resource library. You can get the password by filling out the form above.
Save the zipped folder that downloads to your computer. You’ll need to unzip or extract the folder FIRST so you can upload the SVG file to Cricut Design Space.
STEP 2 – Upload The Spring Flowers Charm Bracelet Template to Cricut Design Space
Click on Upload Image, then browse to where your unzipped file is located.
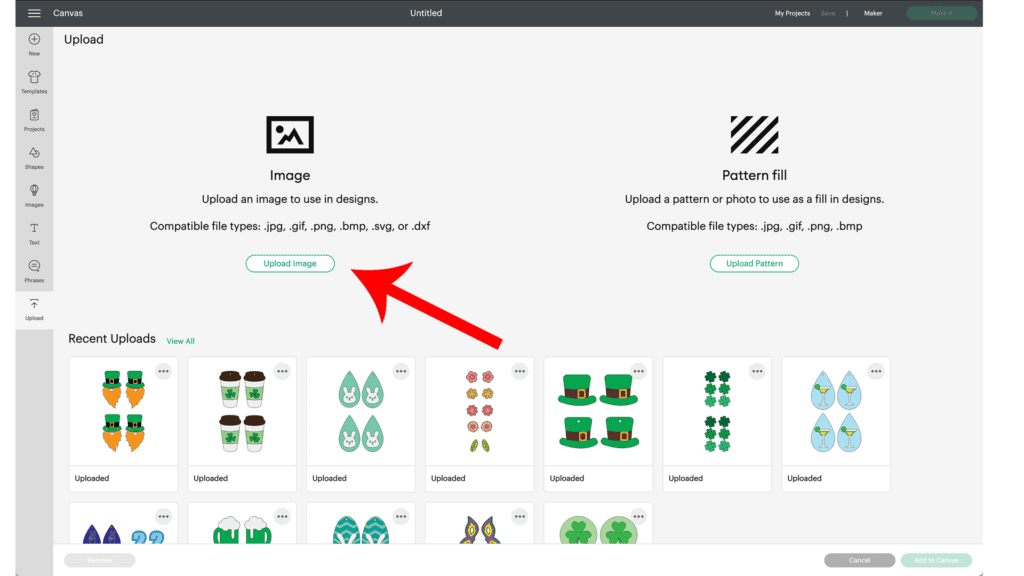
Click on it to upload it to Design Space. You’ll see a preview of the SVG on the screen. Click the UPLOAD button.
Then select the SVG from your Recent Uploads row and click Add to Canvas.
NOTE: The faux leather ribbon I chose was thin, so I decided to make the charms double sided. Follow the steps below to make double sided charms. If you are using thick faux leather, you can make the charms one-sided and put HTV on the back to add interest and structure. You can see how I put HTV on the back of faux leather here.
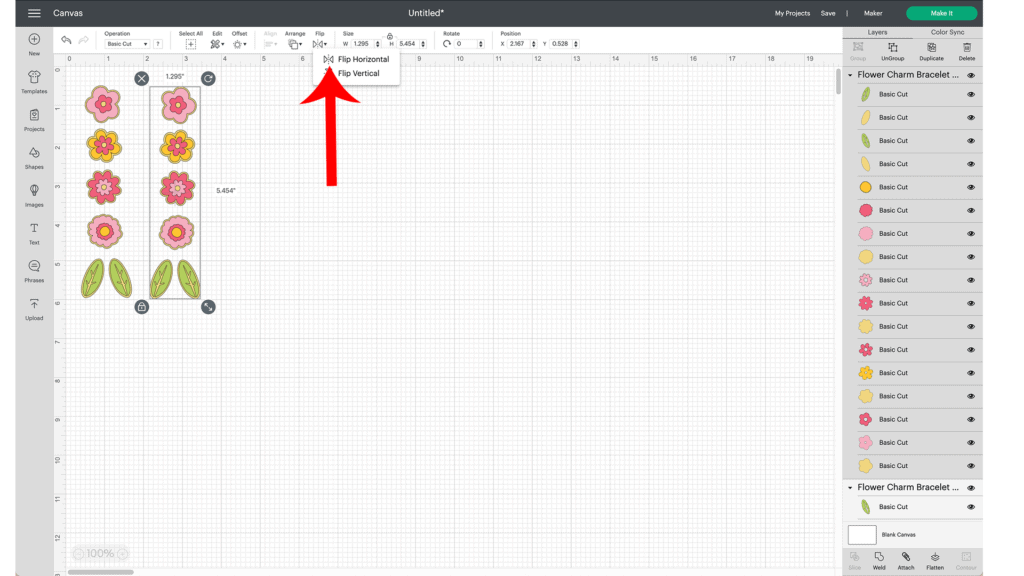
With the shapes selected, make a copy of the shapes by clicking on Duplicate.
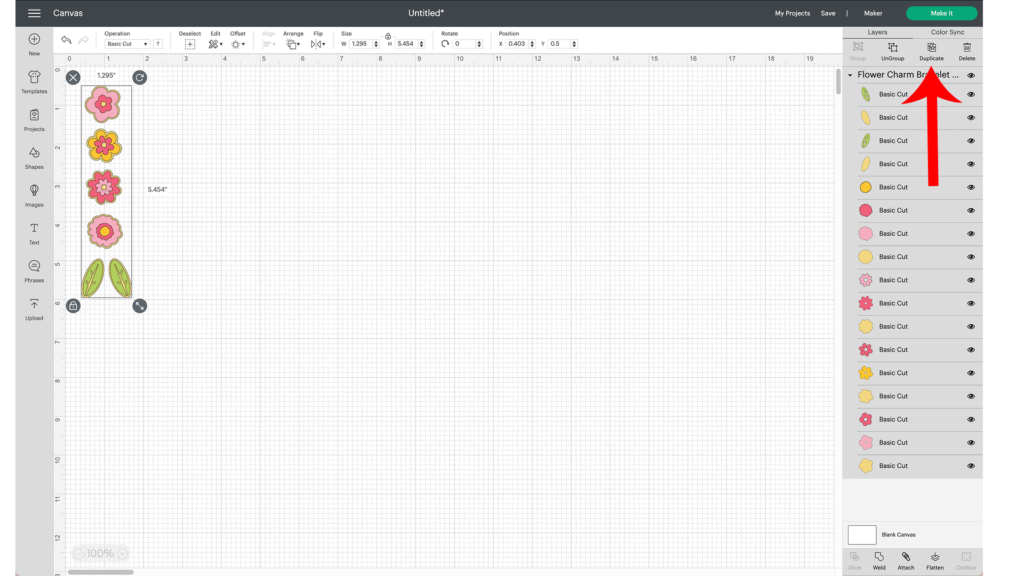
Then click on Flip and Flip Horizontal to mirror the second set of shapes.
This will create a front and back shape to the charms.
Next, click on the green “Make It” button.
STEP 3 – Prepare to Cut Faux Leather Charm Shapes in Cricut Design Space
The mat preview screens will show all five mats for the faux leather charm bracelet project, separated by color on the left hand side.
The light yellow mat will cut from faux leather. The other mats will cut from the heat transfer vinyl colors of your choice.
To make lots of charms for the bracelet, first increase the Project Copies number from 1 to 3 and then click Apply. This will triple the shapes that will cut for this project.
Remember if you are making double sided charms, you need two shapes for each charm.
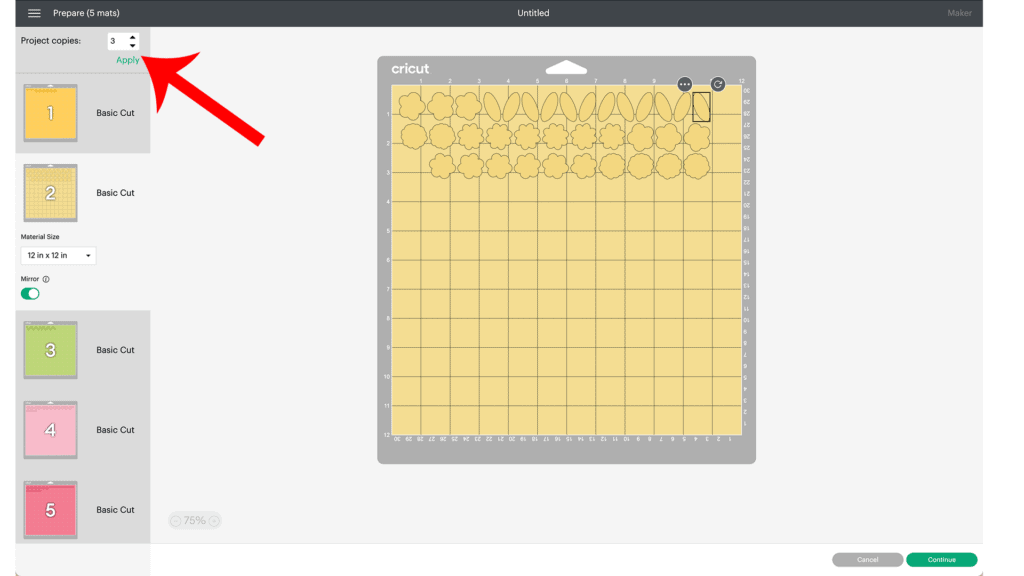
Then click on each mat, one at a a time. Toggle the MIRROR button to on for EACH mat. Faux leather and heat transfer vinyl cut in reverse (pretty side down) so shapes should be mirrored before cutting.
Return to the faux leather mat preview. Make a note of what size material you’ll need on each mat so the shapes cut out completely.
If you are using the gold faux leather ribbon from Michael’s, it’s about 7 inches wide. You may need to drag your shapes around on the mat to be sure they will cut within the size constraints of the ribbon.
Press the CONTINUE button.
NOTE regarding which blade to use for all Cricut machines: I will cut the faux leather with the standard fine point blade that comes with all the Cricut machines.
Note for Explore Air 2 users: Cricut Explore Air 2 users will need to turn the dial to “Custom” before choosing Faux Leather (Paper Thin).
Note for Cricut Joy users: Cricut Joy users should check out my tutorial on How to Make Earrings with the Cricut Joy with more specific instructions for Joy users.
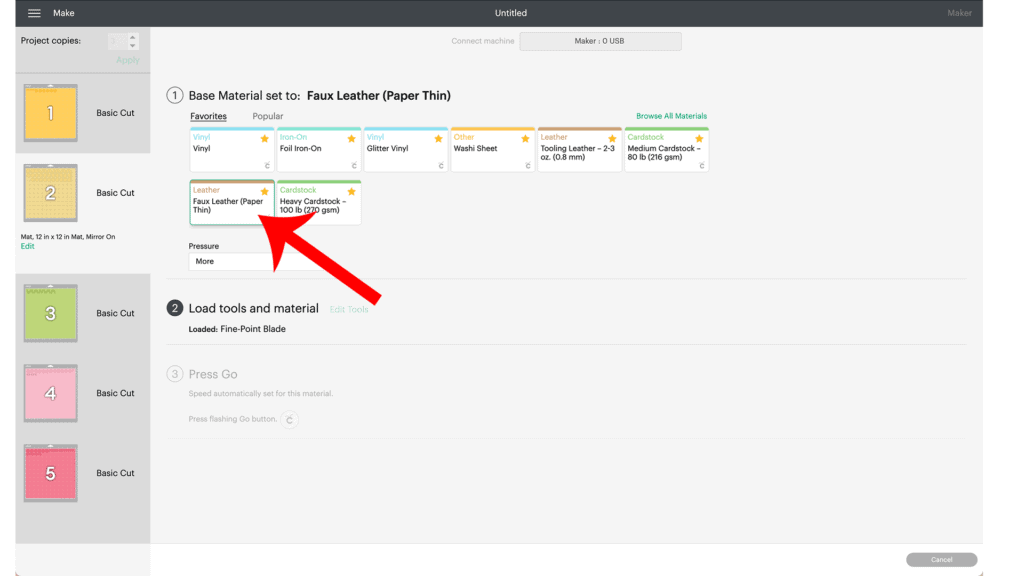
On the Material Selection screen, choose Faux Leather (Paper Thin) as the material setting. If you don’t have this material setting as a favorite, click “Browse All Materials” to search for it and select it.
Then select “More” from the Pressure dropdown menu.
Now it’s time to prepare the faux leather mat to cut.
STEP 4 – Cut Faux Leather Mat
Cut a piece of gold faux leather ribbon just slightly larger than the size shown in the mat preview screen.

Place it pretty side down on a sticky purple cutting mat in the same location shown in the mat preview screen.
Tape the faux leather down on all sides with blue painter’s tape.
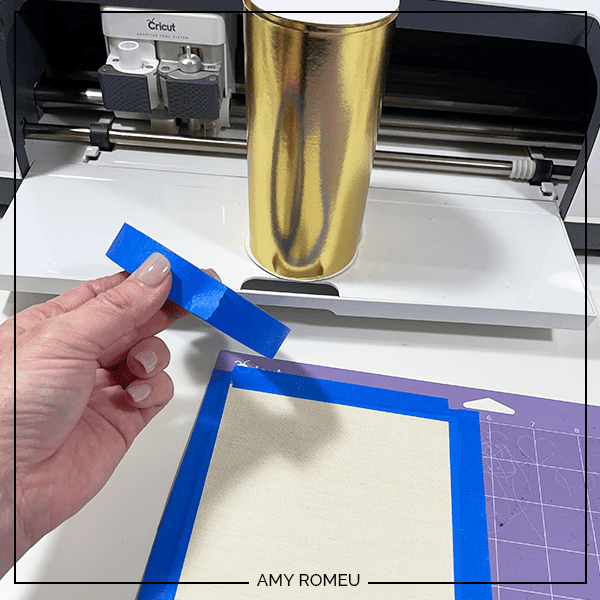
Make sure the white “star wheels” on the roller bar are pushed off to the side so the wheels don’t make indentations in your material.
Load the mat into the Cricut by lining up the mat with the guides and pressing the double arrows button. The machine will pull the mat into the machine.
Press the C button to begin the cut.
After the cut is complete and before unloading the mat, use a weeding tool to carefully lift the edge of the faux leather shape to see if the cut was complete.
If not, press the C button again to repeat the cut.
Unload the mat and remove the charm shapes. I peeled away the excess faux leather and then carefully lifted up the charms with my Cricut small spatula.
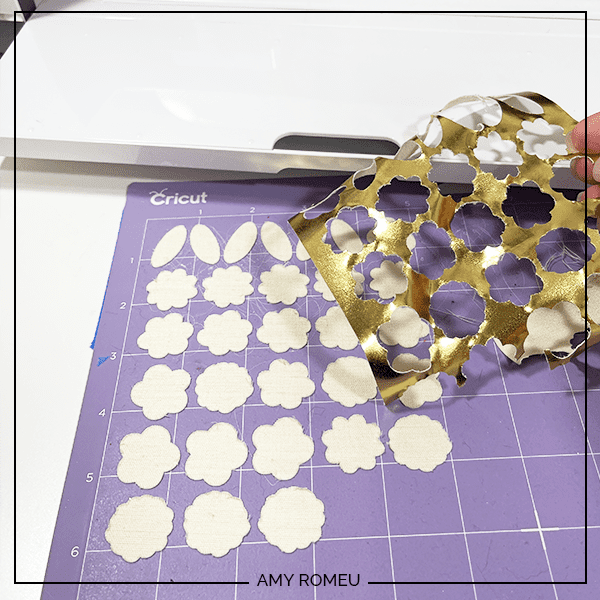
You can trim any stray fuzz at the edges with small curved scissors before continuing.
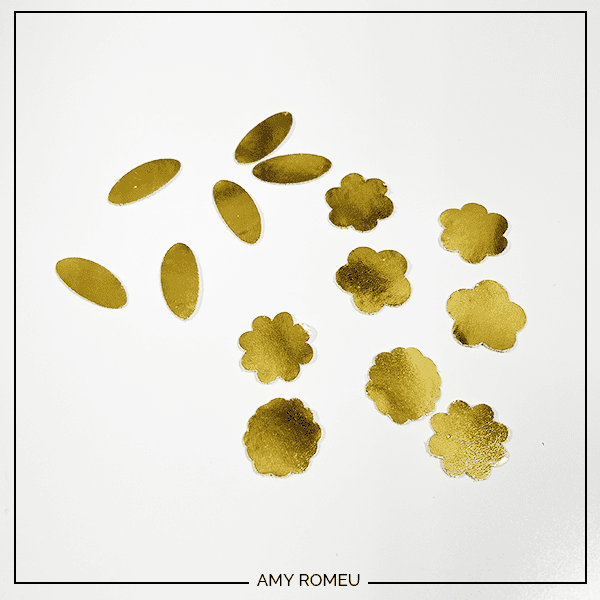
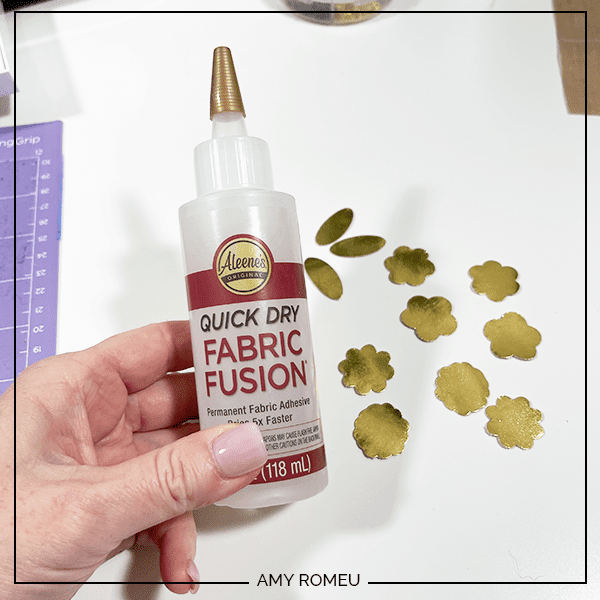
Use glue to glue the fronts and backs together. Place the glued charms underneath something heavy like a book to dry flat for several hours. Overnight is best.
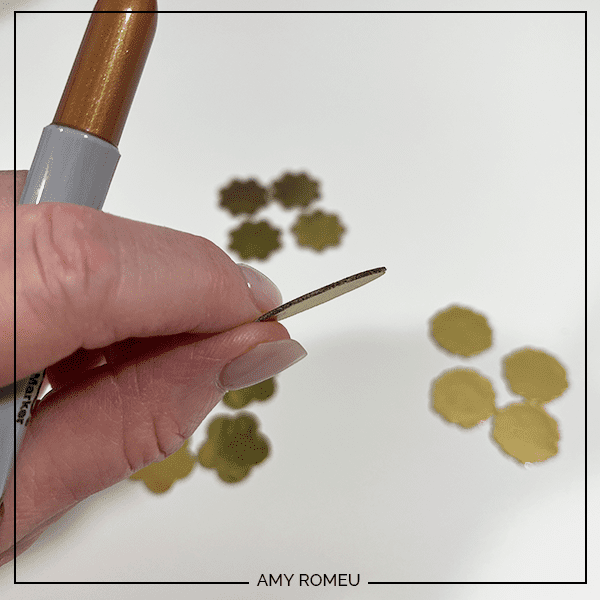
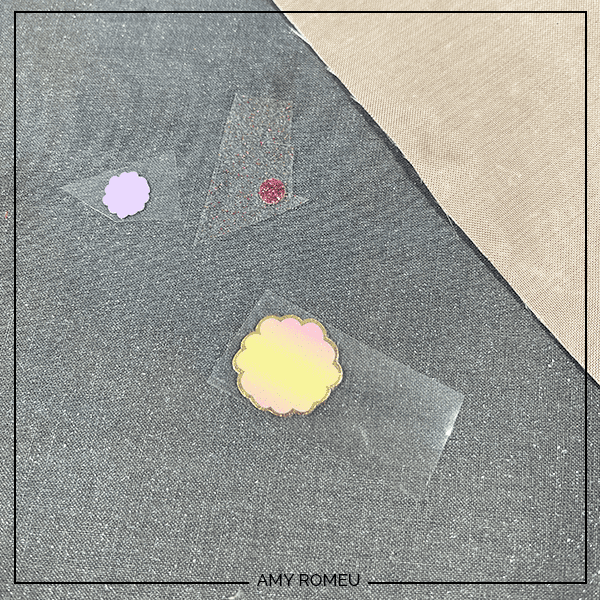
If you want to color the edges of the faux leather charms so the white doesn’t show, use a color coordinated Sharpie marker. I couldn’t find my gold Sharpie, so I used bronze and it worked just fine.
STEP 5 – Cut Heat Transfer Vinyls Mat
Return to Design Space to cut all of the various HTV flower shapes from your desired colors and materials.
Click on a heat transfer vinyl mat to begin.
Make sure the MIRROR toggle is turned on. Make a note of the placement and size of vinyl you’ll need to put on the mat.
Press the green CONTINUE button.
I used the Washi Sheet setting with Default pressure for the regular HTV and the EasyPatterns Plus HTV.
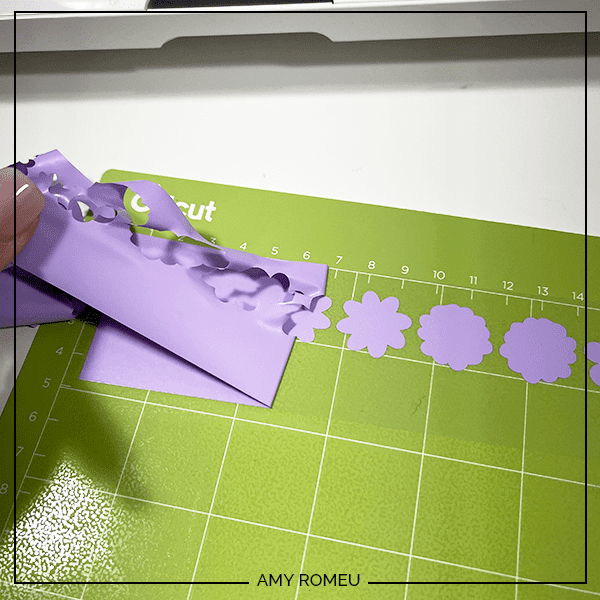
Place the heat transfer vinyl shiny side down on a green standard grip cutting mat. Cut with the recommended cut setting. Unload the mat and weed away the excess.
Repeat with the other HTV mats.

STEP 6 – Press The HTV Layers onto the Faux Leather Charms
Once all the HTV flower shapes are weeded, it’s time to press them onto the faux leather charms.
Trim the vinyl flower shapes apart from each other. Do a dry run and layer different colors and layers of vinyl onto each other until your layer combinations are visually pleasing.
I made sure to vary the layer colors on flowers that were the same shape for extra variety.
If you want to make earrings, you’ll want to make two of the same flowers with the same vinyl layers so they match. 🙂
Place a HTV flower layer on top of the faux leather charm shape. Cover with a Teflon sheet or cover sheet.
Turn an EasyPress Mini on to the LOW setting, or an EasyPress to 275 degrees.
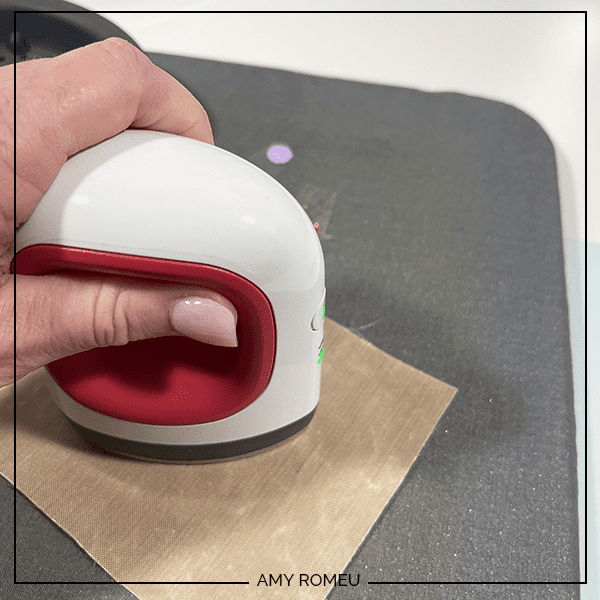
When the press is warmed up, press for 5-7 seconds at a time, allowing the HTV to adhere properly to the faux leather backing without overheating the faux leather itself.
Then carefully peel away the vinyl cover sheet. Layer on the next vinyl layer and repeat the press.
Turn the charm over and repeat with the other side if your charms are double sided.
Repeat with all of the faux leather flower charms and leaves.
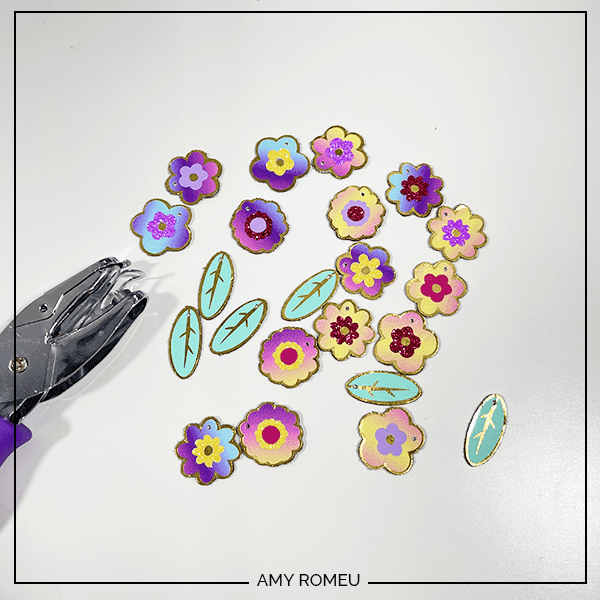
Use a 1/16″ hole punch to punch holes in the charms.
STEP 7 – Attach the Charms to the Bracelet
Now it’s time to assemble the spring flowers charm bracelet.
You’ll need jump rings and two pairs of flat nose pliers. I used 6mm jump rings.
First, cut a piece of chain to the desired size. Then attach the to parts of the toggle clasp to each end of the chain using pliers and the included jump rings.
Lay the charm bracelet flat on your work table and plan out the placement of the flowers and leaves. I did two flowers and then one leaf, then repeated that pattern.
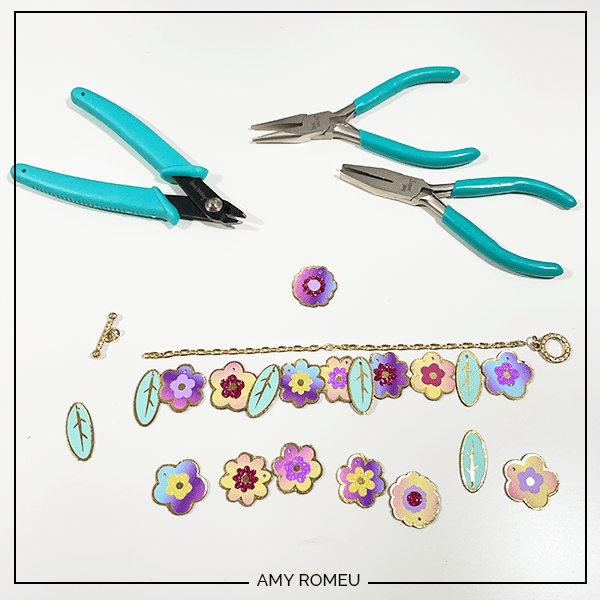
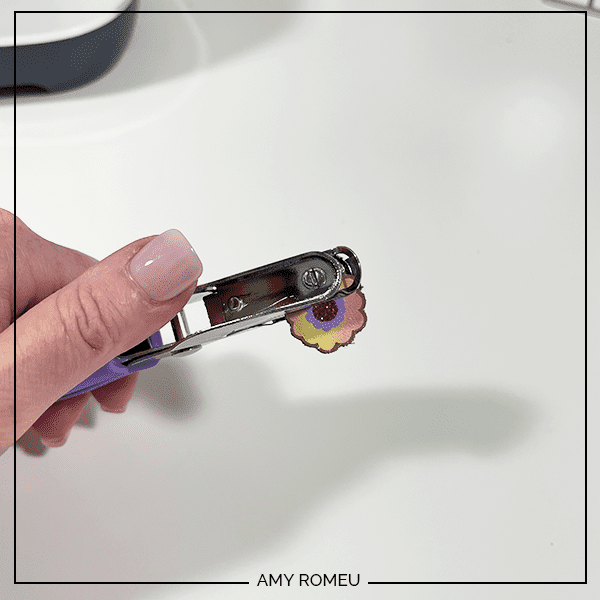
Use the two pliers to open the jump rings and connect the charms to the bracelet.
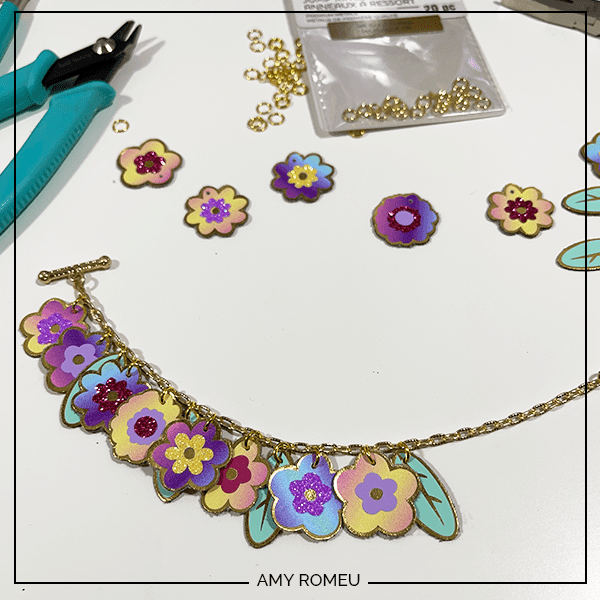
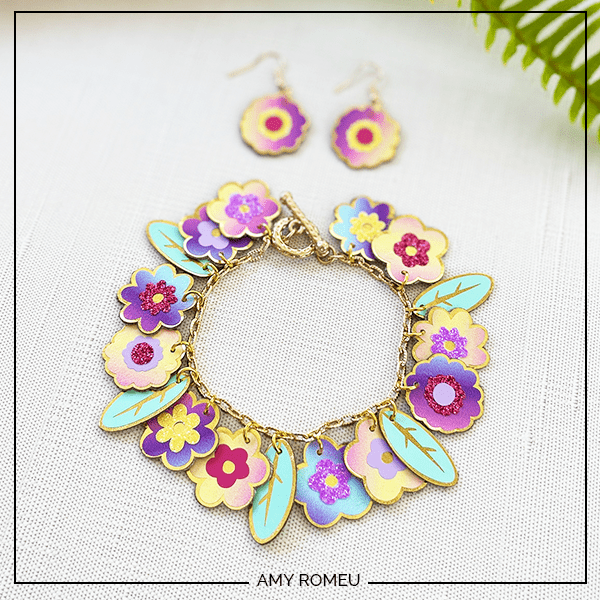
You can use any extra flower charms to make earrings.
To do this, you’ll first need to turn the bottom loop on the fishhook sideways so your earrings will hang correctly.
Use one pair of flat nose pliers. Hold the hook firmly between two fingers, grip the entire earring loop between the pliers and twist your wrist 90 degrees. Repeat with the second earring hook.
For more step by step directions on attaching earring hooks, be sure to visit my post on how to make faux leather earrings hang straight.
Once the earring hook loop is turned 90 degrees, open a jump ring and connect the earring hook to the flower charm. Use two pliers and close the jump ring again.
Repeat for the second earring.
That’s it! The faux leather spring flowers charm bracelet and matching earrings are finished!
Isn’t this Cricut Faux Leather Spring Flowers Charm Bracelet colorful and fun? If you do make this project, I would love to see your finished charm bracelet. Please share a photo of them in the comments, or tag me on Instagram: @amyromeucrafts
Want to see all of my Cricut earring & jewelry tutorials? CLICK HERE

WANT THE SVG FILE SO YOU MAKE THIS SPRING FLOWERS CHARM BRACELET YOURSELF?
It’s Design #196 in my FREE Resource Library. Get instant access by filling out the form below!
NOTE: This design is for PERSONAL USE ONLY. If you’d like to sell earrings made from my Spring Flowers Charm Bracelet SVG template, you may purchase a Commercial Use License from my shop here.
WANT TO REMEMBER THIS CRICUT SPRING FLOWERS CHARM BRACELET PROJECT? PIN IT TO YOUR FAVORITE PINTEREST BOARD
This is extremely beautiful. You really have perfected your craft. It’s tutorials like this that give me inspiration to push myself. Baby steps for me, but always moving forward.
Thank you so much, Veronica! Your kind words have made my day. 🙂 Amy
Amy, this is great. I have to get a few items before I can make it. Thanks for coming up with such a cool idea as spring is just around the corner!
Cindy
I’m so glad you love this project, Cindy! Thanks for letting me know!
Love this bracelet! Thank you for this project.
It’s my pleasure, Cathy! I’m so glad you like this one. 🙂 Amy
This is very pretty. I like charm bracelets. My favorite piece of jewelry is my charm bracelet to all the countries I have been to.
I’m glad you like this project, Stephanie! I love charm bracelets, too. I bet yours is so special! Amy
I love this bracelet! Looking forward to seeing more jewelry items and sets like this. Thank you for sharing!
I’m so glad you like this project, Helen! It’s my pleasure. I love to create and share. Thanks again. Amy
Love this project! Wonderful summer theme, just what we need. Thanks for sharing your talents. I haven’t worked with faux leather yet, but I did buy some for my craft stash, so here goes . . but first, a quick trip to Michael’s for supplies.