
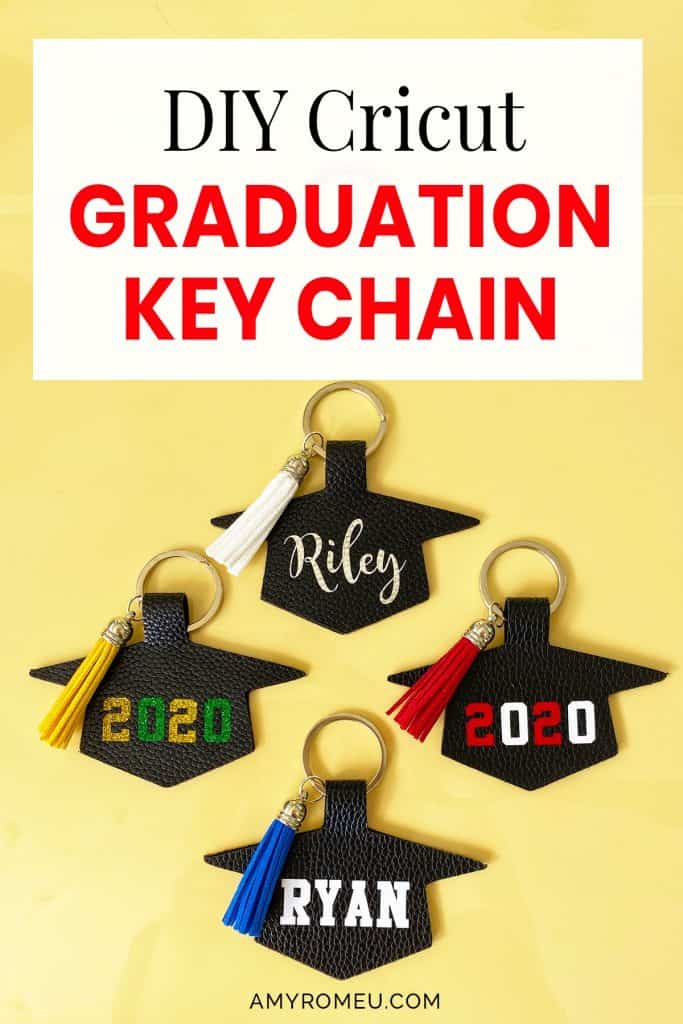
Graduation Keychain Cricut DIY

How to Make A Graduation Keychain with a Cricut
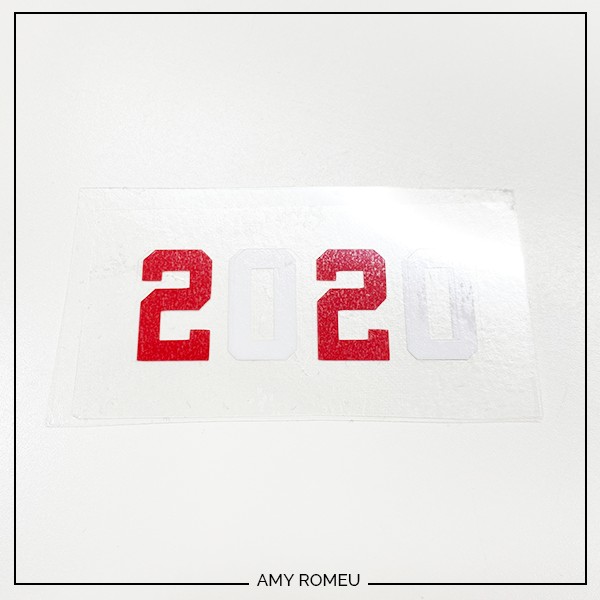
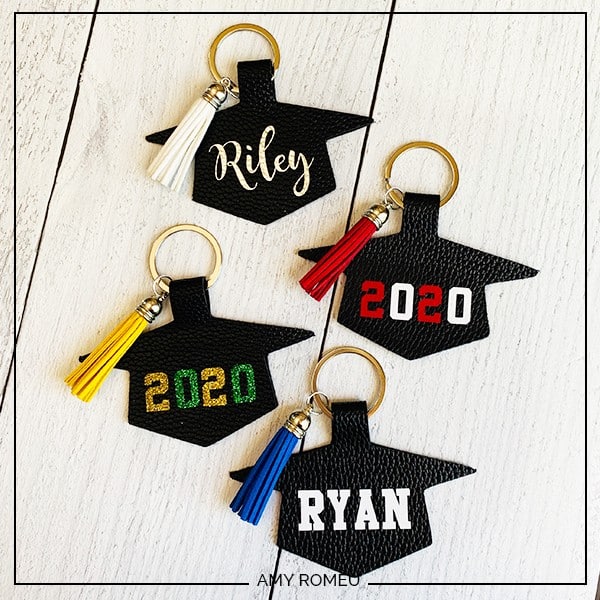
Do you know a special graduate this year? As a mom to two high schoolers, I know quite a few! In fact, my oldest son is graduating this year as part of the Class of 2023. I wanted to make a special, personalized graduation gift with my Cricut, so I designed this Graduation Keychain in the shape of a graduation cap. It’s made from faux leather and heat transfer vinyl – the added faux leather tassel is store bought, but it adds a nice touch, don’t you think? I love how this project can be customized with the graduate’s school colors, too. So if you want to learn how to make this graduation keychain with your Cricut, keep reading!
By the way, this project is best made with a Cricut Maker or a Cricut Explore Air 2. I cut all the shapes for the keychain with just the Cricut Fine Point Blade, which means it can be made with either machine. (If you have the new Cricut Joy, you can still make this project if you size the art down just slightly in Cricut Design Space so the keychain will fit on the Joy sized mat. To learn more about how to cut faux leather with your Cricut Joy, see this post.)
As much as I love to make things for myself with my Cricut, my favorite thing to do is make personalized gifts to give away. If that sounds like you, too, I know you’ll love making these as graduation gifts! I’m happy to share my original SVG cut files for this graduation keychain project so you can make this project at home. You can get access to the files via a free download from a link at the bottom of this post.
Want to see all of my Cricut earring & jewelry tutorials? CLICK HERE
Ready to make Graduation Keychains with a Cricut? Let’s get started!
This page contains some affiliate links (which means if you make a purchase after clicking a link, I will earn a small commission at no additional cost to you). Read my full disclosure policy here.
DIY Cricut Graduation Keychain – Materials List
- A vinyl cutting machine. I have the Cricut Maker, available at Amazon here. You can also use the Cricut Explore Air 2 or any cutting machine you have that will cut a thicker material like faux leather.
- Cricut Strong Grip (Purple) Cutting Mat. You’ll use the purple mat to cut the faux leather. You can buy these on Amazon here, or at Michael’s here. They are also available at Hobby Lobby, Joann’s, and Walmart – or anywhere Cricut machines are sold.
- Cricut Standard Grip (Green) Cutting Mat. You’ll use the green mat for cutting the HTV. You probably already have one from when you bought your Cricut machine, but if you need a new one, they are available on Amazon here or at any craft store.
- A Cricut Easy Press or a Cricut Easy Press Mini (what I use). I bought my Easy Press Mini from Amazon here. (For this project, I don’t recommend using a traditional heat press unless you are very experienced at controlling the pressure. Too much pressure on these keychains can damage the faux leather pebbled texture.)
- If you will be using the Easy Press Mini like I do, you’ll need an EasyPress Mat to safely press your items on. I use the 8×10 size, which you can see on Amazon here.
- Faux Leather in your choice of colors. For this project, I used this faux leather in Black from Amazon here. There are several solid color choices available, so you’re sure to find a color that works with your school colors if you don’t want to go with black. You can make a lot of graduation cap keychains with this package!
- HTV Vinyl in the color of your choice. You can use any vinyl colors you want, or Cricut Iron-On Foil or Glitter HTV! I used solid red and white heat transfer vinyl. I also used Cricut Foil Iron-On from the Cricut website here. You can also get Cricut Foil-Iron On on Amazon. I used the color Chrome for the silver foil on this keychain.
- Keyrings. I used 1.25 inch size key rings from Amazon here. You could use 1 inch key rings, too, but I wouldn’t go much smaller than that.
- Blue painters tape (as needed). This will help keep your faux leather in place on your mat. (If your mat is new and very sticky, you may not need to use it.) I bought this one on Amazon here but you can get it at any hardware store or even some grocery stores!
- Weeding tools. I have all the tools I need in my Cricut tool set from Amazon here. You can get also get the basic Cricut tool set at Michael’s here, or from Hobby Lobby, Joann’s, or Walmart.
- Glue. I’ve made a lot of keychains and there are so many good glues that will work: E6000, Art Glitter Glue, and Aleene’s Quick Dry Tacky Glue. I used Quick Hold quick drying glue, available on Amazon here, but use whatever you have around the house.
- Faux suede or faux leather tassels – Amazon has several faux suede tassel assortment packages. Many of them are sold with assorted colors, like this one. If you want all of the tassels to be the same color, you can also find single color packages, like these: this tassel package from Amazon here. I recommend at least 2 inch long tassels for this project, so they look most like graduation cap tassels.
- Large jump rings – I used this assortment of 10mm size jump rings in different metal finishes from Amazon here. Your local craft store or bead store will have plenty of jump rings if you want to shop in person. Or you may buy a keyring that already has a smaller jump ring attached.
- Two pairs of flat nose pliers – These are to open and close the jump ring so you can attach the tassel to the keyring.
- The SVG file template for these Graduation Cap Keychains. IT HAS YEARS 2020, 2021, 2022, 2023, and 2024. It’s Design #134 in my free resource library. You can get the password to my library instantly by filling out the form below, or the form at the bottom of this post.
NOTE: If you don’t have pliers, but you end up buying the 10mm jump ring assortment I linked above, you can use the included “jump ring open/close tool” instead. If you want to use pliers, you can use any two flat nose pliers you have in your jewelry making tool box, or in your household tool box. You can also use two pair of very strong tweezers in a pinch!
If you love making Cricut jewelry like I do, though, you’ll want to invest in some quality jewelry making pliers. They will last for many years to come, I promise! My favorites flat nose jewelry making pliers are Wubbers brand in the “Baby” size. You can see the Baby Wubbers Chain Nose Piers on Amazon here, and the Baby Wubbers Flat Nose Pliers on Amazon here.
PROJECT INSTRUCTIONS
STEP 1 – Download Free SVG
Download the free SVG cutting file for the keychain shape from my free Resource Library. The link to get the password is in the Materials list above and at the bottom of this post.
Save the zipped folder that downloads to your computer. You’ll need to locate your zipped file after you save it so remember where you are downloading it to! You’ll have to unzip or extract the files FIRST before you can upload the cutting file to Cricut Design Space. Make a note of the file location after you unzip it so you can find it in the next step.
STEP 2 – Upload SVG to Cricut Design Space
When you open Cricut Design Space, click on NEW PROJECT to get started. Then click on UPLOAD from the left hand side menu.
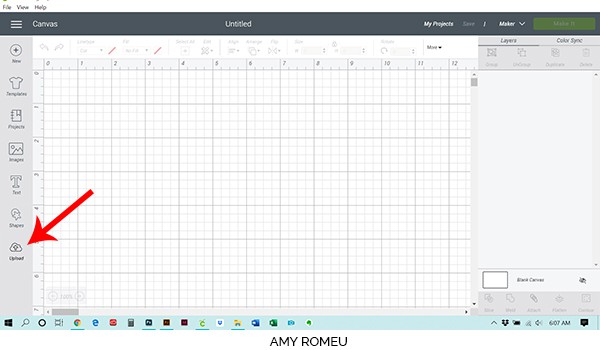
Click on the UPLOAD IMAGE button.
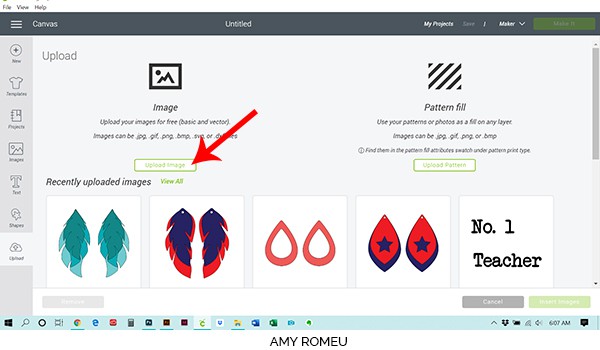
Then click BROWSE to locate where your unzipped SVG files are saved on your computer.
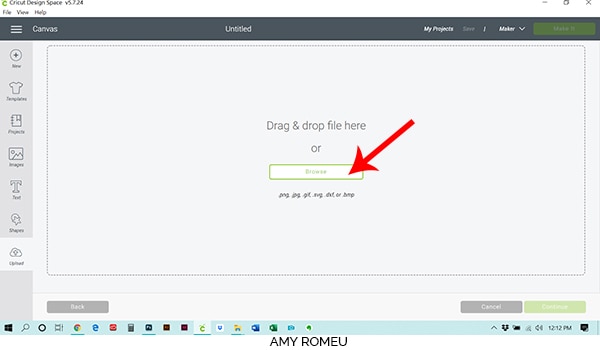
Double click on the graduation keychain SVG file to bring it into the upload screen in Design Space. If you get an error message that says “unsupported file type,” you may have clicked on the wrong file, or your SVG file is still zipped.
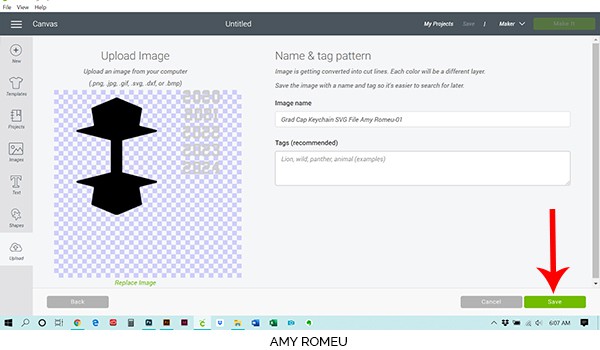
You’ll see a preview of the keychain shapes for this project. Hit the green SAVE button.
After you’ve selected your file to upload, you’ll see it as the first item in your “recently uploaded designs” row.

Click on it so it is outlined in green. Then click on the green INSERT IMAGES button in the bottom right corner.
STEP 3 – Prepare SVG for Cutting
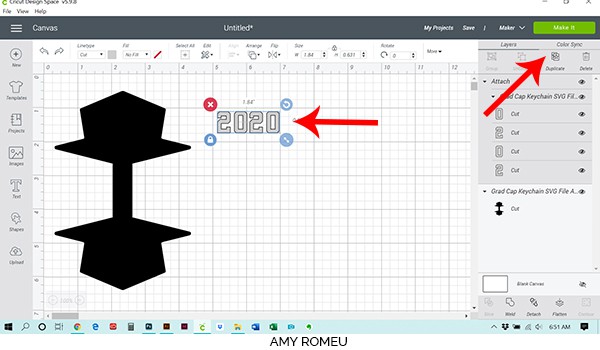
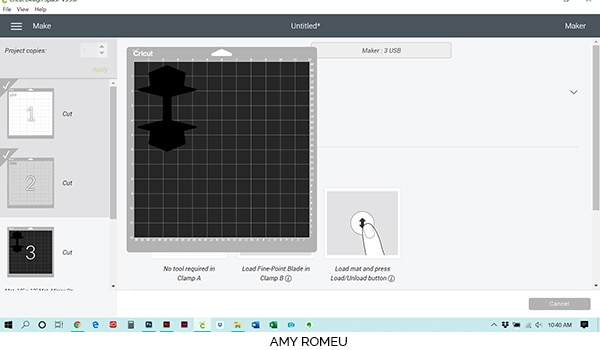
This brings the shapes you’ll cut for the graduation keychain into Cricut Design Space. Drag them up to the top left corner of your canvas. Your canvas should look like this:
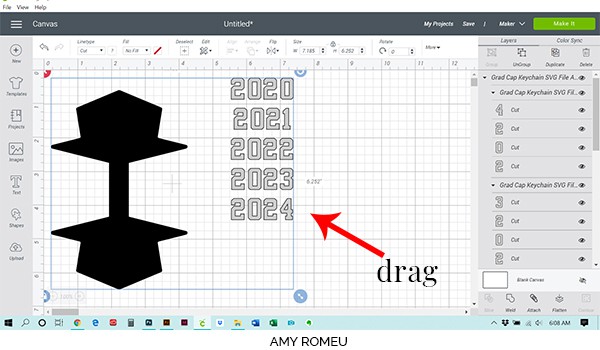
You’ll see the two elements to this keychain design – the graduation cap itself, which will cut from faux leather, and also several graduation years.
If you want to add a custom name to the back of the keychain, I’ll show you how to do that next.
But first, UNGROUP the art on your canvas by clicking the UNGROUP button at the top of the Layers panel on the right.
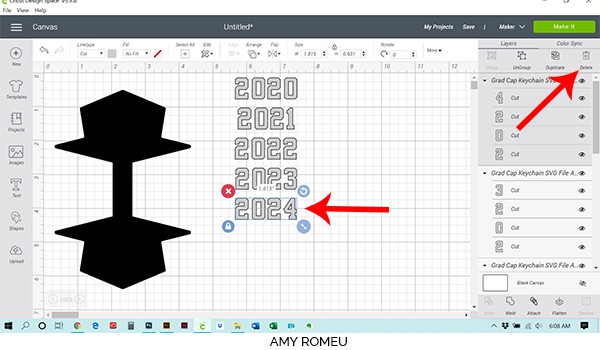
Then click on each year you don’t want to use, and click on the DELETE button. Leave the one year you want to use remaining. Your canvas should look like this:
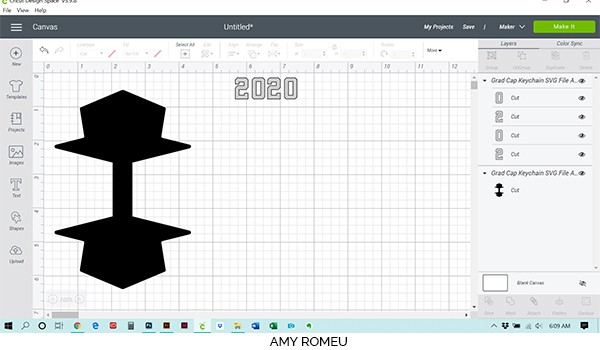
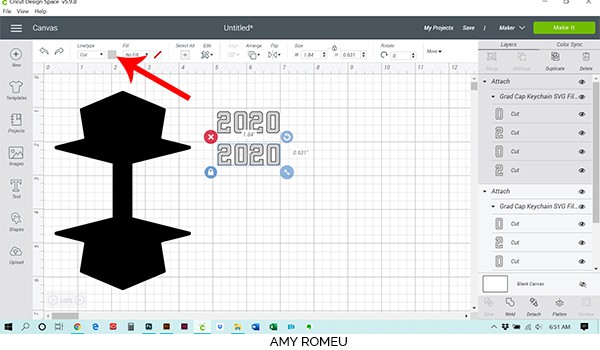
If we sent this design to cut now, you would see each number in the year would cut separately, and it would be difficult to line up the numbers neatly on your keychain. So we first need to ATTACH the letters so they will cut in the exact layout and positioning as shown here.
To do that, click on either the year design OR the heading of the year design layers on the layers panel. Then click ATTACH at the bottom of the layers panel.
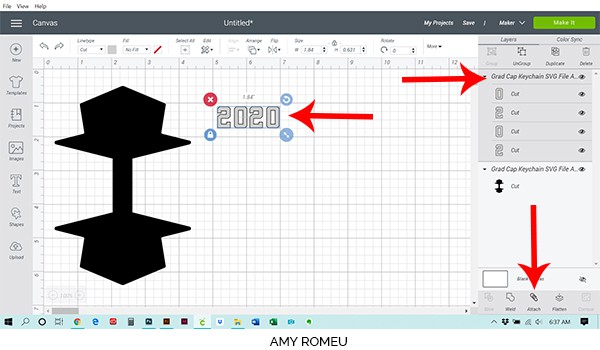
The Layers panel will indicate the year numbers are now attached, and the ATTACH button has transformed into a DETACH button, if you need to separate the layers again.

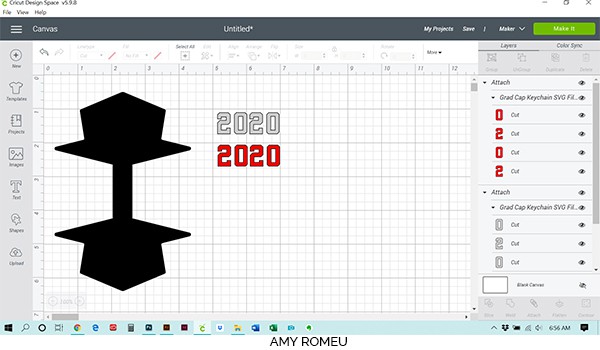
To create a two-color year number, the easiest way to do that is to create a copy of the first year, recolor it, cut and weed both, and then remove two numerals from each year number before pressing. I’ll show you what I mean in a a bit.
NOTE: You will also want to duplicate the year number if you won’t be putting a custom name on the back, and you’ll be putting the year on both sides.
To duplicate, click on your attached year numbers, and click the DUPLICATE button at the top of the Layers panel.
You will see a copy of the year on your canvas. To recolor it, click on the copy and choose a new color from the Linetype menu.
You can see the year in two different colors below:
STEP 4 – Create a Custom Name
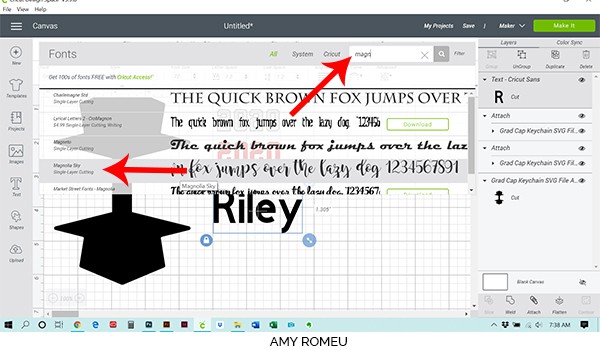
If you want to add a custom name like I did, that’s easy to do in Cricut Design Space. You can chose any font you want – either a Cricut font, or a system font from your computer. I’m using the Athletic font (free) from dafont.com and Magnolia Sky, also free, from dafont.com. If you’re not sure how to upload new fonts to Cricut Design Space, check out this great tutorial from my crafty friend, Jennifer Maker, here.
Click on TEXT from the left hand side of the screen. A text box will appear. Click inside the box and type your desired text. Then click on the dropdown menu under Fonts.
Scroll through the available fonts, or search for a specific font you are looking for. When you find the font you want to use, click on it to select it.
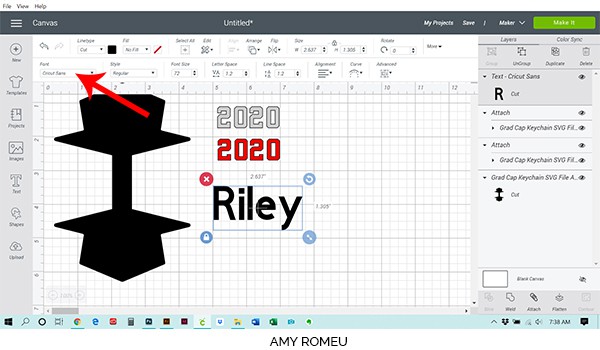
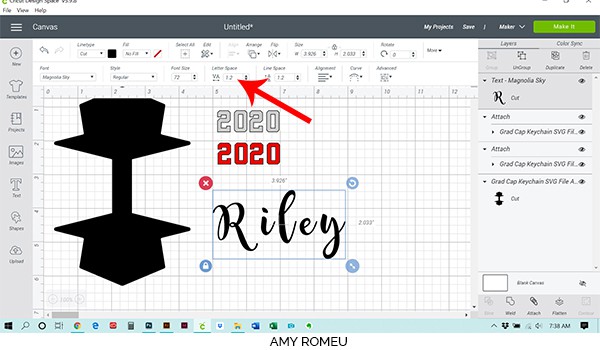
Your name will transform into the font you selected. First, change the line spacing from 1.2 to 0.
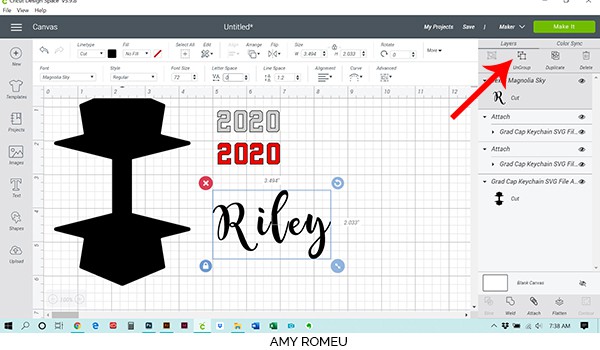
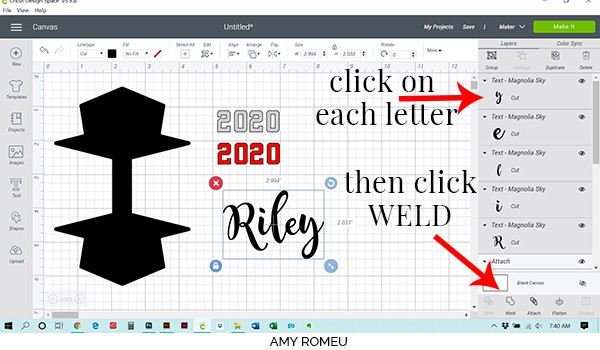
That brought the letters closer, but the name still needs some tweaking. To do that, click on UNGROUP to separate the letters so they can be moved individually.
Click and drag each letter closer together until it looks good.
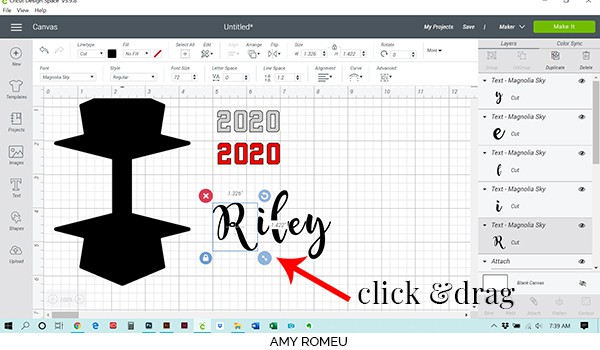
Then select each individual letter layer on the right hand side, and click WELD.
Your welded text will now be visible in the layers panel.
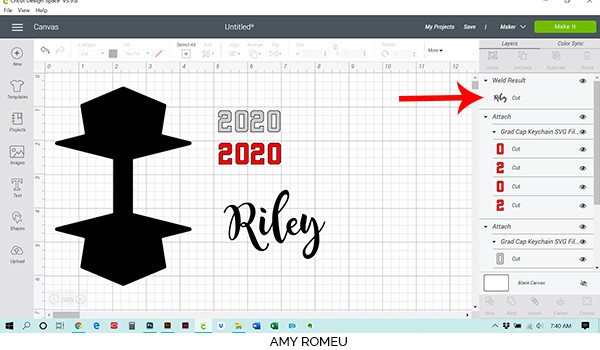
Use the year number as a size guide, and drag the name to be the width of the year.
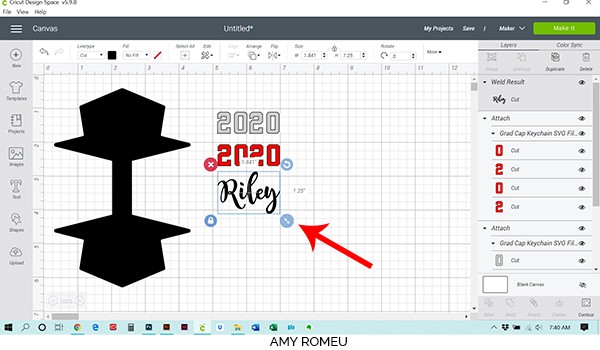
Finally, change the color of your name design to the color you want it to cut from. If you want it to cut from the same color as the year number, be sure to select the exact same color. I’ve selected a third color for the name in this project, because I want to cut the year from red and white vinyl, and the name from silver foil iron on.
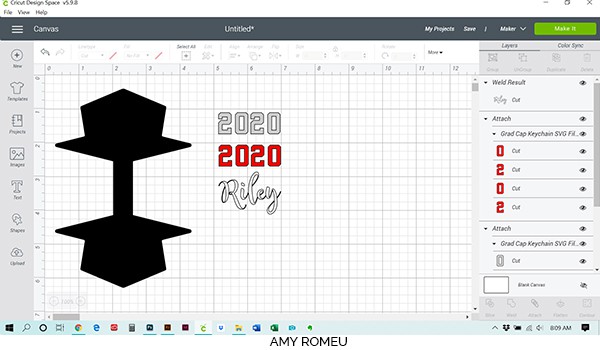
Your keychain art is ready to cut!
Click on the green MAKE IT button in the top right hand corner.
STEP 5 – Prepare Mats for Cutting
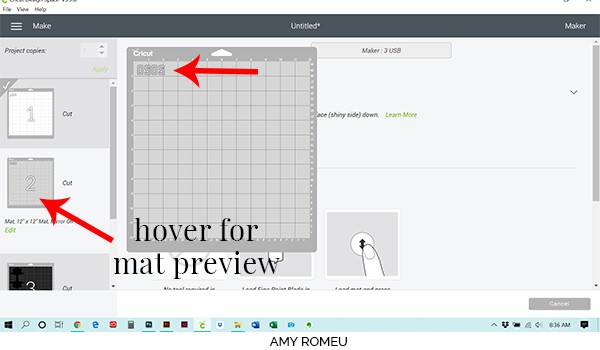
This keychain project will cut from two different types of materials – faux leather and heat transfer vinyl. Cricut does all the hard work and separates the mats for you. You can see the different mats in a preview on the left.
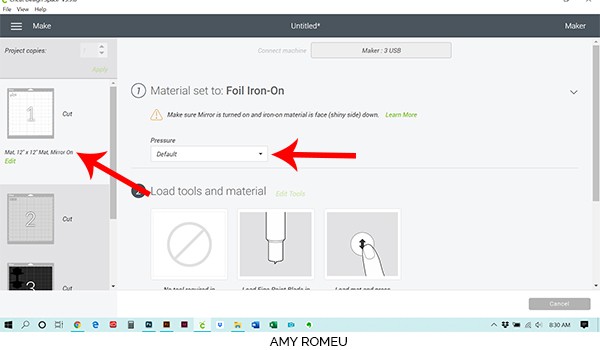
The first mat that will cut is the name. I’m going to use Cricut Foil Iron On in Chrome.
Before you go further, toggle the first mat’s green MIRROR toggle on. Then click on each of the other mats in the mat preview and toggle MIRROR on for the rest of the project mats, so you don’t forget later.
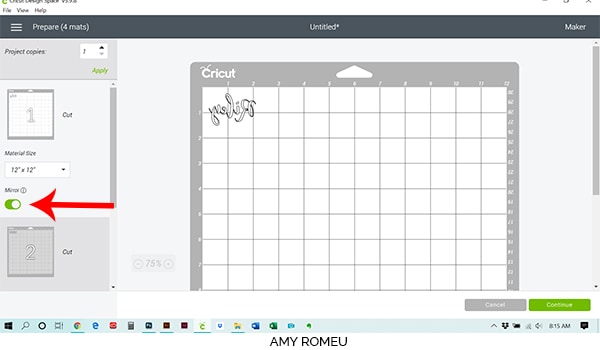
We can see the size of silver foil iron on we will need to cut is a little less than three inches wide and two inches tall. Make a note of this size.
Then click on the green CONTINUE button.
Cut a piece of foil iron on (or heat transfer vinyl, or glitter vinyl) in the shape you noted from the mat preview. Press it shiny side down to the location on the mat the corresponds to the mat preview location. In my case, it’s the top left corner.
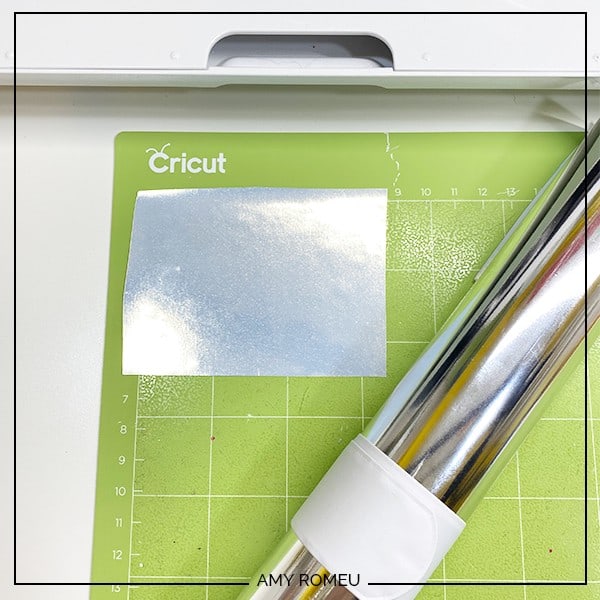
Note: If you’re wondering what the white band around my Foil Iron-On roll is, it’s a white slap bracelet! I use them to keep my vinyl rolls neatly wound and organized. You can get slap bracelets in lots of colors, but I prefer the all white slap bracelets from Amazon here.
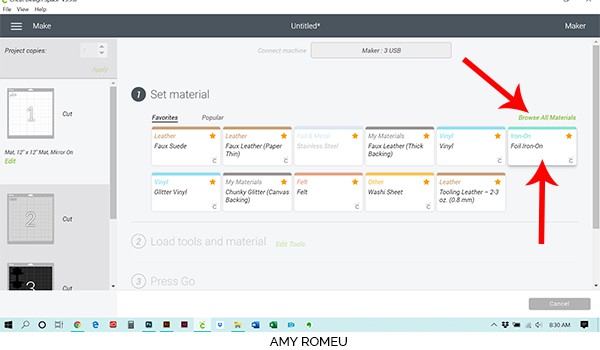
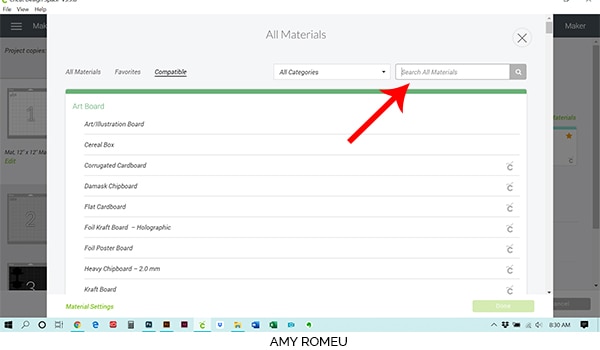
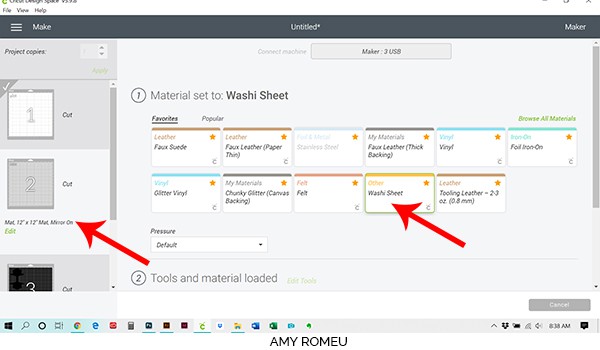
In Cricut Design Space, you’ll be on the material selection screen. Choose the best material selection for the material you are using – I use Foil-Iron On for foil iron on, Washi Sheet for regular heat transfer vinyl, and Glitter Vinyl for glitter vinyl. If you don’t have the right setting in your favorites, click on Browse All Materials to search for your desired setting. Click on it to select it.
After you’ve selected your materials, you’ll see a dropdown menu to adjust the pressure. I leave this choice at the default when cutting any kind of heat transfer vinyl, but you may need to make an adjustment depending on how your machine cuts.
I always double check that the mat is mirrored by looking underneath the mat preview on the left hand side of the screen:
Load your mat into the Cricut by lining up the mat underneath the mat guides and pressing the double arrow load/unload button. Then press the flashing C button so the Cricut starts to cut.

Unload the mat when the cut is complete.
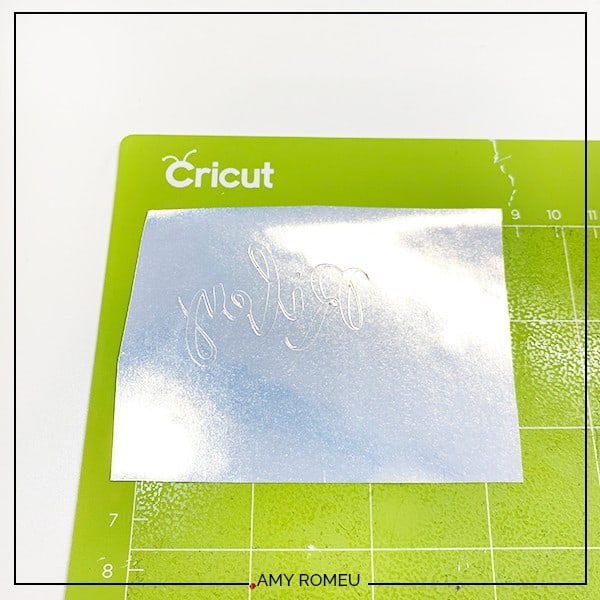
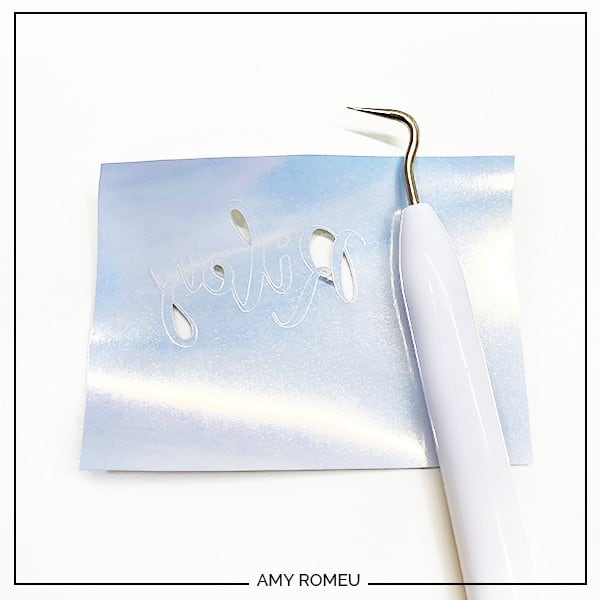
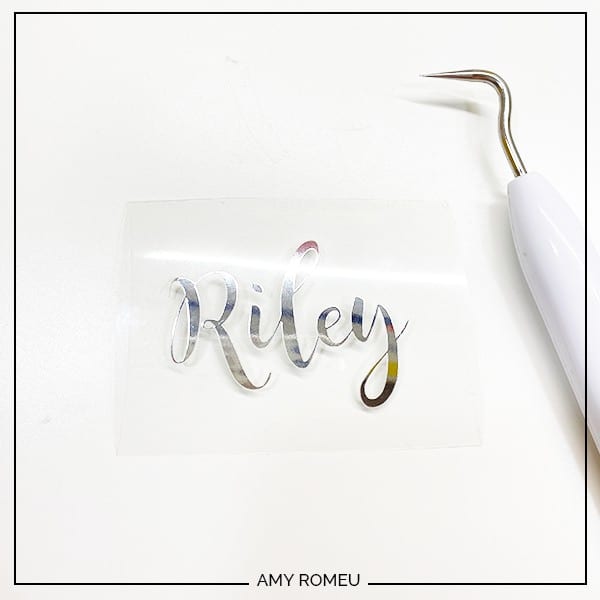
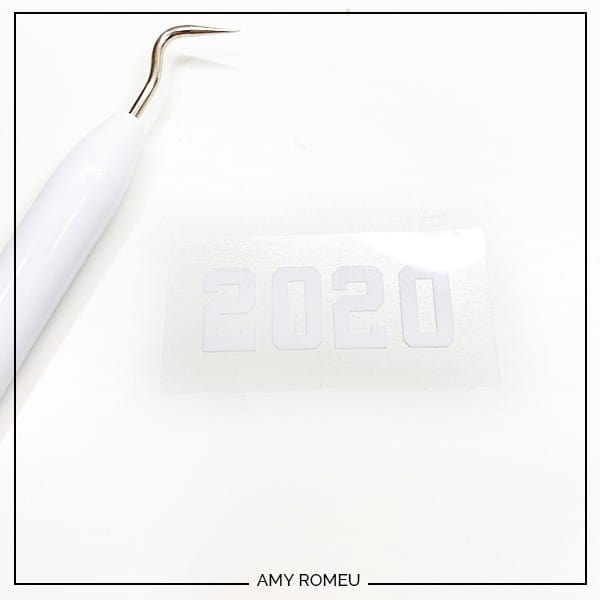
Remove the foil iron on piece from the cutting mat and use your weeding tool to remove the excess from the clear transfer tape backing.
Cut the next vinyl mat. Remember you can hover over the mat preview to get the measurement for the vinyl piece you need to cut. If you are using regular heat transfer vinyl like I am, try the Washi Sheet setting. It’s better for intricate cuts, in my opinion.
Load the next Cricut mat into the machine. Cut the vinyl and unload the mat. Weed the excess vinyl and set the vinyl year piece aside.
I recommend skipping the faux leather mat and cutting that last, so you can continue with all of your green mat cuts before switching to the purple mat for faux leather. To do that, just click on the next vinyl mat displayed on the left hand side of your screen.
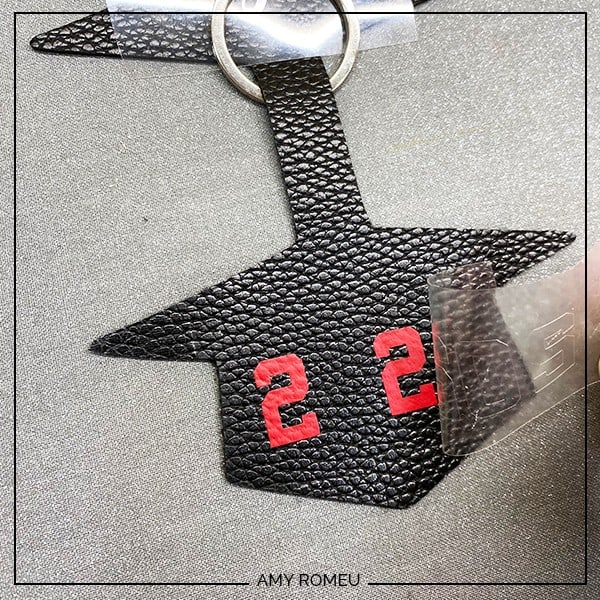
When you’ve cut and weeded all of your HTV layers, you can create the two color effect by removing two numbers from each of the years, like this:
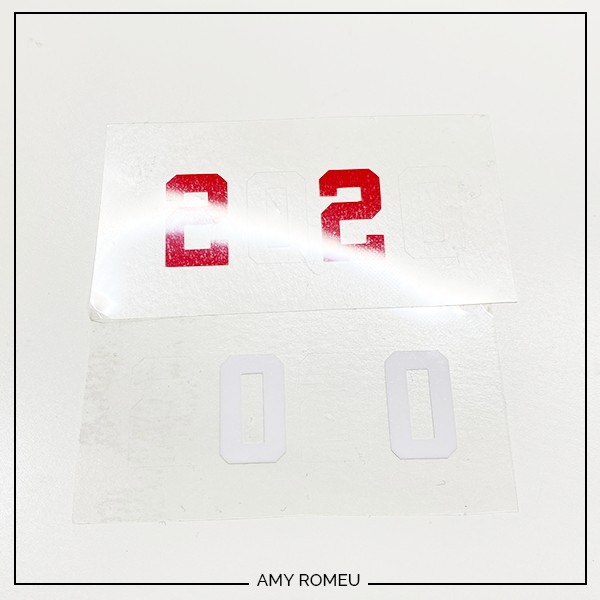
This is how the year numbers will look when you press them on the keychain, one layer at a time.
Set all of the cut vinyl pieces aside. Time to cut the faux leather keychain.
STEP 6 – Cut the Faux Leather Keychain
Hover over the faux leather mat with your mouse to see the size material you need to cut for the graduation keychain.
I like to cut a slightly larger piece of faux leather so there’s room to tape it down without getting in the way of the blade. For this cut, I cut a piece that was about 5 inches wide and 7 inches tall.
You’ll be placing the material on a sticky part of your mat. If the top left corner of your mat is used a lot (like mine is), you can change the placement of your cut shape by clicking the green EDIT link under this mat in the mat preview. Drag your shape to a stickier location on the mat in the mat preview screen. Be sure to place your material on your mat in this new location.
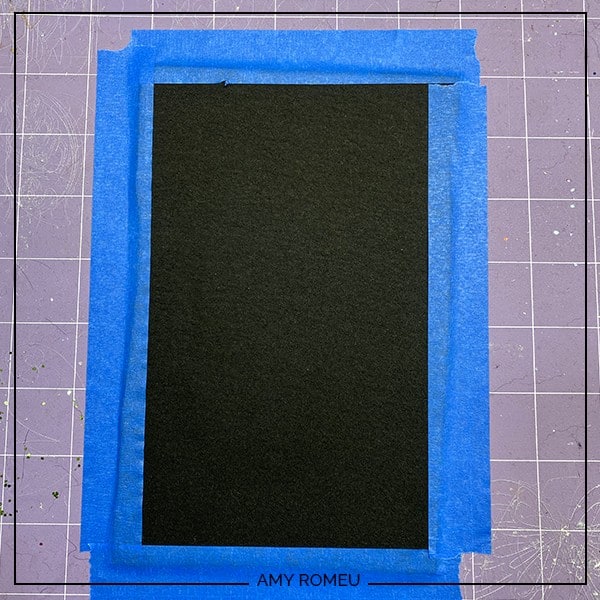
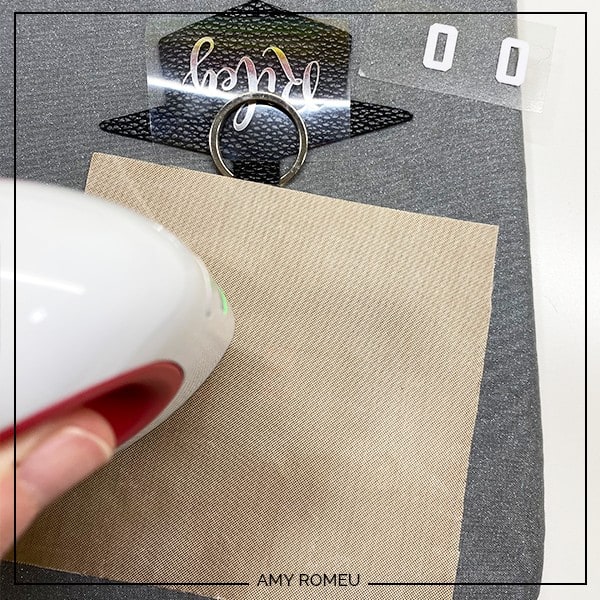
Place your faux leather face down (pretty side down) on your purple strong grip cutting mat. Then tape down the faux leather to the mat on all sides, like this:
Load your mat into your Cricut by pressing the load button with the arrows. Make sure the white star wheels are moved off to the side of the faux leather so they don’t drag cross your cutting area and lift the material.

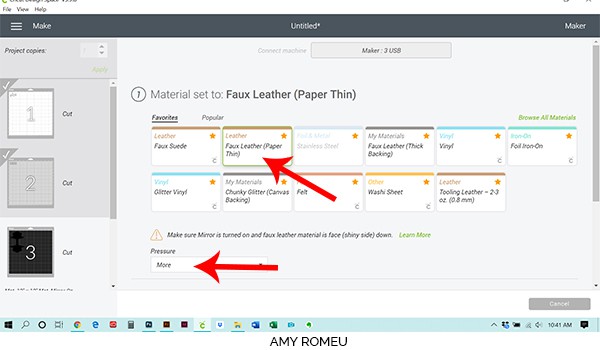
Next we need to choose our material. I’ve cut faux leather using a variety of settings, and I’ve found there are so many different settings that work. For this project, I’m going to select Faux Leather (Paper Thin) as my material on my Maker. Even though this material isn’t paper thin, this material setting is an automatic double cut, and that seems to do the trick.
If you don’t have Faux Leather visible as a material option as shown below, you can find it by clicking on “Browse All Materials” and searching for Faux Leather (Paper Thin).
I changed the pressure setting to MORE. You may not need to adjust the pressure, depending on how your machine cuts.
Cricut Explore Air 2 users can turn the Smart Set Dial to Custom and select Faux Leather (Paper Thin) as the material. You’ll also use the Fine Point Blade.
Press the C button on your Cricut machine and it will start cutting.
Unload your mat by pressing the double arrows button again.
Use your weeding tool to release your keychain shape from your mat. It should come right out. If not, you can use small scissors to make any necessary snips. I use my 4 inch curved tip Fiskar scissors when I need to trim very small areas of faux leather.
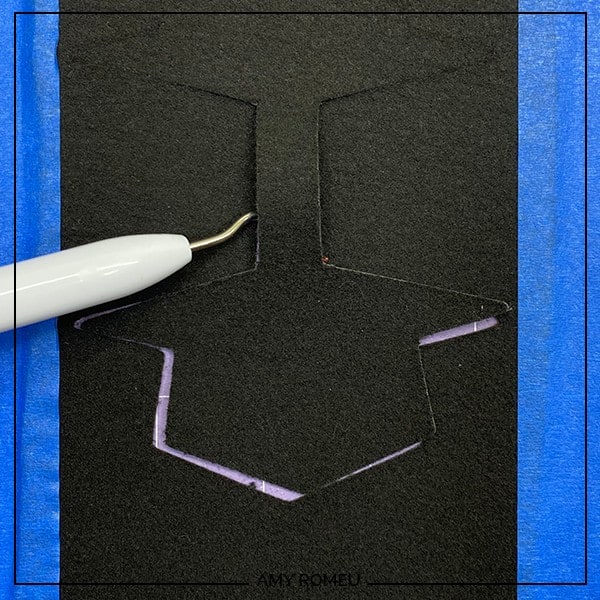
Use your small scissors to trim any fuzzy edges.
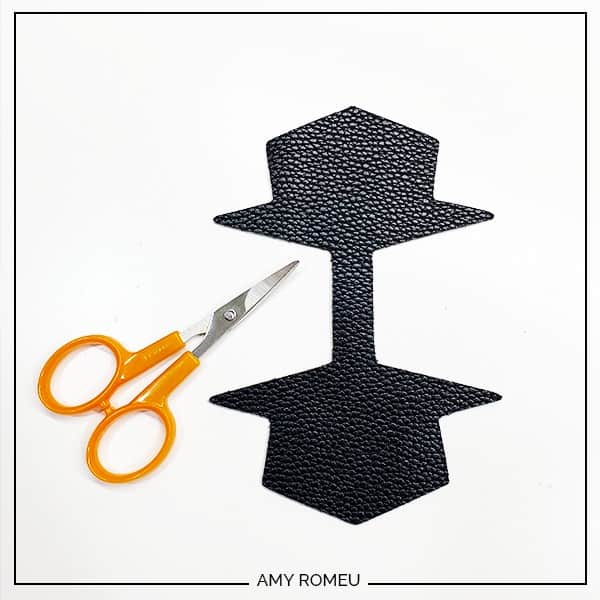
Now we’re ready to assemble the keychain!
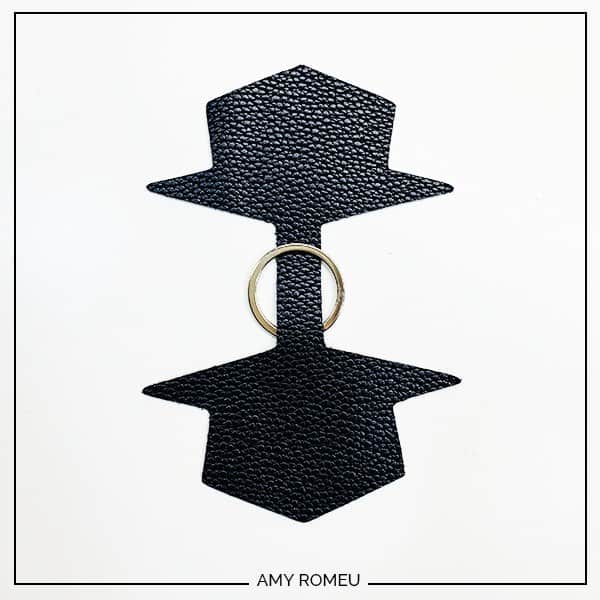
STEP 7 – Assemble the Keychain
Thread your key ring onto your faux leather graduation keychain before pressing. This way you don’t have to bend the faux leather and vinyl to get it through the key ring after.
For this step, I used my Cricut Easy Press Mini, my Easy Press Pressing Pad, and a small piece of teflon paper. Lay out your vinyl shapes first to be sure of the correct positioning.
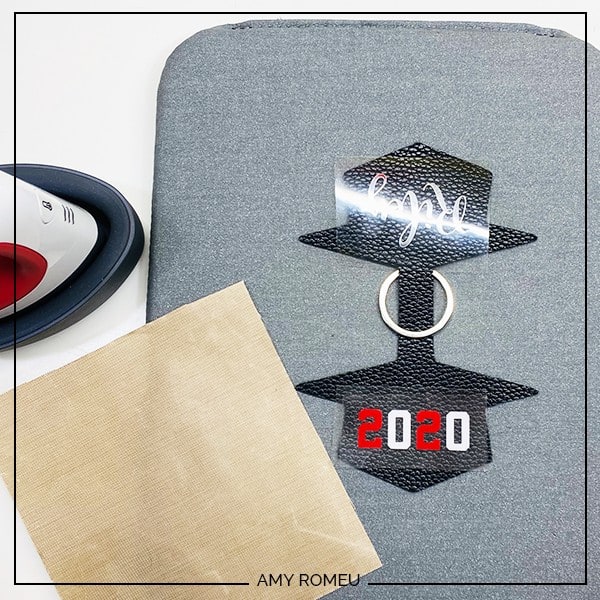
I used the lowest heat setting on the Easy Press Mini for this project. Using your Easy Press Pressing Pad or a towel, lay the HTV on top of the faux leather and then cover with a teflon sheet or parchment paper (not wax paper).

Gently press while moving the heat around all over the HTV for 10-15 seconds. If you aren’t using a cover sheet, be sure not to press the Easy Press Mini on the faux leather directly, only on the clear transfer tape.
Keep the faux leather keychain flat and peel the transfer tape away from the surface. This will keep the vinyl wrinkle free.
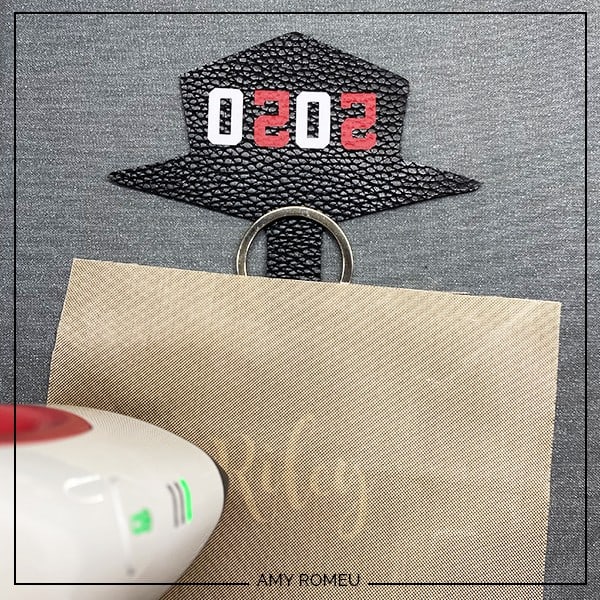
Press the other two year numbers. You can line up the second numbers with the first ones by looking at the ghost outline that remains on the transfer tape (from the two letters you removed earlier). It’s pretty easy to get the letters perfectly straight that way!
Flip the keychain around and press the name on the other side. If any parts didn’t stick down, just cover them with the teflon sheet and press them a little more.
Now it’s time to glue the front and back of the keychain together. I used Quick Hold glue, but you can use E6000 or whatever fabric glue you have at home.
If you didn’t put your key ring on your keychain before, now is the time to do it!
Carefully apply small dabs of glue on the back of one side of the keychain. Apply the glue close to the edges but allow some room for the glue to spread.
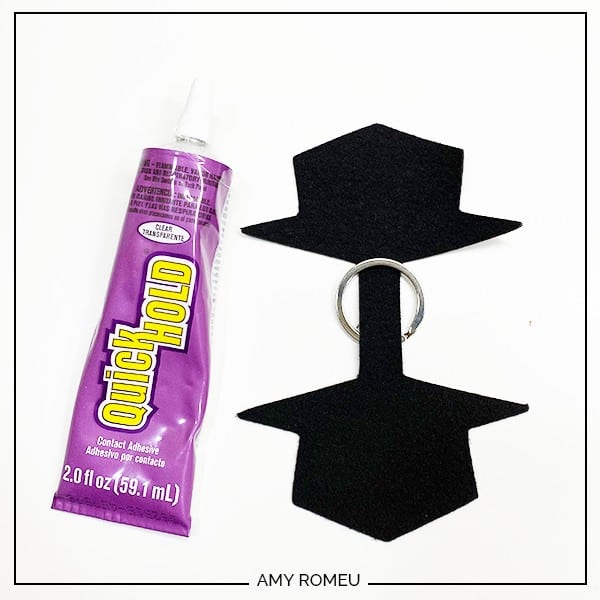
Don’t put glue on the thin connector piece of faux leather that goes through the keychain!
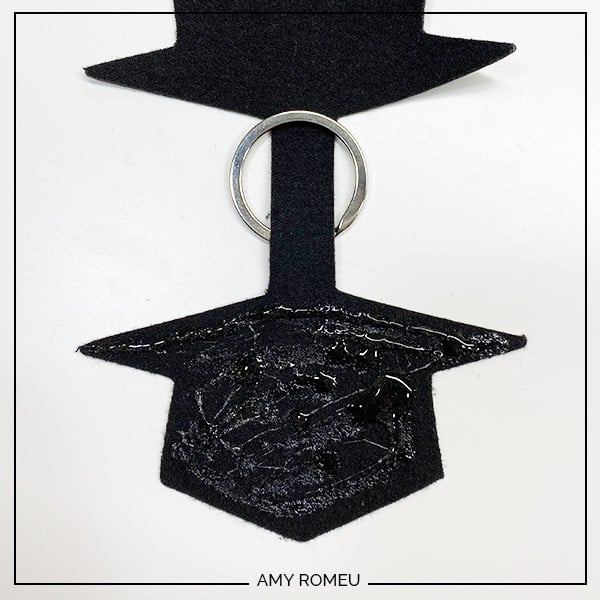
Fold the glued and unglued halves together, line up the edges so they match perfectly, and press down.
Now place the newly glued keychain under something heavy like a book for a few hours to dry. If you used fabric glue, allowing your keychain to dry overnight is best. Check the seams between the two halves the next day and see if there are any places that need additional glue, especially near the key ring.
Your keychain will be very firm and stiff. If you used a faux leather with different colored backing than the front, you can color the edges of your keychain with a Sharpie if you’d like.
STEP 8 – Add The Tassel
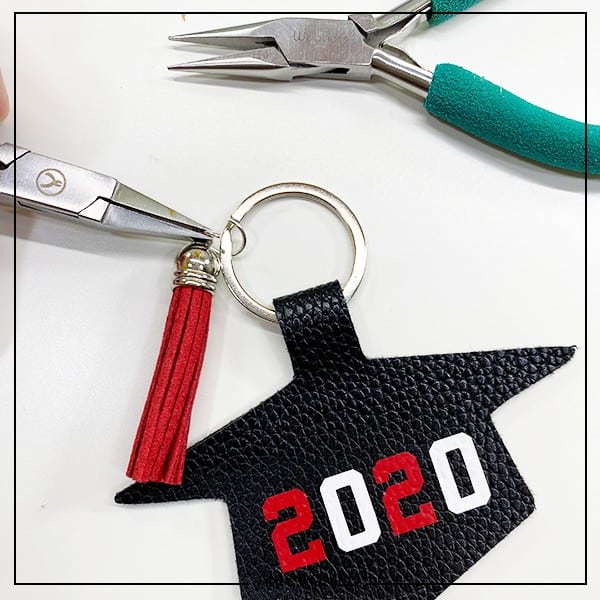
No graduation cap would be complete without a tassel! To add the tassel, use your two pliers to open your 10mm jump ring.
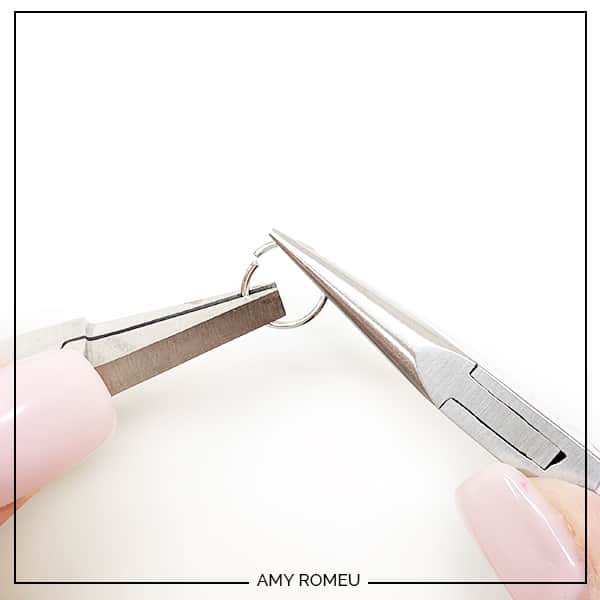
Slide the tassel onto the jump ring. Then slide the jump ring onto the key ring, and use the two pliers to close the jump ring. That’s it!
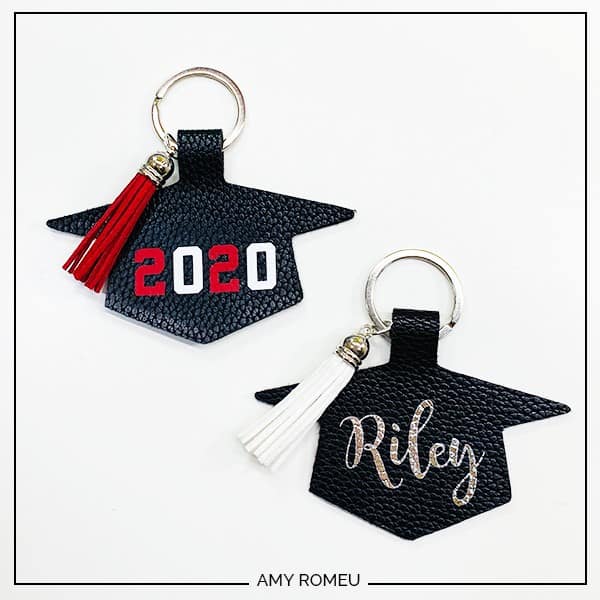
Are you going to try this project? If you do, please post a comment and attach a photo of your finished graduation keychain. Be sure to let me a little about the special graduate you made it for!
Want to see all of my Cricut earring & jewelry tutorials? CLICK HERE
Until next time… and happy creating!

Want the FREE SVG file so you make a Graduation Keychain yourself?
Get it from our Resource Library! You’ll receive the password for the Resource Library instantly after filling out the form below!
Want to remember this? Post this DIY CRICUT GRADUATION KEYCHAIN project to your favorite Pinterest board!

i am very confused as to where this file is located. i subscribe to your emails and have let to find it in the resource library
Hi, Debra. This project is the second one from the top in the resource library. If you’ve visited the library before, please refresh your page a few times and you should see it. Thank you. Amy
I am having trouble locating the graduation cap file as well.
Hi, Dana. Are you inside the resource library? The grad cap keychain is Design #134.
can you post the size you used for the black leather grad hat. The one I cut looks so much bigger.
Hi, Katrina! The graduation cap is 4 inches wide from cap point to point. I hope that helps! Thank you. Best regards, Amy
I love the earrings and key rings you shared I think their wonderful.
I was looking for the free svg files for the graduation cap key rings could not find in your library. could you please send me the item number so I can look it up.
Hi, Rosanne! Thank you for your message. The graduation caps are Design #134 in my Resource Library. Thank you!
I have a question about the graduation keychain, what can be put in between the leather to make it stiffer.
Hi, Rebia! You could try a think piece of cardboard or stiff plastic. 🙂
I cannot seem to find a link to down load the grad cap key chain design
Hi, Kimberly! Did you enter your email address into the form on the page to get the password to my library?
When you receive the password and the library link, you’ll scroll down to Design #134 and follow the directions to download the SVG.
If you need further assistance, please send me an email at [email protected].
Thank you.
Amy
I have signed up for this site, TRIED locating #134 to get the grad cap keychain pattern, and NO WHERE do I find the link to get that. Very frustrating.
Hi, Terri! Sorry you are having trouble!
All of my free SVGs are in side my blog’s free library. I see you received the email yesterday with the link and password to the library. (If you don’t see it in your inbox, please check your spam and promo folders.)
Did you open that email, click on the link to the library, and enter the password? This will bring you to the library page.
The library is organized by design number and there are photos for each design. Scroll down to Design #134. There is a photo of the grad cap keychain project and a large “DOWNLOAD SVG” button underneath.
If you can’t find the email, or if you need more help, please let me know by sending me an email to [email protected] so I can assist you further! I’m always happy to help. 🙂
Amy