
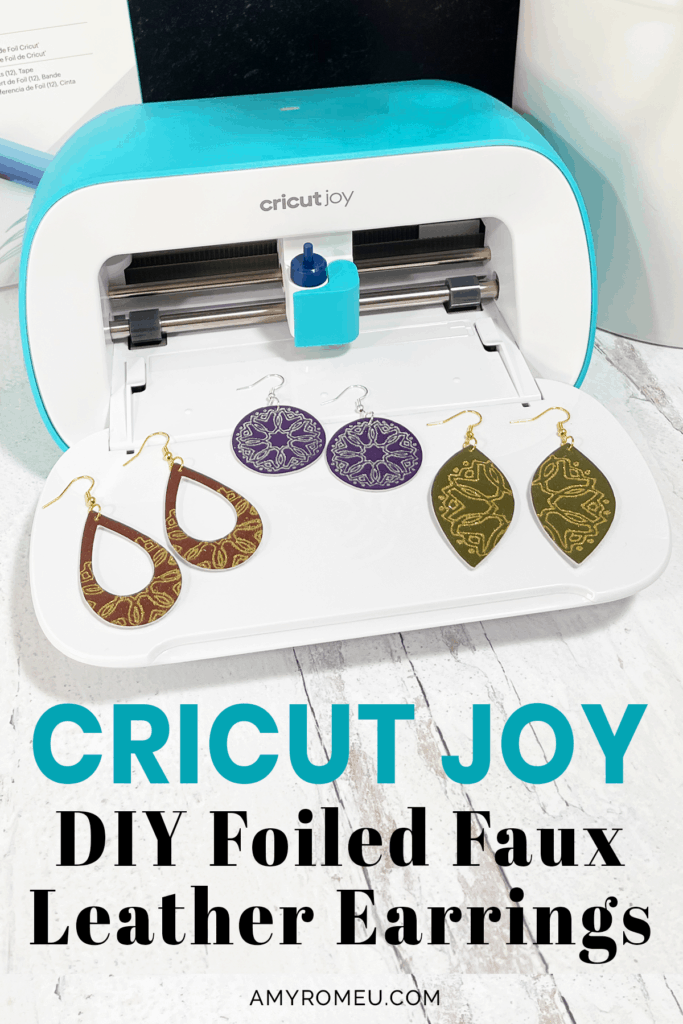
Cricut Joy Foiled Faux Leather Earrings
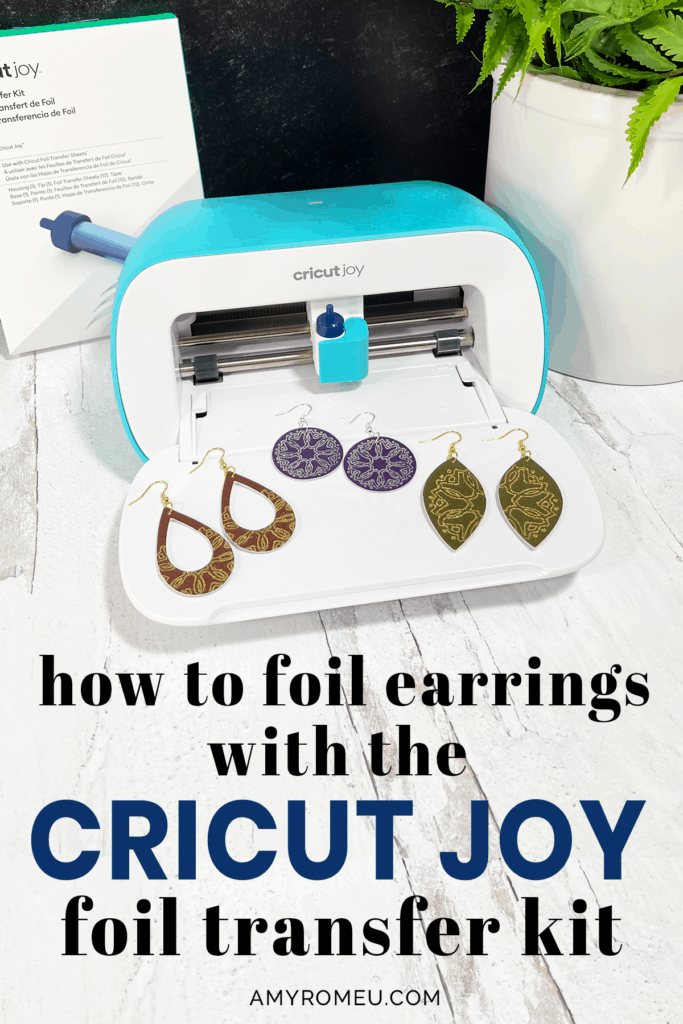
How to Make Foiled Faux Leather Earrings with the Cricut Joy Foil Transfer Kit
Have you tried foiling with your Cricut yet? Last year I shared a tutorial on how to foil faux leather earrings with the Cricut Foil Transfer Kit – if you want to check it out, click here. Now Cricut has launched a Cricut Foil Transfer Kit just for the Cricut Joy. I wanted to know if you could foil faux leather earrings with the Cricut Joy foil transfer kit so I tested it out. I can’t wait to share my tips and tricks with you.
I designed 3 pretty foiled faux leather earring designs for you to test out foiling with the Cricut Joy and the Cricut Joy Foil Transfer Kit. You can get them from my Free Resource Library. You’ll find more information in the Materials section of this tutorial.
A few things to note about the Cricut Joy Foil Transfer Kit:
- The foiling tip only works with desktop versions of Cricut Design Space (not the mobile app on iPhone or iPad).
- Also, the Cricut Joy foiling tip only works with the Cricut Joy, not the the Cricut Maker or the Cricut Explore machine families. The opposite is also true – the Foil Transfer Kit made for use with the Makers/Explore machines doesn’t work with the Joy.
- Cricut recommends using faux leather instead of genuine leather for foiling.
- For best results, I recommend foiling on smooth faux leather, not pebbled or textured faux leather. I’ll share my favorite resource for smooth faux leather below.
If you’d rather watch a video tutorial for this project, click here:
p.s. If you want to check out all of my Cricut Jewelry tutorials, click here.
Ready? Let’s get started!
This page contains some affiliate links (which means if you make a purchase after clicking a link, I will earn a small commission at no additional cost to you). Read my full disclosure policy here.
Foiled Faux Leather Earrings with the Cricut Joy Foil Transfer Kit – Materials List
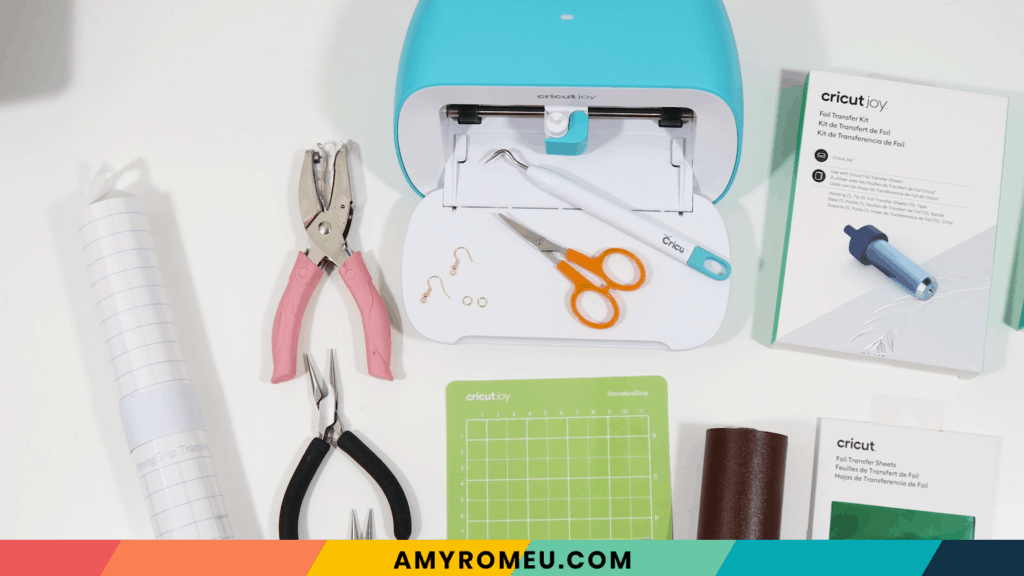
- Cricut Joy. Get the Cricut Joy from Amazon here or from Cricut’s website here.
- Cricut Joy Foil Transfer Kit – This kit made especially for the Cricut Joy includes the foil tip housing, one “medium” thickness foil tip, foil sheets in silver and gold, and the special Cricut foiling tape. Get the Cricut Joy Foil Transfer Kit from Amazon here or from Cricut’s website here.
- SMOOTH faux leather in the color of your choice. I used this smooth faux leather from Amazon in the color Chocolate. There are so many other colors available in the link above, like Black, Brown, Army Green, Purple, and Royal Blue, Pink, Red, Yellow, Orange, White, etc.
- Cricut Foil. (This is different from Foil Iron-On). I used the Gold that comes in the Cricut Joy Foil Transfer Kit. but you can buy more like this Metallics foil pack. You can also buy colored foil packs, like this pack of Blues & Greens and this pack of Reds & Pinks.
- Cricut Strong Grip Transfer Tape (optional). I use this transfer tape to keep faux leather fuzzy backing off my Cricut Joy sized green mat.
- A weeding tool. I use the one in my Cricut tool set here.
- A small hole punch (for punching earring holes in the faux leather). I have both this one and this one and use them interchangeably.
- Small curved scissors. I love these and use them all the time!
- Earring hooks – I used these gold toned shepherd’s earring hooks from Amazon.
- Small jump rings – I used the gold toned jump rings from this assortment of 6mm size jump rings in different metal finishes from Amazon here. You could also use 5mm size jump rings if necessary.
- Two pairs of flat nose pliers – I’m using one wide nose and one needle flat nose here, but you can use any two flat nose pliers. My favorites are Wubbers brand in the Baby size, on Amazon here.
Be sure to check out my post Beginner’s Guide To Jewelry Making Tools for all the information you’ll need to know about jewelry making tools.
- The foiled earring templates, design #183 in my Resource Library. To get the password via email instantly, fill out the form below, or the form at the bottom of this post.
PROJECT INSTRUCTIONS
STEP 1 – Download SVG from Library
Download the free SVG files for my 3 Foiled Earring designs from my free Resource Library – they are Design #183. Fill out the form above to get the password to the library emailed to you instantly.
Save the zipped folder that downloads to your computer. You’ll need to unzip or extract the files FIRST so you can upload them to Cricut Design Space. Remember the Foiling tip will only work on a desktop or laptop computer, not the app.
STEP 2 – Upload SVG to Cricut Design Space
After you’ve unzipped the folder and made a note of the file location, open Cricut Design Space and click on New Project. Then choose Upload from the left hand side menu on the canvas.

Click on Upload Image and navigate to your saved (unzipped!) SVG file.
Double click on it to bring it into the upload screen in Design Space. You’ll see a preview of the file.
Click Save. Now you’ll see the 3 foiled earring designs as the first item in your “recently uploaded designs” row. Click on them and then click on the green “insert images” button in the bottom right corner.
This brings the design into Cricut Design Space. Drag the earring shapes up to the top left corner of your canvas. Then with all the layers selected, click on UNGROUP.
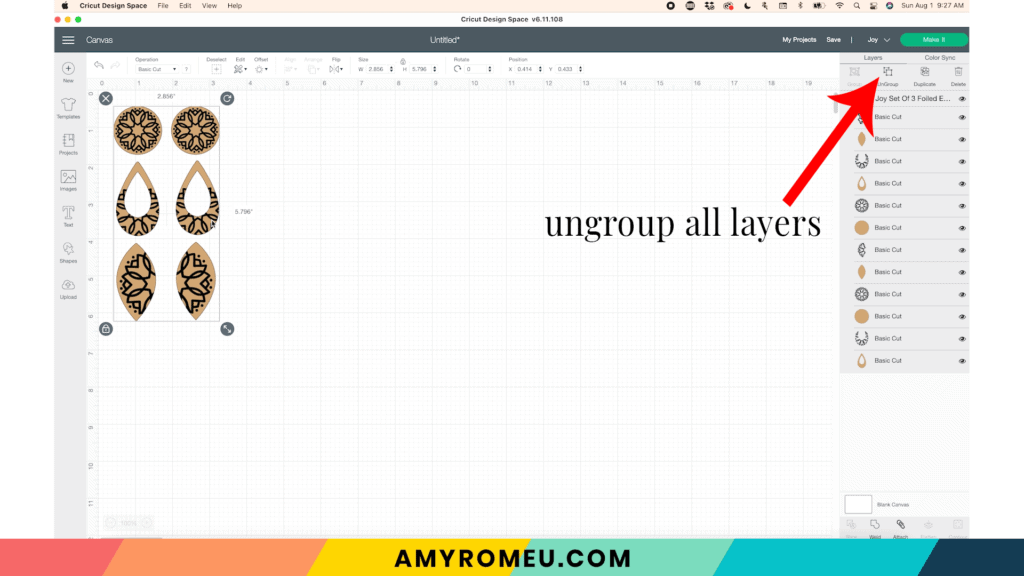
Hide the earring layers you won’t be cutting now by clicking the eye icon next to them in the layers panel. You can also click on those layers and delete them.
Select the foil design layer and change the Operation type from Cut to Foil. You can also change the color of the foiling to see the design better. You can click on the little color picker box next to the Operation dropdown menu and choose another color.
The foil color that foils will be the actual foil you choose, so it doesn’t matter what color you pick in Cricut Design Space.
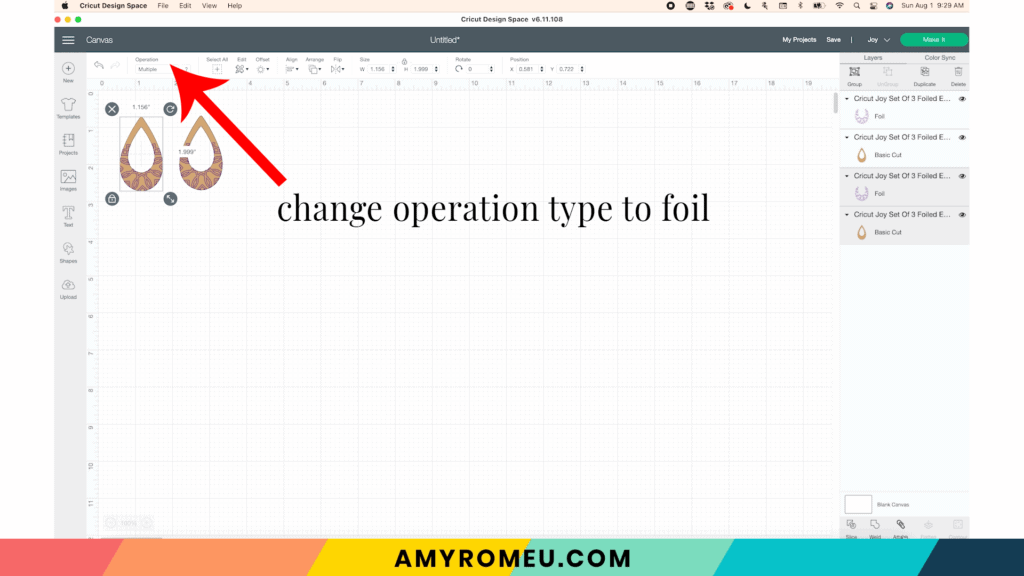
Repeat these two steps with the second earring. Click on the foil layer to select it, change the Operation from Cut to Foil, then change the foil color if desired.
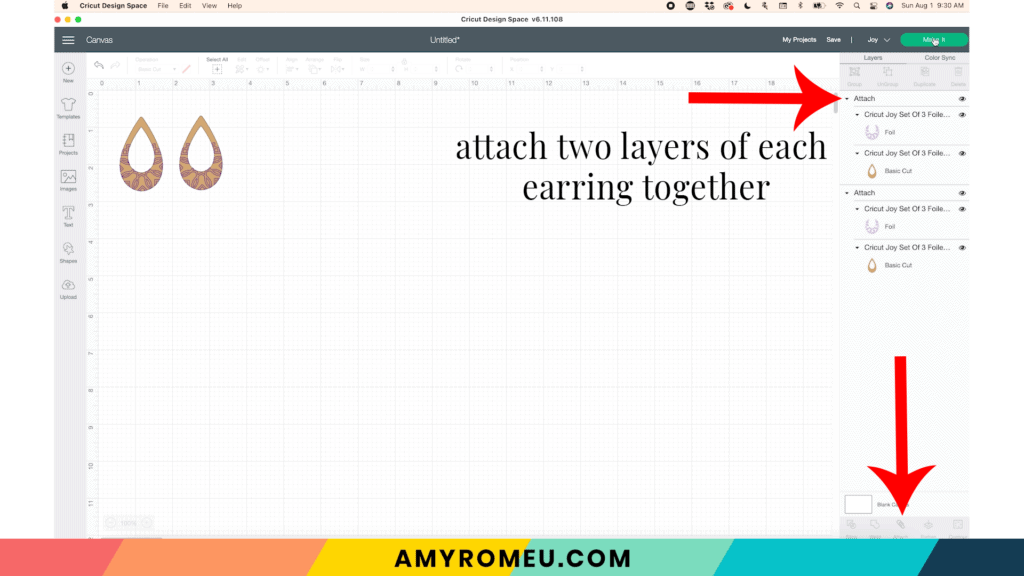
IMPORTANT!!! Now use your cursor to select both layers on one earring together, click ATTACH (the paperclip icon) at the bottom of the layers panel. Repeat with the other earring.
The layers must be ATTACHED for the foiling and cutting processes to work together properly.
Your canvas should change slightly and look like this, with the word ATTACH above the layers in the layers panel:
Once you’ve attached all of the layers together, click the green MAKE IT button in the top right hand corner.
STEP 3 – Material Selection
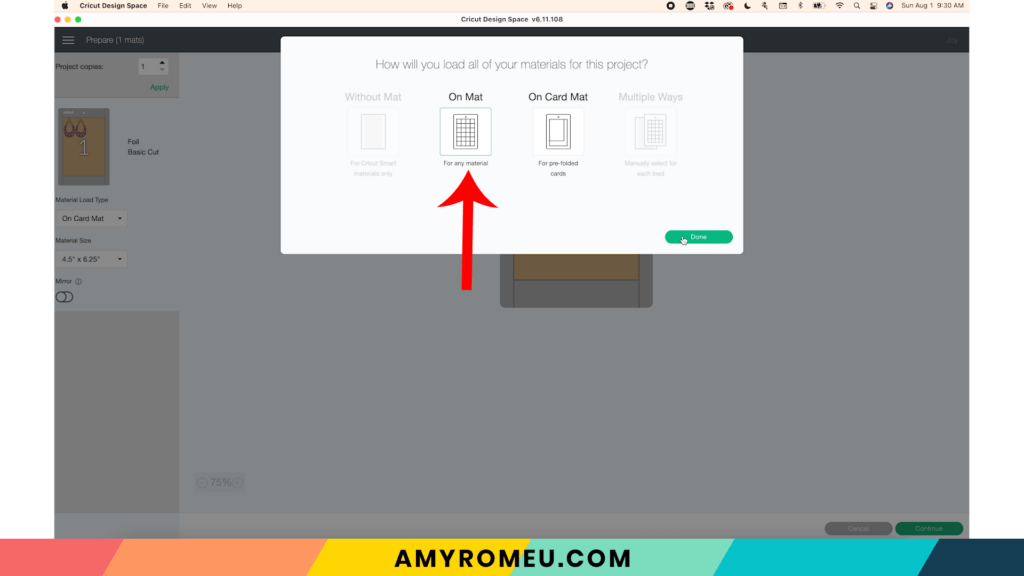
After you click MAKE IT, the Joy will ask you how you will load your materials. Choose “On Mat” and click DONE.
The mat preview screen will look like this. First, click on the earring shapes in the mat preview and drag them away from the left hand side of the mat preview and into the center of the mat.
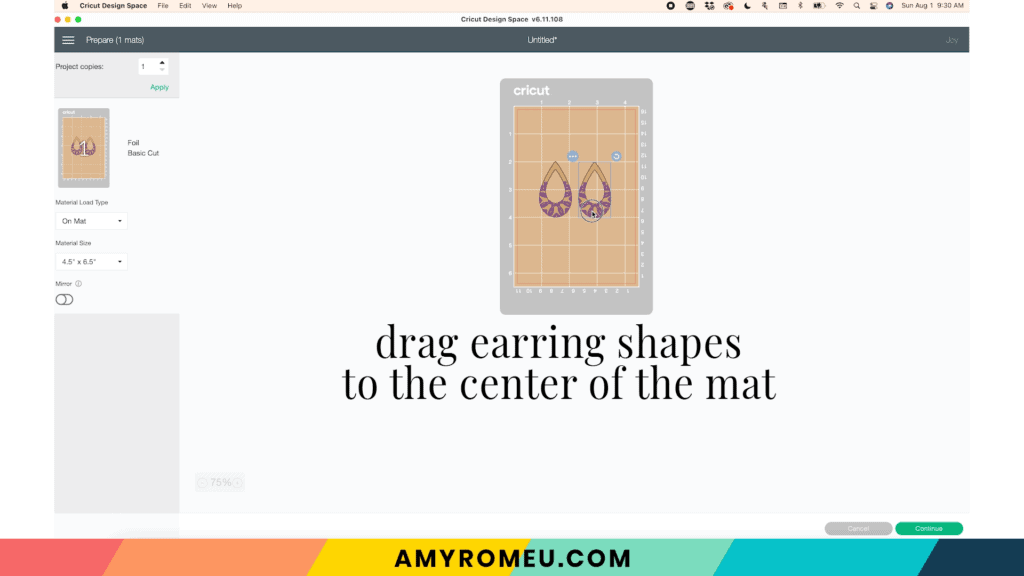
Next, make a note of what size faux leather you’ll need to cut so the shapes will cut out completely. I usually add an extra half inch to the minimum size when making earrings, but when foiling, you’ll want to add an extra inch of faux leather on all sides. This will make sense in the next step.
Don’t MIRROR the mat, since foiling requires the faux leather to be placed face up on the cutting mat.
Click Continue to select your material.
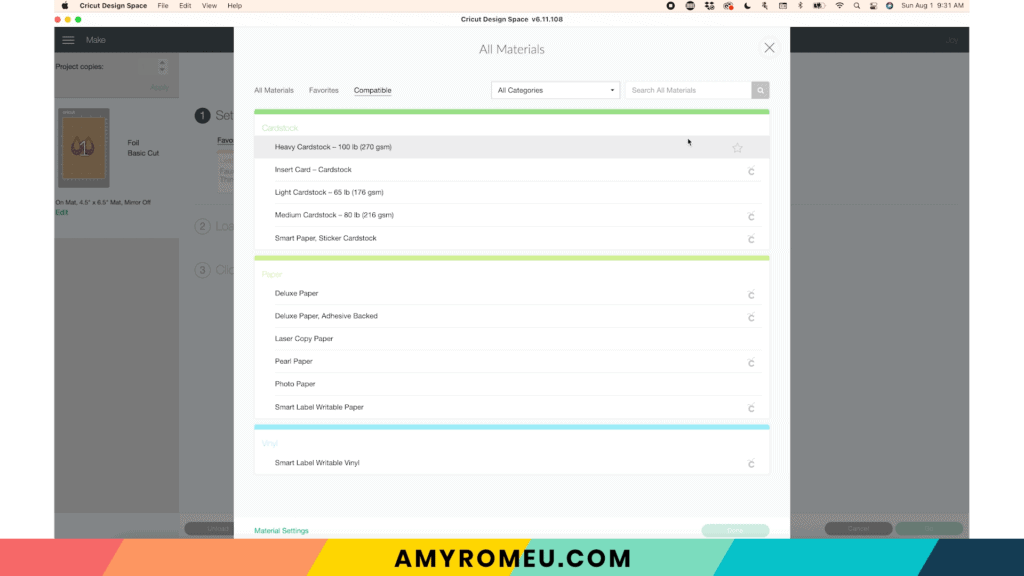
If you have the setting Faux Leather (Paper Thin) selected as a favorite, you may see it as greyed out and can’t be selected. No worries – Cricut recommends finding a similar material cut setting.
Click on Browse All Materials to choose a material from a list of compatible base materials for foiling. I chose Heavy Cardstock.
Once you’ve selected your material, I suggest changing the pressure setting in the dropdown menu to MORE.
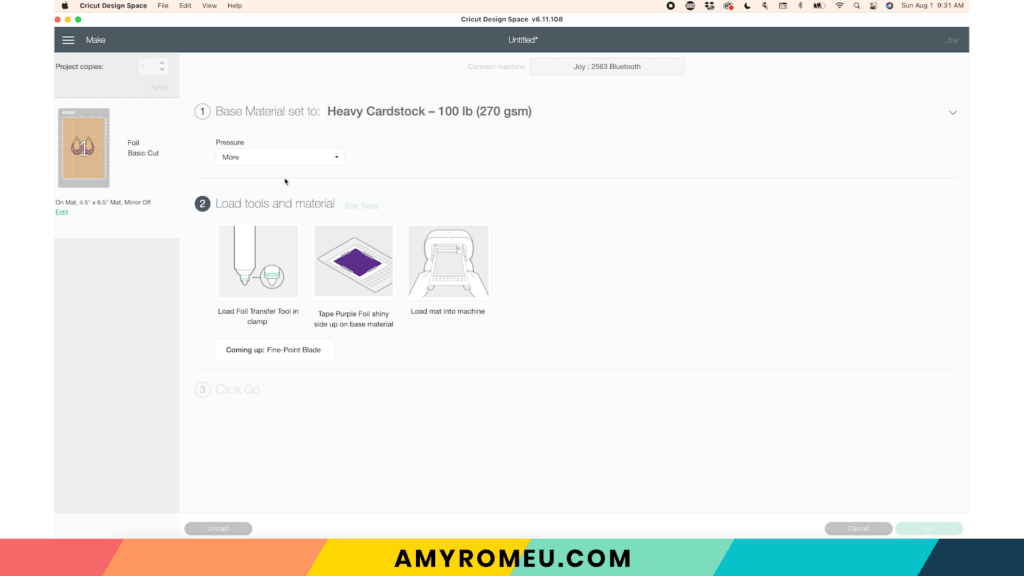
Cricut Design Space will instruct you to load the Foil Transfer Tool into the Joy’s Clamp. I’ll show you how to do that in the next step.
Now it’s time to prepare the purple mat for foiling and cutting.
STEP 4 – Foil and Cut the Earrings
Cut a piece of Cricut Strong Grip Transfer Tape and place it sticky side up on your green cutting mat. This will protect your mat from getting the faux leather fuzzies stuck on the mat surface.
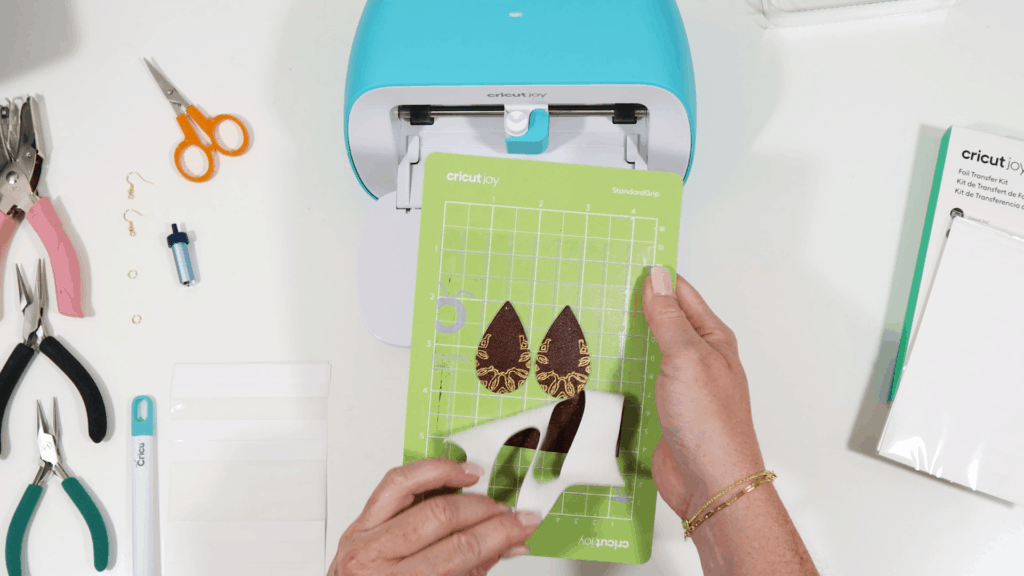
Place the smooth faux leather PRETTY SIDE UP on the location shown in the mat preview screen.
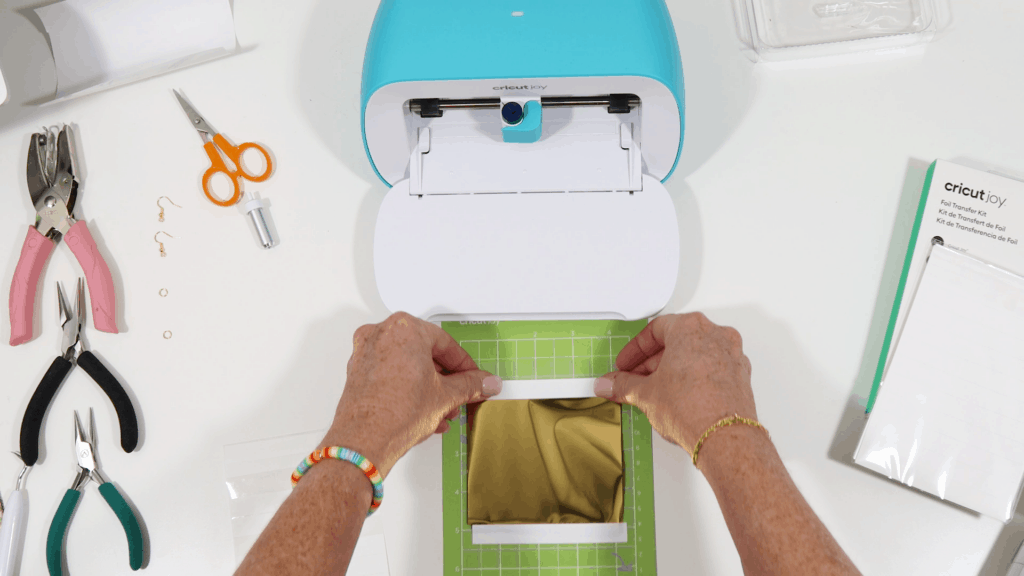
Now cut a piece of Cricut foil smaller than the faux leather piece. If the foil overlaps the faux leather and will touch the mat, trim the foil first! The foil will stick to your Cricut mat and that’s not what you want.
Place it shiny side up on the faux leather piece and use the special Cricut foiling tape to tape it down on all sides. Try to keep the foil as smooth and wrinkle free as possible.
Insert the Foil tip into the Foiling Tool housing by depressing the plunger at the end of the housing and pressing in the tip before releasing the plunger. The tip should remain inside the housing.
Insert the Foiling Tip Housing into the Cricut Joy clamp.
Load your mat into the Cricut Joy and follow the prompts on Design Space begin the foiling process.
If your foil shifts around while foiling, press the pause button and use your fingers to press the tape down firmly again.
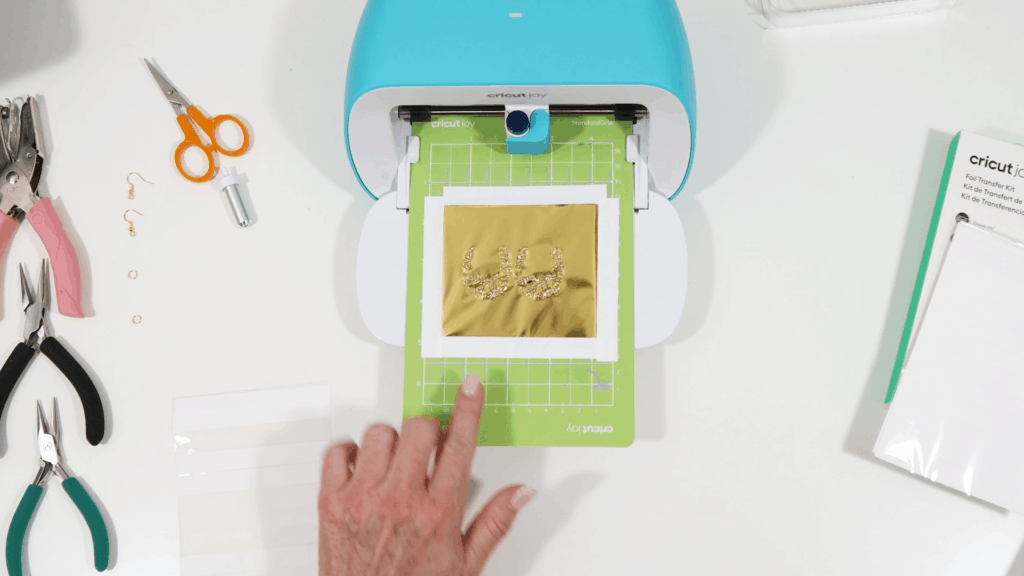
When the foiling is complete, DON’T UNLOAD THE MAT!!!
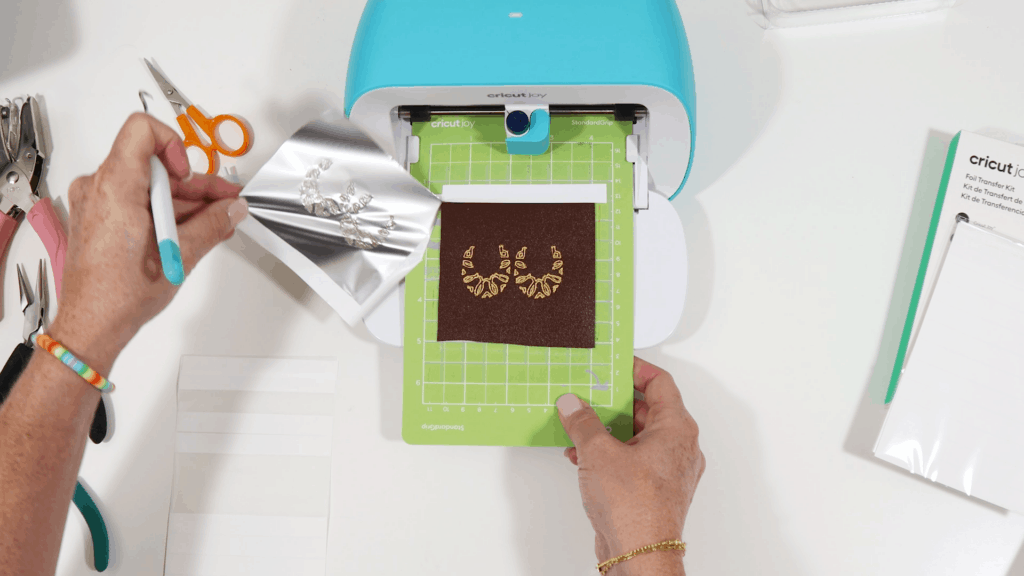
Cricut Design Space will prompt you to remove the foil. Peel it away carefully.(Don’t throw away the white foiling tape – it can be reused!)
Remove the Foiling Tip Housing and replace the Standard Fine Point Blade into the Cricut Joy clamp.
Follow the prompts in Design Space to begin the cutting step.
When the cut is complete, press the double arrows button to unload the mat. Remove the earring shapes from the mat. Use small curved scissors to trim any stray fuzzies from the back of the earrings.
STEP 5 – Punch Earring Holes
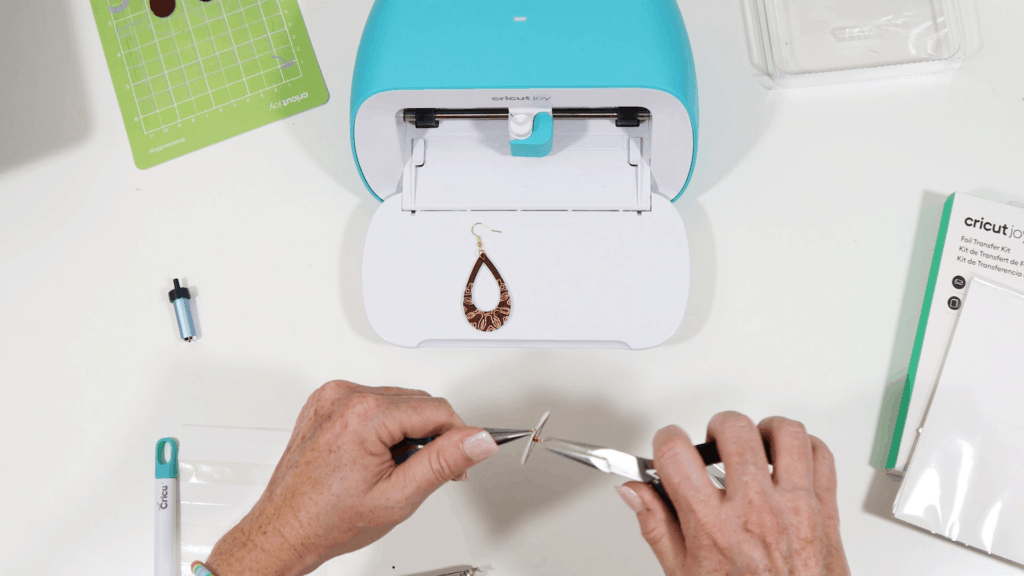
Using a small hole punch, punch the holes for the earring hooks. If you don’t have a hole punch, use a sharp tool. Punch a hole in both earrings, not too close to the top. I use a 1/16″ hole punch from Amazon, here and here.
STEP 6 – Attach Earring Hooks
Now it’s time to attach the earring hooks. You’ll need earring hooks, two 5 or 6mm jump rings, and two pair of flat nose pliers.
First, twist the bottom loop on the earwire so the earrings hang correctly from the jump ring. To do this, grip the earring hook between your thumb and forefinger, and then grip the earring hook loop inside flat nose pliers. Twist your wrist 90 degrees to turn the earring hook loop.
If you want to learn more about how to make earrings hang straight, visit this post, How to Make Faux Leather Earrings Hang Straight.
Now attach the earring hooks to the earrings with the jump rings.
That’s it!
Are you going to try making these foiled faux leather earrings with the Cricut Joy? It’s easy and fun, I promise! If you do, please send me a photo, or tag me on Instagram: @amyromeucrafts. I’d love to see your work!
If you have a Maker or Explore machine instead, I have a foiling video for you, too! Check it out here!
If you liked this project and want to see all of my Cricut Jewelry tutorials, click here.
Until next time… and happy creating!

Want the SVG files you so you make these Foiled Faux Leather Earrings with the Cricut Joy Foil Transfer Kit yourself?
They are Design #183 in my Free Resource Library! You’ll receive the password for the Resource Library instantly after filling out the form below!
Want to remember this? Post this Cricut Joy Foiled Earrings project to your favorite Pinterest board!
These are all wonderful. How about some camping ones too? like a little fire, motorhome (Class C would be great!), etc.
Thanks for the great ideas, Diane! We have a Class C, too, by the way!
Amy as usual you knw I love watching you craft.
Thank you so much, Yvonne!
You are so sweet, Yvonne. Thank you.