
DIY Cricut Infusible Ink Heart Earrings

DIY Cricut Infusible Ink Heart Earrings
I’ve recently discovered Cricut Infusible Ink, so of course I wanted to try making earrings with it. I’m so excited to share this Cricut Infusible Ink Heart Earrings project with you!
Cricut Infusible Ink is similar to sublimation, and uses heat to transfer brightly pigmented color to blanks that are designed to receive the ink transfer. One of the benefits of infusible ink is it permanently bonds with the surface of the blank instead of vinyl, which is only applied as a layer to the top of the surface underneath.
The result is rich, vibrant color that won’t peel off, bubble, or scratch.
I used Cricut Infusible Ink to create these colorful heart earrings, perfect for Valentine’s Day, or any time of year! Ready to learn how to make Cricut Infusible Ink Earrings? Let’s get started!
If you’d rather watch a video of this project, click below:
Want to see all of my Cricut earring & jewelry tutorials? CLICK HERE
This post contains some affiliate links (which means if you make a purchase after clicking a link, I will earn a small commission at no additional cost to you). Read my full disclosure policy here.
DIY Cricut Infusible Ink Heart Earrings – Materials List
- A vinyl cutting machine. I’ll be using the Cricut Maker, available at Amazon here. You can also use the Cricut Explore Air 2 or the Cricut Joy.
- Cricut Standard Grip (Green) Cutting Mat. Use the green mat that came with your Cricut machine.
- EasyPress Mat to press your items without damaging your work surface. I used the 8×10 size, but if you’re using a 9×9 Easy Press, the 12×12 size mat is great. You can get it from Amazon here.
- Sublimation blank earrings in a heart shape. You can also use these from Amazon. If you don’t like heart shapes, there are so many more great earring sublimation blanks. To see them, click here.
- Cricut Infusible Ink Sheets in the colors of your choice. I used Cherry Red, Party Pink, Pink Lemonade (patterned), and Rose Pink.
- HTV Vinyl in the colors of your choice. I used Siser Easyweed Heat Transfer Vinyl in Light Pink.
- A weeding tool. I love the weeding tools in my Cricut tool set, which I got from Amazon here. You can get also get the basic Cricut tool set at Michael’s here.
- Parchment Paper. Be sure the parchment paper you use can withstand at least 400 degrees of heat. I like Reynolds Wrap brand from Amazon here. You can also use a Teflon sheet or butcher paper.
- Earring hooks. I used these earring hooks from Amazon.
- Jump rings. I like 6mm size. I used these jump rings from Amazon.
My Heart Earrings text SVG file. These are the embellishment words I cut out of heat transfer vinyl and pressed on top of the infusible ink hearts. It’s Design #164 in my Free Resource Library. Fill out the form below to get the password to the library emailed to you instantly.
PROJECT INSTRUCTIONS
STEP 1 – Download Free SVG
Download the SVG files for my free infusible ink heart earrings text designs from my free Resource Library (Design #164).
Save the zipped folder that downloads to your computer. You’ll need to unzip or extract the files FIRST before you can upload the cutting file to Cricut Design Space. Make a note of the file location after you unzip it so you can find it in the next step.
STEP 2 – Upload SVG to Cricut Design Space
When you open Cricut Design Space, click on NEW PROJECT to get started. Then click on UPLOAD from the left hand side menu.
Click on the UPLOAD IMAGE button, then click BROWSE to locate where your unzipped SVG files are saved on your computer.
Double click on the SVG file to bring it into the upload screen in Design Space. If you get an error message that says “unsupported file type,” you may have clicked on the wrong file, or your SVG file is still zipped.
You’ll see a preview of the text designs for this project. Hit the green SAVE button.
After you’ve selected your file to upload, you’ll see it as the first item in your “recently uploaded designs” row.
Click on it your newly uploaded file so it is outlined in green. Then click on the green INSERT IMAGES button in the bottom right corner. This will bring the design onto your canvas.
Recolor the text if you’d like to by clicking on the color icon on the top menu bar.

Choose whichever text shapes you want to cut from heat transfer vinyl and hide or delete the other layers. You can hide a layer by clicking on the eye icon next to the layer you want to hide.
These text shapes are already sized for the heart shaped sublimation blanks I used for this project. If you are using different blanks, you may need to resize the art.
Once you’re happy with the size, click the green MAKE IT button.
STEP 3 – Cut & Weed the Vinyl
In the mat preview screen, drag the cut shapes apart just a little so you’ll have room to cut them apart from each other after the Cricut cuts them. If you are using heat transfer vinyl for this part of the project, be sure toggle the green MIRROR button to ON so the letters cut in reverse. If you are using permanent vinyl (adhesive vinyl), there’s no need to mirror.

Double check that your text has been mirrored on your mat preview.
Click the green CONTINUE button in the lower right side of the screen.
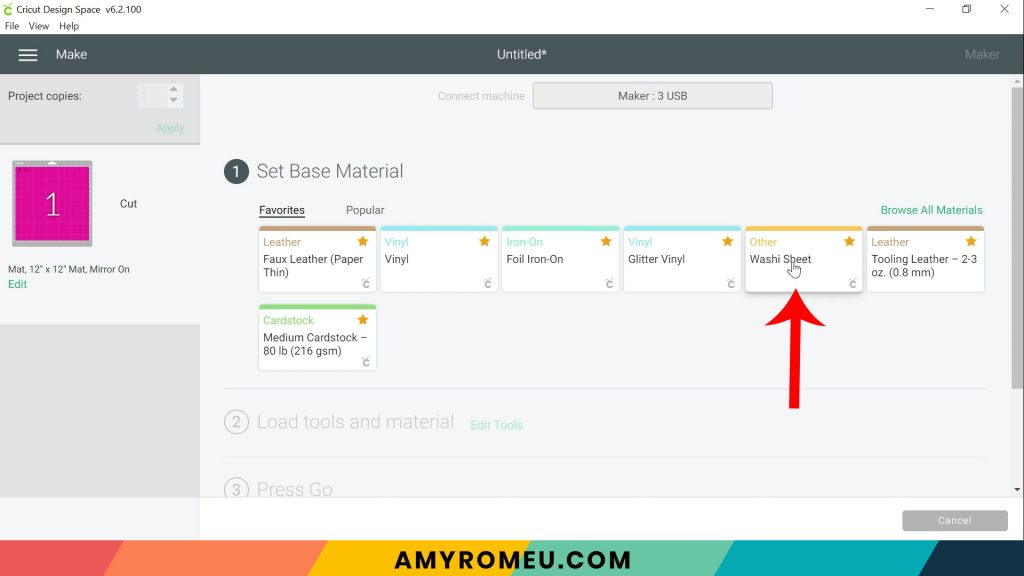
Choose the material setting that corresponds with the material you are using. For Siser Easyweed, I chose Washi Sheet (good for intricate cuts) with “More” pressure.
Place a trimmed piece of heat transfer vinyl shiny side down on the mat and load the mat into the your machine. Press the flashing C button to begin the cut.

When the cut is complete, press the double arrow button to unload the mat. Remove the vinyl.
Using a sharp weeding tool, remove the excess vinyl from around the letters, and set aside.

STEP 4 – Prepare Area for Pressing
It’s important to protect your work surface well when using Infusible Ink. Have clean and dry hands. Oil, sweat, or warmth on your fingers can cause a transfer of infusible ink.
Open the infusible ink package carefully. You’ll notice the colors seem faded or muted – that’s normal. The colors will be much more vibrant after pressing.

Trim a piece just slightly larger than the earring shapes you want to press. Place the infusible ink sheets back inside the package and set aside.

Cover your heat pressing pad or heat press surface with a Teflon sheet, white cardstock, butcher paper or a few layers of parchment paper. Be sure your parchment paper can withstand temperatures of at least 400 degrees.
Have another piece of parchment paper or Teflon sheet handy to use as a cover sheet. You’ll also need your heat tape nearby.
If you are using the Easy Press Mini, I also recommend having a timer on hand. I used the timer on my phone. If you are using the Easy Press, it will count down for you.
The sublimation earring blanks are covered with a protective plastic coating. It may be clear, or blue. Peel that off from the front of the earring shapes only for now.

Leave the coating on the back of the earrings until after you’ve completed the pressing.
If you forget to peel off the coating, this is what your pressed earring will look like, and you don’t want that!

STEP 5 – Press Infusible Ink on Earring Blanks
Now we are ready to press! You can press the infusible ink on the earring blanks with a Cricut Easy Press or a Easy Press Mini.
Turn on your Easy Press or Easy Press Mini and set the recommended time and temperature according to the instructions for Infusible Ink. I suggest referring to the Cricut Heat Guide here.
I used the Easy Press Mini on the highest setting, approximately 400 degrees, for 60 seconds.
Place your earring blanks face down (the side with the plastic coating still in place facing up) onto the infusible ink paper. Use pieces of heat tape to tape the blanks in place.
NOTE: You can also tape and press the earring blanks separately. If you press one earring at a time, make sure you are timing each pressing so both earrings will receive the same amount of ink.
Be sure your pressing pad is protected with parchment paper or some other cover sheet. Flip the earring blanks taped to the infusible ink over so the earring blanks are on the pressing pad and the back of the infusible ink is facing up. Cover with another piece of parchment paper.

Place the Easy Press or Easy Press Mini on top of the infusible ink/earring blanks sandwich and press down firmly. Set a timer so you know when the recommended time is up.
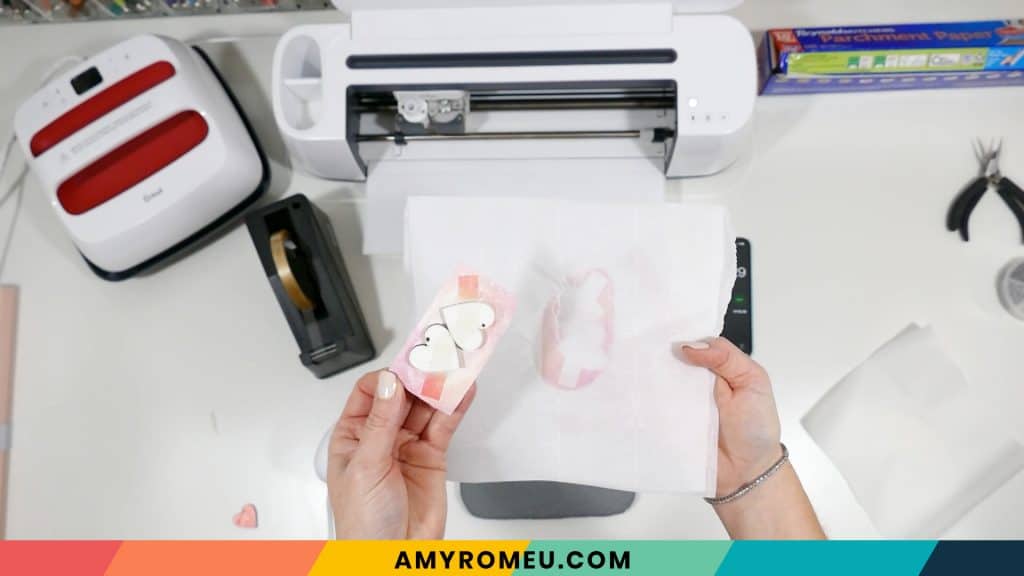
Carefully remove the cover sheet. You’ll see the edges of the infusible ink paper have transferred ink onto the parchment paper protecting your mat.
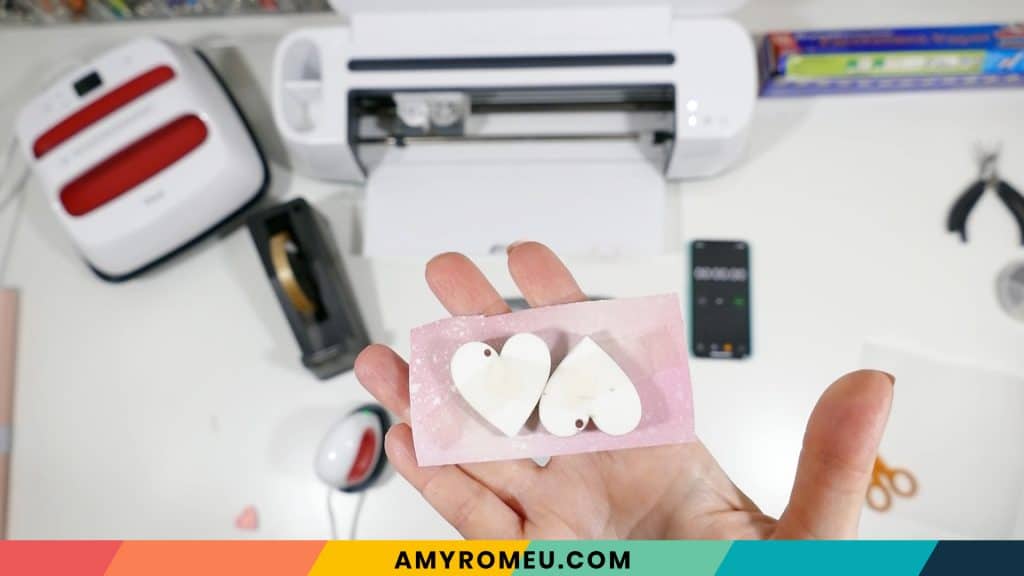
The earring blanks will be warm to the touch. Let them cool a bit and carefully removed the earring blanks from the ink sheet.

Adjust the temperature on your Easy Press or Easy Press Mini according to the heat transfer vinyl you’ll be using. Then place the heat transfer vinyl layer onto the earring shapes, cover with a cover sheet, and press.

Carefully peel away the cover sheet. Press the other earring.

STEP 6 – Add Earring Hooks
The sublimation earring blanks I used for this project came with earring findings. If you want to use those, they are easy to put on. There’s a simple horseshoe type clamp at the bottom of the earring hook that you can open slightly with pliers and clamp closed on the holes of the earring blanks.

If your earring blanks didn’t come with findings, you can use earring hooks, 6mm jump rings, and two pair of jewelry making pliers.
First turn the bottom loop of the earring hook 90 degrees so your earrings will hang straight. To learn more about this process, you can read my blog post about how to make earrings hang straight here.
Then use the pliers to open the jump ring, attach the heart earring and the earring hook, and then close the jump ring again.

That’s it! Aren’t these infusible ink heart earrings so charming?

Are you going to try this Cricut Infusible Ink Earrings project? If so, I’d love to see your creation! You can tag me on Instagram: @amyromeucreative
Want to see all of my Cricut earring & jewelry tutorials? CLICK HERE
Until next time… and happy creating!

Want the FREE SVG file you so you make these DIY Cricut Infusible Ink Heart Earrings yourself?
Get it from my FREE Resource Library! You’ll receive the password for the Resource Library instantly after filling out the form below!
Want to remember this? Post this DIY CRICUT INFUSIBLE INK HEART EARRINGS project to your favorite Pinterest board!


These are so cute! Can the infusible ink be applied to the back too?
Yes, absolutely! Both sides are able to accept ink.
Love it! I want to see more ideas. This is a great way to use small infusible ink leftovers. Your videos are great. I look forward to seeing more. Thanks
Another wonderful project idea, thank you so much for sharing your creativity Amy! I can’t wait to give this a try!