
DIY Cricut Candy Conversation Heart Keychain for Valentine’s Day
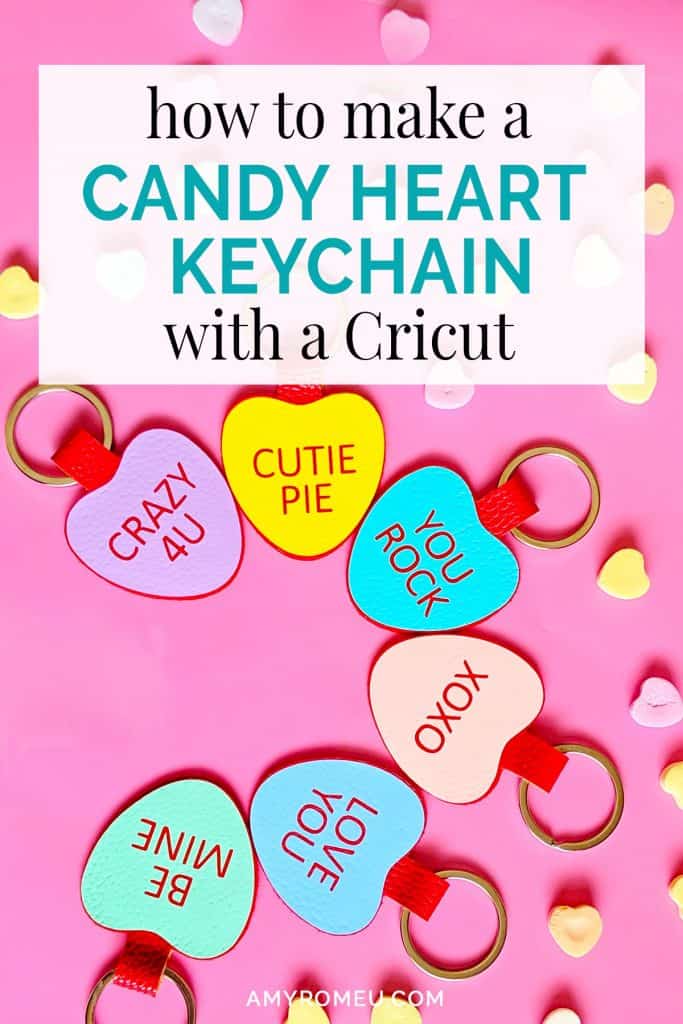
How to Make a DIY Cricut Candy Conversation Heart Keychain
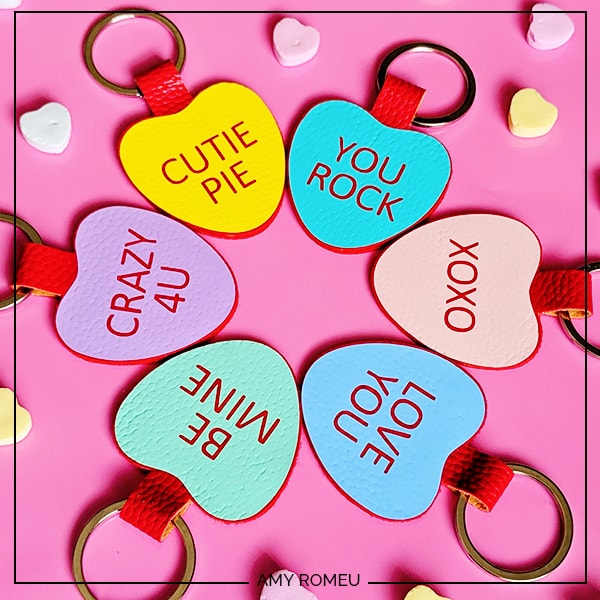
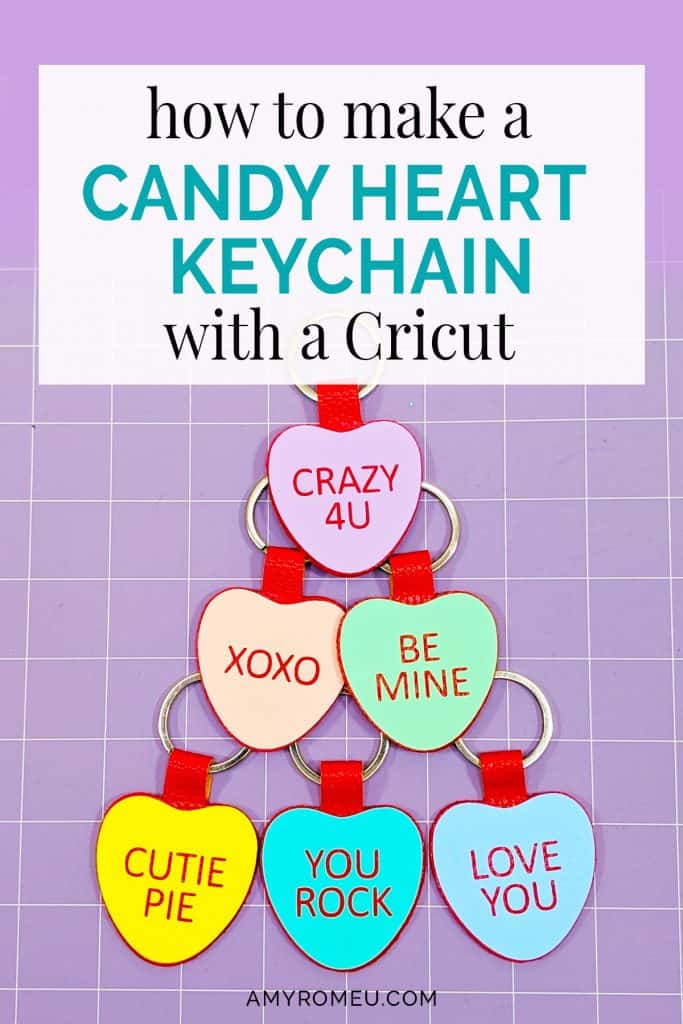
Don’t you love those fun candy conversation hearts for Valentine’s Day? They take me back to my childhood for sure. Candy Heart crafts are so popular for Valentine’s Day, so I decided to make a candy conversation heart keychain with my Cricut. I think they will make super cute Valentine’s Day gifts for my daughter to give to her friends at school this year.
The supplies for this project are pretty simple: red faux leather, heat transfer vinyl in candy heart colors, a key ring, and glue. You’ll also need a heat press, Cricut Easy Press, or Cricut Easy Press Mini (my fav!) to complete this project. I’ll tell you exactly what supplies I used and where I got them in the next part of this post.
But first, if you’re worried you’ll need a Cricut Maker to make these candy conversation heart keychains, don’t! I cut all the shapes for the keychain with just the Cricut Fine Point Blade, which means it can be made with any of the current Cricut machines – the Cricut Maker, the Cricut Maker 3, the Explore Air 2, the Explore 3, the Cricut Joy or the Cricut Joy Xtra!
If you want to make this project yourself, I’m sharing the SVG cut files for my Be Mine, Crazy 4U, and Cutie Pie candy conversation heart keychains FREE.
To get these files emailed to you instantly, click here.
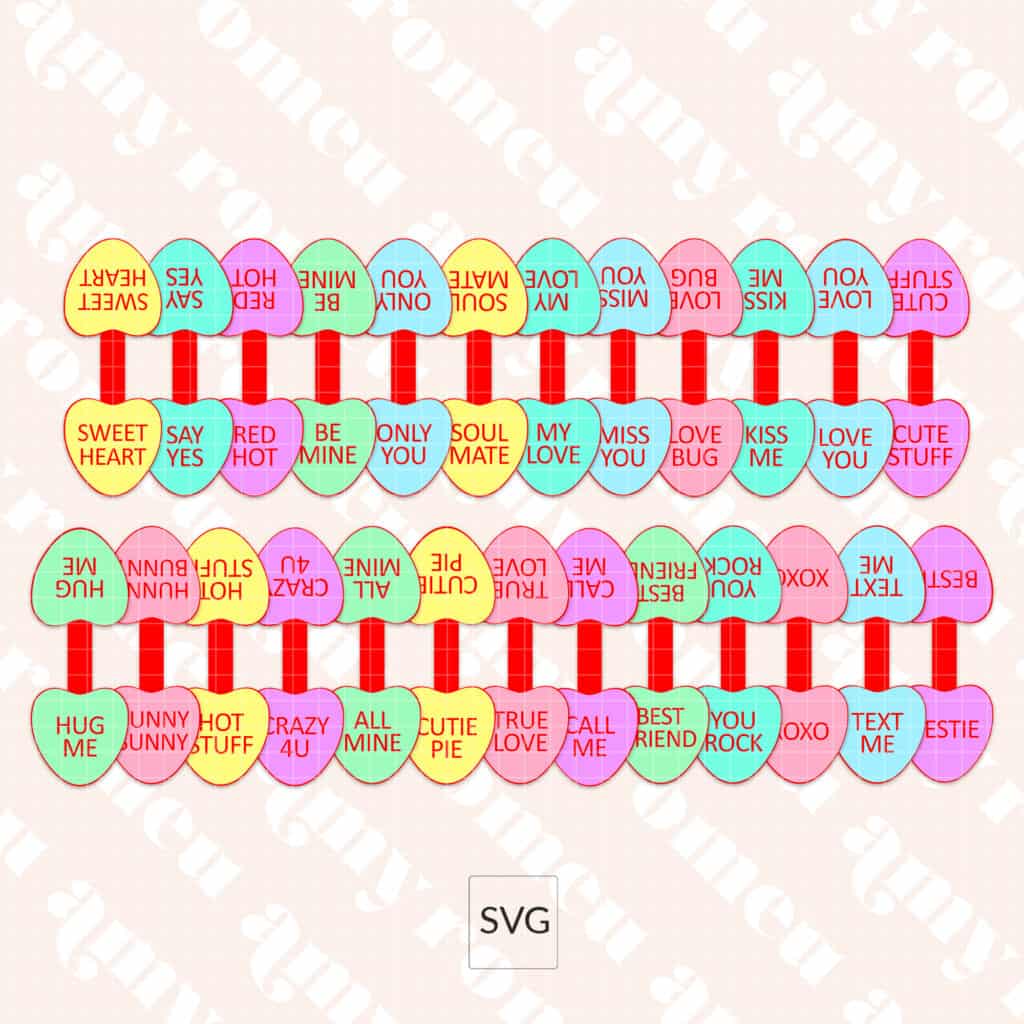
If you want even more candy heart designs, or are interested in a commercial license for my candy heart designs, check out my Candy Heart Keychain Mega Bundle in my shop below.
Get the SVG in my Shop
Personal or Small Commercial Use Available
Ready to make this fun candy conversation heart keychain with your Cricut? Let’s get started!
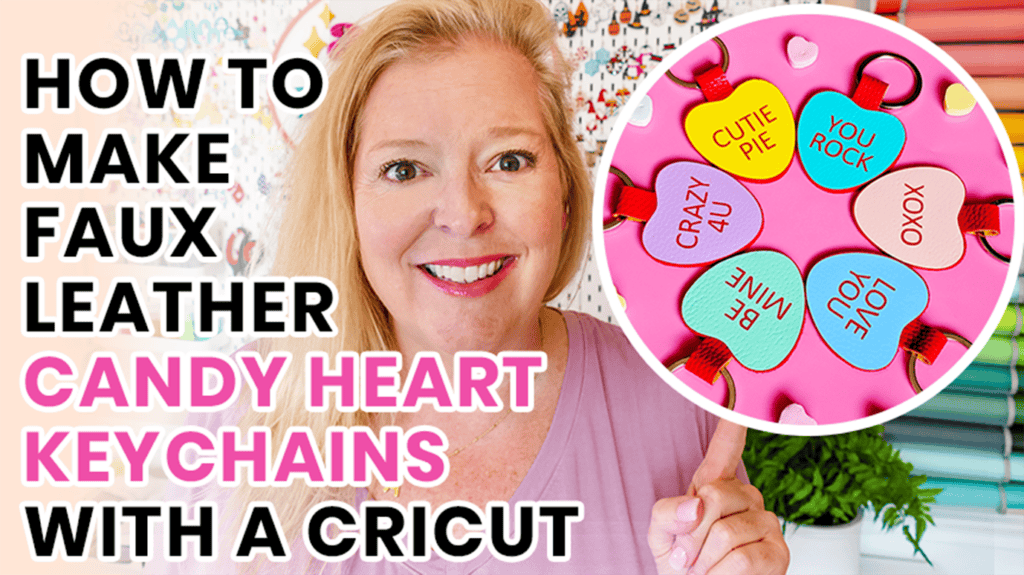
Want to watch a video tutorial instead?📺
See the full step by step video tutorial
Click the image below to watch the video on my YouTube channel, or click here.
This page contains some affiliate links (which means if you make a purchase after clicking a link, I will earn a small commission at no additional cost to you). Read my full disclosure policy here.
DIY Cricut Candy Conversation Heart Keychain – Materials List
🛒 To shop many of these supplies below in my Amazon storefront, click here. 🛒
- My Candy Heart Keychains SVG Files. Get the files emailed to you instantly here.
- The Cricut machine of your choice – you can cut this project with the Cricut Maker, the Cricut Maker 3, the Explore Air 2, the Explore 3, the Cricut Joy or the Cricut Joy Xtra!
- Cricut Easy Press Mini or other heat press
- HTV Vinyl in the pastel, candy heart colors of your choice. I used Siser Easyweed Heat Transfer Vinyl in the colors Lilac, Bubble Gum, Sea Glass, Sweet Mint, Lemon Yellow and Pale Pink.
- 30mm size split ring keyrings like these
- Blue painters tape
- A weeding tool
- A good fabric or craft glue like Beacon Fabri-Tac
PROJECT INSTRUCTIONS
STEP 1 – Download Free SVG
Download the free SVG cut files for the candy conversation heart keychain shapes from the email you requested here.
Save the zipped folder that downloads to your computer. You’ll need to locate your zipped file after you save it so remember where you are downloading it to! You’ll have to unzip or extract the files FIRST before you can upload the cutting file to Cricut Design Space. Make a note of the file location after you unzip it so you can find it in the next step.
STEP 2 – Upload SVG to Cricut Design Space
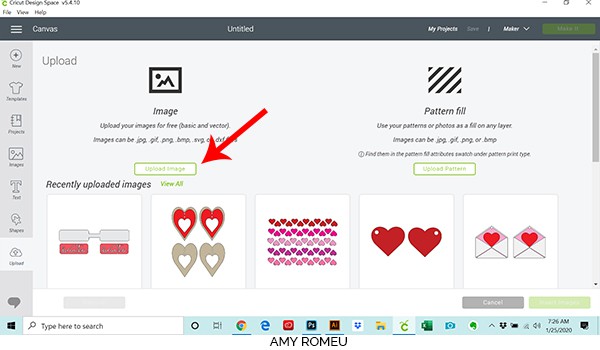
When you open Cricut Design Space, click on NEW PROJECT to get started. Then click on UPLOAD from the left hand side menu.
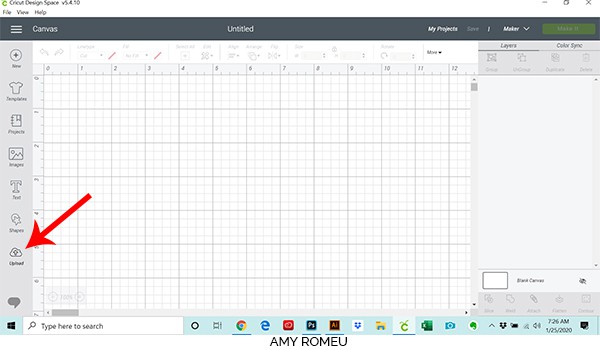
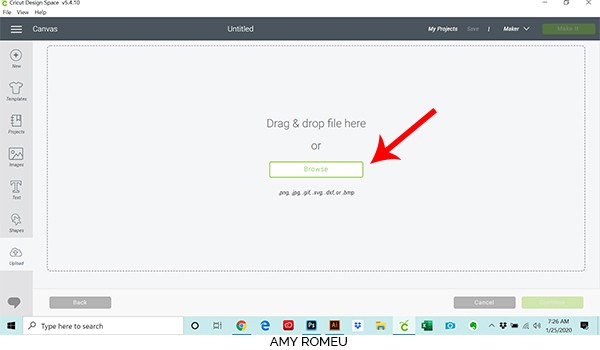
Click on the UPLOAD IMAGE button, then click BROWSE to locate where your unzipped SVG files are saved on your computer.
Double click on the Candy Heart SVG design of your choice to bring it into the upload screen in Design Space. If you get an error message that says “unsupported file type,” you may have clicked on the wrong file, or your SVG file is still zipped.
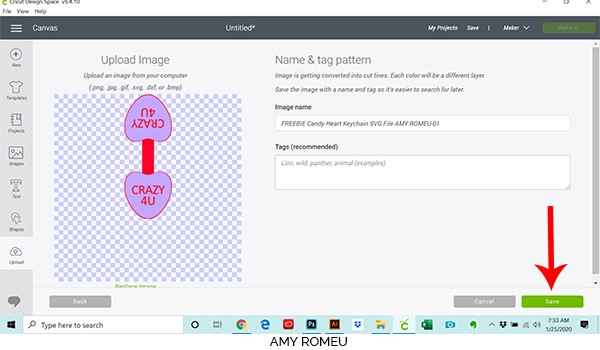
You’ll see a preview of the keychain shapes for this project. Hit the green SAVE button.
After you’ve selected your file to upload, you’ll see it as the first item in your “recently uploaded designs” row.
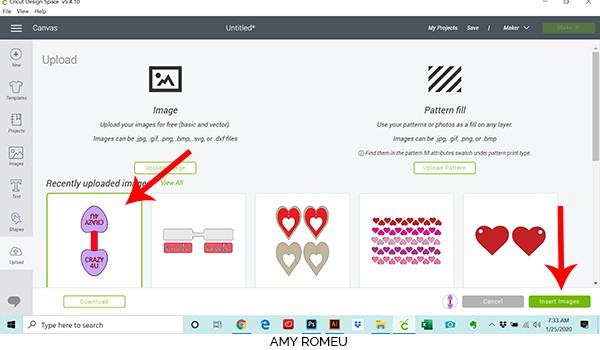
Click on it your newly uploaded file so it is outlined in green. Then click on the green INSERT IMAGES button in the bottom right corner.
STEP 3 – Prepare SVG for Cutting
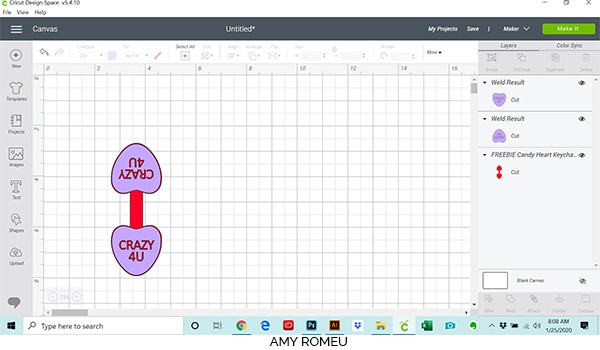
This brings the shapes you’ll cut for the keychain into Cricut Design Space.
Three are two elements to this candy conversation heart keychain cut file. The first is the faux leather keychain backing in red. That will cut out of red faux leather. The second elements are the colored hearts, which are the front and back of the keychain text. I cut these shapes out from HTV.
IMPORTANT! You don’t want to resize your shapes in Cricut Design Space, because they are already sized so the heart fits perfectly on the heart shaped keychain backing.
Your canvas should look like this. Now your shapes are ready to cut!
Click on the green MAKE IT button in the top right hand corner.
STEP 4 – Prepare HTV Mat for Cutting
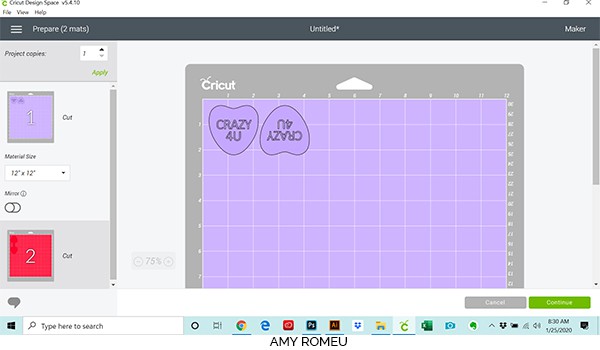
This keychain project will cut the two different materials (faux leather and HTV) on two separate mats. Cricut does all the hard work and separates them for you. You can see the two separate mats in a preview on the left.
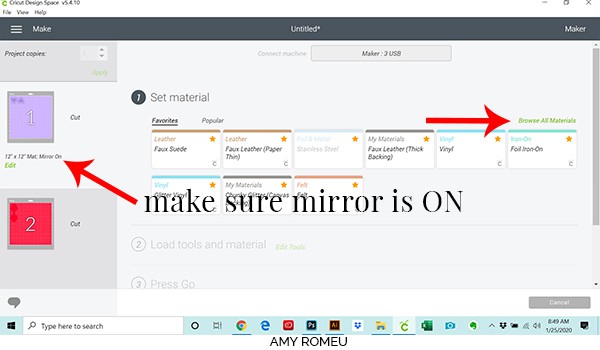
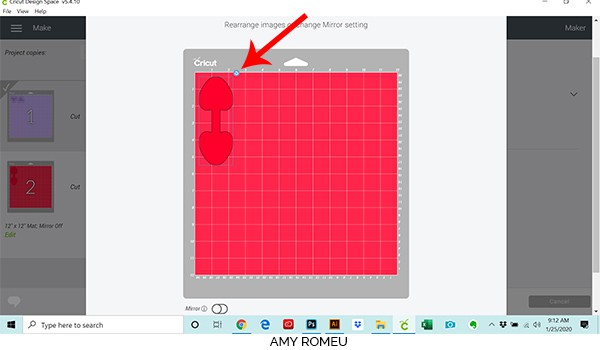
The first mat that will cut is the HTV word heart.
Next toggle the green MIRROR button to ON.
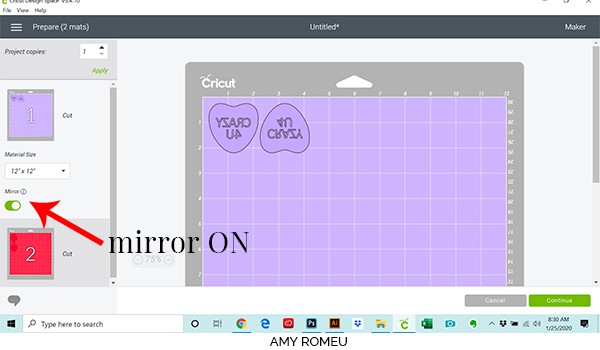
Double check that your text has been mirrored on your mat preview.
Then make a note of what size HTV we need for these heart shapes to cut. This preview shows the hearts will cut from a piece of HTV about 4.5″ wide and 2.5′ inches tall.
Click the green CONTINUE button in the lower right side of the screen.
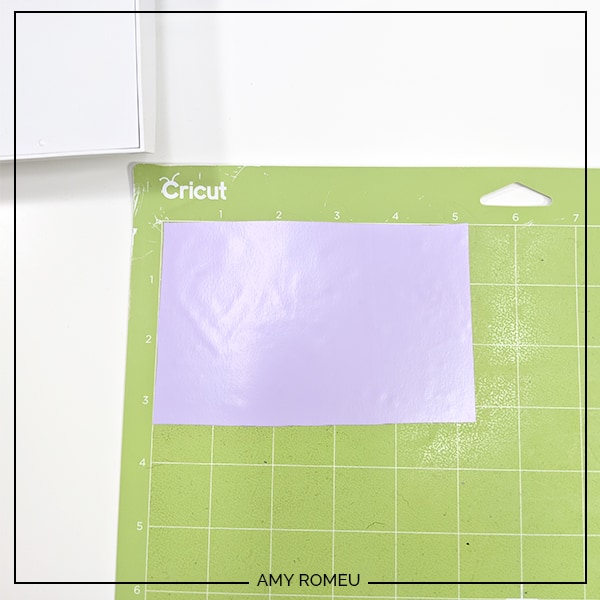
Cut a piece of HTV in the size you noted earlier and place it shiny side down in the top left corner of your mat, like the preview screen shows.
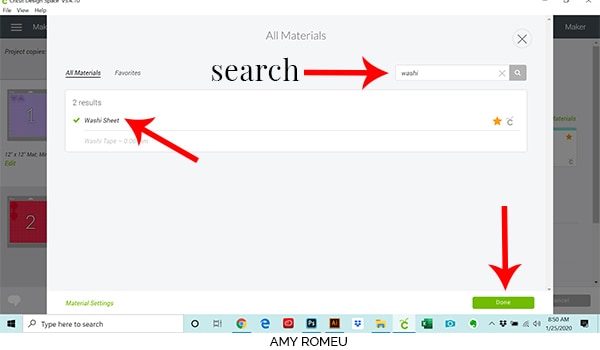
Now we need to choose our Material cut setting.
Cricut Design Space has a Vinyl cut setting, but for these small letters, I prefer to use the Washi Sheet setting. You can find the Washi setting by clicking Browse All Materials in the top right and then typing the word “Washi” in the search box:
Click on Washi Sheet for your setting, and click the green DONE button.
Once your material is selected, load your mat into your machine by pressing the LOAD button (two arrows). Your screen should look like this:

Click the flashing C button on your Cricut to start cutting!
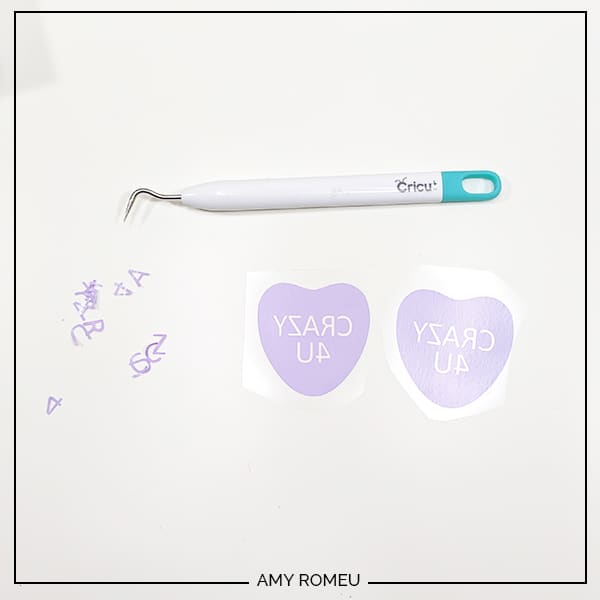
Unload your mat by hitting the double arrows button again. Use your weeding tool to remove the excess vinyl. Remember in this design, the heart remains and the letters are weeded away. Don’t weed out the inside of the letters by accident!
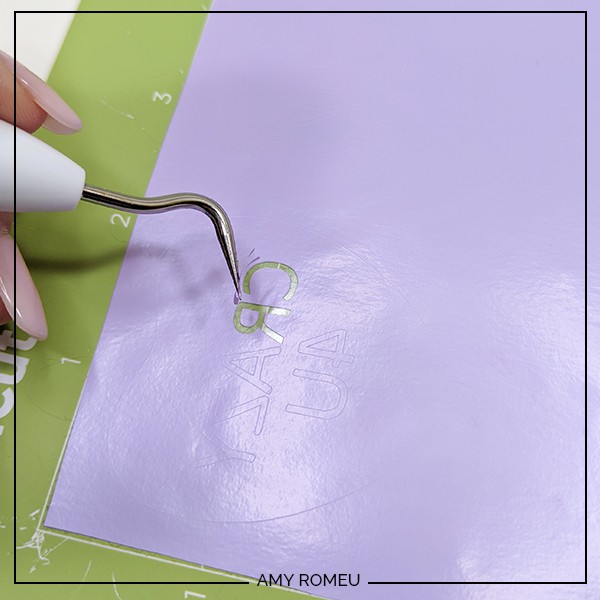
Weed the excess HTV from around the hearts. Trim the excess transfer tape from around the hearts and cut them apart. Set the HTV hearts aside for a moment.
STEP 5 – Prepare Faux Leather Mat for Cutting
Our next cutting mat will show the red faux leather shape will cut vertically. I like to cut horizontally, so click EDIT under the mat preview on the left hand side. Then click the blue arrow to rotate the shape horizontally on your mat.
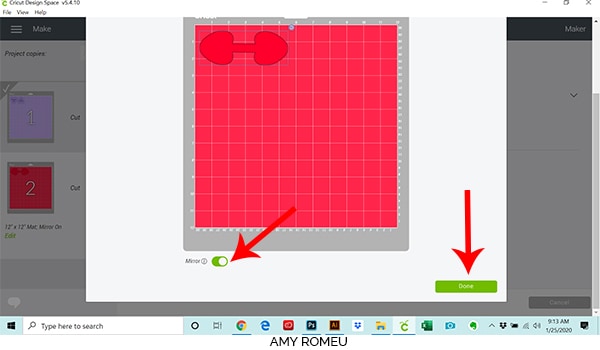
After you’ve rotated your keychain shape, scroll down a little and toggle the green MIRROR button to ON. Scroll down a little more and click DONE.
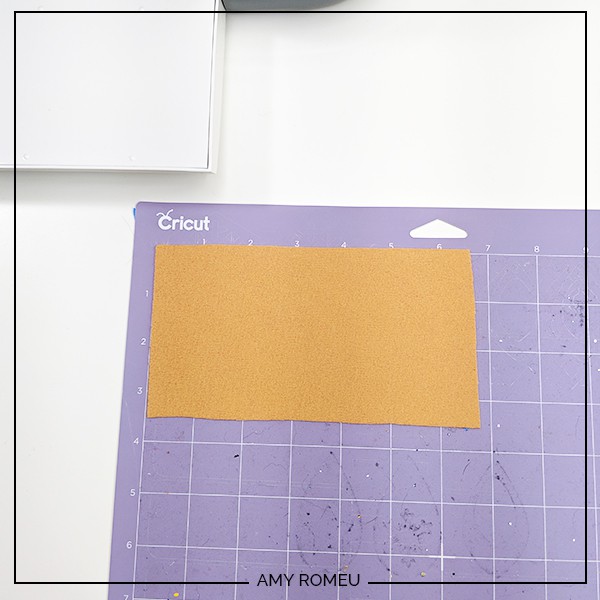
Now we need to cut the faux leather for our mat. We can see the size of red faux leather we need on our mat is approximately 2.5″ inches tall and 5.5″ inches wide. Make a note of this size and cut a piece of faux leather just slightly larger. Place it in the top right corner of your purple mat.
(I use my Fiskars Rotary Cutter to cut my faux leather material to the exact size right on my mat – it’s are available on Amazon here. Just be sure not to press down too hard so you don’t damage your mat! )
Place your faux leather face down (pretty side down) on your purple strong grip cutting mat.
Then tape down the faux leather to the mat on all sides, like this:
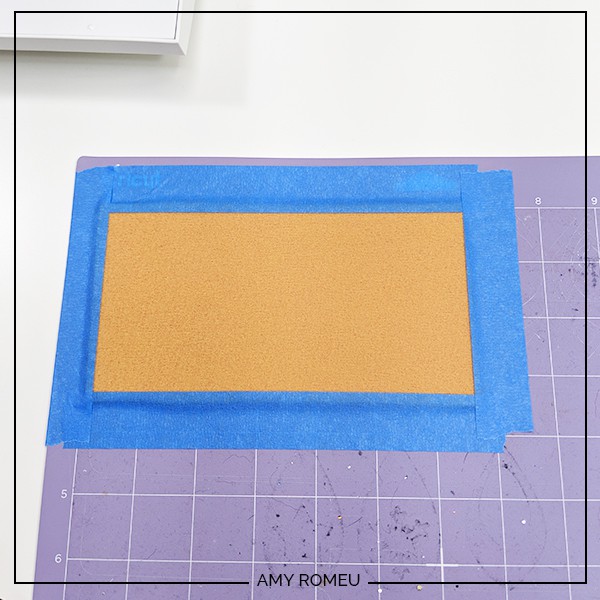
Load your mat into your Cricut by pressing the load button with the arrows.
STEP 6 – Choose Your Material
Select Faux Leather (Paper Thin) as the material setting, and choose MORE from the pressure dropdown menu.
Cricut Explore users will turn the Smart Set Dial to Custom and select Faux Leather (Paper Thin) as the material. You’ll also use the Fine Point Blade. Any other cutting machine users can follow their machine’s settings for thick material like leather or denim. If possible, remember to adjust your cut settings so the blade cuts 2 or 3 times! If you can’t adjust your cut settings, remember Cricut users can press the “cut” button again after your first cut (don’t unload your mat!) and your mat will cut again.
Press the C button on your Cricut machine and it will start cutting.
I like to cut this material a few times. The easiest way to do that is to wait until your Cricut finishes it’s first cut and stops. Then, without unloading the mat, press the C button again for a second cut.
I usually like to press the C button one more time for a third cut just to be sure. For this project, I ended up cutting the faux leather three times.
Unload your mat by pressing the double arrows button again.
Use your weeding tool to release your heart keychain shape from your mat. It should come right out. If not, you can use small scissors to trim any small areas. I use my 4 inch curved tip Fiskar scissors that I got on Amazon for small cuts like this!
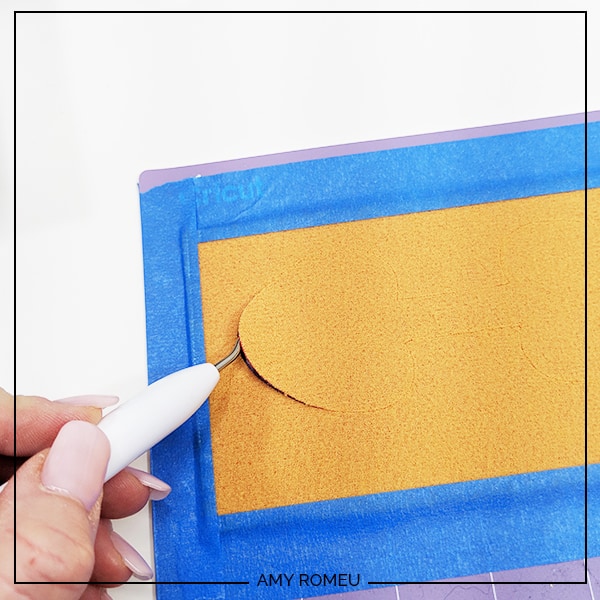
Now we’re ready to assemble the keychain!
STEP 7 – Assemble the Keychain
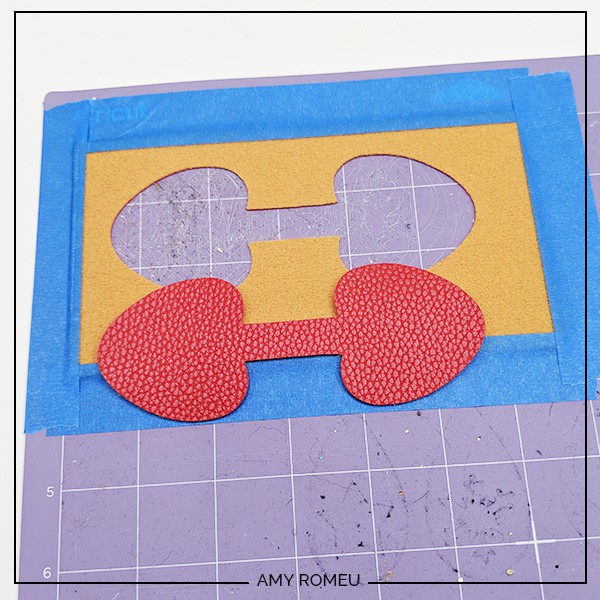
Begin by threading your key ring onto your red faux leather before pressing. This way you don’t have to bend the faux leather and vinyl to get it through the key ring after.
Place your HTV hearts on the faux leather backing. You’ll see there is a tiny red faux leather border around the vinyl heart – I designed it this way purposely so the edges of the vinyl wouldn’t peel up over time if they went all the way to the edge.
I used the lowest heat setting on the Easy Press Mini for this project. Using your Easy Press Pressing Pad or a towel, lay the HTV on top of the faux leather and then cover with a teflon sheet or parchment paper (not wax paper). I always use a teflon cover sheet, but not for this demonstration so you could see what was happening in the photo!
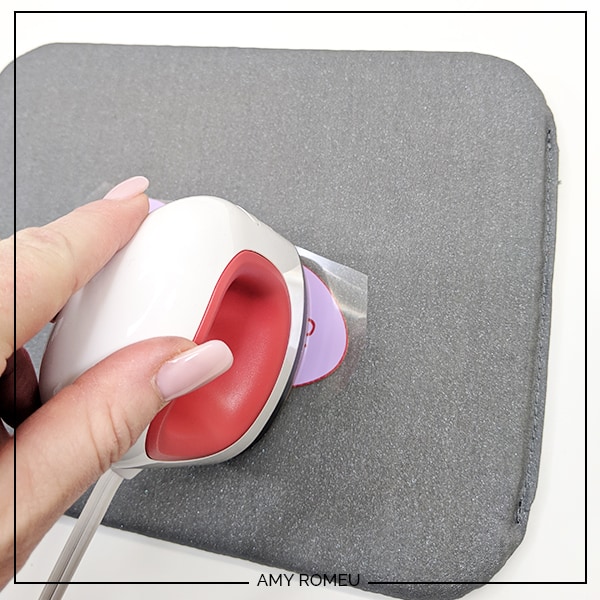
Gently press while moving the heat around all over the HTV for 10-15 seconds. If you aren’t using a cover sheet, be sure not to press the Easy Press Mini on the faux leather directly, only on the clear transfer tape.
Repeat pressing for the other HTV piece, and then carefully peel the protective layer off both sides of the key ring. If any parts didn’t stick down, just press them a little more.
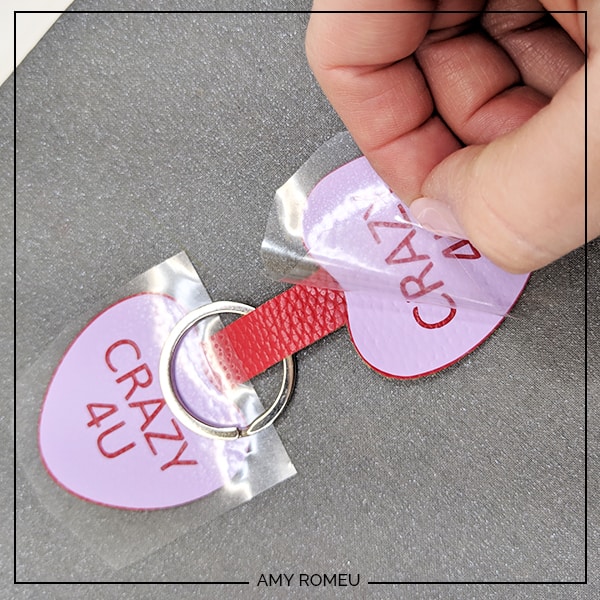
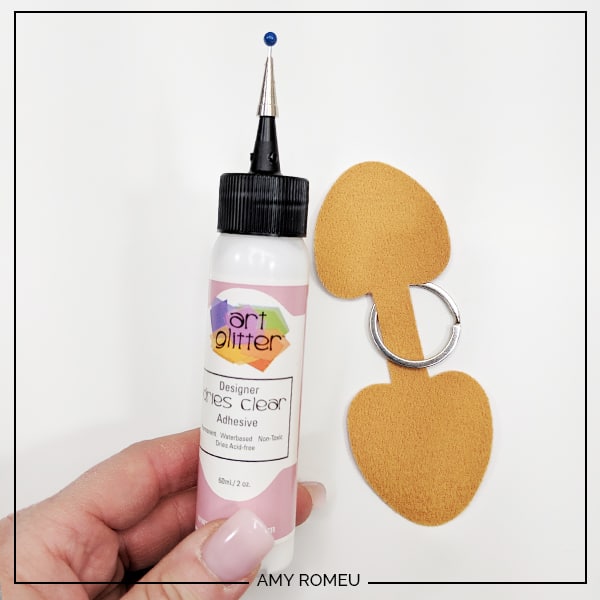
Now it’s time to glue the front and back of the keychain together. I like to use Art Glitter Glue for this step (it doesn’t have any glitter in it, it dries clear, it glues fabric well, and the bottle comes with a fine tip attachment which is perfect for applying glue precisely in small areas!
If you didn’t put your key ring on your keychain before, now is the time to do it!
Carefully apply small dabs of glue on the back of one side of the keychain. Apply the glue close to the edges but allow some room for the glue to spread.
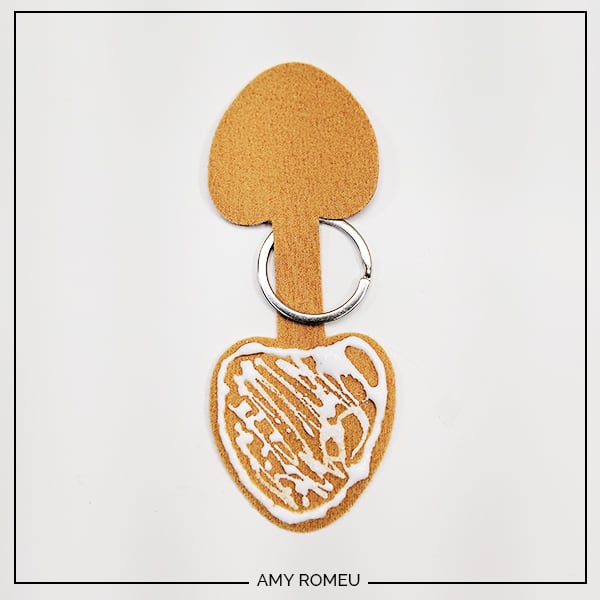
Fold the glued and unglued halves together, line up the edges so they match perfectly, and press down.
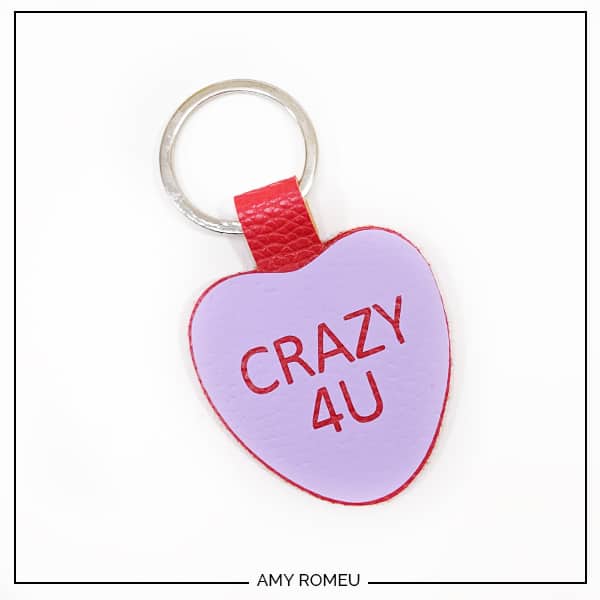
Place the newly glued keychain under something heavy like a book for a few hours to dry, overnight is best. Check the seams between the two halves the next day and see if there are any places that need additional glue, especially near the key ring.
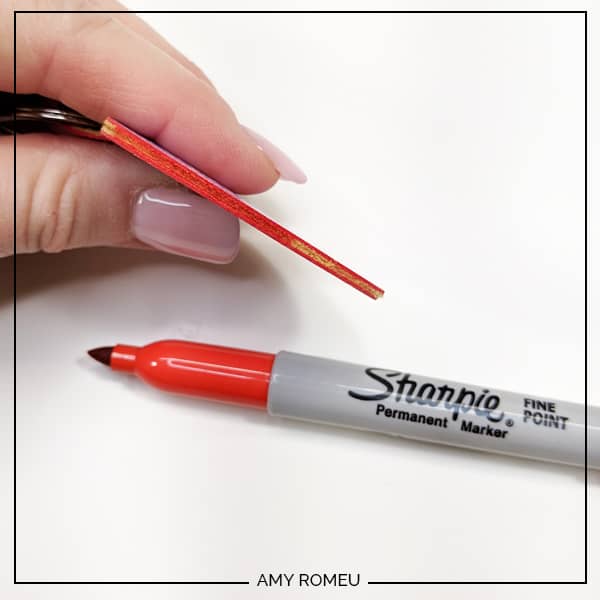
Use a Red Sharpie marker to color the outside edges of the keychain if you’d like. I have this Sharpie assortment pack from Amazon and I use it a lot for coloring the edges of faux leather earrings and keychains. Be careful not to let the marker slip and color the HTV by accident (ask me how I know).
That’s it!
Are you going to try this project super cute Valentine’s Day project? If so, are you going to give them away as keychains? Or as favors on Valentine’s Day candy bags?
If you do, please post a comment and attach a photo of your finished candy heart Valentine’s Day keychain! I would love to see your creation!
Want More Candy Heart Sayings? Check Out This 25 Sayings Mega Bundle!
Do you want to make this project, but want more candy heart sayings? If so, you’ll want to check out my 25 Candy Heart Keychain Sayings SVG File Mega Bundle featured in my shop here.
There’s also a commercial license version available at the link above if you want to sell keychains made from this design.
Until next time… and happy creating!

Want to remember this? Post this DIY CANDY CONVERSATION HEART KEYCHAIN project to your favorite Pinterest board!

Hi I signed up but was unable to locate candy valentine svg file
Hi, Maria. I sent you an email with specific instructions that may help. Thank you. Amy
Your instructions are the bomb. So precise. I would like to show you the ones I made and wore to church Sunday. How do I this as I do not recall the FB group you are in? And still not infringe on your design aspect. Thanks so much,
Hello, Janet! Thank you for the kind words! You can reach me via email at [email protected]. Thank you.
I made them and LOVE them!!! I had to make a few “adult versions.” Lol. What a fun crafting idea. Thank you!
Paula, I’m so glad you liked this project! Thanks for telling me about the adult versions, you made me chuckle today! 🙂
Amy
Hi is there a way to purchase a commercial license for your svg? I love these keychains and would
Like to make and sell them for Valentine’s Day. Thank you
Hi!
Thanks for your message. I’m so glad you like this project! You can find even more candy heart designs with the option to buy a commercial license here:
https://shop.amyromeu.com/products/25-sayings-mega-bundle-svg-files-for-candy-heart-keychain-diy-project
Thank you!
Best regards,
Amy
Amy, is it okay to share this with others on some FB crafting sites? Also, I made mine as gifts, but what commercial guidelines do you have? Is there a commercial license?
Hi, Paula!
Thank you for your comment. It’s ok to share my tutorial on social media as long as you provide a link back to my original blog post for the project. Also, these designs are for personal use only. I do offer a commercial use license version in my shop. Here’s the link: https://shop.amyromeu.com/products/25-sayings-mega-bundle-svg-files-for-candy-heart-keychain-diy-project
Thank you!
Best regards,
Amy
ok I am lost lol All I see in the library is the hearts. I don’t see a link for the keychain. Please help.
Thanks
Hello, thank you for your comment.
Have you downloaded Design #121 from the Resource Library? That is the Candy Hearts Keychain file. Inside that zipped file are the SVG files for the three free keychain designs. Each SVG file has three elements when you upload it to Cricut Design Space – a red keychain shape, and the two candy hearts. You can follow along with my complete tutorial once you’ve uploaded the SVG to Design Space.
You may be seeing Design #163 in my Library, which are Candy Hearts for Baby Onesies. That project is different than the keychains. The tutorial for that project is here: https://amyromeu.com/diy-cricut-joy-valentines-day-candy-heart-onesie/
Thank you.
Amy
I cant find the files. I typed in the number and it keeps sending me back to the resource library Help and thank you
Hello. Thank you for your comment. Please scroll down on the library page and look for Design #121. Click on the blue words underneath the design number and the file will download instantly to your device. Thank you.
Amy