
How To Take Better Jewelry Photos with Your Phone
Instantly Improve Your Jewelry Photography With This Simple & Cheap Lighting Trick!
Okay, bead friends. Let’s get real for a moment. I know we all love making jewelry, and we are so proud to sit back and admire our work when it’s finished… but, what happens when it’s time for jewelry photography? Are you disappointed when you try to photograph your gorgeous piece and it just doesn’t look right? Do you get frustrated knowing your photos just aren’t Etsy-worthy, not matter how hard you try? I know I have been. Well, I’m here to help with a solution that will help you take better jewelry photos TODAY with just your phone. The best part is, you don’t need any fancy equipment, and the only thing you do need costs a few dollars. Are you interested? Great! Let’s dive in!
Before we begin, let me share my point of view on this topic so you know where I’m coming from. I am not a professional photographer and I don’t claim to be an expert on this topic. I know there are lots of ways jewelry can be photographed, and there are many AMAZING professional jewelry photographers that do incredible work. I’m aware that we can’t recreate the results of a professional photographer with just our smartphone camera at home. But that being said…
What if?
What if the thing that’s stopping you from selling your jewelry on Etsy is your photos?
What if taking photos of your jewelry that are “good enough” for Etsy is the obstacle standing in the way of your dream of selling your own jewelry?
What if a few easy tricks and cheap props could create the momentum you’ve been needing to get you unstuck on photography to listing your jewelry in your shop with photos you can be proud of?
Then I would say BETTER jewelry photography is what we’re after friends. Progress, not perfection.
Why? Because you don’t need to become a professional photographer overnight to take decent photos. Instead, I want you to see what you CAN do with what you’ve got. I want you to conquer this beast so you can move forward. Learn how to make your jewelry photos Etsy-worthy on a budget and with the equipment you’ve got on hand. I want you to get on with following your dreams, girl. LET’S GO.
The bottom line is – you don’t need professional jewelry photography skills or to hire an expensive photographer to move forward. You just have to figure out how to maximize what you already have (your smartphone and a few tips and props!) so you can keep working towards your dreams.
Myths We Tell Ourselves About Jewelry Photography
All right now that I’ve got you on board, let’s discuss some of the barriers you may be experiencing when you think about improving your jewelry photography at home. Do any of these objections sound familiar?
- I don’t know anything about photography to be able to take good pictures.
- I don’t know what equipment to buy, and buying the wrong stuff could be a costly mistake.
- I need a “real” camera to take good pictures, which I can’t afford right now.
- I don’t have time to learn how to use a big, fancy camera.
- I don’t have the budget for expensive lighting and photography equipment.
- I don’t have room to set up a photography area in my home.
- I should hire a professional, but I’ll have to wait until I have money to do that.
Are these some of the ideas stopping you from taking better photos of your jewelry? If so, let me bust some of these myths for you right now.
The truth is, with the technology advances in smartphone cameras nowadays, you don’t NEED a “real” camera that you have to research, and pay for, and learn how to use through hours of You Tube videos and trial and error. You can take all of the pictures you need with what you already have – your phone.
What about lighting, though? And light boxes, and other jewelry photography gear?
All of that stuff is great, and if you enjoy taking jewelry photos and you want to get all next level in your photography skills and equipment, I say more power to you. Go on with your bad self. But if you just Want. To. Take. A. Decent. Photo. Of. Your. New. Beaded. Earrings. So. You. Can. Sell. Them. On. Etsy. then you don’t have to worry about all the rest of that right now. K?
Now that you’ve gotten the expensive equipment out of your mind, let’s briefly review the elements of jewelry photography that don’t involve fancy equipment or expensive cameras. The best part is, the most important thing is FREE!
The Lighting Is The Most Important Thing
Yes, my dear beading friend, lighting really is the key to taking better photos of your jewelry. You don’t need to turn your kitchen table into a studio with lots of artificial lights either. You just have to know how to harness the power of lighting to work in your favor, and produce really nice photos of your jewelry as a result.
So, let’s do an experiment, shall we, and try a few different “at home” jewelry photography lighting scenarios with our phones and lighting we have, and see which one works best. Again, not which-one-rivals-magazine-quality-jewelry-photos, but the one that-gets-your-jewelry-on-Etsy-so-you-can-sell-something-and-your-husband-will-quit-telling-you-no-one-will-ever-buy-your-jewelry.
See where I’m going with this? All right. 🙂 I’m going to call it…
Jewelry Photos That Flop
Not the best title, I know, but just follow me for a second. In the name of SCIENCE, I decided to demonstrate a variety of lighting scenarios we have at home to show you that the reason your photos stink isn’t YOU, it’s your LIGHTING.
Which you can fix. You’ll see. Just stay with me.
So I took the same set up of a pair of earrings and photographed them AT HOME with my regular old CELL PHONE CAMERA to show you how different kinds of lighting can affect your photos. Of course I have a favorite, which I’ll show you, too. So let’s jump in.
Disclaimer: I am a self proclaimed photo editing junkie and I’ve never met a photo I didn’t want to tweak JUST A LITTLE BIT. For this demonstration, though, all of these photos are unedited, or SOOC (a photography term meaning “straight out of camera.” My dad was a photographer so I picked up some of the lingo when I was a kid).
All right. Let’s get started. Up first is…
Kitchen Counter With Overhead Light
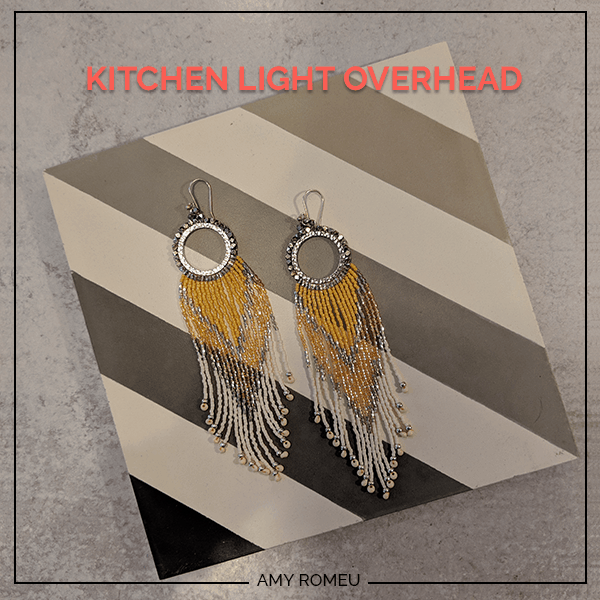
In this photo we can see a few things going on. First, my arm and head are casting a shadow on the earrings because of the light overhead. The overall image is dark, yellowish, and uneven. Jewelry looks flat.
Inside, Phone Flash On
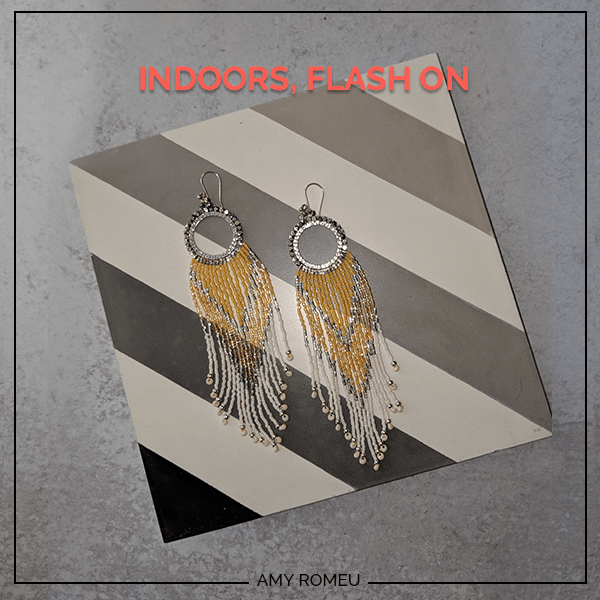
If lighting is important in jewelry photography, flash lighting must be good, right? WRONG. Nope nope nope nope. I seriously NEVER EVER use flash when taking photos of jewelry. You can see how it creates a hideous glare on the metal components of these earrings, flattens everything out, and the rest of the image is dark. There’s also a glare from the center of the flash. Yuck. Just NO.
Lightbox Indoors with 2 Softboxes
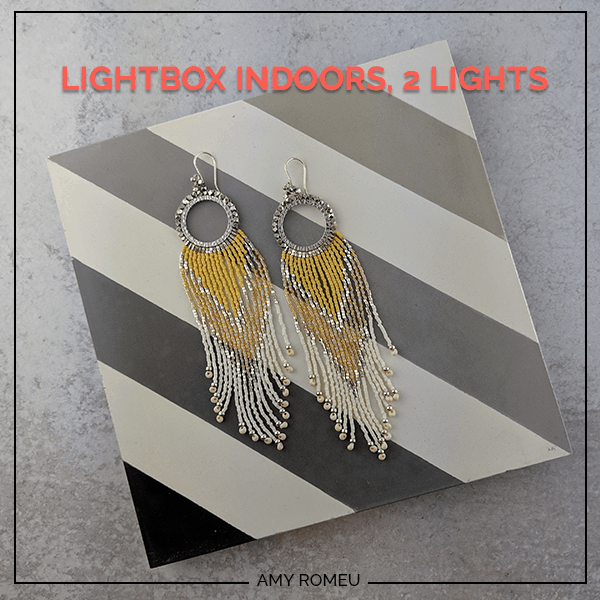
So yes, I have a lightbox which I use for my beading tutorial photos, and you can see in this photo that it’s not a perfect solution. It’s convenient when I want to take photos at night or when it’s overcast outside, but I find that I need a ton of light to illuminate it properly. The above shot is in the lightbox with two softboxes on either side (both are from Amazon – the lightbox is here and the softboxes are here). I normally have two more lights coming from the front, but I wanted to just use basic items you might already have for jewelry photography for this demonstration.
Indoors By A Window
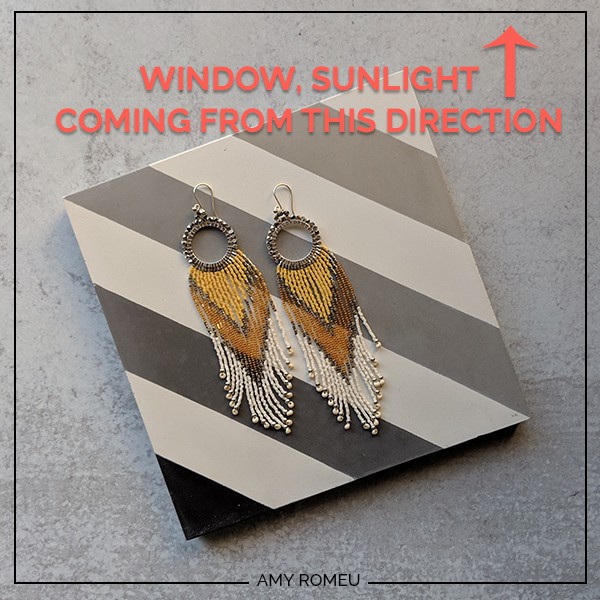
So this photo was taken by a window. The window is at the top of the image, so the light radiates from the top to the bottom of the photo. The resulting light and dark areas are uneven and not desirable.
What about Natural Light?
Let’s take this party outside, shall we?
Yes, natural light is our friend, and in my opinion, for our purposes, it beats artificial lighting indoors anyday. Let’s look at examples of natural light used in more and less successul ways.
Outdoors, Direct Sunlight
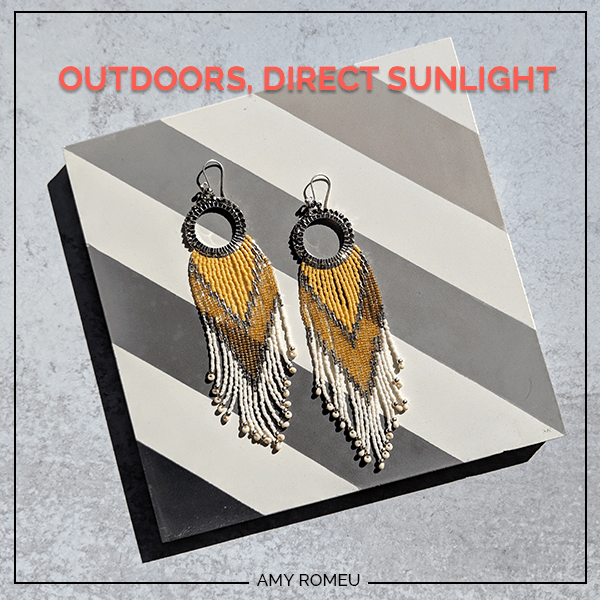
Ok, our photos are getting better since we’ve gone outdoors. But this one is way too harsh in direct sunlight. The shadows are distracting and the details in the beads are flattened out. So direct sunlight isn’t a great fit. What about indirect sunlight?
Outdoors, Indirect Sunlight
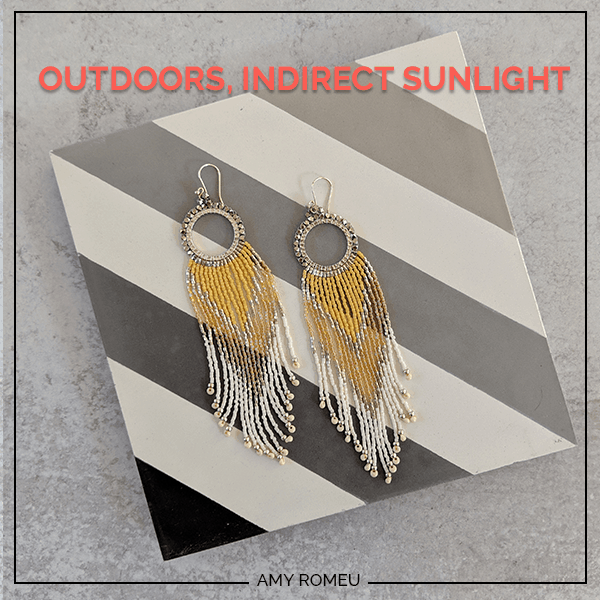
This image is a vast improvement to the photos we’ve taken so far. The image is a little dark, so it’s not perfect, but the earrings look nice on the background and you can see the beads and details without flat spots or flash flares. We can easily brighten up this photo with a little photo editing (which I’ll go into in a future post).
Indoors, Set Up 90 Degree Angle To Window, With Bounce Card
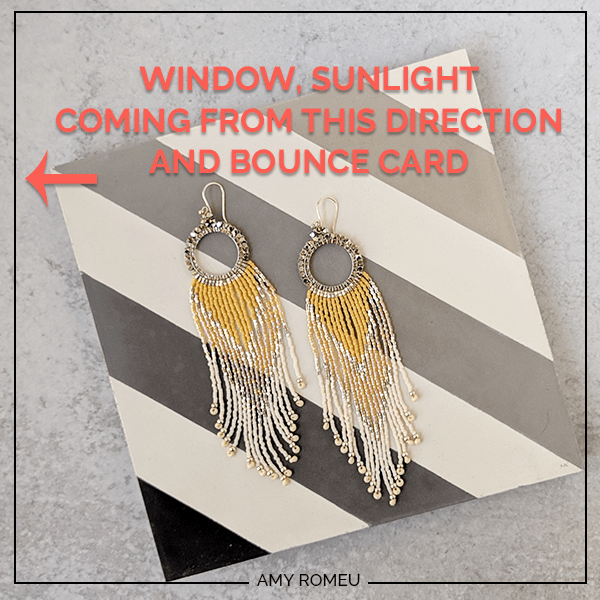
Of all the set-ups we’ve tried, this is my favorite. The best part is it’s super easy, and the only items you need to maximize the shot is two large pieces of white posterboard or foamcore board. That’s it!
Let me show you how this set up works:
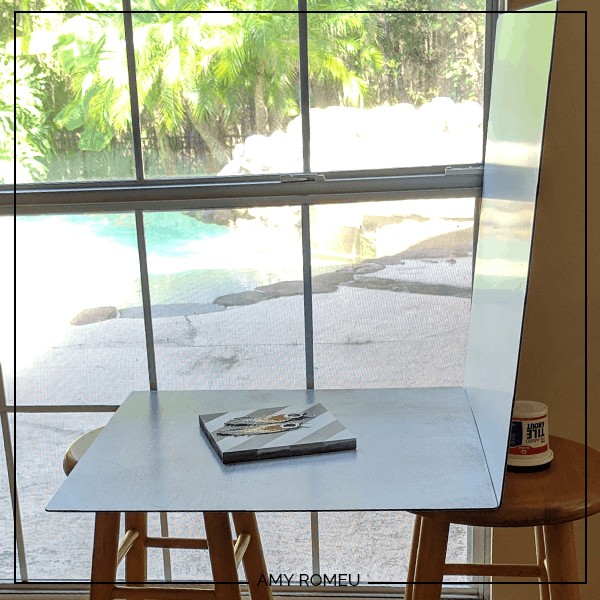
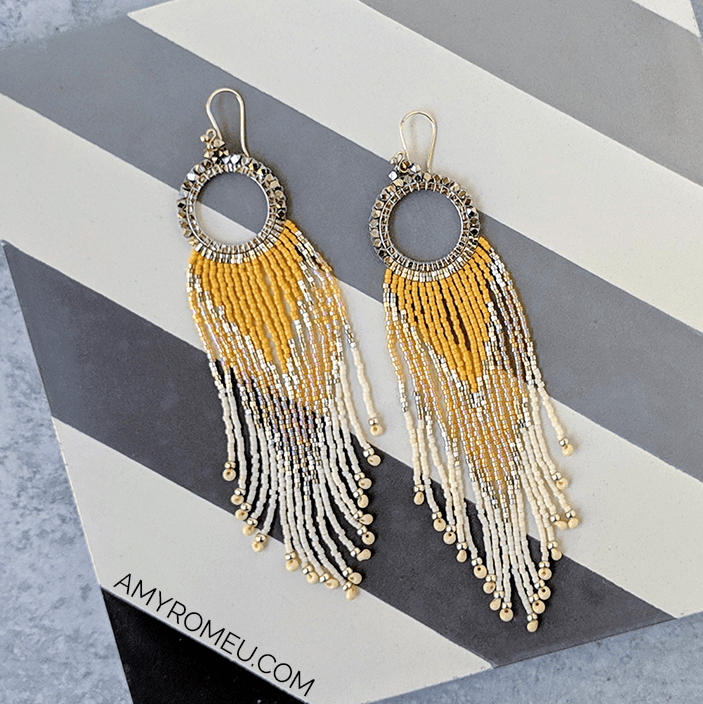
This shot is taken in a window like an earlier shot, but the difference here is the light is coming into the scene at a 90 degree angle, instead of from the top. Then I’ve used a foamcore board at the top end of the shot to fill in more light to the shot. I’ve just propped it up with a can of tile grout. Very technical, I know.
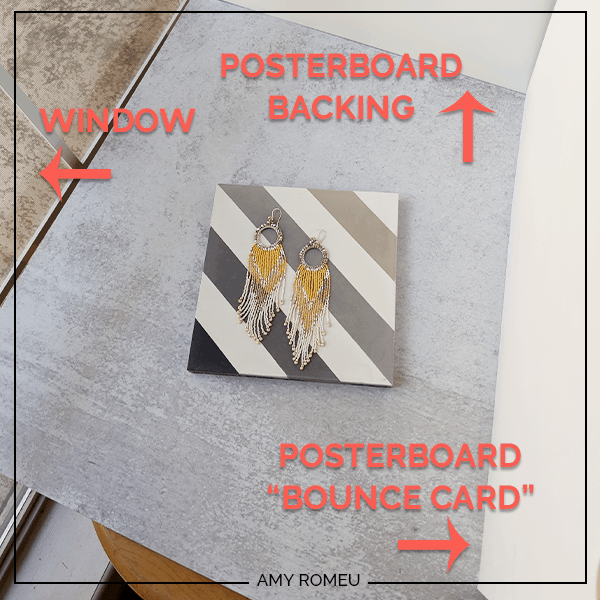
Then when I took the shot, I used another foamcore board as a bounce card to bounce the window light back onto the photo. I didn’t prop that card up like the back one, I held it in place with my hand after positioning it in a way that reflected the best light.
See how simple that is to do? Easy Peasy!
Now, is it the perfect jewelry photo? No. Would it have been much better if it was taken with a professional camera in a more professional set up? Of course.
But, can we use it to list our jewelry in a new Etsy shop? YES. ABSOLUTELY.
And that’s our goal. Take the best jewelry photos we can with equipment we already have, and build from there.
I hope you are feeling encouraged already about taking better jewelry photos with just your phone!
Easy & Quick Photo Editing
If you are, and you want to take your photos to the next level, you can easily tweak it with photo editing functions your phone already has. For example, here is the photo I took in the window with the bounce card, edited using just my camera’s standard editing features. I cropped the image square (Etsy’s image shape,) increased the brightness, brightened the colors, and toned down the yellow light cast. That’s it.
Still not perfect, but much better, right? Good enough to post our jewelry on Etsy or a Facebook page or our website.
There are also a few great FREE apps that can enhance your photos as well, which I’ll go over in another post in the near future. Be sure to sign up for my FREE newsletter at the bottom of this post if you want to be notified when I post more jewelry photography tips and tricks in the future!
I hope this information was helpful for you! If you try this super simple lighting trick, would you please share your photo with me in the comments? I would love to see you put these tricks into action and getting better jewelry photography instantly!
Also, if you’d like to check out more posts I’ve written for beaders who are selling their jewelry, click here.
Until next time… and happy creating!

Want to know when I post more tips, tricks, and resources to help your jewelry business? Join my newsletter below!
Want to remember this? Pin How To Take Better Jewelry Photos With Your Phone to your favorite Pinterest board!
Great article! I love the brackets idea! Will be trying that out for my next jewelry photo shoot. jewelrybynicola.etsy.com
Is my shop. I really need to get constant with my photos! One thing I can’t live with out is my iPhone tripod, and my remote shutter release. Save me from getting out of focus images. Thank you!
Thanks, Nicola! I’m glad you liked this article. I checked out your Etsy shop and your jewelry is lovely! Thanks again for stopping by. Amy