
How to Make a Memory Bear with a Cricut

The holiday season is almost upon us, and I know this time of year can be difficult for people who have lost loved ones, especially children.
I’ve been wanting to make a Memory Bear project with my Cricut for a long time, but we all know how difficult it is to press heat transfer vinyl onto a plush bear’s fur.
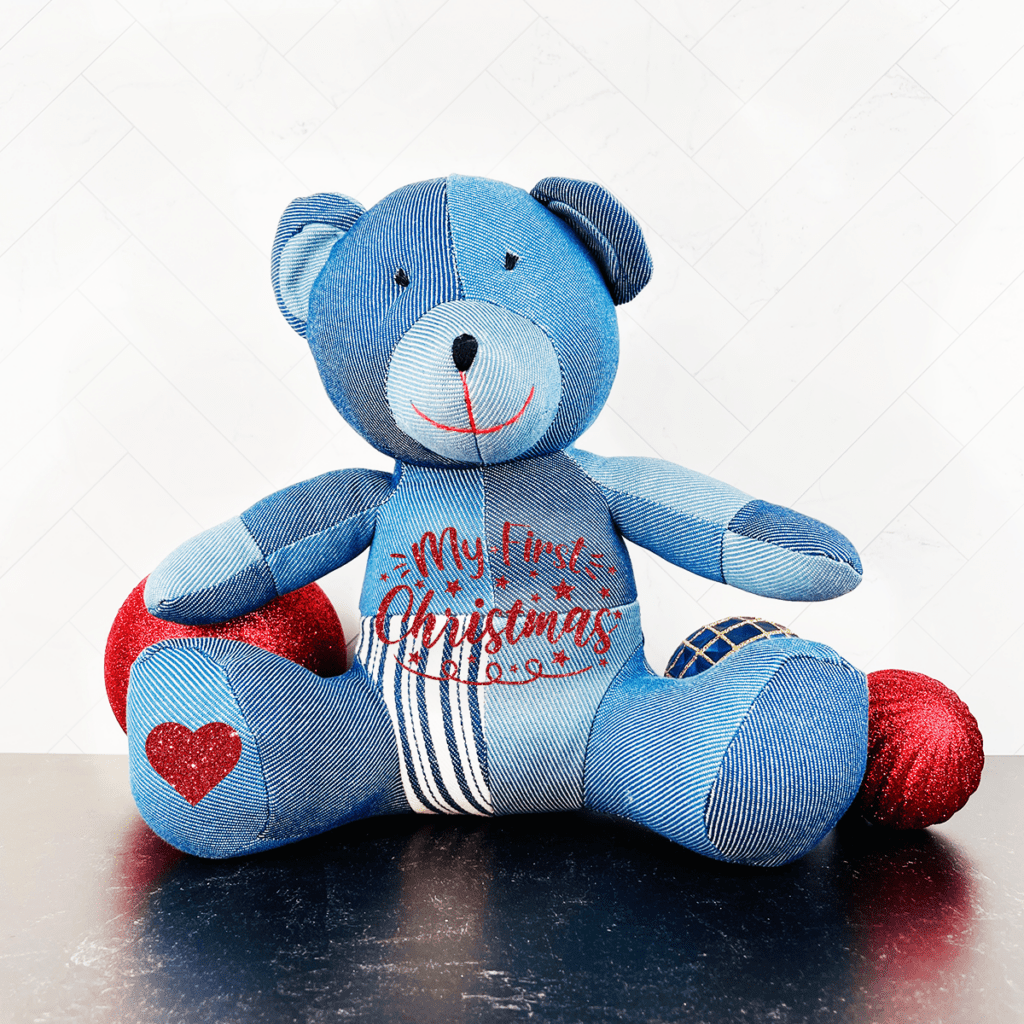
So imagine how excited I was when I came across this patchwork stuffed bear! It’s really nice quality, the patchwork makes it look like it belonged to someone special, and the flat surface is perfect for pressing vinyl!
I’ve designed this DIY Cricut Memory Bear project to share with you in the event there’s a special boy or girl in your life who is missing a loved one this holiday season. I hope this project brings them a little bit of comfort this year.
I’ve designed several memory bear SVG files for you to honor many different family members – from Grandma and Grandpa, Mommy and Daddy, Brother and Sister, etc. There’s also a heart if you’d like to add one to the bottom of the bear’s foot.
All of the SVG files are free in my blog’s resource library. I’ll let you know how you can download them in just a moment.
I’ll also share with you my source for this great Patchwork Bear… it happens to be one of my favorite places to buy inexpensive crafting blanks too!
If you’re ready to learn how to make a DIY Memory Bear with a Cricut, let’s get started!
This page contains some affiliate links (which means if you make a purchase after clicking a link, I will earn a small commission at no additional cost to you). Read my full disclosure policy here.
DIY MEMORY BEAR MATERIALS LIST
- A Cricut cutting machine (or another cutting machine of your choice). I used the Cricut Maker, but you can use the Cricut Maker 3, the Explore Air 2 or Explore 3, or the Cricut Joy.
- The Cricut Maker 3 is available on Amazon here or the Cricut website here.
- The Cricut Maker is available on Amazon here or the Cricut website here.
- The Cricut Explore 3 is available on Amazon here or the Cricut website here.
- The Cricut Explore Air 2 is available on Amazon here or the Cricut website here.
- The Cricut Joy is available on Amazon here or the Cricut website here.
- Patchwork Teddy Bear (sold individually) or in a pack of 10 Patchwork Teddy Bears
- Heat Transfer Vinyl in the color of your choice – I recommend Cricut Everyday Iron-On or Siser Easyweed
- Or Glitter Heat Transfer Vinyl – I used Siser Glitter in Red
- Green Cutting Mat
- Weeding Tools
- Cricut Easy Press Mini
- Teflon Cover Sheet or Parchment Paper
- Design #192 from my free Resource Library. You can get the password by filling out the form below or at the bottom of this post.
NOTE: If you’d rather make a My First Christmas Bear instead of a Memory Bear, I really like this My First Christmas SVG from Design Bundles. You can grab it here.
How to Make a Memory Bear with a Cricut
STEP 1 – Get the Free Memory Bear SVG Templates
Download the free Memory Bear SVG templates (Design #192) from my Free Resource Library. Click here to visit the Library page. You can get the Library password by filling out the form above.
I’ve created several Memory Bear SVGs for you to choose from. All of the following phrases are included in the SVG download from my free resource library:
- Abuela in Heaven Loves Me
- Abuelo in Heaven Loves Me
- Daddy in Heaven Loves Me
- Gigi in Heaven Loves Me
- Grammy in Heaven Loves Me
- Grampy in Heaven Loves Me
- Mimi in Heaven Loves Me
- Mommy in Heaven Loves Me
- My Aunt in Heaven Loves Me
- My Auntie in Heaven Loves Me
- My Brother in Heaven Loves Me
- My Grandma in Heaven Loves Me
- My Grandpa in Heaven Loves Me
- My Sister in Heaven Loves Me
- My Uncle in Heaven Loves Me
- Nonna in Heaven Loves Me
- Nonno in Heaven Loves Me
- Papa in Heaven Loves Me
- Papaw in Heaven Loves Me
- Someone in Heaven Loves Me
- Tia in Heaven Loves Me
- Tio in Heaven Loves Me
- Heart
STEP 2 – Upload The Memory Bear SVG Template to Cricut Design Space
Save the zipped folder that downloads to your computer. You’ll need to unzip the folder or extract the files FIRST before you can upload them to Cricut Design Space.
Upload the Memory Bear SVG template of your choice to Cricut Design Space.
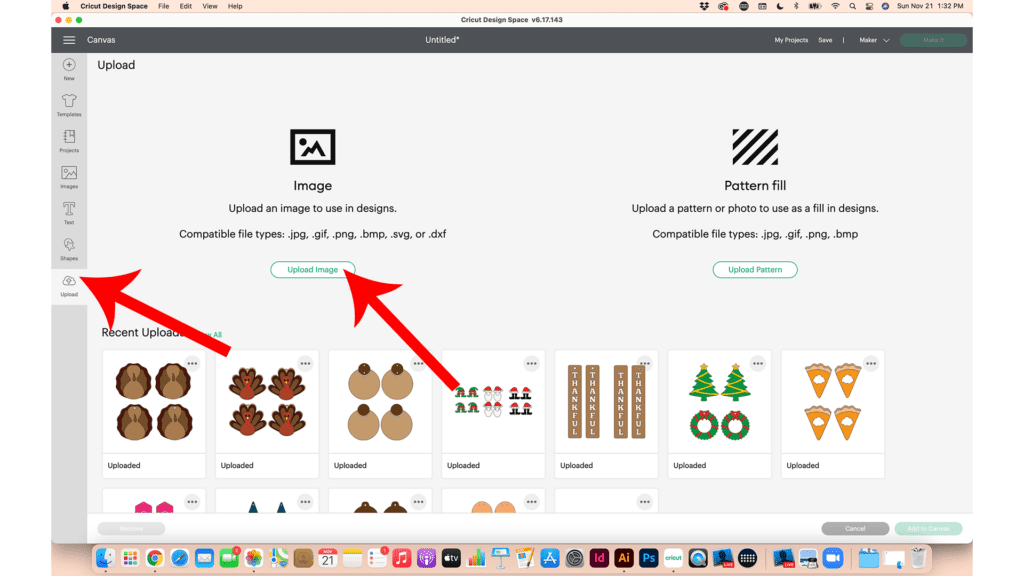
To do that, click on Upload from the left side menu, then Upload Image.
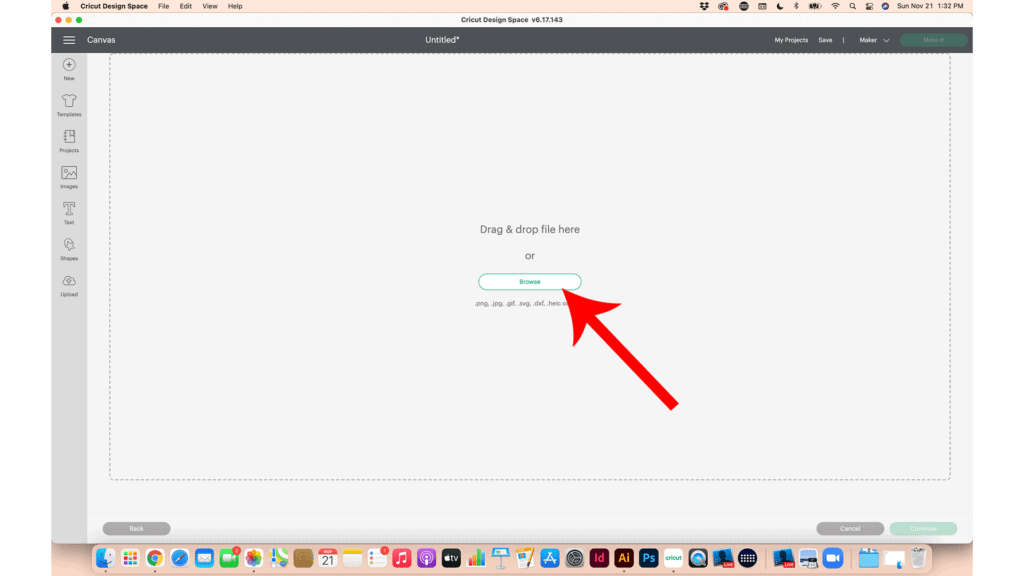
Click Browse to locate the unzipped SVG file on your device. The SVG may look like a Chrome icon or an html file, depending on your operating system, but it is the SVG file and will upload perfectly to Design Space.
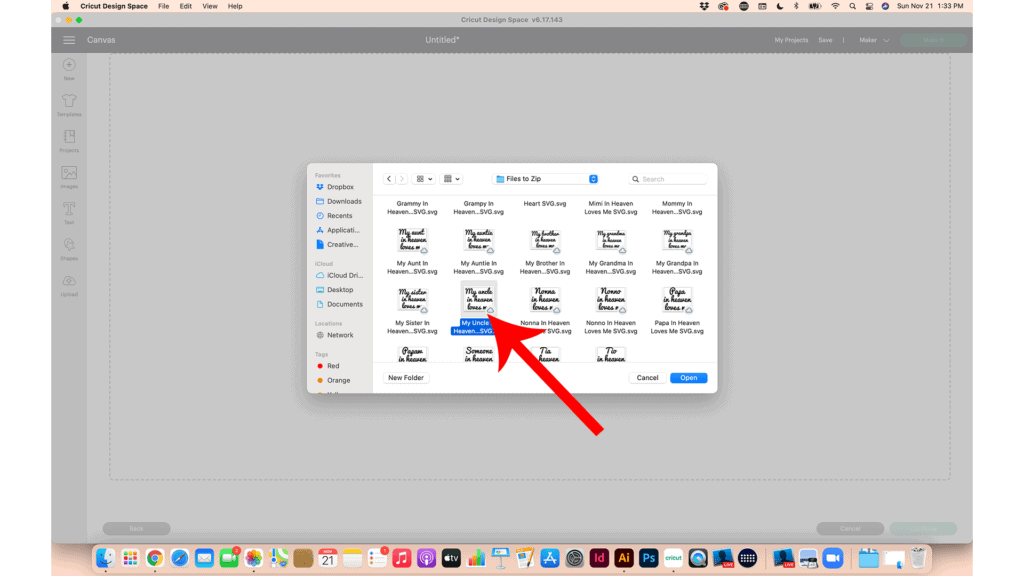
Click on the SVG to select it.
You’ll see a preview of the SVG during the upload process. Click Upload to continue.
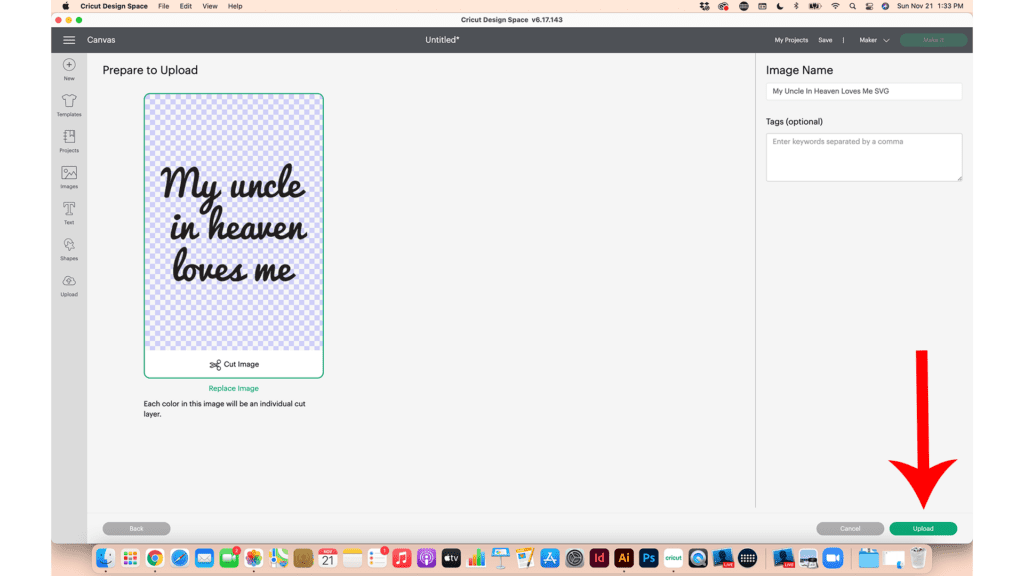
Select the design from your Recent Uploads row and click Add To Canvas to bring it onto your canvas.

NOTE: This text is NOT editable, but if you like this font and want to create your own custom text, you can download the font for free from dafont.com. It’s called Pacifico.
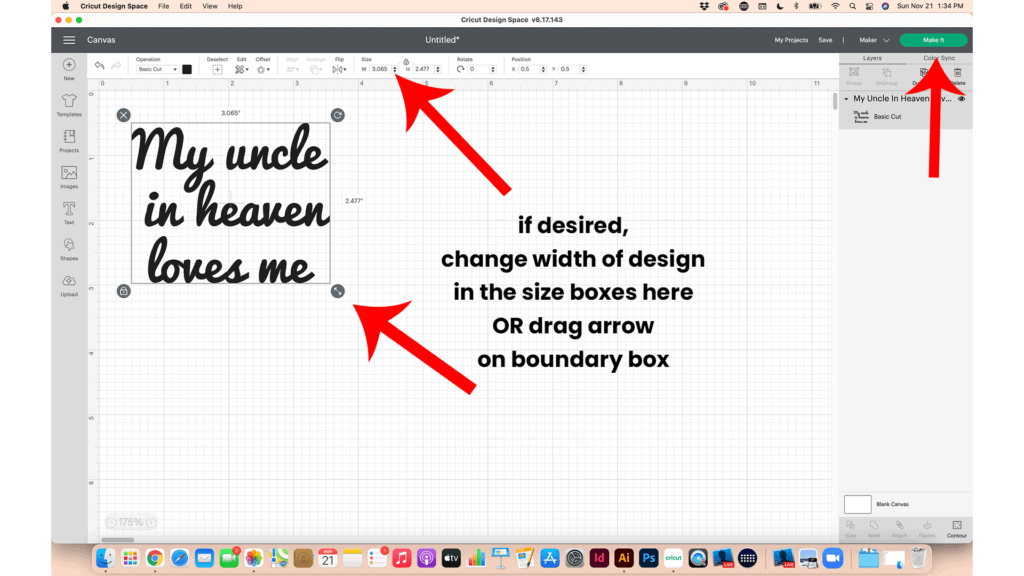
I’ve sized all of the SVG files for this project to be the perfect size for the Patchwork Bear already.
If you are using a different bear, you’ll want to measure the width of your bear’s chest and adjust the size of the SVG as needed. You can adjust the SVG size either by dragging the arrow on the border box or by changing the size in the size box on the top menu.
If you want to add the heart to your canvas to cut from the same vinyl as the text, click Upload to add it now.
It isn’t necessary to change the color of the text – you’ll be cutting the text from the vinyl color of your choice.
Once your art is appropriately sized, click the MAKE IT button.
STEP 3 – Prepare Mat for Cutting
The mat preview screen will show the cutting mat preview on the left hand side.
Since this design is text based and will cut from heat transfer vinyl, the design needs to cut in reverse. Be sure to toggle the the MIRROR toggle to green (ON) so your text will cut correctly.
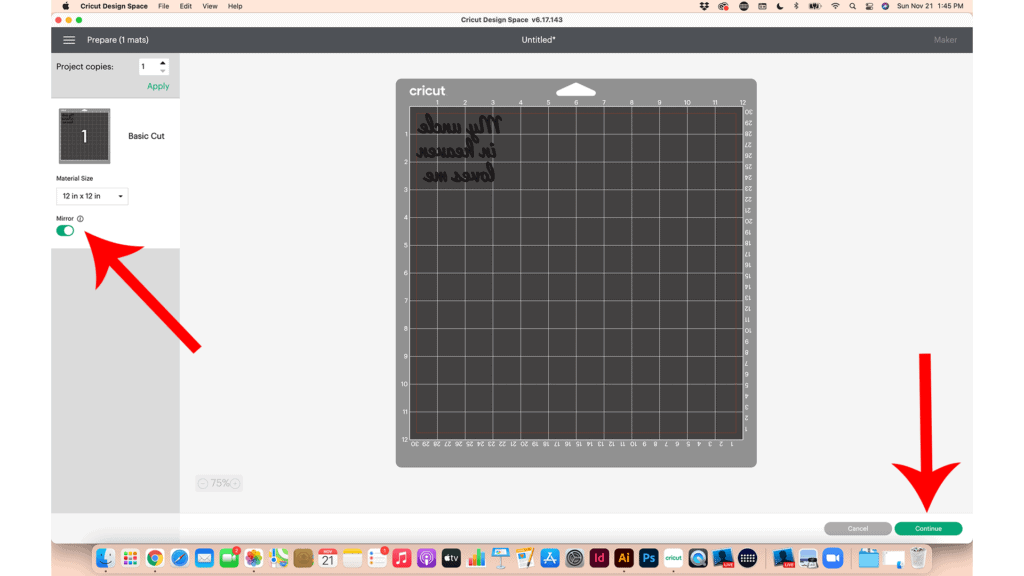
Make a note of the size vinyl the design will need to cut from. Look at the grid lines to get the estimated size – this project will cut from a piece of vinyl about 3 inches tall and 4 inches wide.
Then click CONTINUE.
On the Materials Selection screen, choose the material setting that corresponds to the type of vinyl you are cutting.
I cut glitter vinyl using the Glitter Vinyl setting with “Default” pressure.
I cut solid vinyl using the Vinyl setting with “Default” pressure.
STEP 4 – Cut Vinyl Mat
Place the heat transfer vinyl shiny side down on a green standard grip cutting mat. Be sure to place the vinyl in the same location on the mat as shown in the mat preview screen.
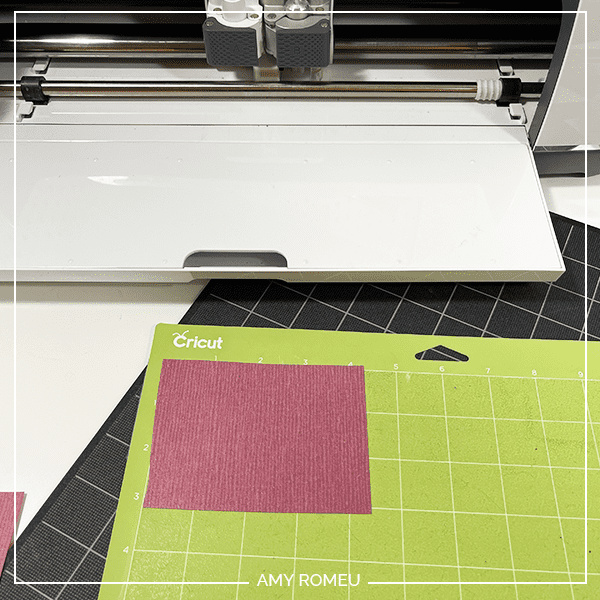
Load the green mat into the Cricut and press the C button to begin the cut.
NOTE: When using Siser brand glitter heat transfer vinyl, I like to repeat the cut because it’s a thicker material. To do that, after the first cut is complete, don’t unload the mat – just press the C button to repeat the cut.
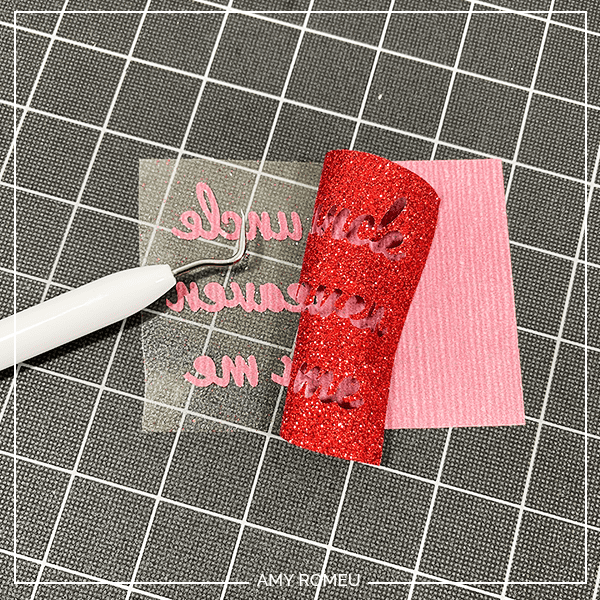
When the cut is complete, unload the mat and remove the piece of cut vinyl from the mat.
Using a sharp weeding tool, carefully weed away the excess heat transfer vinyl – be sure to weed the inside of the letters, too.
STEP 5 – Press The HTV to the Memory Bear
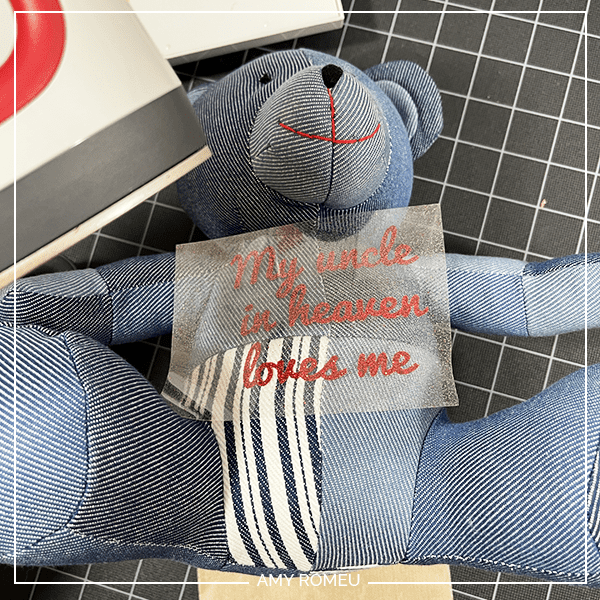
Once the heat transfer vinyl text is weeded, it’s time to press it into place.
Lay the text onto the bear to get a sense for the best placement. If the vinyl will overlap a seam, trim the vinyl rows apart so they can be placed separately.
Preheat an EasyPress Mini on the LOW setting.
Cover the vinyl over the bear with a Teflon sheet or cover sheet.

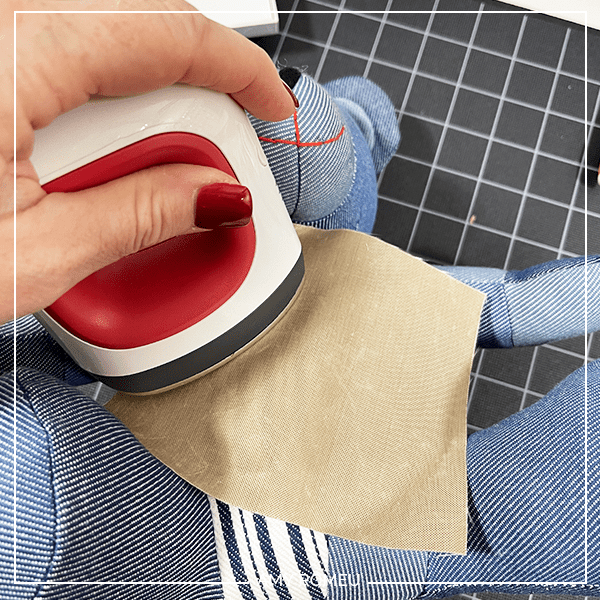
Press for 10-15 seconds, allowing the HTV to adhere properly to the bear. Then carefully peel away the vinyl cover sheet.
Cover again with the Teflon sheet and repeat the press for another 5-10 seconds.
Repeat the cutting and pressing process with a vinyl heart or any additional text you want to add to the Memory Bear.
Tie a ribbon around the bear’s neck if desired.
That’s it! The Memory Bear is finished!

Isn’t this Memory Bear sweet? If you do make this project, I would love to see your finished bear. Please share a photo of it in the comments, or tag me on Instagram: @amyromeucrafts

WANT THE SVG FILES SO YOU MAKE THIS MEMORY BEAR YOURSELF?
They are Design #192 in my FREE Resource Library. Get instant access by filling out the form below!
Want to remember this? Post this DIY CRICUT MEMORY BEAR project to your favorite Pinterest board!