
Spotify Code Keychain Cricut DIY
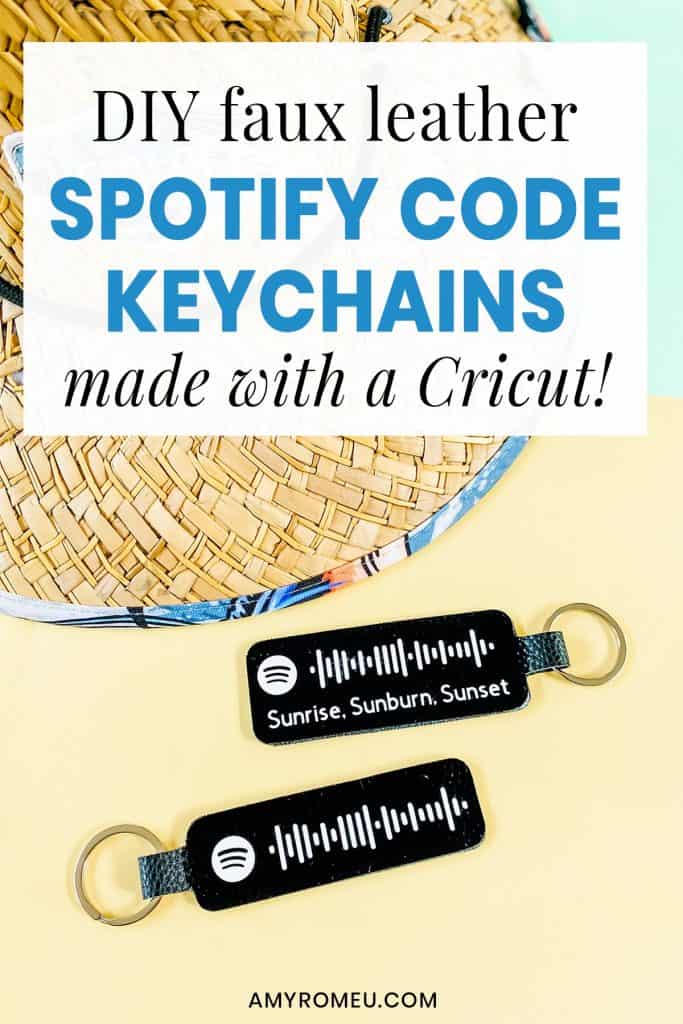
How to Make a Spotify Code Keychain with a Cricut
Have you fallen in love with all the cool Cricut Spotify code DIY projects out there lately? I certainly have. Once I saw all of the amazing wall decor and frame projects, I knew I had to make a Spotify Code Keychain as a personal gift for my husband – with my Cricut, of course!
If you think you have to have a Cricut Maker to make a Spotify Code Keychain, don’t worry – you don’t! I cut the faux leather keychain shape with just the Cricut Fine Point Blade, which means it can be made with either the Cricut Maker or the Cricut Explore Air 2! (You could even make this project using a Cricut Joy if you use the long Cricut Joy mat – see my post here for my tips and tricks on cutting faux leather a Cricut Joy.)
This Spotify Code Keychain project is so fun and is really simple to make. If you want to make your own Spotify Code Keychain, I’m sharing my SVG cut file for the keychain shape (for personal use only). You can get access to the file via a free download from a link at the bottom of this post. It’s important to note that my free SVG file is for the blank keychain shape only. You’ll need to get your own code from Spotify to make this project yourself as a gift for someone special. I’ll be showing you how I got the Spotify code for my keychain in the tutorial below.
Want to see all of my Cricut earring & jewelry tutorials? CLICK HERE
If a video is more your speed, you can check out my YouTube video for this project here:
Ready to make this fun Spotify Code Keychain project? Let’s get started!
This page contains some affiliate links (which means if you make a purchase after clicking a link, I will earn a small commission at no additional cost to you). Read my full disclosure policy here.
Spotify Code Keychain – Materials List
- A vinyl cutting machine. I have the Cricut Maker, available at Amazon here. You can also use the Cricut Explore Air 2 or any cutting machine you have that will cut a thicker material like faux leather.
- Cricut Strong Grip (Purple) Cutting Mat. You’ll use the purple mat to cut the faux leather. You can buy these on Amazon here, or at Michael’s here. They are also available at Hobby Lobby, Joann’s, and Walmart – or anywhere Cricut machines are sold.
- Cricut Standard Grip (Green) Cutting Mat. You’ll use the green mat for cutting the HTV. You probably already have one from when you bought your Cricut machine, but if you need a new one, they are available on Amazon here or at any craft store.
- A Cricut Easy Press or a Cricut Easy Press Mini (what I use). I bought my Easy Press Mini from Amazon here. You may already have an Easy Press, which is perfect for this project. I recommend the 9×9 size. It’s available on Amazon here. (For this project, I don’t recommend using a traditional heat press unless you are experienced at controlling the pressure. Too much pressure on these keychains can flatten out the pebbled texture of the faux leather.)
- If you will be using the Easy Press Mini like I do, you’ll need an EasyPress Mat to safely press your items on. I use the 8×10 size, which you can see on Amazon here.
- Faux Leather in the color of your choice. For this project, I used this black faux leather sold on Amazon here. There are 5 sheets that come in this particular package, so you can make a lot of keychains!
- HTV Vinyl in the color of your choice. I used Siser Easyweed Heat Transfer Vinyl in White (available on Amazon) here. You can also use Cricut Iron-On Foil or Glitter HTV, whatever you prefer!
- Keyrings. I used 1.25 inch size key rings from Amazon here. You could use 1 inch key rings, too, but I wouldn’t go much smaller than that.
- Blue painters tape. This will help keep your faux leather in place on your mat. I bought this one on Amazon here but you can get it at any hardware store or even some grocery stores!
- Weeding tools. I have all the tools I need in my Cricut tool set from Amazon here. You can get also get the basic Cricut tool set at Michael’s here, or from Hobby Lobby, Joann’s, or Walmart.
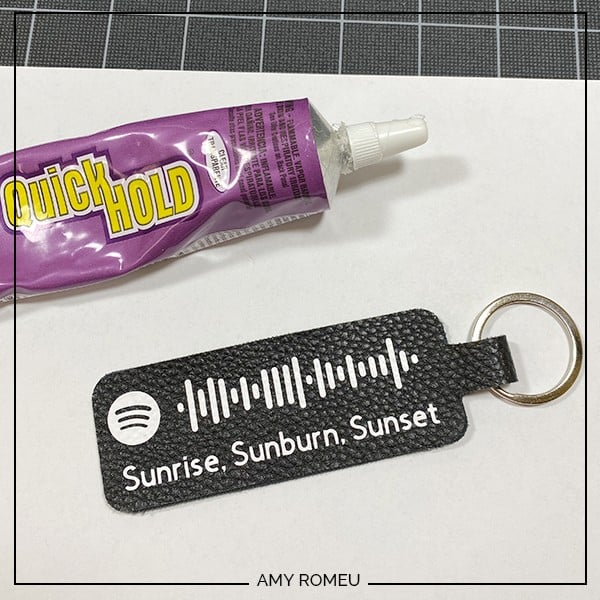
- Glue. I used Quick Hold Glue to make this keychain, but you can use E6000, Art Glitter Glue, or Aleene’s Quick Dry Tacky Glue. I’ve tested all of these glues with faux leather and they all work well.
- Mod Podge. For sealing the vinyl on keychain. I used Matte Mod Podge from Amazon here.
PROJECT INSTRUCTIONS
STEP 1 – Download Keychain Shapes SVG
Download the FREE SVG cutting files for the keychain shapes from my Resource Library. It’s Design #144 in the library. The link to get the password is at the bottom of this post.
NOTE: There are two keychain shape SVGs – the first is named “narrow” and works best with just the Spotify code only. The second shape is taller and works best with the code and the song title.
Save the zipped folder that downloads to your computer. You’ll need to locate your zipped file after you save it so remember where you are downloading it to!
You’ll have to unzip or extract the files FIRST before you can upload the cutting file to Cricut Design Space. Make a note of the file location after you unzip it so you can find it in the next step.
STEP 2 – Download Spotify Song Code as an SVG
If you don’t have a Spotify account, you’ll need to create one before you can download the song code. A Spotify account is free and it’s quick and easy to sign up. Click here to create a new Spotify account.
Once you have logged in to Spotify and you’ve located the song you want to use for this project, click on the three dots next to the song title and click on “Copy Song Link.” You’ll see a message that says the link was copied to your clipboard.

Now visit the Spotify Codes website: www.spotifycodes.com
In the code field, erase the code already in the box, and then paste your own code. Click on GET SPOTIFY CODE.
The box shown below will appear. The only thing to change before downloading the art is to change the Format from JPEG to SVG. Then click download.

Note: I was able to use this same process on my phone, but I couldn’t figure out how to get the Spotify code SVG image to download to my phone’s camera roll so I could upload it. I’ll try to figure that out, and when I do I’ll post an update here.
STEP 3 – Upload SVGs to Cricut Design Space
Next we need to upload both the keychain shape SVG and the Spotify code SVG to Cricut Design Space.
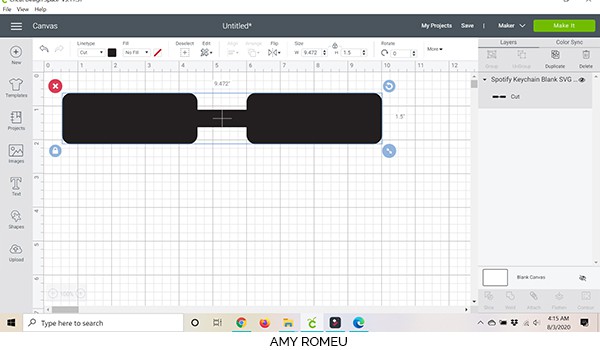
When you open Cricut Design Space, click on NEW PROJECT to get started. Then click on UPLOAD from the left hand side menu.

Click on the UPLOAD IMAGE button, then click BROWSE to the location where the unzipped keychain template SVG is saved on your computer.

Double click on the keychain shape SVG file to bring it into the upload screen in Design Space. If you get an error message that says “unsupported file type,” you may have clicked on the wrong file, or your SVG file is still zipped.

You’ll see a preview of the keychain shape for this project. Hit the green SAVE button.
After you’ve selected your file to upload, you’ll see it as the first item in your “recently uploaded designs” row.

Click on it so it is outlined in green. Then click on the green INSERT IMAGES button in the bottom right corner.
This will bring the keychain shape onto your canvas.
Click on the Upload button again, and repeat the process above to upload the Spotify code SVG. Your canvas should look like this.
Locate the black rectangle that surrounds the Spotify code and click the eye icon to hide it.
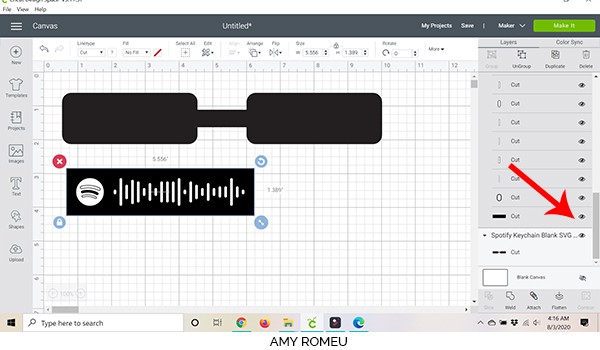

Select the Spotify code art layers in the layers panel and click ATTACH.

With the attached code layers still selected, click on DUPLICATE to create a copy of the code.

Resize the Spotify codes to 3.5 inches wide. You can do this by dragging the blue size arrow or by changing the width size in the Size box in the top menu. Be sure to keep the padlock ON in the size box so the code art changes size proportionately.

OPTIONAL: You can add the song title (or any other short line of text) if you’d like. You can click on TEXT and type out your song name. I like the Cricut Sans font for this. Be sure to keep the title to less than 3.5″ wide! I cut the text separately just to keep this tutorial simple.

Click the green MAKE IT button.
STEP 4 – Prepare Vinyl Mat for Cutting
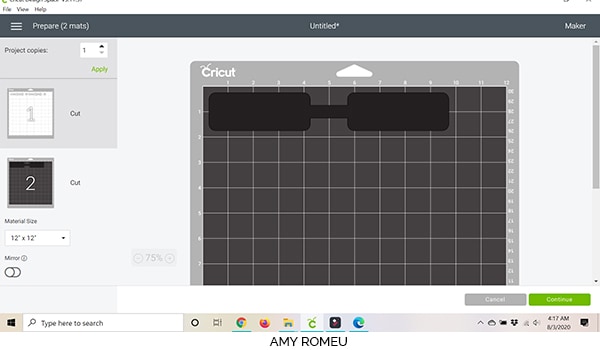
This keychain project will cut the two different materials (faux leather and HTV) on two separate mats. Cricut does all the hard work and separates them for you. You can see the two separate mats in a preview on the left.
The first mat that will cut is the white heat transfer vinyl mat.
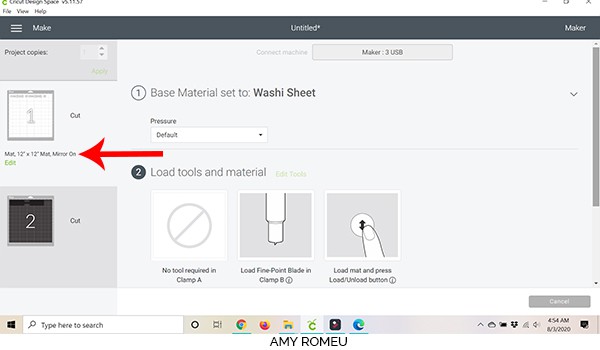
In the mat preview screen on the left side, toggle the MIRROR button to ON. The Spotify code will cut from vinyl placed face down, so you’ll need to mirror the cut so the code will read correctly on the keychain.
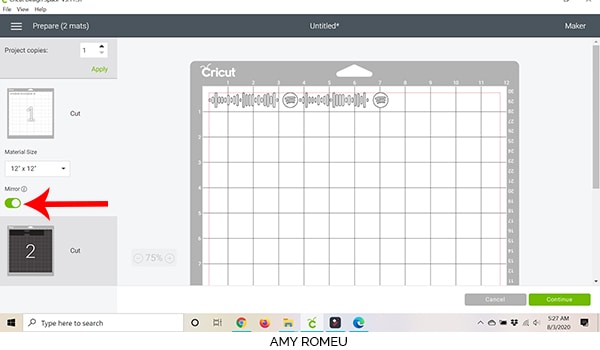
Make a note of what size vinyl you’ll need to put on your mat to cut the codes completely. In this case, the vinyl will be about 1 inch tall and just over 7 inches wide. Click the green CONTINUE button.
Make your material selection from the next screen.

I like to cut heat transfer vinyl with the WASHI SHEET setting. If you don’t have this setting selected as a favorite, click on Browse All Materials to search for it and then click on it to select it.
Confirm the MIRROR setting is on for this mat. Now you’re ready to cut the first mat.
STEP 5 – Cut and Weed Vinyl Mat
Place your heat transfer vinyl shiny side down in the position indicated in the mat preview screen (generally the top left corner of the mat.

Load the mat into the Cricut by pressing the double arrows button. Then press the C button to start the cut.
When the cut is complete, unload the mat by pressing the double arrows button again. Then use your weeding tool to remove the excess vinyl from around the Spotify code.

Cut the two codes apart so you can place them separately.

TIP: If you also cut a line of text, weed that part very slowly and carefully! Those little letters and commas (in my design) are tricky to weed! You may need to recut and re-weed the song titles if necessary.
Set aside your heat transfer vinyl shapes and return to Cricut Design Space to cut the faux leather keychain shape.
STEP 6 – Cut the Faux Leather Keychain Shape
Cut your faux leather to the size noted in the mat preview screen in Cricut Design Space. It is not necessary to mirror this particular shape before cutting. Click the CONTINUE button.
On the material selection screen, select Faux Leather (Paper Thin) as the cut setting, and MORE from the Pressure dropdown menu. If necessary, click on Browse All Materials and search for this setting.
NOTE: Cricut Explore Air 2 users will want to turn their dial to Custom before making the material selection.

Even though most faux leathers are not “paper thin,” this setting is an automatic double cut and cuts the majority of faux leathers perfectly with just one pass.
Place your faux leather face down (pretty side down) on your purple strong grip cutting mat. Tape around all the edge with blue painter’s tape. Move the white star wheels out of the way so they don’t roll over your faux leather while it’s cutting.

Load your mat into your Cricut by pressing the load button with the arrows. Press the C button to start the cut.
When the cut is complete, check that the cut went all the way through BEFORE unloading the mat. If it didn’t, hit the C button again to repeat the cut. Then unload the mat and remove the keychain shape.
Use your weeding tool to release your keychain shape from your mat. It should come right out. If not, you can use small scissors to make any necessary snips. I love my 4 inch curved tip Fiskar scissors that I got on Amazon for tiny jobs like this!

STEP 7 – Press the Vinyl to the Keychain
Gather your heat press, heat pressing pad, and teflon cover sheet or parchment paper (never wax paper). Thread your key ring onto your faux leather keychain before you start. This way you don’t have to bend the faux leather and vinyl to get it through the key ring after.

I used the lowest heat setting on the Easy Press Mini for this project. Using your Easy Press Pressing Pad or a towel, lay the HTV on top of the faux leather and then cover with a teflon sheet or parchment paper.

Gently press while moving the heat around all over the HTV for 10-15 seconds. Carefully remove the clear transfer sheet from the vinyl. If any of it lifts up, repeat the pressing again.
Repeat pressing on the other side.
NOTE: Think about how your keychain will look before you press your Spotify code. I pressed one code upside down – this is so when I fold the two halves of the keychain backing together, both codes will start on the same end, where the key ring is.
STEP 8 – Glue the Keychain
Now it’s time to glue the front and back of the keychain together. I used Quick Hold Glue, but you can use E6000 or any good fabric glue like Art Glitter Glue for this step.

If you didn’t put your key ring on your keychain before, now is the time to do it!
Carefully apply small dabs of glue on the back of one side of the keychain. Apply the glue close to the edges but allow some room for the glue to spread.
Fold the glued and unglued halves together, line up the edges so they match perfectly, and press down.
That’s it! Place the newly glued keychain under something heavy like a book for a few hours to dry, overnight is best. Check the seams between the two halves the next day and see if there are any places that need additional glue, especially near the key ring.
STEP 9 (OPTIONAL) – Seal Keychain with Mod Podge
An OPTIONAL step, but one I strongly recommend, is to coat both sides of the keychain two times with some Mod Podge to protect the vinyl, and give the keychain a smooth finish. I used Matte Mod Podge for this keychain and I let it dry thoroughly between coats. Don’t forget to brush Mod Podge all around the edges of the keychain to seal them.


Are you going to try this project? If you do, please post a comment and attach a photo of your finished Spotify code keychain! I would love to see what song you choose!
Also, here’s another cool Spotify Code project from my friend Nick of The Bearded Housewife. Check out his awesome tutorial on making a keepsake Spotify Code Wall Art piece here.

Want to see all of my Cricut earring & jewelry tutorials? CLICK HERE
Until next time… and happy creating!

Want the FREE SVG files so you make this Spotify Code Keychain yourself?
Get it from our Resource Library! You’ll receive the password for the Resource Library instantly after filling out the form below!
Want to remember this? Post this SPOTIFY CODE KEYCHAIN project to your favorite Pinterest board!

LOVE this Idea! Thanks for sharing.
Question .. When I get my Spot Code and upload it to design Space ai loose two of the Spotify Logo crescents. Did you happen to encounter this ? Trying to sort out how to fix it.
Hi, Coco! If you mean the crescents lose their fill color – that happened with one of mine, you can see it in my photo of the canvas in Design Space. But when I sent it to the mat to cut, it was fine. What does yours look like in the mat preview screen?
This looks great. The daughter of a friend has 4 songs on Spotify so I want to make her some key-chains! My question is can I use real leather? I have a lot of real leather and would love to use that! Thanks! BTW I am new to your page
Hi, Kathleen! Thanks for your comment. Yes, you can use real leather. You’ll need to use the Tooling Leather settings and the knife blade with a Cricut Maker in that case. Thank you. Amy
I can’t wait to make a couple of these Spotify keychains! I’ve always had a “special” song for my two oldest grandsons. I plan to use those songs on the keychains, so they can hang them on their backpacks and take me to school with them!
I love that idea, Meg! Thanks for your comment!
Hi Amy, I love this project and can hardly wait to try it out. I’m not familiar with techy music apps so might question is probably silly. Does the person I gift this to have to have a Spotify account in order to listen to the song? Yeah, I’m a grandma and think this would be a nice gift for my teenage granddaughter.
Hi, Yolanda. Thank you for your comment. It’s not a silly question at all! Yes, the person who receives the keychain with the code will need to have a Spotify account so they can scan the code from within the Spotify app to listen to the song. 🙂 Thank you. Amy
I’m almost done with mine now (waiting for it to dry). Can’t wait to give it to my hubby for Valentine’s Day. I had a time saving tip I wanted to share. When I modge-podged it, I painted both side and the edges all at one, then hung the key ring on a pencil (or any stick) laying the pencil across the top of a solo drinking cup. The keychain hangs in the middle without touching anything, and it can all dry at one. I checked it a few times to make sure none of the modge podge pooled at the bottom of the key chain, but all looks good. Thanks for this great project. I’ll definitely do again.
Thanks for the great tip, Jill! I’m so glad you liked this project.
Hi where do I get the SVG files for this project I cant find them?
I am unable to locate the SVG as well. I search and just get the tutorial
Hi, are you looking inside of my free resource library? The Spotify keychains are design #144. Thank you.
Hi, Vicky.
The Spotify keychain SVGs are Design #144 inside my blog’s free resource library. If you need the password, you can get it here: https://amyromeu.com/get-a-password/
Thank you.
I made this and it’s awesome! Thank you Amy! Do you know if other music apps/sites have anything similar, such as Pandora, iTunes, etc.?
Hi, Cindy! I’m so glad you love this project! I don’t know of any similar apps or music sites, but that doesn’t mean there aren’t any out there. 🙂 Thank you for taking the time to comment! I appreciate it. Amy
Thank you for providing this wonderful gift idea and instructions. I have completed almost all the steps. I was testing out the codes to ensure they scanned correctly after weeding and while they were successful, I ran into a problem that I think is important. If you try to scan the code with a free Spotify account, it will take you to the song, but the song is part of a randomly created playlist (the green play button has the shuffle symbol on it). When you hit play, it does not guarantee that the song you desire will be played first. If you scan the code using a paid premium account, it will play the song that was scanned. I’m a little bummed because I don’t think the person I made these for has a paid Spotify account. But I thought this was pretty important info to share when considering making this for someone! The link I included is where I found the information directly from Spotify.
Hi, Rachel! Thanks for your comment. It sounds like Spotify has changed how they allow music to be played with the code in the last 2 years since I made this project. Thanks for sharing your information. 🙂 Amy
Amy , your instructions were so easy to follow and helpful. I have tried doing this from another site with an epic fail. I think I will have to get the paid Spotify app as it continues to play other songs.
Hi, Jen! Thanks for your comment! I think Spotify has changed their rules on how scanned songs can be played since I created this tutorial. 🙂