
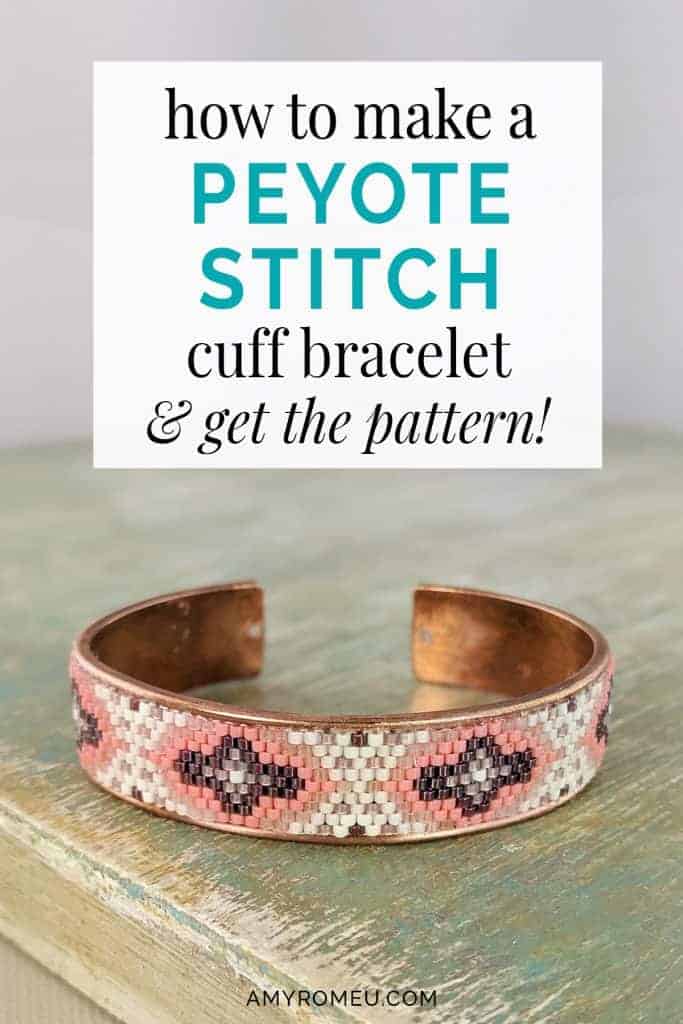
How To Make a Peyote Stitch Cuff Bracelet
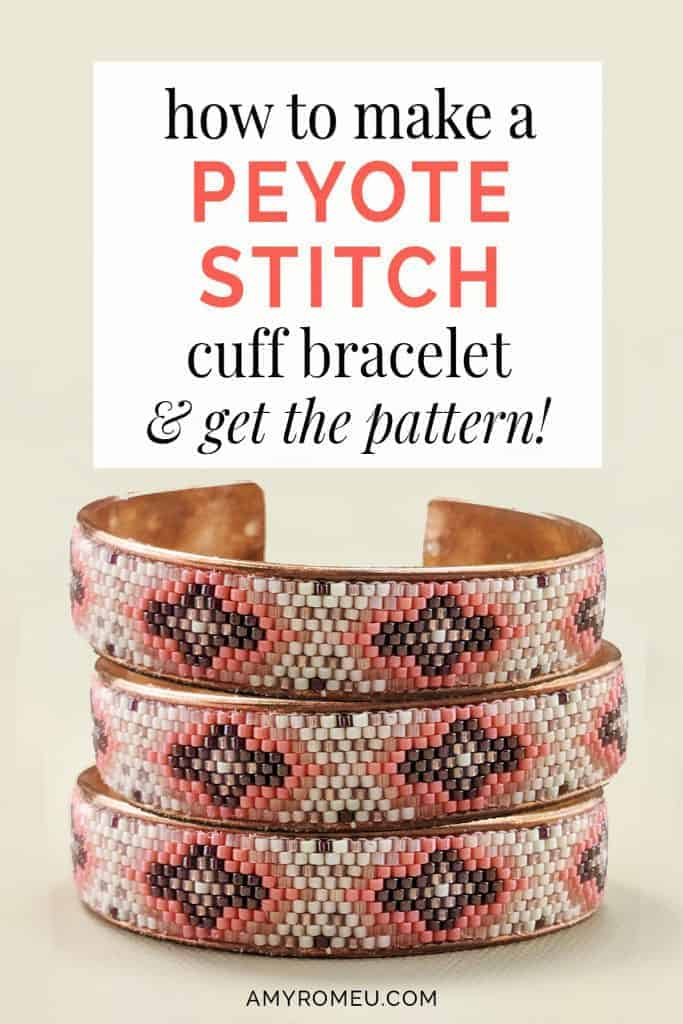
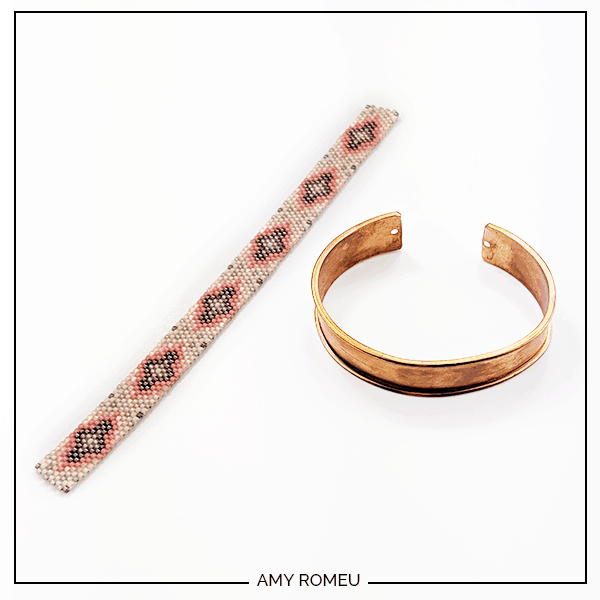
How To Make a Peyote Stitch Bracelet – a Copper Cuff In Coral, Cream & Brown
I’ll be honest… I love all kinds of beading, but peyote stitch has always been my first love. For years, I made so many peyote stitch pieces and enjoyed every minute of it, until… I got to the end. I struggled with questions like… how do I finish it off? What clasp do I use? And how the heck is someone going to wear this? 🙂 Well, I don’t have those issues any more. I’ll tell you why a little later in this post. As I do, I’ll also be showing you how to make this pretty Peyote Stitch Cuff Bracelet in transitional fall shades of coral, cream, brown and copper.
Have you experienced the frustration of making a beautiful peyote stitch pattern and then realized finishing off the piece was going to be a headache? I know I have. How great would it be to make a peyote stitch project without worrying about how you are going to finish it off, or what clasp will fit? These peyote stitch cuff bracelets are the perfect solution to that problem. Not to mention, the peyote stitch pieces that fit into these cuff blanks are fun and quick to make. You’ll see!
Oh, and if you like this pattern and want to make this project yourself, I’m sharing the pattern with you for FREE! I also designed a free BLANK peyote stitch graph paper you can use to draw your own pattern for this cuff. (You can get instant access to both from a link at the bottom of this post!)
Before we get to the step by step instructions, let me first share with you reason I don’t get frustrated or disappointed with peyote stitch anymore. It’s pretty simple, really. I always begin by thinking about the end. Specifically, I choose the clasp or finishing elements FIRST, and then design the peyote stitch pattern around it. In this case, I found the cuff blank first and then figured out how tall and wide of a bead pattern I needed to fit. Then I built my pattern to those specifications. I also use slide clasps a lot, and for those, I know exactly how many Delica beads wide will fit in them, and I just work backwards.
When you design your own patterns, it’s easy to work backwards like this so you never have to worry about how to finish off a peyote project. If you don’t make your own patterns, this is something to always be aware of when buying someone else’s patterns. I discuss this and other important questions to ask before buying a bead pattern in this post here.
If you’re wondering how I design my peyote stitch bracelet patterns… I’m writing a post about it very soon! I’ll link to it here when it’s on my blog.
All right, ready to make this copper cuff peyote stitch bracelet? Let’s get started!
This page contains some affiliate links (which means if you make a purchase after clicking a link, I will earn a small commission at no additional cost to you). Read my full disclosure policy here.
Materials Needed To Make This Peyote Stitch Cuff Bracelet
1. The free Peyote Stitch pattern. It’s available for FREE in my Resource Library. Get access to the file from a link at the bottom of this post.
If you want to draw your own pattern instead, I’ve created a piece of size 11/0 Delica Peyote Stitch pattern paper sized exactly right for this cuff project. It’s also in my free Resource Library – get access from a link at the bottom of this post.
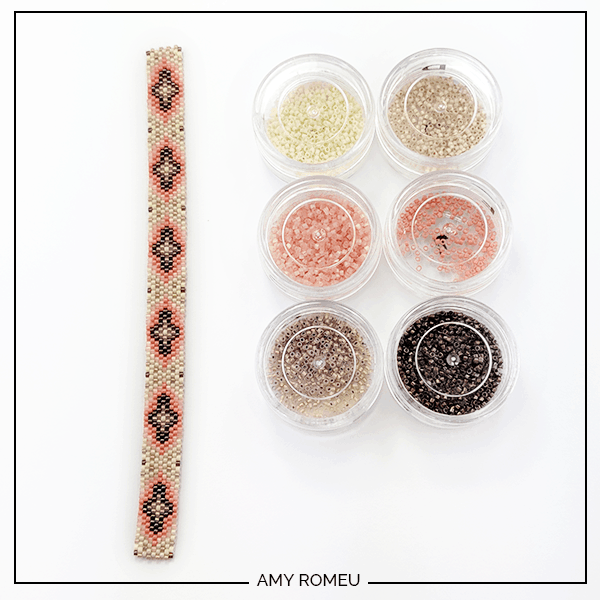
2. Size 11/0 Delica beads. You can use your choice of colors, or you can use the colors I used. There are 6 colors in my pattern, and the exact Delica bead color codes are listed in the free pattern. One of my favorite sources for Delica Beads is Fire Mountain Gems. Simply type the Delica Bead code in the search bar (for example: DB200) and their availability will pop up.
3. Beading Thread. I prefer Crystal 6 lb. test Fireline for this project. The exact thread I used is here.
4. Beading Needle. I use Tulip needles in Size 11, but you can use any stiff, long beading needle you like to use. The exact needles I use are here.
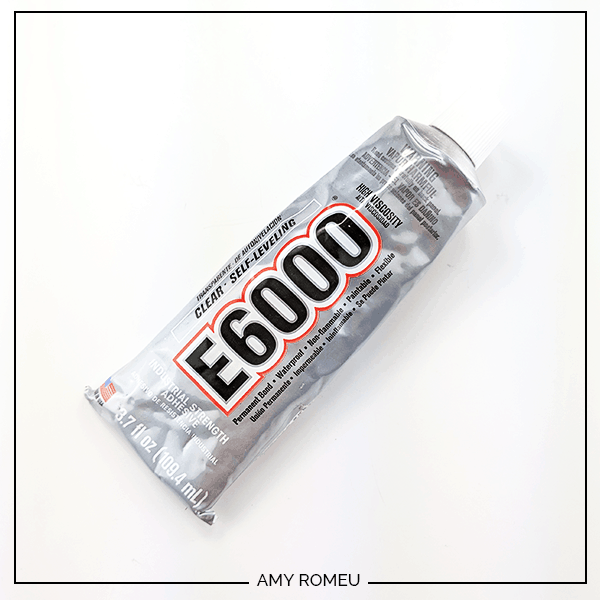
5. E6000 Glue, High Viscosity, Self-Leveling formula. This is not regular E-6000 glue – be sure you get the high viscosity, self leveling formula. This is a special formulation that is less liquidy and will not squish up through your beads (yes, those are two very professional beading terms). A link to the exact glue I used is here.
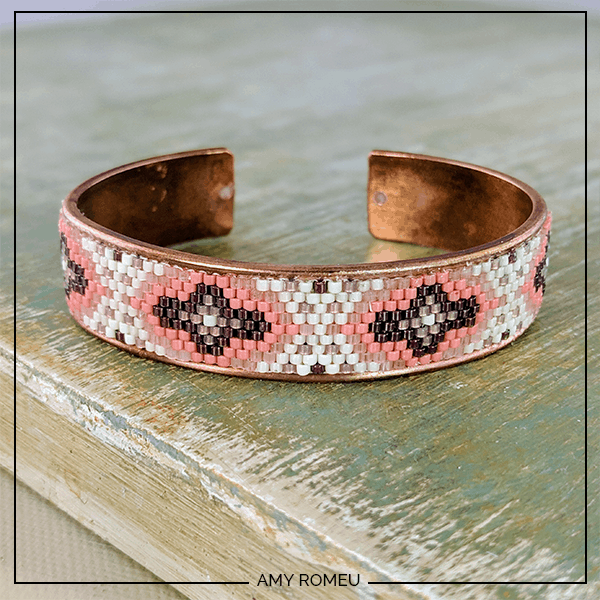
6. A cuff bracelet blank. The exact one I used from an Etsy seller is here. The one I used is copper, and nickel free and lead free. They are available in a variety of metal colors and three different sizes. This project calls for the 15mm size. See my comparison chart below for the available sizes and the number of Delicas that will fit in each size:

Do you want to make this peyote stitch cuff bracelet yourself? Get my original pattern from my FREE Resource Library. Link at the bottom of this post.
INSTRUCTIONS
STEP 1
Using the free pattern from my resource library, or your own pattern that’s 9 beads wide by 97 rows long, use odd count peyote to weave your flat peyote bracelet.
If you’re new to peyote stitch or need a refresher on odd count, there are a lot of free resources online for how to do peyote stitch. I recommend checking out this video tutorial from a one of my favorite bead shops, Beadaholique.
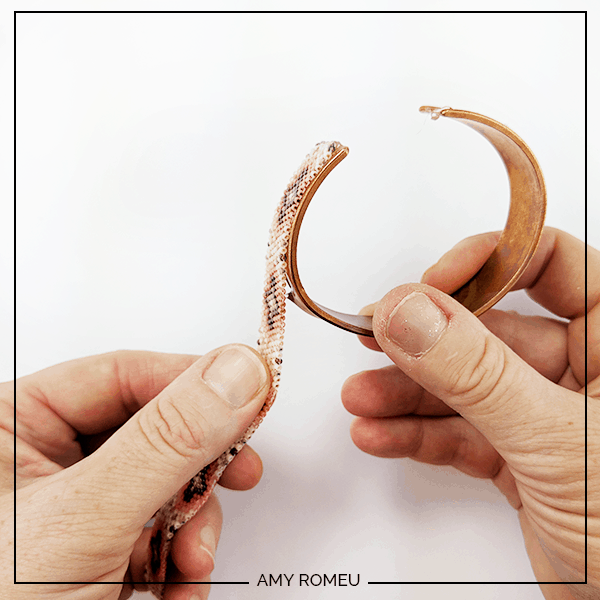
Once you’ve beaded your pattern, check the length of your peyote stitch band and your cuff by wrapping the beads around the cuff. The beads should just reach the ends of each cuff. If not, add a row or two of Delicas to bring the peyote stitch beading to the cuff ends. In this project, I needed to add one row of copper colored Delicas to the each end of the peyote stitch bracelet. I used copper beads so the ends of the Delica bracelet would blend with the cuff color.
STEP 2
Now that you know your peyote stitch bracelet fits your cuff blank, you’re ready to glue. But before you start gluing your beads onto the cuff, you’ll want to set up your workspace. Lay down some paper or paper towels on the area you’ll be working in to protect your work surface from glue residue. Make sure you have extra paper towels on hand, and toothpicks or a dull pencil (yes, I have used a pencil to smear my glue).
When you are ready to glue, you’ll need to work fast! This glue starts to firm up very quickly.
Starting at one end of the cuff, squeeze a small amount of the self leveling E-6000 glue onto the cuff.
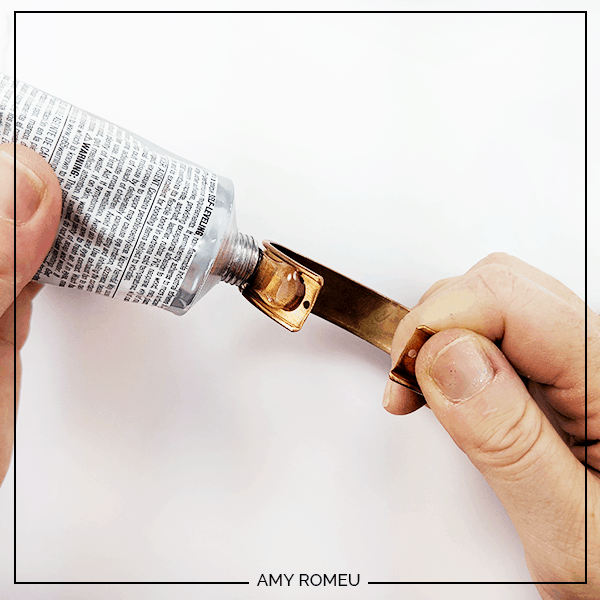
You want to get a thin layer almost the edge of each side of the cuff, but not too much! The big glob in this photo is too much glue. I used my toothpick to spread the glob around and then remove the excess.
You don’t want the glue to come up on the sides of your beads and onto the cuff edges.
You’ll want to quickly and carefully spread the glue over the whole cuff before you move on to placing your peyote stitched beads down on the glue.
STEP 3
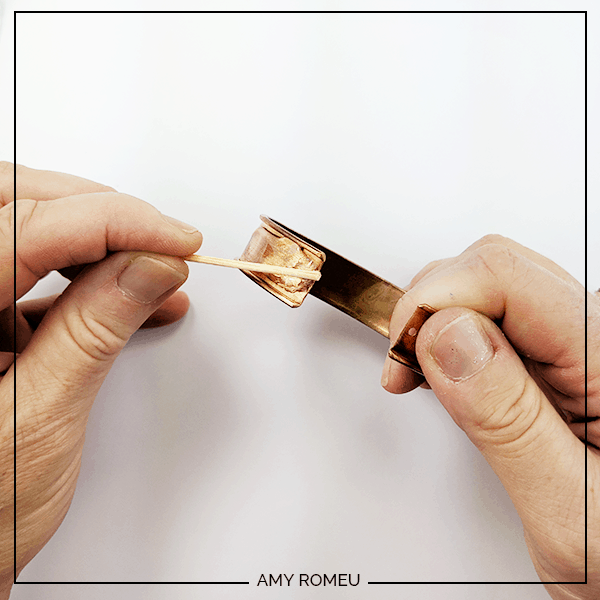
Holding your peyote stitch bracelet in one hand and the cuff in the other, place the end of the beaded bracelet at the end of the cuff and begin to press the beads down onto the glue. You should feel the beads sink into the glue but not see any glue seep up through the beads. This is the benefit of using the high viscosity formulation of E-6000.
Continue wrapping the beads around the cuff and onto the glue. Wipe away any excess glue as you go, but work quickly!
STEP 4
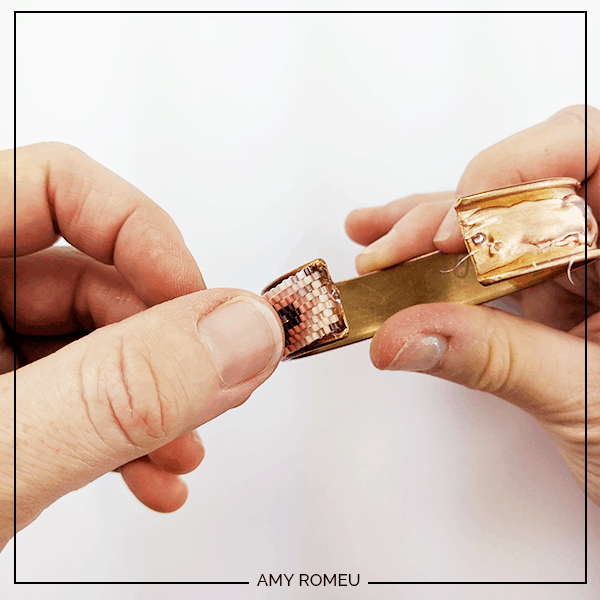
Gently pull the ends of the peyote stitch bracelet so the ends meet the cuff ends evenly. You still have a moment or two to be able to slightly adjust the beads before the glue sets. Once your beads are positioned correctly, clean up any glue spots on your cuff. You can rub and excess glue and it should ball up so you can remove it. Don’t rub it with a paper towel or else the fibers can get stuck in the glue
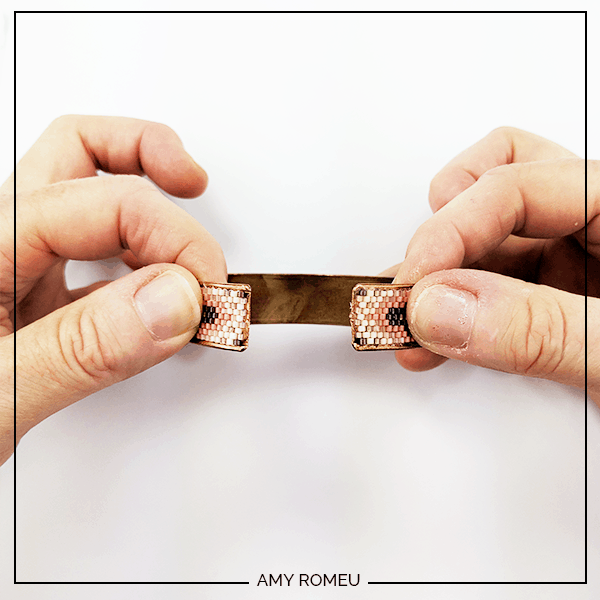
Let your bracelet dry overnight. Check for any remaining glue globs and remove them as needed. That’s it!
These cuffs are flexible and can be bent gently to form around the wearer’s wrist. I love how they frame any peyote stitch bracelet pattern so well. You can also create a trendy cuff bracelet stack by making coordinating patterns that fit the other size cuffs. Go for it, the only limit is your imagination!
If you do make this bracelet, please let me know in the comments! I love to hear about what you’re working on and see your beaded creations!
Until next time… and happy creating!

If you want the pattern for this project, get it from my Resource Library! You’ll receive the password for the Library instantly after filling out the form below.
Want to remember this tutorial? Post How To Make a Peyote Stitch Cuff Bracelet to your favorite Pinterest board!

Amy thank God and you that I stumbled upon your blog site thank you. I was wondering if you could message me on two things you may have knowledge of one where is the best place to but the bracelet blanks with the lipped edge like you have here? Two do you have any blogs or videos on the slider connector for beaded bracelets. I am a beadier and I live in a small country town where we have fairs and street markets and I want to have a stand and sell bead work, so I am trying hard to absorb as much knowledge as possible. Also one more thing I have seen cuff like you have here with the lipped edge but they are post earrings but I can’t find them do you have any idea where I could find such things. Amy I not rich but I want good quality finishing’s for my bead work any advice to help me succeed is a God Blessing to me and I would be so so very grateful to know, thank you and thank you for your blog it has helped me lots.
Hi, Susan!
Thank you for your comment.
The lipped edge bracelet blanks are from an Etsy seller. I link to the exact ones I bought in the Materials section of the tutorial.
The post earrings you are interested in are called bezel earring posts. They are available on Amazon and Etsy, that style is very popular now so I hope you’ll be able to find many different options online.
For more good quality jewelry findings, I highly recommend Fire Mountain Gems: firemountaingems.com
Have a great day!
Amy