
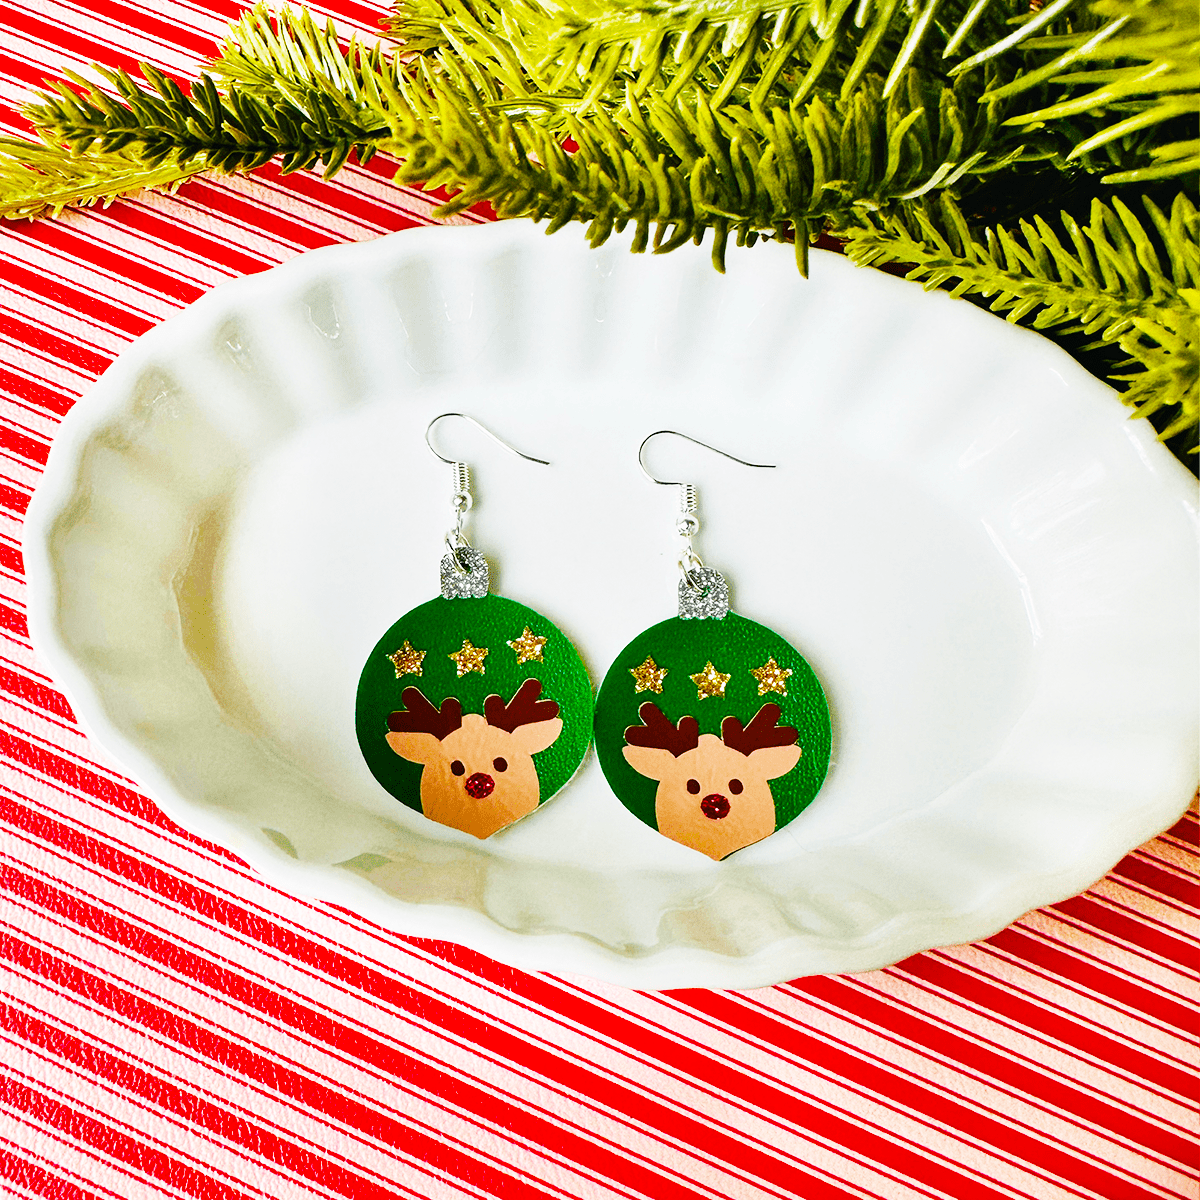
How To Make Faux Leather Earrings with Crystals on a Cricut
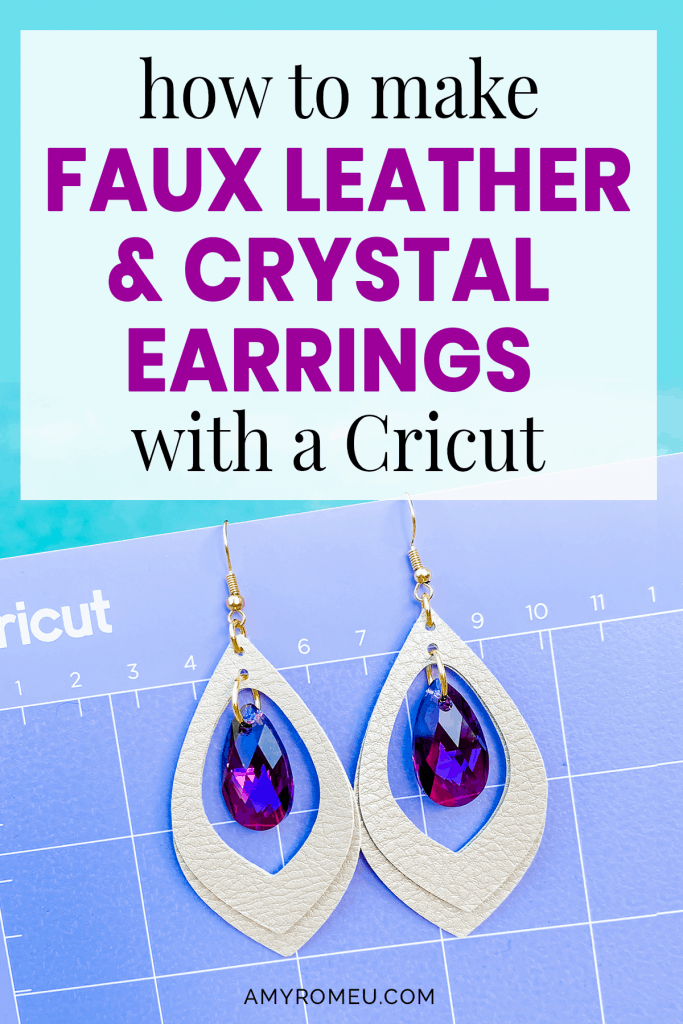
How To Make Faux Leather Earrings with Crystals On a Cricut
Do you love making leather earrings (and faux leather earrings!) with your Cricut, but you’re getting a little bored of the same old shapes and designs? I LOVE making faux leather earrings with my Cricut Maker, but I’ve been excited to move beyond the basic teardrop shape and get a little more creative with my future faux leather earring designs.
If you feel the same way, then I have an exciting new design for Cricut faux leather earrings for you! It’s not only a cool shape, it’s also got BLING. That’s right! If you’re familiar at all with my jewelry designs, you know I love to add sparkle and shine to every design I can, and this one is no exception.
For this project I used a Cricut faux metallic leather sampler pack so I had a variety of colors with just one purchase (I’ll tell you exactly which one in just a minute!). Also, since faux leather is thinner than real leather, it can be cut with the Cricut Fine Point Blade – which means if you don’t have the Cricut Maker yet, you can still create these earrings with your Explore Air 2, and even the Cricut Joy! (You can also cut them by hand if you want – more on that later!)
NOTE: To learn how to cut faux leather earrings with a Cricut Joy, visit this post about Cricut Joy Earrings here.
If you want to learn how I made these fun and easy faux leather earrings with crystals using my Cricut, read on! I’ll give you my step by step instructions and tell you exactly what materials I used to make this project.
Also, if you’d like to give this a try yourself, I’m happy to share my SVG cut file with you FREE so you can download the earring shapes and make these yourself with your cutting machine! I’ve also included a PDF file of these earring shapes if you’d like to print them out on paper and cut them out by hand. You’ll find out how to download my free SVG file for this project in the materials section below.
Ready? Let’s get started!
This page contains some affiliate links (which means if you make a purchase after clicking a link, I will earn a small commission at no additional cost to you). Read my full disclosure policy here.
Faux Leather Earrings with Crystals – Materials List
- Cricut Faux Leather in Metallic colors. I bought this Cricut Faux Pebbled Leather Sampler Pack which has 5 12″x12″ sheets of faux leather in the following colors: Brown, Caramel, Beige, Champagne, and Silver.
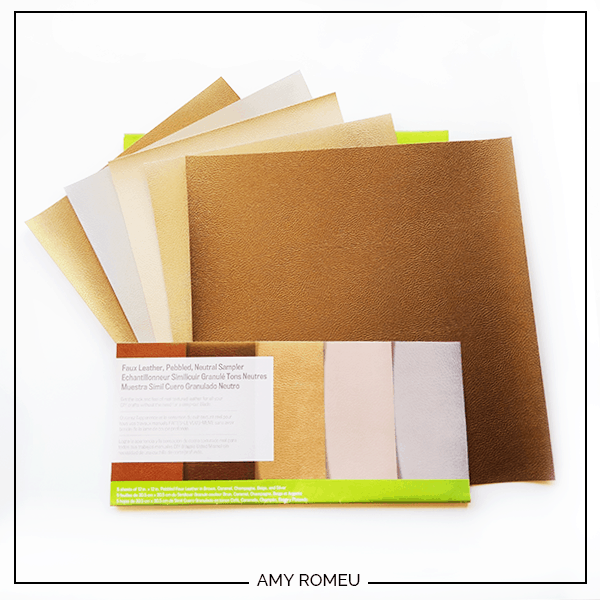
I love how these colors can be mixed and matched for a endless variety of faux leather looks!
- A vinyl cutting machine. I have the Cricut Maker, available at Amazon here. You can also use the Cricut Explore Air 2 or any cutting machine you have that will cut thin faux leather. (You can also cut these by hand if you’d like. Just print out the PDF available in my free resource library and use it as a pattern to cut out your shapes.)
- Cricut Strong Grip (Purple) Cutting Mat. You can buy these on Amazon here, or at Michael’s here. They are also available at Hobby Lobby, Joann’s, and Walmart.
- A weeding tool and a small spatula tool (if you have one). I had all the tools I needed in my Cricut tool set here. You can get also get the basic Cricut tool set at Michael’s here, or from Hobby Lobby, Joann’s, or Walmart.
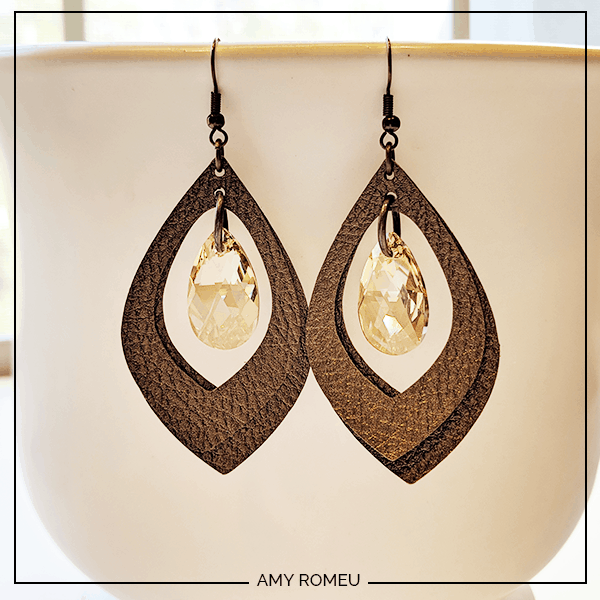
- 2 Swarovski Elements 22mm Pear shape crystals (style #6106, 22x13mm size). I used the color Crystal Golden Shadow for these earrings. I usually buy my Swarovski crystals from Fire Mountain Gems. They have great selection and prices on all the amazing Swarovski crystal colors in this gorgeous pear shape here. However, Amazon has them too, with a few colors available as Prime items. You can see them here.
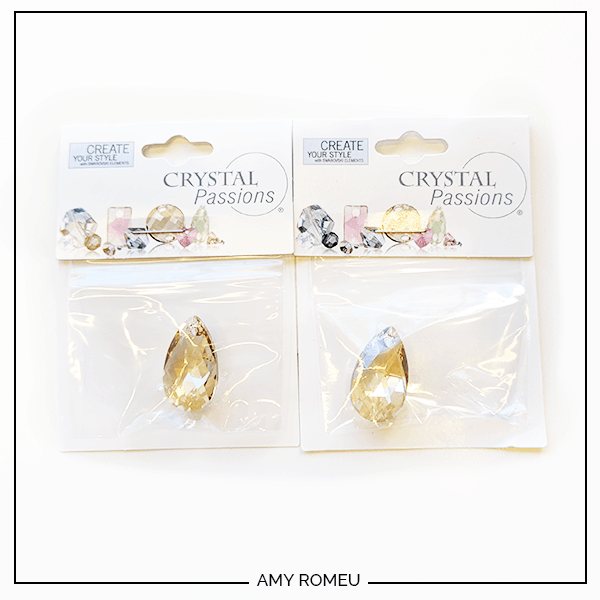
Note: Swarovski uses the same style #6106 for smaller pear shape crystals which are 16x9mm. These are lovely, but for this project you’ll want the larger, 22x13mm size.
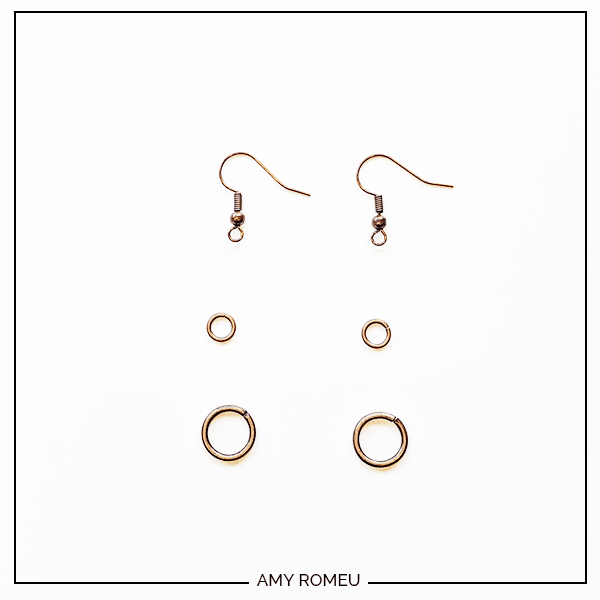
- Earring hooks – I bought these Fish Hook Ear Wires in Antique Copper from Hobby Lobby here.
- Small jump rings – I bought these 6mm Round Jump Rings in Antique Copper from Hobby Lobby here. You could use 5mm size if necessary, but I wouldn’t go any smaller (or larger) than that for this project.
- Large jump rings – I bought these 12mm Heavy Gauge Jump Rings in Antique Copper from Hobby Lobby here. You could use as small as 9mm size if necessary, but I wouldn’t go any smaller than that. The smaller jump ring won’t fit through the hole of the Swarovski crystal correctly.
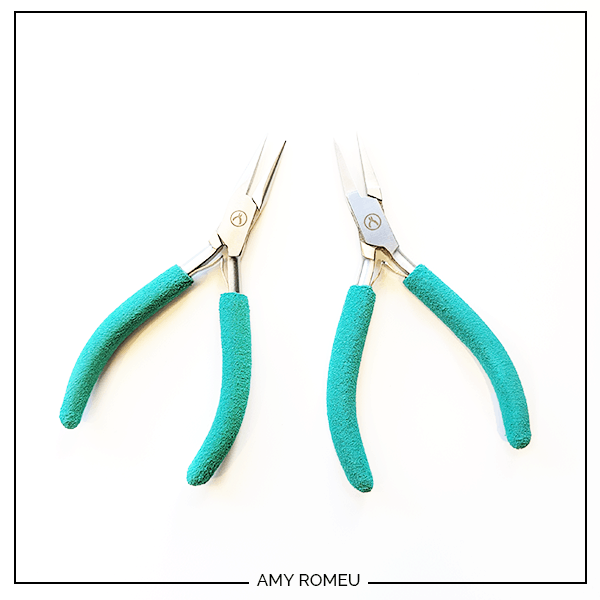
- Two pairs of flat nose pliers – I’m using one pair of wide nose pliers and one pair of needle nose pliers here, but you can use any two flat nose pliers you have in your jewelry making tool box .My favorites are Wubbers brand in the “Baby” size. You can see the Baby Wubbers Chain Nose Piers on the left on Amazon here, and the Baby Wubbers Flat Nose Pliers on the right on Amazon here.
Note: Be sure to check out my post Beginner’s Guide To Jewelry Making Tools for all the information you need to know about buying and using jewelry making tools.
- My free Faux Leather & Crystal Earrings SVG template. It’s Design #113 in my Free Resource Library. Get the library link and password emailed to you instantly by filling out this form here:
Cutting by hand?
If you’ll be cutting these shapes out by hand from the PDF instead of using a cutting machine, I suggest using small curved scissors like my favorite 4 inch curved Fiskars scissors on Amazon here. To punch the holes in the faux leather, I love my 1/16″ Paper Punch, for cutting holes in faux leather and faux suede. You can see the one I have and use all the time on Amazon here.
PROJECT INSTRUCTIONS
STEP 1 – Download the SVG Template
Download the free SVG cutting file for these faux leather earrings from my free Resource Library. It’s Design #113. The link to get the password is at the bottom of this post.
Save the zipped folder that downloads to your computer. You’ll need to unzip or extract the files FIRST so you can upload the cutting file to Cricut Design Space.
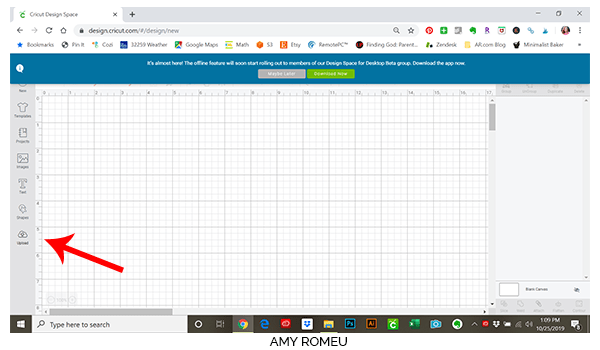
STEP 2 – Upload SVG to Design Space
After you’ve unzipped the folder and made a note of the file location, open Cricut Design Space and choose Upload from the left hand side menu.
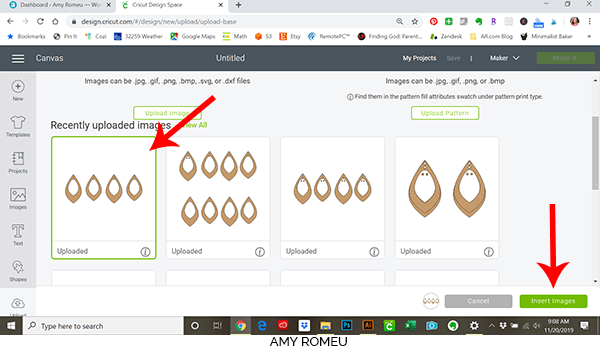
Click on the UPLOAD IMAGE button, then click BROWSE to locate your file.

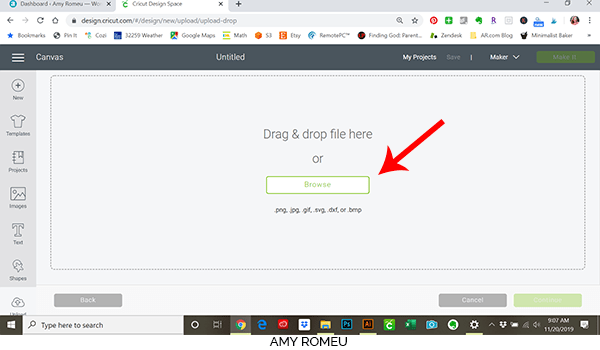
Navigate to where you’ve saved the already unzipped SVG files for this project. Double click on the SVG file to bring it into the upload screen in Design Space.
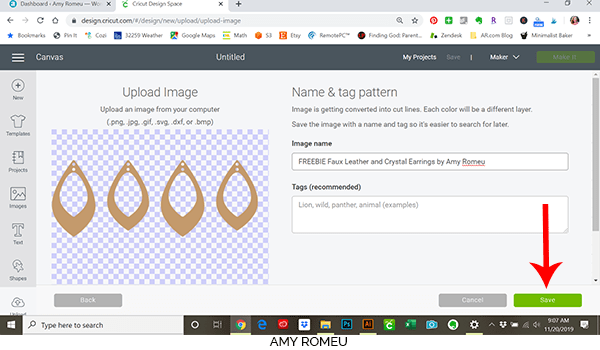
After you’ve selected your file to upload, you’ll see it as the first item in your “recently uploaded designs” row. Click on it and then click on the green “insert images” button in the bottom right corner.
STEP 3 – Prepare SVG for Cutting
This brings the design into Cricut Design Space. Using the blue arrows in the bottom right hand corner of the rectangle border around the earrings, drag the entire rectangle up to the top most left corner of the screen. This positions your earring shapes in the top left hand corner so they will cut in the same position on your mat and you minimize material waste.
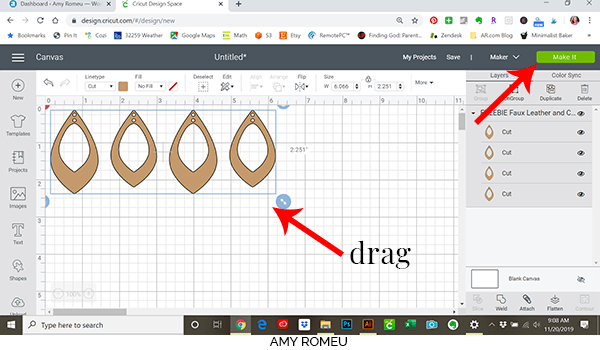
NOTE: You don’t need to resize your earrings unless you really want to! Each earring will be 2.25″ inches tall, which is sized perfectly for the 22mm Swarovski crystals we’ll be adding to them. You can resize them if you’d like, but keep in mind if you change the size of the earring, your earring hole size will change, too! For that reason, I really recommend keeping the earring size in the original SVG file.
Once you’ve dragged your shapes to the top left corner of your canvas, then click the green MAKE IT button in the top right.
Now you’ll prepare your material and mat for cutting. On this next screen toggle your Mirror button to green (ON). It isn’t really necessary for this project, but whenever I am cutting on material face down on my mat, I like to be sure I’ve mirrored the design first as force of habit.
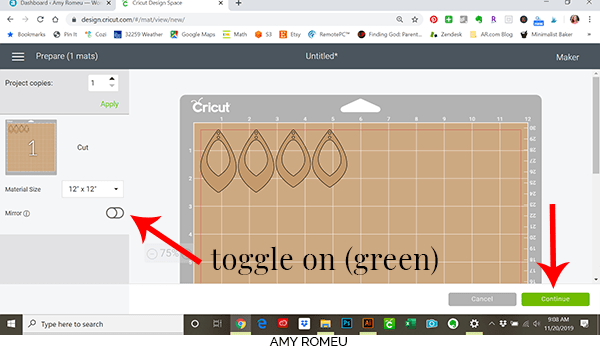
If you are going to use a small piece of faux leather to cut from, you can see here how large your faux leather piece will need to be to cut your shapes. The mat preview shows how the four shapes will fit on a piece of faux leather that is 6 inches wide and 3 inches tall. Of course you an use a full sheet of material instead and just save the rest.
After you’ve made a note of the size of the faux leather piece you’ll need, click the green CONTINUE button.
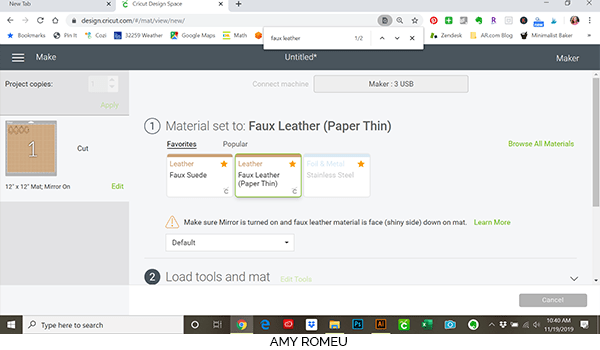
STEP 4 – Choose Material Settings
Next we need to choose the material setting. I like to use the Faux Leather (Paper Thin) setting. If you already have this setting in your Favorites, you can select it now. If not, follow the directions below to find it:
When the Material selection screen opens, click on BROWSE ALL MATERIALS on the right.
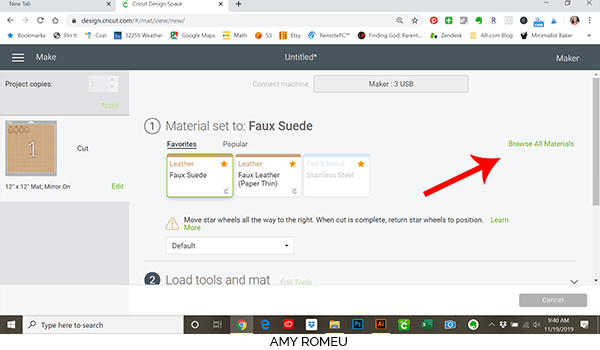
Type “faux leather” in the search bar and it should pop up. Click on it to select it.

Now click on Faux Leather to select it as your material:
Now you’ll be prompted to make sure your fine point blade is loaded in Clamp B. This is the blade that came with the Cricut Maker.
Cricut Explore Air 2 users will want to turn the Smart Set Dial to Custom and select Faux Leather (Paper Thin) from the list of custom materials. You’ll also use the Fine Point Blade. Any other cutting machine users can follow their machine’s settings for thin faux leather or faux suede. Remember to adjust your cut settings so the blade cuts 2 or 3 times! If you can’t adjust your cut settings, you may need to “help” release your earring hole cuts using small scissors.
STEP 5 – Prepare the Mat
Gather your materials for this next step. You’ll need a small piece of Cricut faux leather in the size you noted earlier. In this case, it’s 6 inches wide by 3 inches tall. Or you can lay down a larger piece of material.
You’ll need your spatula and “poker” tool to poke out the earring holes as needed. You’ll also need a purple Cricut strong grip mat.
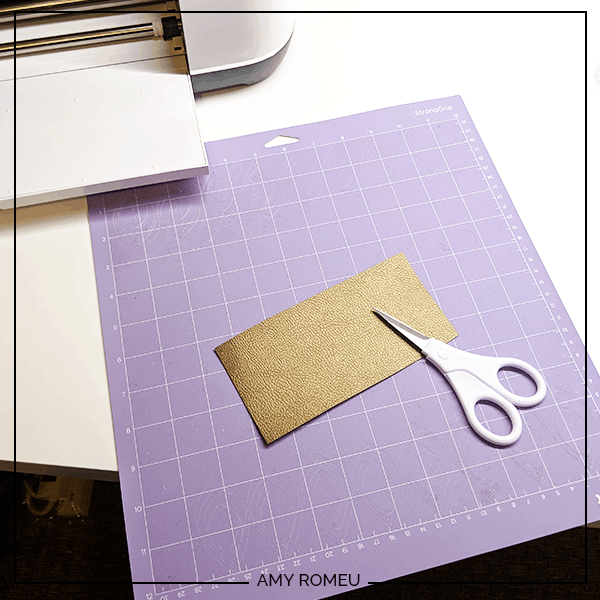
Place your faux leather piece FACE DOWN at the top left corner of your Cricut purple strong grip mat. Rub the piece all over the back so it sticks well to the mat.
NOTE: You can also tape down the faux leather to the mat with blue painter’s tape all over to keep it extra secure. I’m using the Cricut brand faux leather, which doesn’t require blue tape, as long as the mat is nice and sticky!
You’ll need your white “star wheels” to be moved off to the sides as far as they will go so they are out of the way! This way they won’t leave little marks on your faux leather as your machine cuts.
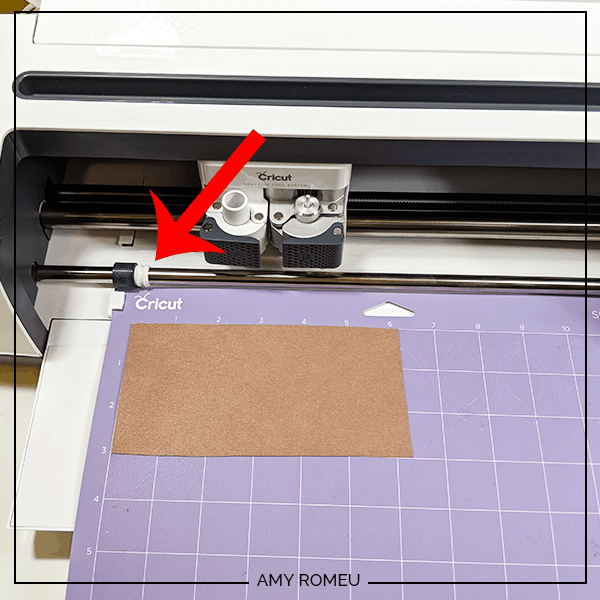
Load your mat into your machine by hitting the load button (two arrows) on your Cricut Maker.
Then hit the Go button (the Cricut face) on your maker and it will start to cut.
STEP 6 – Remove the Cut Shapes
After your machine finishes cutting your earring shapes, unload your mat by pressing the two arrows/unload button again). You’ll see the Cricut brand faux leather results in perfect shape cuts and hole projects for this design.
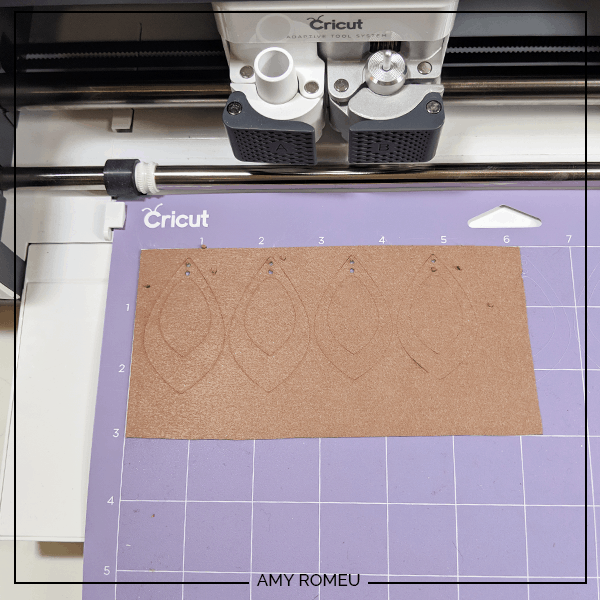
I begin weeding by removing the excess faux leather from the mat first, using the spatula tool. Then I use the spatula tool to lift each shape off of the mat, and then the poker weeding tool to clear the earring holes.

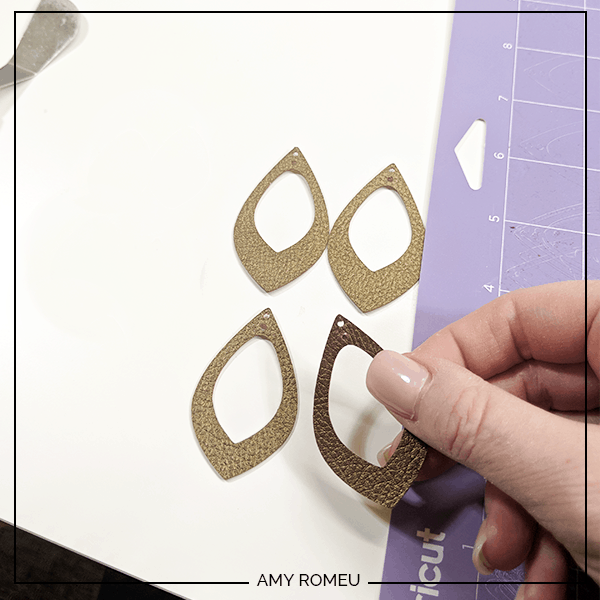
If the earring hole still doesn’t come out cleanly, just use some small scissors to snip the circle from the backside. I always have my 4 inch curved tip Fiskar scissors handy for tasks like these.
Once you’ve got all of your shapes cut out and the earring holes clear, you’re ready to start assembling your earrings!
STEP 7 – Prepare Earring Hooks
Now it’s time to attach your earring hooks and your crystal dangles! You’ll need your earring hooks, your small jump rings, your large jump rings, the crystal teardrops, and two pair of flat nose pliers. Let’s get started!
We will use the small jump rings to connect the earring hook to the faux leather shapes.
NOTE: You might be wondering why you can’t just hang the faux leather shapes directly from the loop on the earring hook, and skip the jump ring altogether. That’s a very common question, and the answer is: technically, you can.
BUT the more professional way to finish earrings is to use a jump ring, so that’s the way I’m going to show you. Also, the faux leather earrings will have a lot more movement if they are attached to a jump ring.
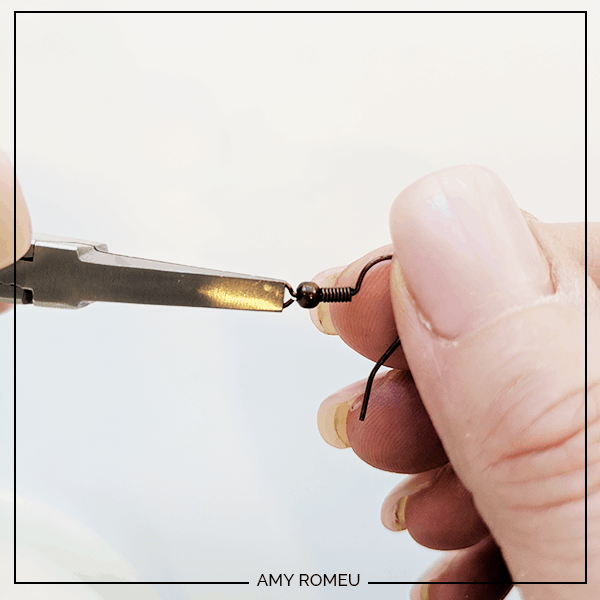
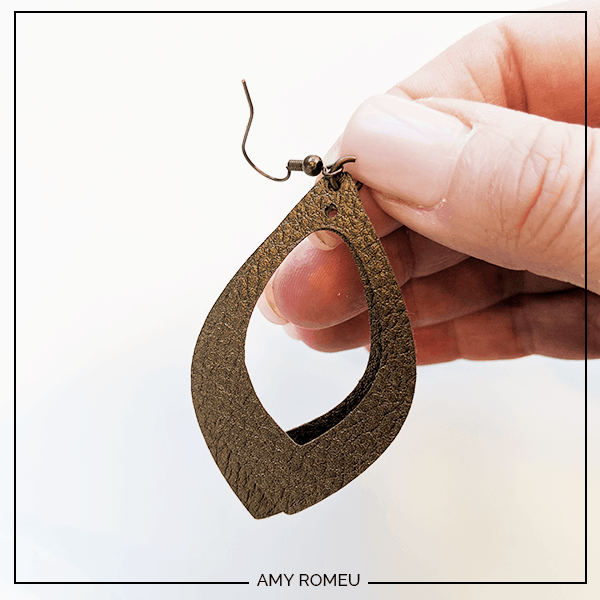
To connect the earring hook to the faux leather with a jump ring, you’ll first need to turn the bottom loop on the fishhook sideways so your earring will hang correctly. See the example image below to see what I mean about how your earring hook needs to turn.
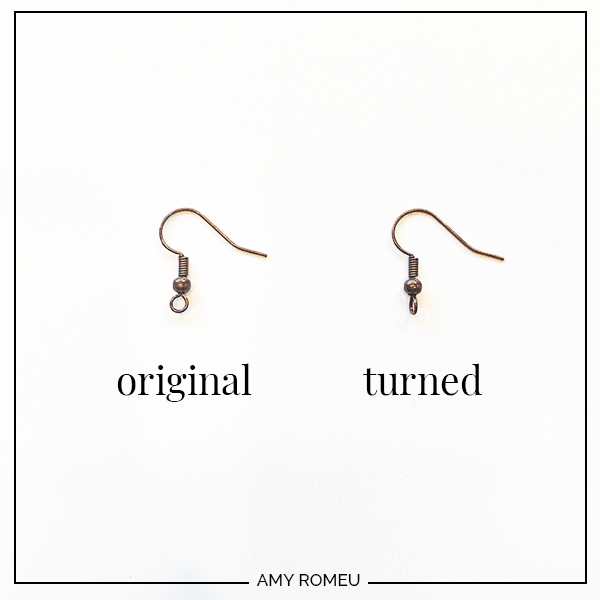
You’ll do this using flat nose pliers. While holding the hook firmly between two fingers, grip the loop between the pliers and twist until the loop is perpendicular to the earring post. Repeat with the second earring hook.
STEP 8 – Attach Earring Hooks
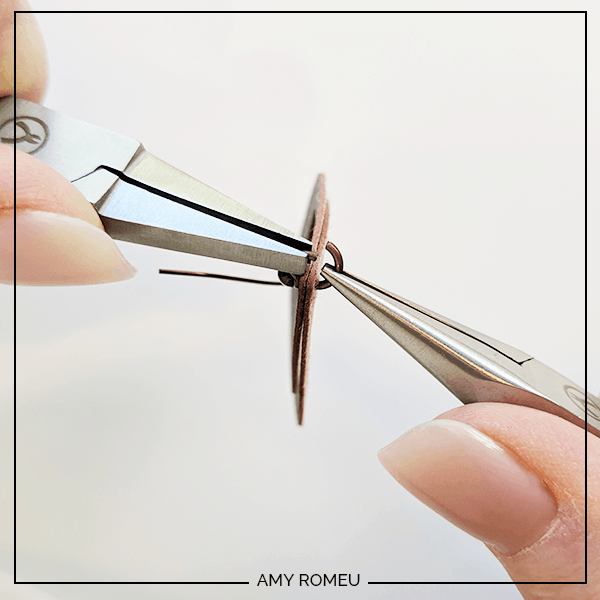
Now you’ll need to open your small jump ring to slide the two layers of faux leather earrings on. Using two pliers, grip each side of the jump ring, making sure the opening in the jump ring is facing up (the twelve o’clock position).
Rotate one wrist forwards or backwards, so the circle creates an opening but doesn’t bend out of it’s circle shape.
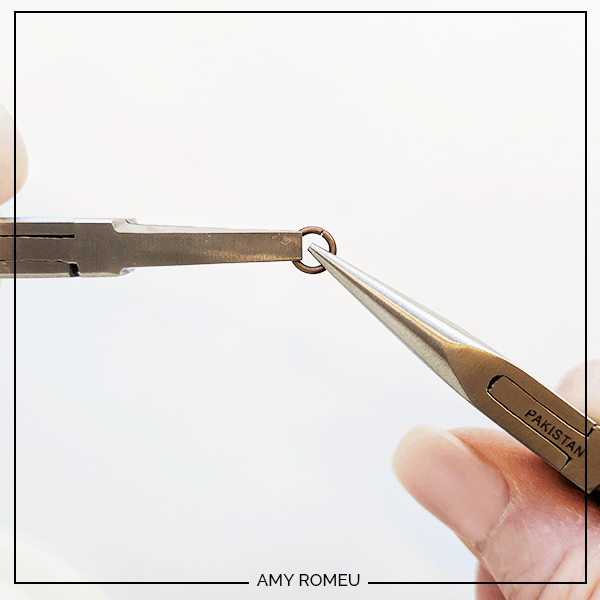
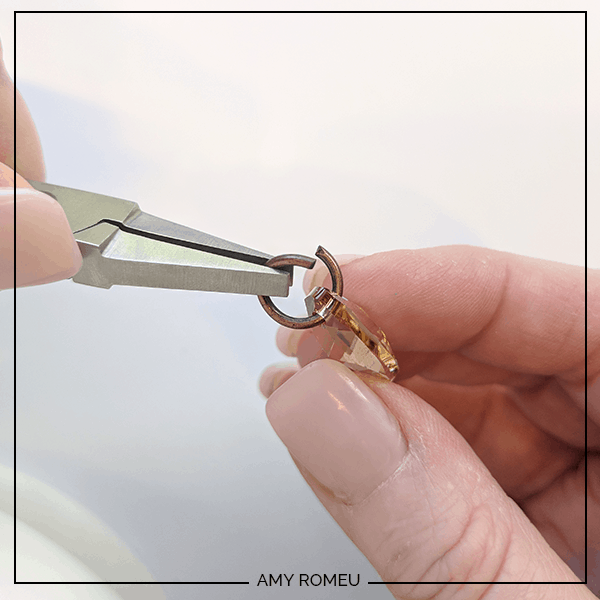
Slide your faux leather shapes onto your jump ring, then slide your earring hook onto the jump ring. Pay attention to which side is the front of your earring as you do this.
Using two pliers again, twist one set of pliers the opposite direction you used to open the jump ring so the ends of the ring meet. If they don’t, use your two pliers to firmly wriggle the ends of the ring closed. This may take some practice if you aren’t familiar with opening and closing jump rings! That’s ok. The goal is the have the two ends of the ring meet without any gap, which maintaining the circle shape of the jump ring.
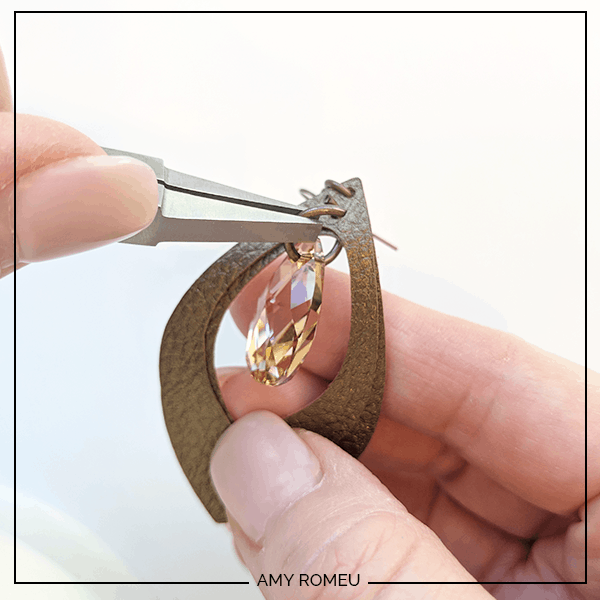
STEP 9 – Attach Crystals
Now it’s time to add the Swarovksi crystal to the faux leather earrings. Using the same two pliers, repeat the process above to open the jump ring, slide on the crystal, thread the ring through the hole in the faux leather shapes, and carefully close the ring again.
NOTE: Be careful as you work with the crystal. If you push the ring against the hole of the crystal too hard, you can snap off the crystal tip by accident.

Repeat for the other earring. That’s it! Here’s what the finished earrings look like.
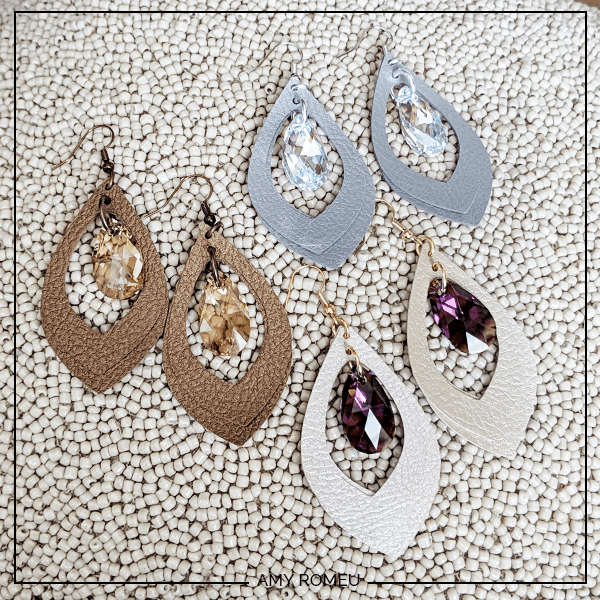
Now you can experiment with using two colors of faux leather, and using the other faux leather colors in the neutral metallic sampler pack, or cutting these shapes from other colors of faux leather or suede. The possibilities are endless! Check out these other earrings I made with other colors of faux leather from the same sampler pack.
For the top pair, I used the Silver Cricut faux leather and Swarovski 22mm Pear Crystal Drops in Crystal AB (these are available on Amazon here).
The bottom right pair was made with the Beige color Cricut faux leather and Swarovski 22mm Pear Crystal Drops is Amethyst Shimmer. I bought these from Fire Mountain Gems here.
Are you going to try this project? Please post a comment and attach a photo if you do… I would love to see the combinations you come up with.
WANT MORE CRICUT EARRING TUTORIALS CUT FILE TEMPLATES?
If you’ve got the Cricut earring bug now and want even more projects and tutorial, I’ve got you covered! I have so many Cricut faux leather earring tutorials on my blog that would be great starter projects. Click the banner below to see them all!
Also, my 5-star rated Etsy shop is packed with stylish and easy-to-cut earring templates. Click here to visit my Etsy shop!

If you’re looking for the ultimate guide to making Cricut earrings, you’ll want to grab my e-book and earring cut file bundle, Cricut Earrings Made Easy. This 86 page, instant download workbook has all the information you need to get started making earrings with your Cricut. It includes step by step tutorials and 12 of my best selling earring cut file templates, so you can get started making earrings right away.
If you want to learn more about Cricut Earrings Made Easy, click the link below!

Until next time… and happy creating!

Want the FREE SVG file you so you make These FAUX LEATHER & CRYSTAL EARRINGs yourself?
Get it from our Resource Library! You’ll receive the password for the Resource Library instantly after filling out the form below!
Want to remember this? Post this FAUX LEATHER EARRINGS WITH CRYSTALS project to your favorite Pinterest board!
I am new to the cricut, I have the explore air 2. I have been having probelm getting things done right but am working on doing that. I want to say I love the way your instruction are so easy to follow. Now I am very excited again and will be following you. Thank you so much. Sharon
Thank you, Sharon! I’m so thrilled you are excited about your Cricut again. I can’t wait to see what you create. 🙂