
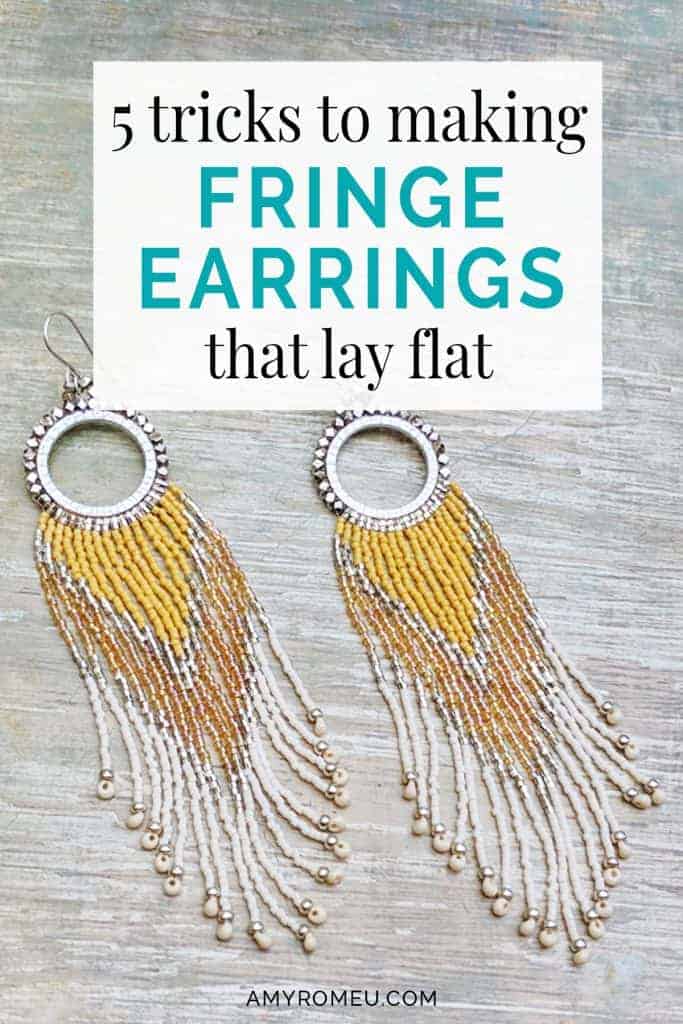
5 Tricks To Making Beaded Fringe Earrings That Lay Flat
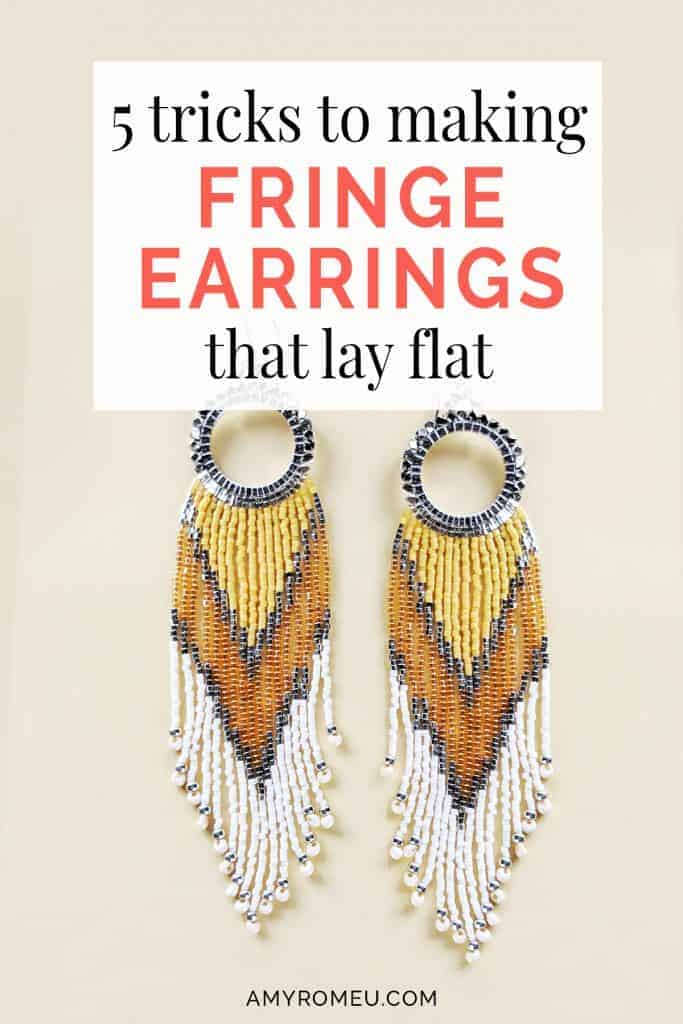
5 Tricks To Making Beaded Fringe Earrings That Lay Flat
I’ve been beading for over 25 years, but I have to admit, I’ve always avoided beaded fringe. I know, it’s silly! I’ve beaded so many different projects with a wide variety of beads. But beaded fringe has always frustrated and intimidated me. However, I was recently inspired by some amazing beaded fringe earrings I saw on Pinterest, and I felt encouraged enough to try again. It took several tries and some experimentation, but I finally finished them. The hardest part after I finished beading the fringe was figuring out how to make the fringe lay flat.
But I struck upon a trick that helped flatten the fringe in just a few hours, and I was overjoyed! I’d like to share my secret – and a few other tips – with you in this post.
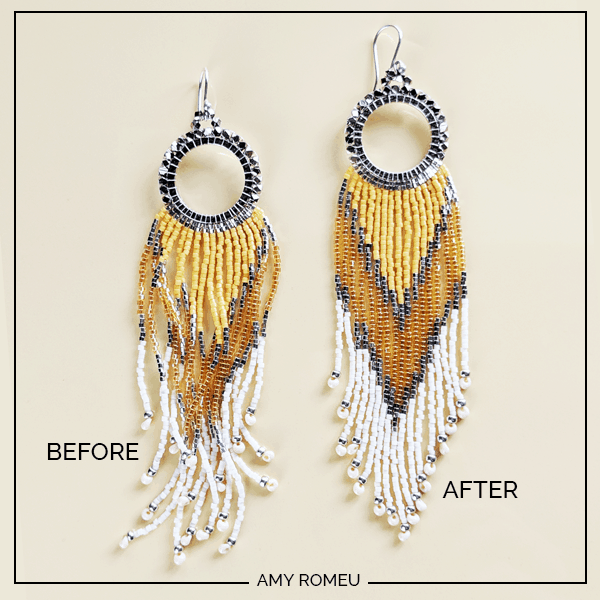
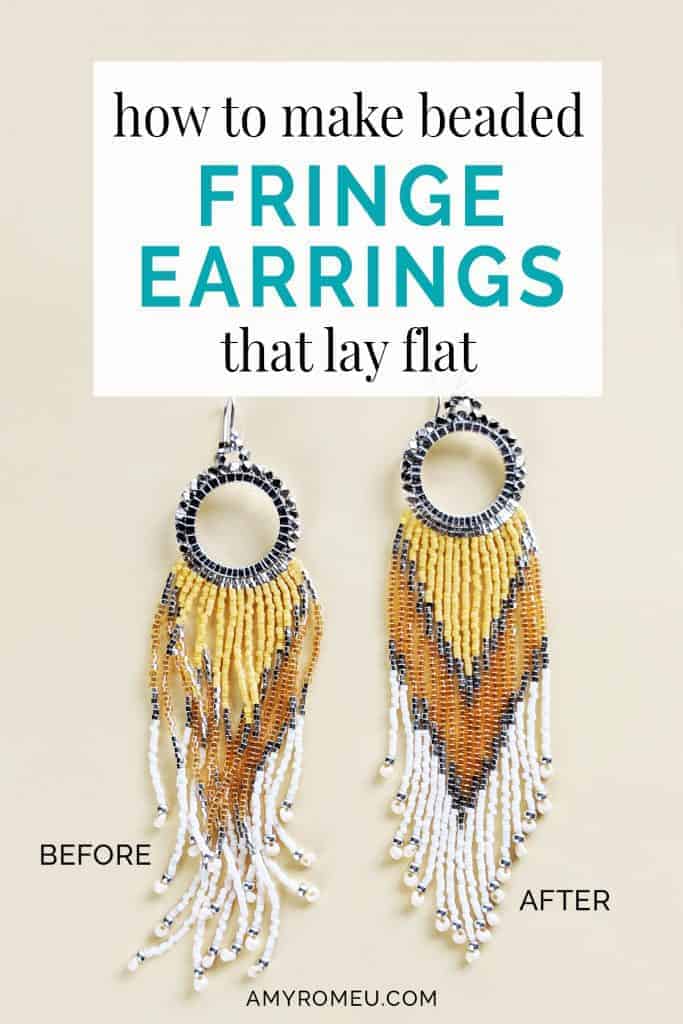
Before we start, let me show you what I mean about getting the fringe to lay flat. Here is a before and after photo of a pair of earrings I made. See how the left one has curly and wild fringe? This is the challenge I’ve always struggled with when attempting fringe earrings. I never knew how to get the fringe strands to hang naturally and lay flat without leaving a large gap visible in the fringe thread. Until now! Here’s what I did to finally tame the beaded fringe… and what’s gotten me hooked on making these beautiful beaded fringe earrings!
This page contains some affiliate links (which means if you make a purchase after clicking a link, I will earn a small commission at no additional cost to you). Read my full disclosure policy here.
Trick #1 – Using a Soft Thread
I’ve been beading with seed beads, mostly peyote stitch with size 11/0 Delicas, for many years. I used Nymo thread for a long time, and recently switched to Fireline. Since peyote stitched pieces need some structure, the slightly stiffer Fireline is a perfect fit. In these earrings, I’ve used Fireline to brick stitch the faceted metal beads around the circle component. However, the beaded fringe needed a softer, less structured thread if I wanted the best chance for drapey fringe.
I use KO thread for my bead embroidery projects, and I’m really happy with how it added to the softness and drape of the fringe. I could have used Nymo, but I had gold KO thread from this pack on hand, and I wanted to use a complementary thread color. The center section on these earrings use transparent beads, and I knew the thread would be visible through the beads.
Using a softer thread on fringe is a key ingredient to making the fringe on your beaded earrings lay flat. If you must use Fireline, use the 4 lb test version. Also, make sure you aren’t going back back through your fringe for any reason, after the initial pass down and up to create the fringe strand. Your fringe strands should have only one strand of thread (which will become a double strand after you thread down, then back up) to keep them as soft and fluid as you can.
Trick #2 – Tension, Tension, Tension
Correct tension is the holy grail of beaded fringe! It takes a little practice to bead each fringe strand with the right amount of tension, but it’s really important!
You want the beads on each strand to be touching without any visible thread showing between the beads, especially where the fringe strands attach to the earring at the top. At the same time, you don’t want the beads so tight though that the strand curls out of shape.
One trick is to put your fingernail between the last bead and the bead above it to create a very small space, however I don’t personally use that technique.
I knew I would be pulling the strands down gently and that may already result in a very small gap. You’ll see in my last step how I was able to make my fringe straight and flat even when my fringe started out as a little curled. As such, I recommend keeping the tension firm while beading for best results.
Trick #3 – Using a Larger Bead At The Bottom Of Each Strand
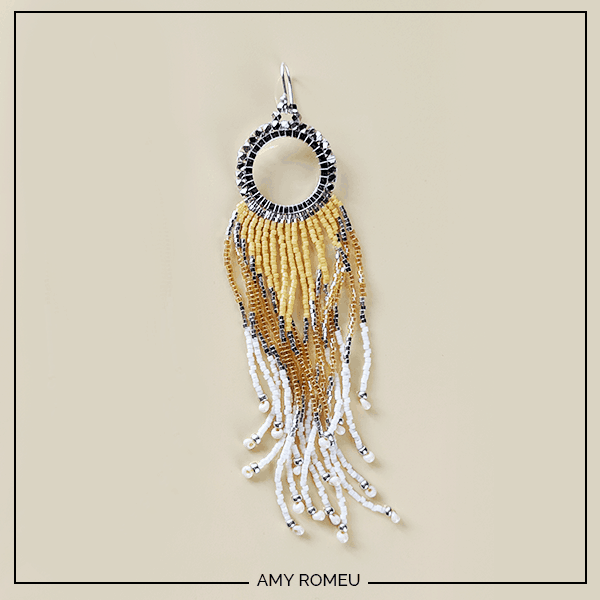
I know this step isn’t really required to get your fringe to lay flat. I’ve seen so many amazing beaded fringe earrings that end with a single Delica or size 11/0 bead, but I figured every little bit helps. In my earrings, used a size 8/0 seed bead and a Miyuki fringe drop bead to help add visual interest, and the slightest bit of weight. These beads are slightly larger than the Delicas, and I knew the slight increase in weight would help pull the fringe strands downward. Not by a lot, I know, but like I said, I needed all the help I could get.
Trick #4 – Harness the Power of Long Fringe
It stands to reason that the longer your fringe strand is, the more beads will be on each strand, and the heavier your fringe will be. When your fringe is heavier, it helps to pull the fringe strands downward.
Also, a tip: when you are working on your earrings, attach the earring hooks while your earrings are still in progress. Then hang them as often as you can, both while you are beading them, and when you are taking a break or overnight, to let gravity help your fringe do it’s job.
Trick #5 – Rubber Bands Are The Key
So I made my first earring in this set by using all of the above steps. I used a soft thread, had the right tension, weighted each strand with larger beads, and made the strands as long as possible to add weight. However, my first earring, when finished, looked like this:
I was totally deflated! I could not figure out how to make the fringe lay flat and straight! A Google search on this topic but didn’t find any resources or tips for me. I was so frustrated!
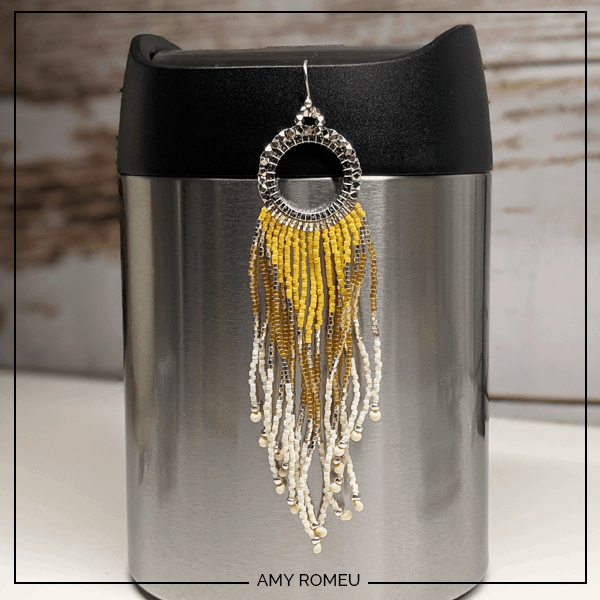
But the next thing I tried was a happy accident. I was hanging the earring from the edge of a canister to let it hang naturally, and I thought. if only I could keep the fringe in place to better follow the pattern for the second earring in the set.
So I placed a rubber band gently around the canister over the fringe section. When I did that, I made sure to line up all the fringe strands next to each other, without any twists or overlaps.

Then I added two more rubber bands, making sure the rubber bands were pulling down ever so slightly on the strands so there wasn’t any slack in each strand.

I went to do something else for a short time, and when I returned to my bead studio and removed the bands, I was amazed at how much straighter the fringe was! Suddenly, I was feeling encouraged! I repeated the process and left the earrings banded overnight. Voila! It worked! My fringe strands were straight and hung nicely. Victory!
This simple trick is my secret to making beaded fringe earrings with fringe that hangs straight. Who knew something so simple could be so effective?
I’m going to be making a LOT more beaded fringe earrings from now on!
If you found this quick tutorial helpful and want to see more of my beading and jewelry making tutorials, click here.
Also, be sure to check out my favorite beading supplies here.
If you make beaded fringe earrings, I would love to know if this tip works for you. Also, please let me know in the comments below if you have any tips for making beaded fringe earrings. I would love to hear them!
Until next time… and happy creating!

Want to remember this? Post this Secrets To Making Beaded Fringe Earrings That Lay Flat tutorial to your favorite Pinterest board!

Thank you!!!! This saved me a lot of grief!!!
You’re welcome, Magdalene! It’s my pleasure! I was struggling, too, so I decided to share. So glad you found it helpful.
I have made beaded fringe earrings over 30 years. I never had a problem with any twisting fringe. I use regular polyester thread. I double up thread, down the fringe then back up the fringe, into the earring. I use the same tension and work the fringe on a clip board…holding the top of the earring under the clip.
Thanks for sharing your tips, Kimberly! I don’t have the same result with KO thread. I’ll have to give your technique a try!
Just had to say it works!
I’m pretty new to making these & until yesterday my thread had always worked fine, I do use beeswax though which I think is a massive help. But yesterday’s thread must of been super tightly wound on the bobbin that it was more like a twister than a piece of thread! I thought maybe that it would just naturally straighten but as I worked further into the roll it seemed to get even tighter! I did manage to fix it with a LOT of wax, but I also did some up like you’ve suggested and left them overnight, and this morning it was like magic, perfectly straight. I can’t than, you enough for another little weapon in my beading arsenal, if all else fails, I know gravity will do the trick.
I hope your enjoying lots of craft time and are safe 🙂
Thanks again, from Lockdown in NZ
Eden
Thanks for your comment, Eden! I’m so glad you tried this trick and it worked for you. 🙂
Thanks for the tips! I’m new to beading and was wondering if you could elaborate on how you’re finishing the fringe at the bottom instead of threading back up? I’d love to figure out how to keep it to a single thread.
Hi, Rachael! Thanks for your comment. I don’t finish the thread at the bottom, I do thread back up using a single thread. After I add my fringe beads, I thread on a sort of stopper bead at the bottom that’s a little larger than the others (larger is just for decorative purposes). Then I skip threading through that larger bead again and instead start threading back up through my fringe. The stopper bead creates the end of the fringe for me. I hope that makes sense! 🙂
I just made my first pair of fringe earrings ever on Sunday. I wondered if a shot of steam from my iron would help, not close to the iron but still a little humidity. I haven’t tried it but if I need to, I’ll try your tip first! Thanks 😊
That’s an interesting idea, Jo! I may give that a try! Thanks for your comment. 🙂
Hi, do you have a tutorial on attaching the fringe to the hoop? I’ve tried to find something similar and it’s hard to tell from the images if there’s a brick stitch part at the top or if it’s just strands coming down. Thank you!
Hi, Maya! I’m sorry, I don’t. I may write one at some point but it will take a lot of time, I’m afraid! 🙂
The problem I’m having with my brick stitch fringe earrings is that they curl longways. They don’t curl up and become shorter, the sides curl in towards each other so they look really skinny. It’s so frustrating! I’m making another pair now, using a very light hand and making sure I don’t pull the thread tightly. That’s the only thing I can think of that might be causing them to do that–making the weave too tight. Thoughts?
Hi, Rho. Thanks for your message. What thread are you using? Sometimes a thread that is too thin doesn’t fill up the bead holes enough to give them structure.
Amy
Your “single thread in fringe” doesn’t make sense to me. How do you finish a fringe strand without going back up (into brick section & back down again to next)
Hi, Sophie! Thanks for your message. Sorry if this part wasn’t clear! I do go down and back up into the fringe strand. I was trying to say not to begin with a double strand of thread on the needle. You are right, every fringe has two strands inside, one up and one down. I tried to edit my post to clarify. Thanks!
I’ve been trying and trying and trying to make a pair of fringe earrings myself but keep giving up on them each time for this very reason. I’ve tried different threads, miyuki round beads and delicas, togo, and most recently czech because they have significantly smaller holes which I thought might help keep the fringe straighter. The czech beads do stay slightly straighter but not enough to appease. I am definitely going to finish a pair for once and try your rubber band trick. It is always the simplest things that tend to be effective. Thank you so much for taking the time to share your experiment results with us. Your time and findings are so very much appreciated as time is probably the most valuable commodity of all.
I roll mine gently on the same surface I work with using my fingers. It always seems to work for me.
That’s a great tip! Thank you for sharing. I’ll have to give it a try.
That’s how I do it and it always works out perfect for me 😁
Hi … great tip, thanks. When I make shorter fringes, I wet them and place them in a clamp overnight. You have to make sure the are laying straight in the clamp though.
Merry Christmas Everyone and Stay Safe 🙂
That’s a great tip, Carrie Lynn! Thanks for sharing!
Thank you for these wonderful tips. Such a huge help!
Thankfully I stumbled upon your post before I braved my first try at fringe earrings. Your post and some of the other people who added tips who have been doing them awhile have been a blessing. As always; I am humbled by the knowledge of other artists that have picked up their own tips throughout time.
Thank you for this info as I have also had issues with the fringe laying flat. I also had an issue with the beads not aligning and having this “zig-zag” look which drove me crazy. For this, I used size “D” Nymo thread doubled, making one pass going down and around a larger bead or drop and coming back up the beads again, for a total of four threads. This helps keep the beads straighter and more aligned. I know this is contradictory to what was previously posted, but this works for me. Secondly, when your thread becomes more “curly” and less straight, try using a flat iron (for hair) set on a low setting. This will straighten the thread and help it lay more flat. Thirdly, instead of using a rubber band, which is definitely a great idea, I insert straight pins, on a foam board, through the top of the earring and in the bottom of each fringe to keep them nice and taunt. Again, this is what works for me but may not work for all. Just sharing my two cents worth of knowledge! LOL!!!
Thanks for sharing the great tips, Marie! I will have to try them!
Amy
Thank you for doing the popsicles. My favorite was the patriotic one, but the watermelon was very close too. Thank you for doing this video.
Thank you for the helpful tips. Appreciate it.
Hi! I’m just starting to make beaded earrings and these are perfection! The colors are amazing! Do you have the color names of the delicas you used for this particular earring?!
These are so beautiful! Do you mind sharing the colors of the delicas you used?!
I am new at making fringe earrings and my biggest issue is not curling as much as getting a gap where the fringe begins. It all looks fine when I first make it, then after wearing the earrings the gap starts showing up. I use nymo size 0, waxed and stretched. Any advice? Thank you!
Hi, Laura! You may need to start out with tighter tension so when the beads naturally pull down they won’t create a gap.